There have been a lot of complaints about Chelsea not having a Plan B and these people have gone on to criticize Di Matteo. Trust me, if there’s one part of Di Matteo that cannot be blamed, then it is his well-researched and creative tactics.
As everyone knows, Chelsea operates in a 4-2-3-1. Did you know Chelsea also has a viable alternative of 4-2-2-2, otherwise known as Plan B? Yes, it can be called a 4-4-2, but the two wide players are not very defence minded.
This is Chelsea’s movement for the entire season but we can clearly see some important mistakes made by the players -
In this frame, Luiz has the ball. Cahill is gesturing for a pass. Azpilicueta has made a run down the right-flank , to provide extra width. Romeu is moving forward as he see’s Hazard come back and Mikel is returning from the left-flank. Luiz is at the moment looking for a proper pass.
Bertrand received the pass after Luiz lobbed it to him. Look at the frame carefully. There is more than just obvious signs of an incoming congestion. Sturridge has moved to the center and Torres has spotted it. On paper, Nino has to move back to the supposedly empty No.10 role as Hazard should have drifted right after seeing Sturridge move centre. Moses has stuck to his left-flank where he was placed to cut inside with his right-foot.
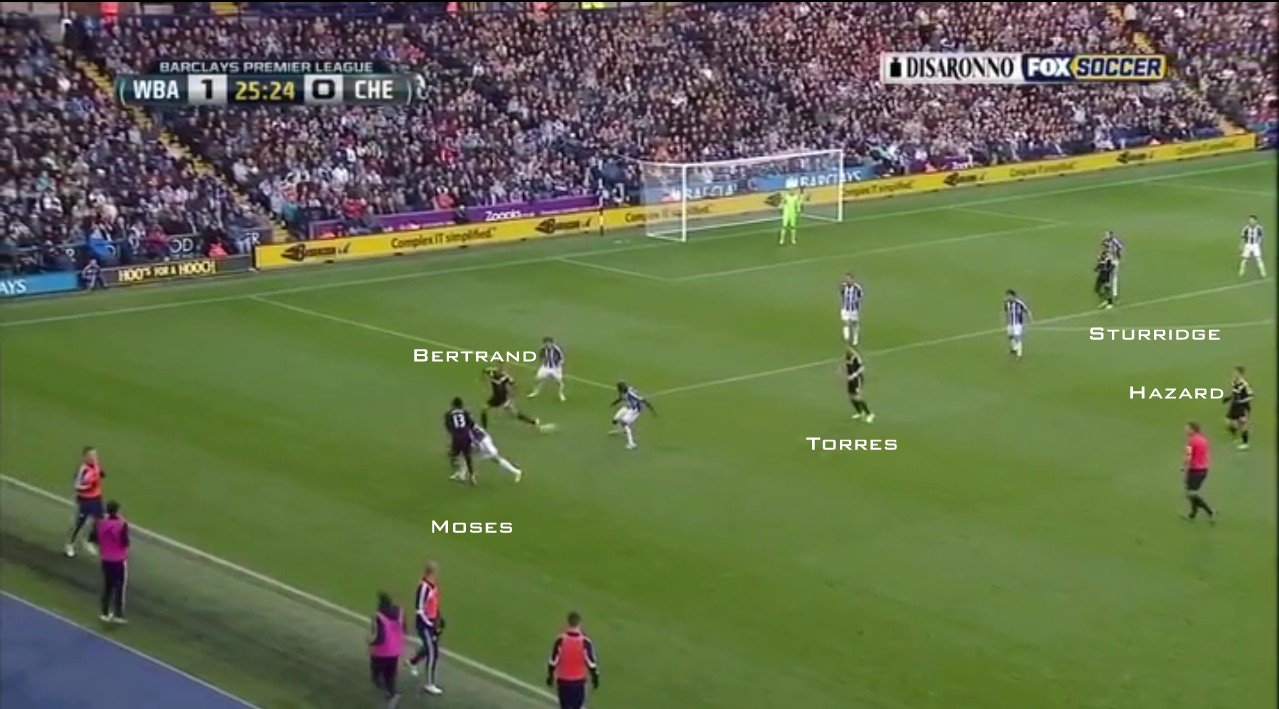
Bertrand has passed to Moses and now Torres has turned smart. This is the part where you have to give him credit. He begins moving to the middle where he can occupy the AMF space. Moses continues his movement right whereas Sturridge is in the center, ready to receive any kind of ball. Bertrand on the other hand should be moving back but he wants to go on. This is where the problem occurs, and there is a foreseeable congestion in the left side of the attacking third.
Moses passes it to Bertrand who shakily gives it to Nino. Now comes problem part number two. Instead of going to the right, where only Azpilicueta is yawning, Hazard comes into AMF. Moreover, neither Moses and Bertrand look like they are going back. Sturridge is still waiting whereas Torres is facing the consequences. He can’t do much and is rooted to the spot. Notice that there are 3 defenders who can put immediate pressure on him.
Torres can’t do much as he is about to pass it to Hazard. Hazard looks like he is ready to receive the back pass. Notice once again that Bertrand and Moses don’t move at all. Going by the laws of providing width, the full-back should not push up the flank if a winger is already present, as this brings the detrimental effects of providing “extra width”. They are in a lot of trouble.
Hazard makes the wrong choice of movement and Torres the wrong pass. The ball is lost. Once again neither Moses or Bertrand show any sign of going back as Sturridge looks on.
This frame shows the extent of damage. Bertrand is running back as he suddenly realizes the tactical game plan. Torres moves slowly as he has all the time in the world to move to the center. Sturridge moves right as Azpilicueta begins to charge back to defend. Moses still hasn’t moved. Romeu is debating what decision to make. Moving right will cause a huge problem in the centre as Hazard might not be there in time. Moreover Mikel is burdened with the duty of covering the left as Bertrand might not make it in time.
What should have happened is that Bertrand should have come back or never pushed in the first place, while Hazard should have been on the right and not looking for time on the ball.
Now what did Di Matteo do? He initiated Plan B or 4-2-2-2 -
He first called out Sturridge and told him what had to be done. Don’t trust me? Keep an eye on the timer.
Okay, so the first major change was Hazard going to the left. THIS is why he scored via a header, as he found himself on the left wing as his natural position. Torres is a bit to the left and Sturridge has an exact penetration point that is right ahead of the pivot players and the the second centerback of WBA who has been lured on by Torres as a false nine. Bertrand is about to make a run…..
But stops. He has been told about the congestion. Hazard passes to Torres and moves to the left. Moses makes a run whereas Sturridge still lingers around in the AMF role. If Sturridge was making a run from the previous frame, a clean through ball by Torres and we had a scoring opportunity.
Torres has been robbed but Hazard has a good chance of getting the ball. Here we can see Chelsea’s high pressing, where the full-back pounces on WBA’s right-back. The main thing though is, notice Sturridge. He’s seen that Moses has left a gap, and off he goes, or does he?
Romeu has entered the fray. One of the pivot players has to be a bit attack minded. Hazard wins the ball back and wants to enter the AMF zone. Bertrand has a good chance of going down the left flank now. Torres has dropped deeper as well to lure that center-back out. Moses has stuck to his position as Sturridge disappears off frame.
Here we get a clean picture. The pivot is attack-minded now and trying to claw back a goal. Sturridge has told Moses to get back to the right, as Torres resumes his number nine position. Bertrand loiters around the left side, as Hazard moves in closer to the box to receive a pass. Romeu is falling back as Mikel goes forward. Moses will cut in soon and Azpilicueta needs to provide width, so off he goes.
Skip a minute later and this shows the change in formation. Sturridge and Torres have become our forwards with Sturridge playing as a second striker. Mikel has just shifted to the left, and Bertrand notices that and plays a quick pass to Hazard and moves back to the pivot to assist Romeu. Moses has pushed wide and Azpilicueta moves back.
To give a clearer picture, this is the 4-4-2, or in my words the 4-2-2-2:
Di Matteo has no idea with his tactics? Tactically bad? No Plan B? Think again.


'%20x='0'%20y='0'%20height='100%25'%20width='100%25'%20%0A%20%20%20%20%20%20%20%20%20%20xlink%3Ahref='data:image/jpg;base64,/9j/2wBDAAYEBQYFBAYGBQYHBwYIChAKCgkJChQODwwQFxQYGBcUFhYaHSUfGhsjHBYWICwgIyYnKSopGR8tMC0oMCUoKSj/2wBDAQcHBwoIChMKChMoGhYaKCgoKCgoKCgoKCgoKCgoKCgoKCgoKCgoKCgoKCgoKCgoKCgoKCgoKCgoKCgoKCgoKCj/wgARCAAGAAoDASIAAhEBAxEB/8QAFQABAQAAAAAAAAAAAAAAAAAAAgX/2gAIAQEAAAAAgj//xAAUAQEAAAAAAAAAAAAAAAAAAAAF/9oACAECEAAAAAf/xAAUAQEAAAAAAAAAAAAAAAAAAAAE/9oACAEDEAAAADf/xAAcEAAABgMAAAAAAAAAAAAAAAAAAQIEERRUcZL/2gAIAQEAAT8Att4SdRG5BuWuInox/8QAGBEAAgMAAAAAAAAAAAAAAAAAAAMBAlL/2gAIAQIBAT8As5mpP//EABcRAAMBAAAAAAAAAAAAAAAAAAACElH/2gAIAQMBAT8AttP/2Q=='%3E%3C/image%3E%3C/svg%3E)


