
'%20x='0'%20y='0'%20height='100%25'%20width='100%25'%20%0A%20%20%20%20%20%20%20%20%20%20xlink%3Ahref='data:image/jpg;base64,/9j/2wBDAAYEBQYFBAYGBQYHBwYIChAKCgkJChQODwwQFxQYGBcUFhYaHSUfGhsjHBYWICwgIyYnKSopGR8tMC0oMCUoKSj/2wBDAQcHBwoIChMKChMoGhYaKCgoKCgoKCgoKCgoKCgoKCgoKCgoKCgoKCgoKCgoKCgoKCgoKCgoKCgoKCgoKCgoKCj/wgARCAAHAAoDASIAAhEBAxEB/8QAFQABAQAAAAAAAAAAAAAAAAAABAX/2gAIAQEAAAAAjD//xAAUAQEAAAAAAAAAAAAAAAAAAAAE/9oACAECEAAAAAf/xAAUAQEAAAAAAAAAAAAAAAAAAAAB/9oACAEDEAAAAD//xAAfEAACAgEEAwAAAAAAAAAAAAABAgMRBAAFEhMzQUP/2gAIAQEAAT8AG2bTkRQR1NH5EzY2+44MyHkPdhV0maFQL2saFX0Jr//EABgRAAIDAAAAAAAAAAAAAAAAAAABAhQy/9oACAECAQE/ALskso//xAAXEQADAQAAAAAAAAAAAAAAAAAAASFB/9oACAEDAQE/AK9P/9k='%3E%3C/image%3E%3C/svg%3E)
The charm of the close finish in Tests is unique. Unlike the limited-overs games, Tests provide a longer window for the classic ebbs and flows that are the cornerstone of a thrilling encounter. Teams may start on top and stay on top for nearly two days but can let the advantage slip away with just an hour of poor batting. On the other hand, teams may be evenly balanced nearly till the end of the game but the tide may turn with just one good partnership or a couple of breakthroughs.
Most of us have been lucky enough to watch (at least on television) 2-3 close Test finishes. The closest of them all – the two ties – have perhaps been watched by very few. The margin of victory (or defeat) has often been the only factor used in trying to understand how close a contest has been. However, it does not do complete justice to the sense of theatre that such contests produce.
In this article, I plan to dig deeper into these contests and analyze the pattern and flow of the match across the four innings. The relative position of strength of a team, the ground that the team trailing has to make up, the record and history a team has before the game, and the ultimate pressure of a final-innings chase are all revealed in this detailed analysis. Let me outline a few important factors considered in this article –
1st innings – The first innings analysis considers the runs per wicket (RPW) and the average runs per wicket RPW-R (includes not outs) record for the last ten years leading up to the game for the team batting in the first innings, Diff – the difference between RPW and RPW-R.
2nd innings – RPW – runs per wicket and the runs per wicket required – the average runs per wicket the team needs to get to match the 1st innings score of the opposition, Diff – the difference between RPW and the runs per wicket required.
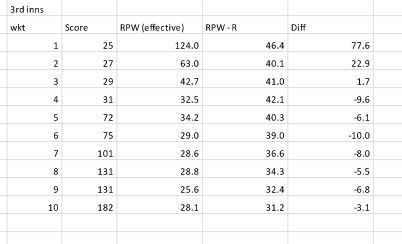
3rd innings – RPW (effective) – the runs per wicket factoring in the lead or deficit at the end of the match 2nd innings, RPW–R is the average runs per wicket (includes not outs) record for the last ten years leading up to the game for the team batting in the third innings, Diff – the difference between RPW and RPW-R.
4th innings – RPW – runs per wicket, the runs per wicket required – the average runs per wicket the team needs to get to win the match, RPW–R is the average runs per wicket (includes not outs) record for the last ten years leading up to the game for the team batting in the fourth innings, D1 (the difference between the RPW and the required runs per wicket), D2 (the difference between the RPW and the RPW–R).
I have picked five matches for this analysis – the two Tied Tests, West Indies’ 1-run win in Adelaide in 1993, England’s amazing victory at Edgbaston in the 2005 Ashes, and the extraordinary chase by Brian Lara’s West Indies in Barbados in 1999. The presence of Australia in every match is not surprising – they have featured not just in these games but also in a one-wicket loss against Pakistan in 1994, a 3-run loss against England in Melbourne in 1982 and the 5-run defeat against South Africa in Sydney in 1994.
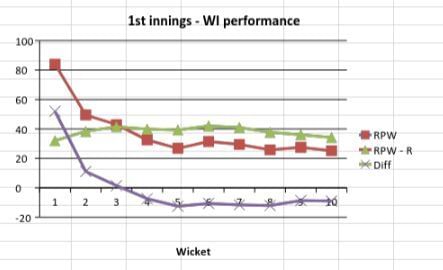
#1 Tied Test 1 – Australia v West Indies, Brisbane, 1960-61

West Indies arrived in Australia under Frank Worrell without much fanfare. They were not really expected to trouble Richie Benaud’s powerful Australian outfit. The Caribbean entertainers, however, had a few aces up their sleeve including the extremely talented all-rounder Garry Sobers and the fearsome paceman Wes Hall.
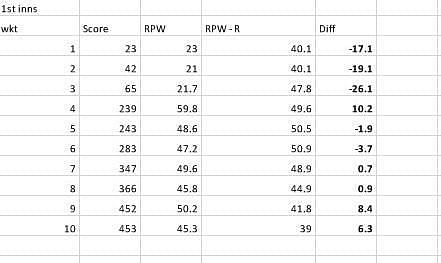
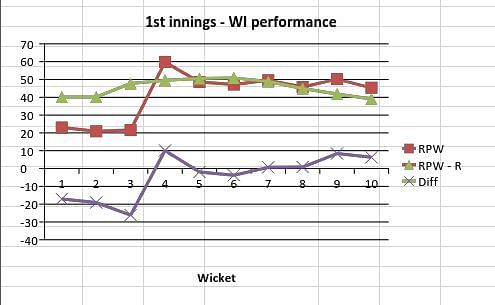
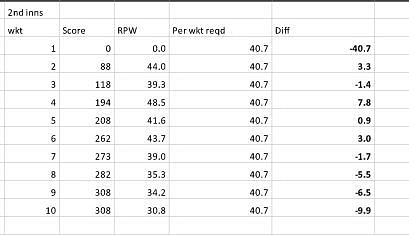
A closer look at the 1st innings (WI) suggests that they had a very ordinary start when compared to their record (post war matches considered in this case given that fewer games were played then) leading up to the Gabba Test. An excellent fourth-wicket stand gave them the impetus needed and lifted their RPW over the RPW-R for the first time. The RPW more or less stayed hovered around the RPW-R and eventually ended well above. This indicates that WI’s performance in the 1st innings was definitely above par.
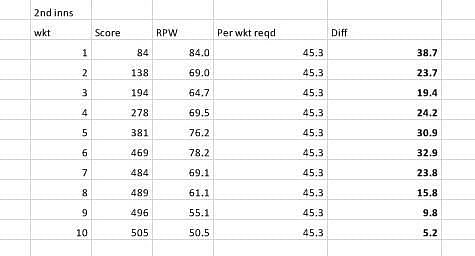
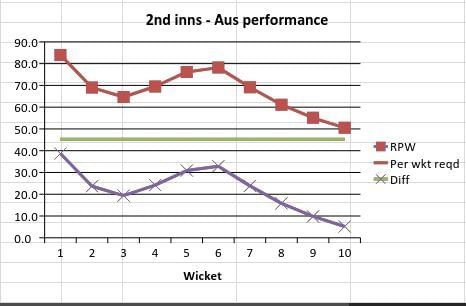
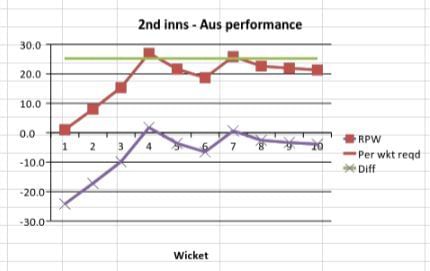
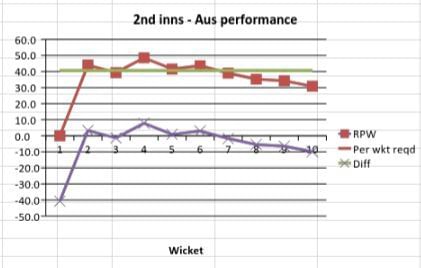
Australia, who required 45.3 runs per wicket to match the 1st innings total of WI, started off brightly and maintained an RPW that consistently stayed well above the required RPW. After a slight fall in the beginning, their RPW reached 78.2 (diff of 32.9) at the fall of the sixth wicket. A mini collapse after that meant that Australia did not quite consolidate their strong position. Nevertheless, with WI having to make up 5.2 runs per wicket, Australia were definitely in the ascendancy.
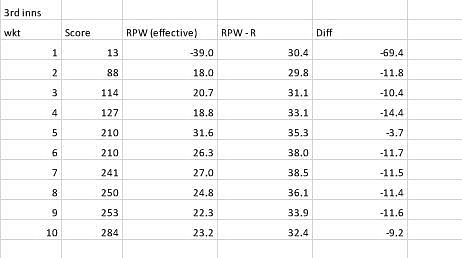
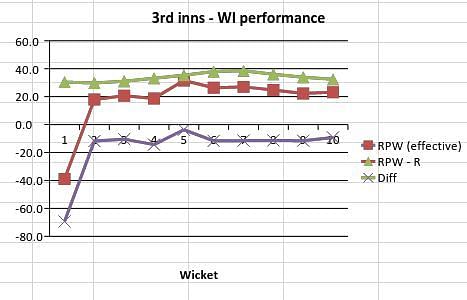
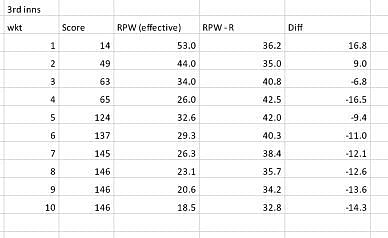
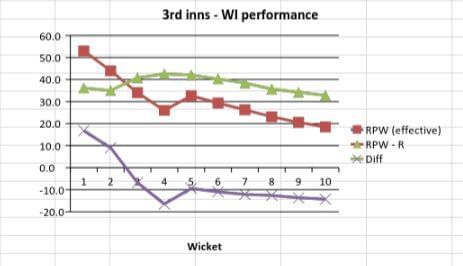
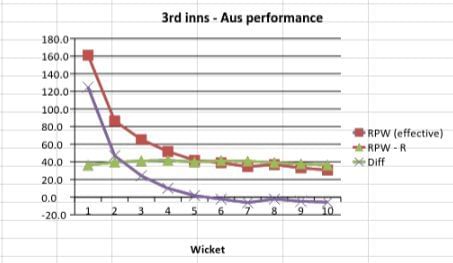
Rocked by quick and regular strikes, West Indies never quite got going in the 3rd innings. Their RPW (effective) was well behind the RPW – R throughout the innings. But for a brief period in the middle (5th wicket), where they were almost on par with their 3rd innings record, the visitors were unable to churn out a performance that would lead them to a competitive target. Or so, it seemed.
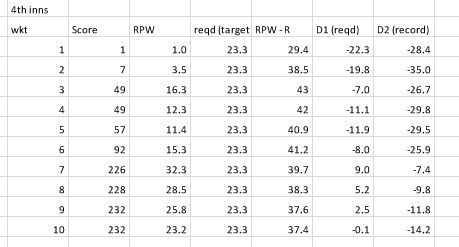
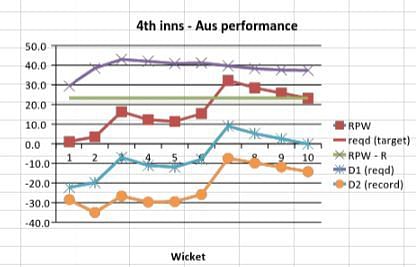
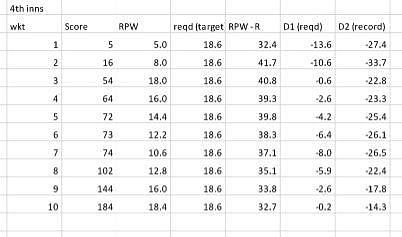
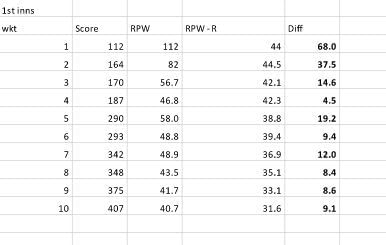
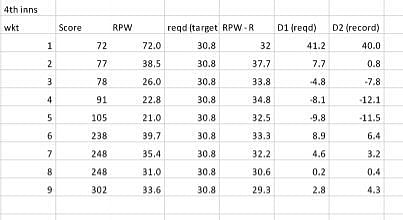
In the final innings, Australia required 233 (RPW required 23.3). Given their 4th innings record (RPW-R) in the years before the game, this seemed like a stroll in the park. However, what transpired was something totally different. Australia fell way behind right from the beginning with both D1 and D2 extremely low (negative double digit). The famous 7th wicket stand between Benaud and Alan Davidson rescued the hosts and moved D1 to 9.0 but D2 was still negative.
This indicates that Australia might have had the upper hand at that moment but were performing below the level they had leading up to the game. The burst of wickets in the end (last over) meant that D1 fell away once again leaving the classic game tied. It is interesting to observe that both teams batted much better than they were expected to in the first innings and much poorer in the second innings than their records suggested. This humdinger, then, could be regarded as a game of two halves (innings).
#2 Tied Test 2 – India v Australia, Madras (Chennai), 1986
Australia in the mid-1980s were a very ordinary team struggling after the departure of top players. India, as always, were a tough side to beat at home. The first Test at Madras produced some astonishing performances and had an extraordinary finish.
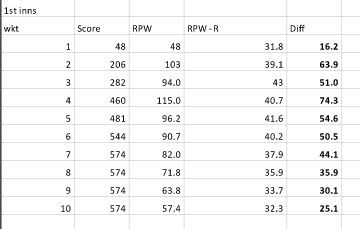
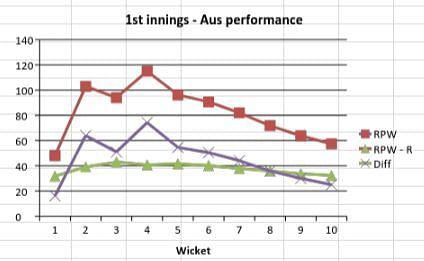
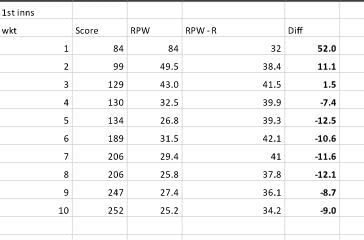
Right from the beginning, Australia had an RPW that was well ahead of their RPW – R leading up to the game. The difference (Diff) consistently remained over 50 and reached a peak of 74.3 at the time the fourth wicket fell. Australia declared seven down and left India requiring a massive 57.4 runs per wicket to establish parity. (Because the effective runs per wicket required for India does not change, the table of the 1st innings shows the last few wickets falling at the same score (574). However, Australia declared 7 down.
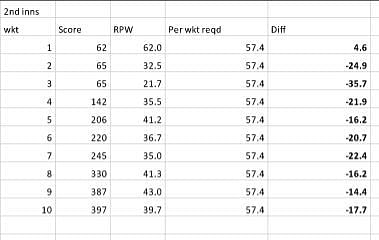
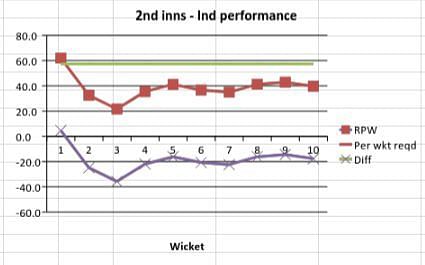
India, faced with a major challenge, started well but quickly found themselves behind the eight ball with an RPW well below the required RPW (57.4). The difference (Diff) was low throughout the innings (< - 15) and stayed there at the end. With a massive deficit (177 runs), India had more or less been batted out of the contest.
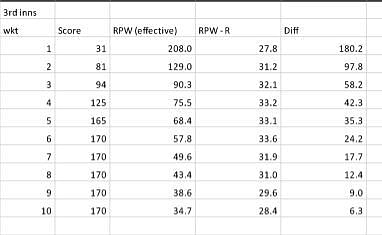
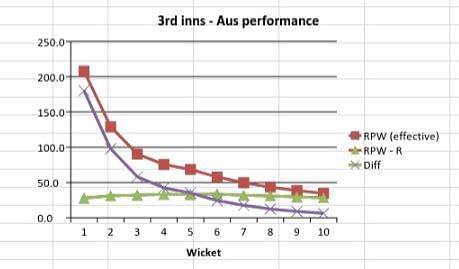
Australia, armed with a commanding lead, played well enough to move further ahead in the contest. Although they lost wickets at regular intervals, their RPW (effective) was extremely high (68.4) when the fifth wicket fell. Pushing for a win, Australia declared five down for 170 with an RPW (effective) of 34.7. This performance, however, was well above the RPW–R in the preceding ten years. The difference (Diff) was consistently over 20 and ended on +6.3 suggesting a relatively stronger position for Australia going into the fourth innings.
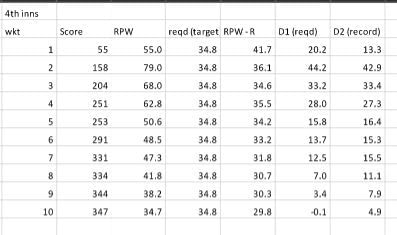
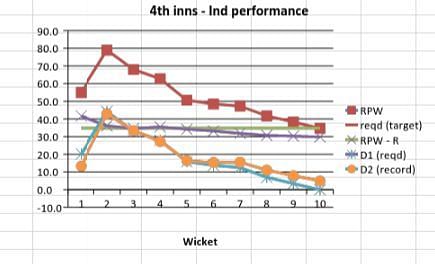
India started superbly. They maintained an RPW well above the required RPW (34.8) & RPW–R. Both D1 and D2 remained high (+12.5 and 15.5) at the time the seventh wicket fell at 331. However, a collapse at the end meant that the advantage was lost. We may never know whether Maninder Singh was actually out lbw or not but Australia had just about managed to come back from a position where the odds were heavily stacked against them. A see-saw contest ended in the best way possible. However, it is perhaps safe to suggest that Australia would feel slightly more aggrieved given that they lost only 12 wickets in the match and comfortably outperformed themselves (record leading up to the match) but could not haul themselves past the finish line.
#3 Australia v West Indies, Adelaide, 1993
West Indies were hardly the powerhouse they were in the 1980s. They had arrived in Australia with an inexperienced side and were looking to somehow retain the Frank Worrell trophy which they had not lost since 1975. Australia had risen from the depths in the mid-1980s and had steadily become a highly competitive unit who were hard to beat in home conditions. After a heavy defeat in the second Test in Melbourne, West Indies did well to fight back in a high-scoring draw in Sydney with Brian Lara scoring a splendid 277.
After a great start, West Indies lost a steady stream of wickets. Their RPW, which was well above the RPW–R at the start of the innings, fell away continuously. The difference (Diff), which was nearly 52 at the fall of the first wicket, dropped below -10 and ended close to that mark. Clearly, West Indies had turned in a performance that was nowhere close to the consistent level they had maintained for over a decade.

Faced with a modest 1st innings target of 252, Australia stuttered at the start losing three quick wickets and saw the difference (Diff) drop close to -10. A brief recovery was followed by another collapse and the hosts ended with a deficit of 39 runs – an RPW deficit of 3.9 which would be extremely crucial in what seemed like a low-scoring encounter.
Already down 1-0 in the series, West Indies could ill afford a collapse. However, that is exactly what happened. A cluster of wickets at the top left West Indies in a tough spot. Their RPW (effective) was 32.6 at the fall of the fifth wicket – a diff of -9.4. From that point on, the middle and lower order put up no resistance whatsoever as the RPW fell to 18.5 and the diff crashed to -14.3.
Australia needed just 186 to regain the Frank Worrell trophy. But a horror start set them back a long way. Despite a brief recovery, their RPW was way behind the RPW – required (18.6) and the RPW–R. At the fall of the seventh wicket, D1 and D2 were -8.0 and -26.5 respectively. The last three wickets, however, brought Australia back into the contest. The differences D1 and D2 quickly kept moving up (improving) and were -2.6 and -17.8 when the penultimate wicket fell. The last wicket partnership had reached 40 leaving Australia to get just two runs when Courtney Walsh produced a lifting delivery that Craig McDermott could not evade. West Indies had won by a single run and leveled the series.
They then went on to clinch the series in the next Test in Perth and Australia had to wait another two years to regain the trophy. The Adelaide Test saw both teams struggle to match their record leading up to the game. West Indies nearly threw it all away in their 2nd innings but set off a collapse when Australia batted last that ultimately made the target a bridge too far for the hosts.
#4 England v Australia, Edgbaston, 2005
The Ashes had ceased to be a competitive contest for more than 16 years when Australia’s powerful team reached England in 2005. Although England had played some solid cricket in the previous two years, the Australian juggernaut was not expected to be really troubled. A comfortable 239-run win for Australia in the 1st Test at Lord’s demonstrated a gulf in class between the sides. But there was something different about this England team. With McGrath slipping on a stray ball and hobbling off, England received a shot in the arm they needed badly ahead of the 2nd Test at Edgbaston.

With Ricky Ponting making a surprise choice to bowl first, England capitalized. The McGrath-less Australian attack was struggling to make an impact early on as England’s RPW was well and truly above their RPW – R (diff of 37.5 at the fall of the 2nd wicket). Despite a mini wobble, England ensured that their RPW stayed high and ended with an RPW of 40.7, nearly 9.1 above their RPW – R.
After an early wicket, Australia set about repairing their innings well. Their RPW at the fall of the 6th wicket was only 5.1 behind England’s at the same stage. However, a late collapse saw their RPW plummet to 30.8, a deficit of 9.9.
England’s advantage was to prove extremely crucial. They had a terrible start to their 2nd innings and lost wickets in a heap. Their RPW at the fall of the 6th wicket was still only 29 (despite the lead of 9.9 per wicket). The RPW fell away even more to 25.6 at the fall of the 9th wicket but a vital 51-run stand for the last wicket moved the RPW to 28.1 which was not too far from their RPW-R (31.2).
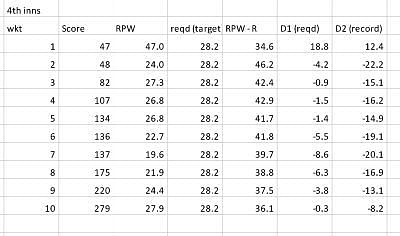
Australia started well but steadily lost wickets at the top to find themselves with an RPW of 26.8 at the fall of the fifth wicket. At this stage, the D1 was -1.4 but more significantly, D2 was -14.9. This clearly suggested that Australia were under pressure and that their performance was well below the exceptional level they had maintained for years. Three more wickets fell and Australia seemed dead and buried at the fall of the eighth; their RPW was down to 21.9 and the differences, D1 and D2 were -6.3 and -16.9 respectively.
The last two wickets, however, turned the game on its head. When the ninth wicket fell, D1 and D2 for Australia looked much better at -3.8 and -13.1. The last pair of Brett Lee and Michael Kasprowicz moved the score to 279 and Australia’s RPW at that stage was 31 (D1 was 2.8). England, who could not believe what was happening, badly required a stroke of luck. And that is exactly what happened. Kasprowicz failed to get his gloves out of the way of a Harmison lifter and was caught down the leg side by a diving Geraint Jones.
England had won a thriller by 2 runs and kick started a run that saw them clinch a classic Ashes series 2-1. Australia had dragged themselves back from nowhere into the contest twice: once by bowling England out cheaply in the 2nd innings and in the final two partnerships in their 2nd innings. However, England’s exceptional 1st innings display with bat and ball just about gave them the margin needed to pull off this triumph.
#5 West Indies v Australia, Barbados, 1999
Australia were not yet the indomitable unit they were to become in the next 7-8 years. However, Steve Waugh had an experienced squad brimming with confidence. Brian Lara, on the other hand, had numerous headaches to deal with. A 5-0 thrashing in South Africa was followed by a humbling loss in Trinidad. The peerless left hander had engineered a remarkable turnaround in Jamaica with a majestic 213 but Australia were still the better side going into the third Test in Barbados.
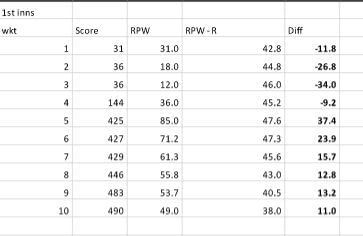
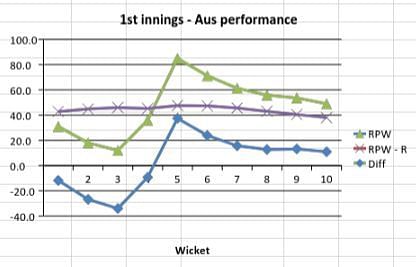
Australia’s performance in the 1st innings makes for an interesting analysis. They started poorly and their RPW fell way behind their RPW-R so much so that the difference (diff) was -36 at the fall of the 3rd wicket. A brief recovery was followed by a huge partnership that moved them into the ascendancy. The RPW at the fall of the 5th wicket was 85 and the diff was 37.4. Despite a few quick wickets at the end, their RPW was comfortably above the RPW-R at the end of the innings (diff of 11.0).
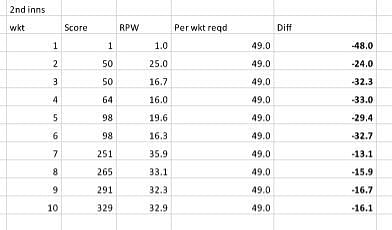
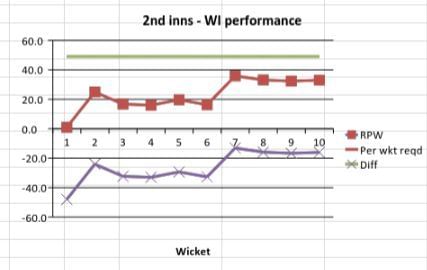
The hosts were already on the backfoot at the start of their 1st innings. Quickly, their grip on the match well and truly slipped away as their RPW crashed to 16.3 at the fall of the 6th wicket – a diff of -32.7. Solid knocks by Sherwin Campbell and Ridley Jacobs steadily lifted the RPW to 32.9 at the end of the innings. The diff, however, was still a substantial -16.1 going into the 3rd innings of the Test.
West Indies needed some inspiration. It came in the form of their bowlers. The visitors were in a terrible position when the 7th wicket fell (score at 81) but the big lead meant that the RPW was still a respectable 34.6, just 6.2 behind their RPW-R of 40.8 at that stage. A late charge threatened West Indies’ chances but was snuffed out quickly and the innings ended with an RPW of 30.7, a fall of 5.7 from their RPW-R. However, it was still well above what West Indies had ever achieved (RPW-R) in the ten years before the game.
Despite a good start, the hosts’ batting crumbled to leave them with an RPW of 21 at the fall of the 5th wicket – well behind the RPW–R (32.5) and the RPW required (30.8). The D1 and D2 were -9.8 and -11.5 respectively. Lara, together with the resolute Jimmy Adams, stitched together a terrific stand for the 6th wicket and lifted the RPW to 39.7 when Adams fell to McGrath. At this stage, West Indies had boosted D1 and D2 to 8.9 and 6.4 respectively. Two quick wickets, however, brought the RPW down to 31 and the differences, D1 and D2 were just a shade above 0 (0.2 and 0.4). Lara, realizing that he had to do it all by himself now, took the game to the Australians.
With the plucky Ambrose for company, Lara lifted West Indies to an RPW of 37.7 and just six runs away from victory when Ambrose fell. At this stage, West Indies were still marginally ahead but with the rather unreliable batting of Walsh to come, the outlook was bleak. However, Walsh held on and Lara soon took West Indies home with a scorching drive through the covers. West Indies ended with an RPW of 34.5 which was well above what they had ever achieved in the ten years before this great Test. Given their dominant position in the match, Australia would probably feel that they lost out in their 2nd innings with a below-par batting display that gave West Indies a glimmer of hope. In the form he was in, Lara did not need a second chance.
Brand-new app in a brand-new avatar! Download Cric Rocket for fast cricket scores, rocket flicks, super notifications and much more!
