
'%20x='0'%20y='0'%20height='100%25'%20width='100%25'%20%0A%20%20%20%20%20%20%20%20%20%20xlink%3Ahref='data:image/jpg;base64,/9j/2wBDAAYEBQYFBAYGBQYHBwYIChAKCgkJChQODwwQFxQYGBcUFhYaHSUfGhsjHBYWICwgIyYnKSopGR8tMC0oMCUoKSj/2wBDAQcHBwoIChMKChMoGhYaKCgoKCgoKCgoKCgoKCgoKCgoKCgoKCgoKCgoKCgoKCgoKCgoKCgoKCgoKCgoKCgoKCj/wgARCAAGAAoDASIAAhEBAxEB/8QAFQABAQAAAAAAAAAAAAAAAAAABQj/2gAIAQEAAAAAnwv/xAAUAQEAAAAAAAAAAAAAAAAAAAAC/9oACAECEAAAAH//xAAUAQEAAAAAAAAAAAAAAAAAAAAB/9oACAEDEAAAAH//xAAgEAACAQQBBQAAAAAAAAAAAAABAwIABAUSESIxYYGi/9oACAEBAAE/AMcvGSxVxJ6Ltj+0WReIRh5016j7oWpI5DPmv//EABQRAQAAAAAAAAAAAAAAAAAAAAD/2gAIAQIBAT8Af//EABQRAQAAAAAAAAAAAAAAAAAAAAD/2gAIAQMBAT8Af//Z'%3E%3C/image%3E%3C/svg%3E)
You might wonder why ab rollers are increasingly gaining popularity these days. Well, this small equipment has the ability to help you perform some of the most challenging ab exercises which help in engaging your entire core
The ab roller or the ab wheel (as it is alternatively called) is a simple inexpensive device and all you need to get started is a flat surface.
Having and maintaining a healthy core is important because it provides support to the abdominal muscles, obliques, muscles of the lower back, glutes and the pelvis. Your core takes the strain of daily activities and sports, it becomes important to strengthen it so that our day to day load do not affect the bones directly.
Research has shown that an ab roller is a highly effective workout performer as far as muscle contraction of the core is concerned. The core should be trained like any other muscle and should not be neglected at any cost.
Working with an ab roller is a good bet to get tight and toned abs. You can use it anywhere, anytime and it can be a great addition to your workout routine. Here are some of the ab roller exercises that you may want to perform to strengthen up the muscles of the core.
Apart from the exercises mentioned, you can also do wide-stance roll out, oblique tuck, one leg roll-out using the ab rollers.
Exercise #1
Ab Roller Planks
If you are using the ab roller for the very first time then this is the exercise that you should begin with. It helps one to understand how to hold the roller while maintaining the body balance.
Also, read 8 Best Ab Exercises To Get Those Perfectly Sculpted Six Packs.
Instructions:
Step 1: Begin by starting in the push-up position.
Step 2: Now hold the ab roller with both hands with your palms facing down and your body in a plank position. Hold for 30-45 seconds and repeat the same for about 4-5 times.
Important Tip: If you are not able to balance the ab roller then place your knees on the ground instead of the toes. If you are able to balance then use the equipment to slightly roll in and roll out in the same posture.
Note: This exercise is for absolute beginners and once you are used to this move on to the next exercises.
Get your own Ab Roller: Buy Here
Next up: Kneeling Roll Outs
Exercise #2
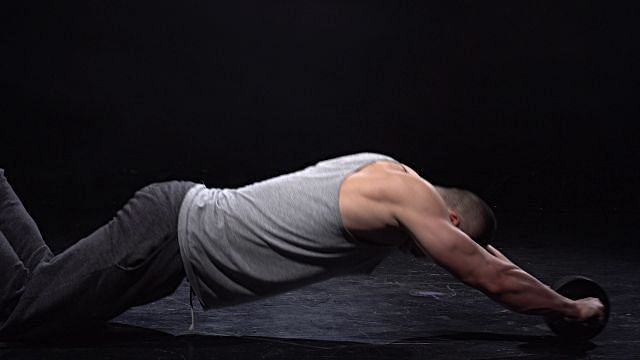
Kneeling Roll Outs
Instructions:
Step 1: Start with kneeling on the floor with the ab roller in front.
Step 2: Now grasp the handles of the roller with both your arms stretched.
Step 3: Once this is done roll forward stretching your body until it is parallel to the ground.
Step 4: Go down as far as you can without touching the body to the ground and breathe in during this movement.
Step 5: After a pause for 2-3 seconds, roll yourself back to the starting position by breathing out without arching your back and repeat the cycle.
Important Tip: During the course of this exercise, you have to keep in mind your body posture as you need to keep your arms and back straight throughout. (Tip: Tighten and squeeze the core as you move forward and backward.)
Beginner: 7-9 reps
Intermediate: 12- 14 reps
Advanced: 16-19 reps
Next up: V Roll Outs
Exercise #3
V Roll-Outs
The V roll-outs put greater emphasis on the obliques and are similar to the knee roll-outs the only difference being the extension which needs to be done at an angle of 45 degrees.
Instructions:
Step 1: Begin by grasping the handles of the roller by kneeling.
Step 2: Keep your arms extended and roll out to the right to an angle of 45 degrees. Return to the starting position and then roll out to the left (45 degrees angle).
Repeat the cycle by alternating to the right and left. (Tip: Squeeze your core when you roll out)
Beginner: 5-7 reps
Intermediate: 9-12
Advanced: 14-19
Buy Fitness Mats Online at the Best Prices
Next up: Knee Tucks
Exercise #4
Knee Tucks
For this variation, you will have to be in a plank position but instead of your hands this time your feet will be on the handles of the ab roller. An extra accessory that you will require is afoot strapping attachment for this exercise. You need to set yourself in a plank position after your feet is secured in the attachments.
Remember that your hands need to be straight and under your shoulders throughout. Now roll in the wheels by bending your knees and bring it closer to the chest. Keep your body straight to achieve higher efficiency and extend your knees back to the plank position.
Important Tip: This form helps to engage the abdominal muscles, obliques, arms, and shoulders. (Tip: Breathe in when you bend your knees and breathe out when you extend your knees back to the plank position)
Beginner: 7-10 reps
Intermediate: 12-15 reps
Advanced: 16-20 reps
Next up: Single Arm Roll Out
Exercise #5
Single Arm Roll Out
This is the higher version of the double arm rollout or the kneeling roll out. In this, your rolling arm supports your body weight and the stabilizer muscles keep you upright. The other hand which is not in use should ideally be rested at the back of your waist or you can keep it parallel to the body.
You can either do it by standing or by kneeling. Initially, the kneeling version should be preferred as it will give you more control over the posture.
Instructions:
Step 1: Begin by kneeling on the ground and bend your waist to hold the roller with one hand.
Step 2: Start slowly by rolling forward focusing more on the core.
Come back again to the starting position by rolling back with one hand. Use alternate hands to repeat the cycle to achieve more productivity. (Tip: Hold for 2-3 seconds when the body is completely stretched).
Beginner: 5-7 reps
Intermediate: 9-12 reps
Advanced: 14-20 reps
Let us know how these exercises worked out for you in the comments section below!
