
'%20x='0'%20y='0'%20height='100%25'%20width='100%25'%20%0A%20%20%20%20%20%20%20%20%20%20xlink%3Ahref='data:image/jpg;base64,/9j/2wBDAAYEBQYFBAYGBQYHBwYIChAKCgkJChQODwwQFxQYGBcUFhYaHSUfGhsjHBYWICwgIyYnKSopGR8tMC0oMCUoKSj/2wBDAQcHBwoIChMKChMoGhYaKCgoKCgoKCgoKCgoKCgoKCgoKCgoKCgoKCgoKCgoKCgoKCgoKCgoKCgoKCgoKCgoKCj/wgARCAAGAAoDASIAAhEBAxEB/8QAFAABAAAAAAAAAAAAAAAAAAAABv/aAAgBAQAAAAAwk//EABQBAQAAAAAAAAAAAAAAAAAAAAX/2gAIAQIQAAAAU//EABQBAQAAAAAAAAAAAAAAAAAAAAT/2gAIAQMQAAAAZ//EAB8QAAICAQQDAAAAAAAAAAAAAAIDAQUEAAYTIRJBcf/aAAgBAQABPwC03bYLxMuvME8AJ4RYqJXPiPuR7iZ1W1C2V2KY5+WMEoCgYWvrr5r/xAAXEQEAAwAAAAAAAAAAAAAAAAABAAQR/9oACAECAQE/AKZqk//EABcRAQADAAAAAAAAAAAAAAAAAAEABCL/2gAIAQMBAT8AqGkn/9k='%3E%3C/image%3E%3C/svg%3E)
Lunar Client is an all-in-one PvP optimized client for many versions of Minecraft. It is designed to provide players with a better experience when playing on Multiplayer Minecraft Servers. However, since the client is unofficial to Minecraft's creators (Mojang A.B.), Lunar needs to be downloaded and installed manually.
Becoming one of the most popular unofficial Minecraft clients in recent times and featured by many prominent YouTubers, an increasing number of players are looking at how to download, install, and use Lunar.

Downloading and installing Lunar Client for Minecraft
Step 1
The first step of installing Lunar Client is to navigate this link and select the download option underneath whichever operating system is being used.
Once the download button has been clicked, the Lunar Client installer application should begin downloading. And once the application has finished downloading, it should be opened.

Step 2
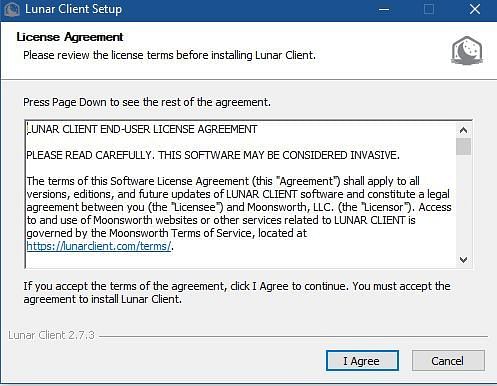
After the Lunar client installer application has been opened, players will be greeted with a license agreement which should be accepted. Once accepted, the client installer should automatically take care of the rest of the installation process.
Pictured below is the page players will see when they first open the application. In this specific instance, Windows OS is being used.
How to use Lunar Client in Minecraft?
Before launching Minecraft, players should configure client settings to ensure the best possible experience. The simple guide below can be followed in order to do just this:
Step 1
First, navigate to the settings section of the launcher, as shown in the picture below.
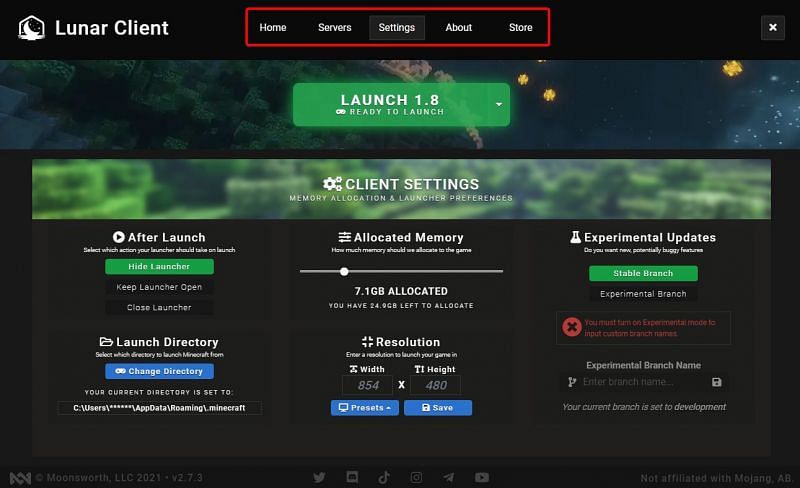
Players must ensure that enough RAM has been allocated (generally allocate ⅓ of the machines available RAM). For most users, that is all that will need changing.
Step 2
After this change has been made, players must now click the arrow next to the green launch button in order to select the version to be launched. Lunar Client currently supports Minecraft versions 1.7, 1.8, 1.12, 1.15, 1.16, and 1.17.
Step 3
Once the preferred version has been selected as their preferred version, players must now click the launch button. On the first launch, the client will download some necessary files, so it may take longer than usual.
Step 4
Once this is complete, Minecraft should launch, and the player will see the Lunar Client menu as shown below.
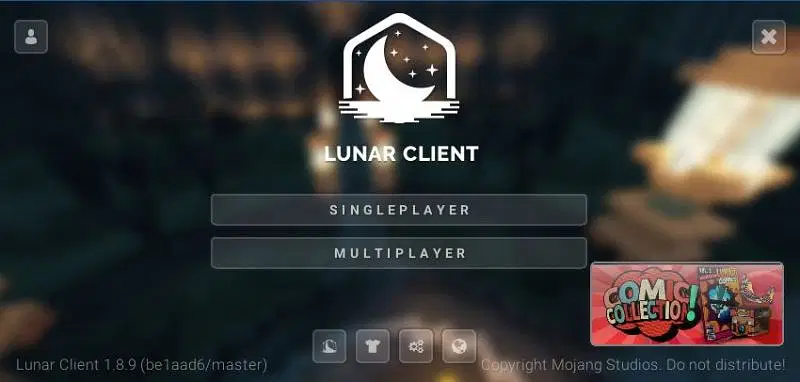
Players may now customize installed client mods by accessing the menu with the Lunar logo button at the bottom. These mods generally comprise PvP and FPS-related enhancements, which come in handy while playing on Minecraft PvP servers.
Everything else apart from these small mods remains unchanged and is the same as vanilla Minecraft. Meaning players don't have to worry about any potential compatibility issues.
