
'%20x='0'%20y='0'%20height='100%25'%20width='100%25'%20%0A%20%20%20%20%20%20%20%20%20%20xlink%3Ahref='data:image/jpg;base64,/9j/2wBDAAYEBQYFBAYGBQYHBwYIChAKCgkJChQODwwQFxQYGBcUFhYaHSUfGhsjHBYWICwgIyYnKSopGR8tMC0oMCUoKSj/2wBDAQcHBwoIChMKChMoGhYaKCgoKCgoKCgoKCgoKCgoKCgoKCgoKCgoKCgoKCgoKCgoKCgoKCgoKCgoKCgoKCgoKCj/wgARCAAFAAoDASIAAhEBAxEB/8QAFQABAQAAAAAAAAAAAAAAAAAABAb/2gAIAQEAAAAAsmf/xAAUAQEAAAAAAAAAAAAAAAAAAAAF/9oACAECEAAAAB//xAAUAQEAAAAAAAAAAAAAAAAAAAAD/9oACAEDEAAAAH//xAAgEAACAgEEAwEAAAAAAAAAAAACBAMRAQAGEhMUMUFS/9oACAEBAAE/AN2RnBG8+Dz4AcXYS0RgMZca92Gc/NI7vFxJdnwCDujGTj33V4v86//EABcRAQADAAAAAAAAAAAAAAAAAAEAAhH/2gAIAQIBAT8Awaz/xAAUEQEAAAAAAAAAAAAAAAAAAAAA/9oACAEDAQE/AH//2Q=='%3E%3C/image%3E%3C/svg%3E)
Hopper clocks, also known as hopper timers, are Minecraft contraptions utilizing redstone machinery to perform tasks over time.

Minecraft players can create simple hopper clocks to do things over time such as harvesting crops with a piston or activating/deactivating lights. They don't take up much space or require any materials rarer than redstone.
Based on the player's requirements, hopper clocks vary in design and complexity. However, simple hopper clocks can be effective when Minecraft players just need something to handle short and rudimentary tasks.
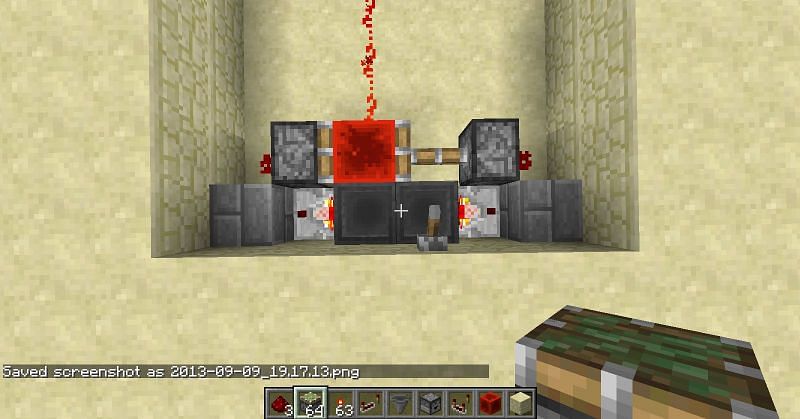
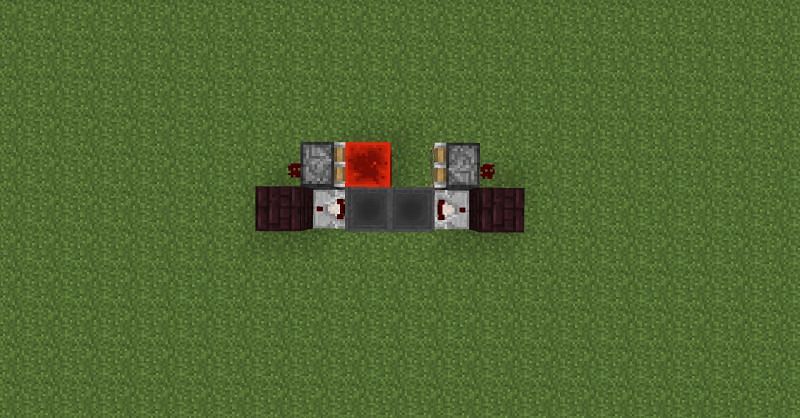
Minecraft: Constructing a simple hopper clock
When creating a simple hopper clock in Minecraft, the materials needed are a little specific but not overly difficult to acquire. Players will need:
- 16 standard blocks of any type (dirt or simple blocks like that work fine).
- 3 building blocks of sturdy durability (stone or harder blocks are ideal).
- At least 3 pieces of redstone dust.
- 2 sticky pistons.
- 2 hoppers.
- 2 redstone comparators.
- A block of redstone.
- A lever.
If created correctly, the hopper clock should take very little space (roughly 40 blocks) and perform its job effectively. Minecraft players can also expand on this design and even turn this hopper clock into a vertical variant with a few more pieces of redstone dust.
Regardless, the steps for creating a standard and simple hopper clock can be found below:
- Place a standard block, with a hopper connected to it.
- Remove the standard block and replace it with another hopper, this should connect the two hoppers together.
- Place redstone comparators on either side of the two hoppers.
- place solid building blocks behind the comparators.
- On the side (not behind) of the building blocks, place one square of redstone dust.
- In front of the redstone dust, place a sticky piston on each side; make sure that the pistons are facing each other.
- Take a redstone block, and place it in front of one of the pistons.
- On the right side of the opposite piston, place an additional solid building block.
- Place a lever on the building block from step 8.
- Take redstone dust and connect it to the redstone block. Using this redstone dust, connect the hopper clock to whatever machinery is desired.
- Lastly, place the 16 standard blocks in the hopper that isn't adjacent to the redstone block.
If done correctly, flipping the lever should activate the hopper clock. Every time those 16 standard blocks transfer hoppers, the pistons will alternate; this will create a timed effect. The more items stored in a hopper, the longer the clock will take before alternating its redstone current.
