
'%20x='0'%20y='0'%20height='100%25'%20width='100%25'%20%0A%20%20%20%20%20%20%20%20%20%20xlink%3Ahref='data:image/jpg;base64,/9j/2wBDAAYEBQYFBAYGBQYHBwYIChAKCgkJChQODwwQFxQYGBcUFhYaHSUfGhsjHBYWICwgIyYnKSopGR8tMC0oMCUoKSj/2wBDAQcHBwoIChMKChMoGhYaKCgoKCgoKCgoKCgoKCgoKCgoKCgoKCgoKCgoKCgoKCgoKCgoKCgoKCgoKCgoKCgoKCj/wgARCAAFAAoDASIAAhEBAxEB/8QAFQABAQAAAAAAAAAAAAAAAAAAAwb/2gAIAQEAAAAAkA//xAAUAQEAAAAAAAAAAAAAAAAAAAAE/9oACAECEAAAAC//xAAUAQEAAAAAAAAAAAAAAAAAAAAD/9oACAEDEAAAAH//xAAfEAABAwQDAQAAAAAAAAAAAAAEAQIDAAUGIRIllNH/2gAIAQEAAT8AEzC4iAXEQiSYqc6CJByXESI4NVcu2bpuRXbinYnemT7X/8QAFhEBAQEAAAAAAAAAAAAAAAAAAQAx/9oACAECAQE/ANC//8QAGBEAAgMAAAAAAAAAAAAAAAAAAREAAhP/2gAIAQMBAT8AxoyFP//Z'%3E%3C/image%3E%3C/svg%3E)
TNT has a lot of uses in Minecraft, and one of the most impressive and useful ones is a TNT cannon.
TNT cannons can be used for several things. Players can use them to grief bases and players in Minecraft wars. TNT cannons may also be used in a medieval castle build, sometimes just for show.
TNT cannons are useful contraptions, and they look quite cool as well. What players may not know is how to build one, so here is a step-by-step guide to building a TNT cannon in Minecraft.

A step-by-step guide to building a TNT cannon in Minecraft
Step #1 - Gather the resources
Players will need a few advanced resources to complete the TNT cannon. One such resource is obsidian. It is used is so that the TNT doesn't blow up the contraption itself.
Here is the list of items:
- 16 blocks of obsidian
- A slab - any material
- 11 Redstone (keep extra around just in case)
- One water bucket
- Two levers
- Five TNT blocks
Step #2 - Building the base
Players should place two parallel rows of obsidian blocks. These rows should be seven obsidian blocks each. Players should then place an obsidian block on the end to create the image above.
Step #3 - Finishing the base
Place an obsidian block on top of the left row of obsidian. This block should be placed at the opening of the structure. Then place the chosen slab in the opening of the obsidian.
Step #4 - Water
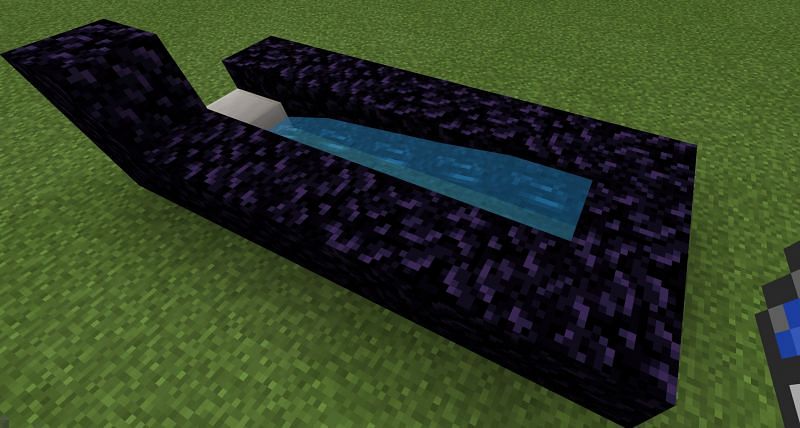
Place the water bucket inside the two rows of obsidian. The water source block should be placed at the obsidian end side, not the slab end side. In this tutorial, the obsidian side will be called the back, and the slab side will be called the front.
Step #5 - Levers
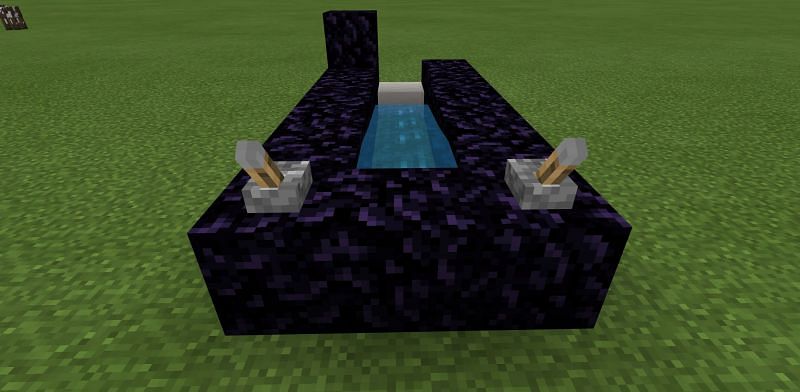
Players should place two levers on the back corners of the obsidian base. Make sure these levers are parallel to the water flow and obsidian rows and not perpendicular.
Step #6 - Redstone
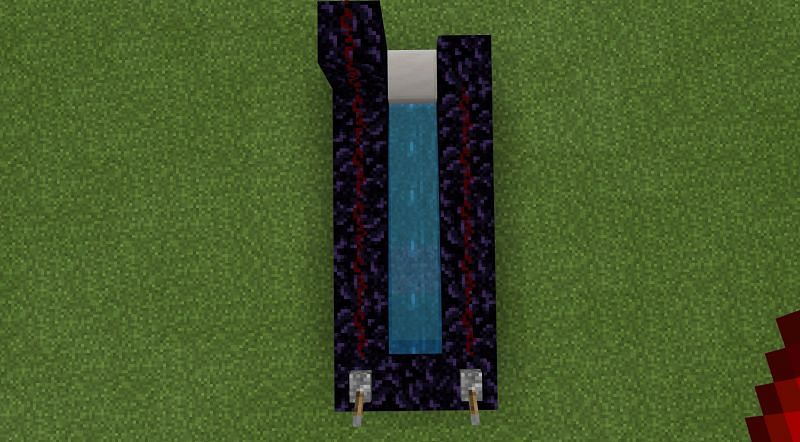
Players should place Redstone along the obsidian rows. Looking from the back, the obsidian row should go down the entire left row. On the right-side row, Redstone should stop at the very top obsidian block. This should take up to 11 blocks of Redstone.
Step #7 - Place TNT
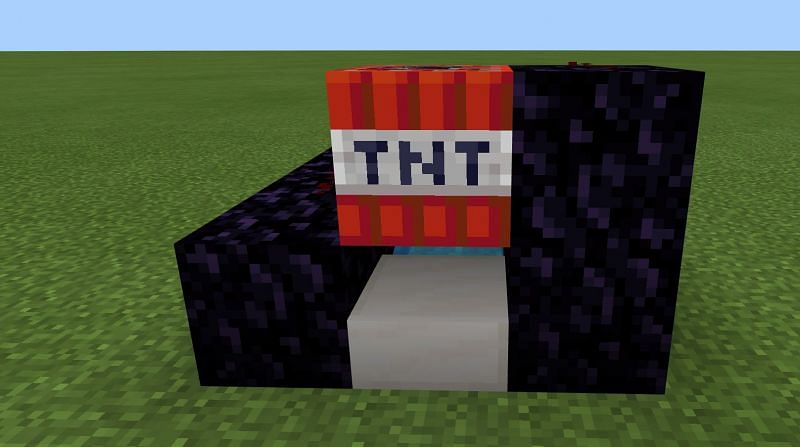
Players should place one TNT block on top of the slab. Players will notice a small space in between the TNT and the slab if this is done properly.
Players will also place four more TNT blocks in the flowing water. Be sure not to place TNT blocks on the water source block, or else the cannon will cease to work.
Step #8 - Click the levers
Players should click the right lever first and then quickly click the left one. The speed at which the player clicks the left lever will determine where the projectile TNT block will go.
If the player clicks the left lever without delay, the TNT block will shoot straight out. If the player delays the left lever, the TNT block will shoot upwards.
Enjoy the cannon
Now that players have their own personal TNT cannon, they can customize the design to fit into their build. Some players like to keep it as it is, and others like to add little decorations like wood around the cannon to make it blend in.
Whatever the case, players now know how to create a TNT cannon in Minecraft.
Also read: 5 Things players didn't know about TNT in Minecraft
