

'%20x='0'%20y='0'%20height='100%25'%20width='100%25'%20%0A%20%20%20%20%20%20%20%20%20%20xlink%3Ahref='data:image/jpg;base64,/9j/4AAQSkZJRgABAQAAAQABAAD//gA7Q1JFQVRPUjogZ2QtanBlZyB2MS4wICh1c2luZyBJSkcgSlBFRyB2ODApLCBxdWFsaXR5ID0gOTAK/9sAQwADAgIDAgIDAwMDBAMDBAUIBQUEBAUKBwcGCAwKDAwLCgsLDQ4SEA0OEQ4LCxAWEBETFBUVFQwPFxgWFBgSFBUU/9sAQwEDBAQFBAUJBQUJFA0LDRQUFBQUFBQUFBQUFBQUFBQUFBQUFBQUFBQUFBQUFBQUFBQUFBQUFBQUFBQUFBQUFBQU/8AAEQgA4AEqAwEiAAIRAQMRAf/EAB8AAAEFAQEBAQEBAAAAAAAAAAABAgMEBQYHCAkKC//EALUQAAIBAwMCBAMFBQQEAAABfQECAwAEEQUSITFBBhNRYQcicRQygZGhCCNCscEVUtHwJDNicoIJChYXGBkaJSYnKCkqNDU2Nzg5OkNERUZHSElKU1RVVldYWVpjZGVmZ2hpanN0dXZ3eHl6g4SFhoeIiYqSk5SVlpeYmZqio6Slpqeoqaqys7S1tre4ubrCw8TFxsfIycrS09TV1tfY2drh4uPk5ebn6Onq8fLz9PX29/j5+v/EAB8BAAMBAQEBAQEBAQEAAAAAAAABAgMEBQYHCAkKC//EALURAAIBAgQEAwQHBQQEAAECdwABAgMRBAUhMQYSQVEHYXETIjKBCBRCkaGxwQkjM1LwFWJy0QoWJDThJfEXGBkaJicoKSo1Njc4OTpDREVGR0hJSlNUVVZXWFlaY2RlZmdoaWpzdHV2d3h5eoKDhIWGh4iJipKTlJWWl5iZmqKjpKWmp6ipqrKztLW2t7i5usLDxMXGx8jJytLT1NXW19jZ2uLj5OXm5+jp6vLz9PX29/j5+v/aAAwDAQACEQMRAD8A+QqKKK/QzkCiiigAq5FpsptDcupWLsT3rofhb8OtQ+KPjKz0KwRyHzLcSqM+TCuNzn8wB7sB3rqf2hI9O8HayPDVmY4o9OjDXTbvljOOFJPTA5NZOolLk6jseU5qQRuYTLt/dhtu739KhXRda1Gza5tZbWx3KTDb3tu7O/HBch18vPptJA5POVEsaa9qi2tn9hOmW0TM7S3YicYIPAEchJYnb97gAHnoD88+JMqXP++Xub+fp/N8rn6AuAOKJOhbAztW+F20V7fG0/c3+3y/gN3ml8w+1R3MNxpd2ttebW8z/U3EalUlOMlcEnawwTjJyBkHhgrq9rCYuhjqMa+HlzRf9fefJZnlmMyfFzwOPpuFSG6f5p7NPdNaNbDt5o8w+35VBJJIZY7e3j8+7lz5cWcDAxlmPO1RkZPuAASQC680jWtKKyu0GrW5BDJaxC3kRuMHMku0r94HkHO3g844sVnGBwVeOHxFVRlL+tXsvmevlvCud5vg6mPwGFlUpQdm137Jbya68qdutiYTMPT8qcLpx6flTLTRNZuoJZ3+z2bZPlWk6bnIAHDujlVJbPIDYBB5ORUEE4nDgo0UsbbJYZBh4267T+YORkEEEEgg08Fm+CzCpOlhqilKO/8Amu680LN+F84yKhRxOZYeVOFX4W/vs1vGX92Vnvpoy2LyQen5Uv22X1H5VBTLWzvdaaQWEkVvBESrXU8RkVnBwURQy5xzls4BG3k7tvTjcdh8vouviZcsf62W7POynJ8fnuKWCy2k6lR3dlZaLdtuyS820r2W7LX26X1H5UfbpfUflWdJaa7A0ln9hW4u/mEd3G0aW5yTtcoZPMAAxuABOQcZ4zb1LT7zRIhcXEsVzaD/AFssURjMA7MwLNlfU8beCRjJXy48Q5XKpTpxrJue3/B7P1PopcDcSU6GIxNTBTjGj8V1b1cU/jS3bjdJa3sSm8kPp+VNNw59PyqOivoj4Qf5zZ7flSi4demPyqOimBYW/lXpt/75p41ScD+D/vkVUopAWTqMx/u/98imG7duu38qhooAeZmPYflSFyfSt7wB4JvfiN4tsPDumzW8F/fF1ga6YqjMqMwXIBOTtwOOpFYU8EltPJDKhjljYo6MMFSDgg0XV7ANLZpM0UUwHCNmjZwMqpwT6U2rukxXt5drY2ETXFxeYgWBE3tISeAB656Y5qvdWs1jdTW1zE9vcQuY5IpVKsjA4KkHkEEYxSAkWxkkg81FLKBniq1elfAuCy1/xVH4eviq/buLZ26CXsv/AAIcfXHrUXxw+Et98KPFCQTQsunXyma0kIIHGN6fVSR+DL61n7Rc/I9x2POqKKK1EFFFFABRRRQAUUV9G/sNfs+f8Ly+LkNzqdt53hTw9svdR3rlJ3z+5tz672BJH91HHBIrKpUjSg5y2Q0r6HvnwZ8F6d+yR+zFffEbxPaK3ibXYkmhs5flcKw/0eDnkEg+Y/cZwR8or4V8d+N9K8V+LRq95ocOjwktcM8E9xc/aLosWzLvZuRhfLVQBuLZy3lAfSH/AAUI+Pf/AAs74n/8IvpVxv8AD/hxmiyh+Wa6PEj/AIfdH418oAZIHr6141TAPH4WcKsnF1OqeqXb/PyPbyjM5ZNmFHHwpxqOm7qM1eLfmtNt0+jSZc8Pazf6vqusW9wRbxCKGa3TALwB/MXaxHDH93u74LEZYAGvT/HdppaaN8Mr/TdC0zQZdR8KmS9XTIDGLqaPUryATSsxZpJGSJMuzE9hgAAet/Cb9n74a/Gr45eH/hxpWt3trHpPgWW/1vxJ4ZmhL6lqC3lufLzPDIhjiF7MgZUDNhcsQoFfQ1v/AMEp/htaSzSQeOPHcMk7b5Xjk0pTI3qxFhyfrX5pjMknSqYijhlFQkopXburW1ej333P3XAeJGCqvLMZm0qssRh5VpTcYxcZe05rJXqRtyppL3dErLTf8v4PESXi6pBryh7CS6mjgeJDiPy5Cip8vzbyYwysOS7YG0hA3XeHPGHh+00S0g1TwFY319GpV7p9Ruo3lAJ2s6pJsDlcbtmF3btoC4FcH4cczaFYzucy3EQuZW/vSSfO7e2WYnA454rSr9DyjJqWXJzpya5lG8b+7dLVr1PyniXizFcSqEMVFP2cp8s2vfcZO6jJ3taPRLa/zbItYSKzu1s4Baa/eFvOCAtHa9drKXLExLk+WpJLc7ju81h6p+z5oGqfE/xn4UtrS0guJrqwe/1Ddpi6iLezWEPcSw2zK5kmAISIBWbfIuPUeaWV29heQXMQUyQyLIodQy5ByMg9Rx0r7T/ZX/4J8+A/2hP2evDXi3xD4j8T2c95PfwDTbA6e1pbx299PbRLGJ7SV+I4UyWdiTk5r5jMsgjhq1PE0pc0nNyk5PV32S0eiPr8H4gSrZXiMpxseSk6MadONOCcU07ynJOcfelrdp79N7/I/wARtUktW8TXelaL/wAIa9zrM4g0Oa0MLaOs14QLcwNjY0KybdhAAK4AC4FYqa/YS6pp15LpSXepQuEu7CZ5FieDPzb5EKkryTGwIO/qMCVa+rP22f2KvCX7NHwu8K6r4c8R+JNTW+8RQ6ZJY6s1l9nWP7NdXIZRBaxMGEltGfvYxuBBzXyZV5Nw/GUni6srTVRyTi900vdei/q/crPvEF4nBxyvAw5sO8PClKNSK0nBv95BKUrO1rNu90m0+VG94t8TaDqWlpb2Hg630gNKv2m7tL26luFhGS3lq0hGSdoJwW2l9vz7SMWLxEz6/o1tpixR6K7PagBAFlxEzq0ePuqvl7QejBiQMBWMda/gfwzB4y+JPgXQ7i5uLKLVPEem6a91aFPOhjubqO3kZN6su7y5nxuVgCQcHFe3neSU8wjKvKTcowkopv3U2vi9f+B2PnOE+M8Rw044elFKnKrTnUlFfvHCLTdNNtLla6abtXtJnpugaC9z8DfHGpajoFqLSMW9xour3Gmwb3kGr2sFwyXYJl85SGiSE7VMbynkHDeTar4iu9N8VmEr5mmw2kcksUSZkzI7jeO7bRF90YJDseSFU/pef+CUXw0M/nHxx47Mm/zN3m6X9/GN3/Hh97HGeuK+BP2i/hhYfBz9oTx14Q07UdQ1az0iWytoLzVGiNw0b2UFztcxRxocPcy4IQHBAOcZr5HC5H9er0qWJS5Iwaeut7aNaLY+xh4g08roY2rlcpqvWrqqrxShyp3cZfvJP3tnb7+3LeE9f8P6Sb6KTwxa65pjOrWk011PCU4IdY/LcAw8KUyM5L4JTy8dB/wmfhPP/JPrH/wZ3f8A8criaK/T8LhVhqEKPM5cqtdt3Z+LZjjP7QxlXF+zjDnk5csVaKu72S7I7YeMvCf/AET6xP8A3E7v/wCOU9fGvhEdfh3Yn/uKXn/xyuGorq5F5/ezzzvk8deDV6/DXT2+urXv/wAcqQePfBQ/5phpx/7i99/8drz2ij2a8/vYXPRP+FgeCc/8kt03/wAG99/8do/4WB4J/wCiXab/AODe+/8Ajted0UvZrz+9/wCYXPVfDnxe8LeFfEOma1p3w00+3v8ATrmO7glXV70lXRgynBkIPI7gj1Br0H9pabwR4J+Kt49v8PtP1TTNct4Ndsb46leRefDcoJA21ZAo+YsMDjivmmuh8U/EDXfGmmeH7DWb0XlvoNmNP0/MSK0VuGLCMsoBYAk43E4HFZul76kn66sdzof+E98F/wDRMdO/8G99/wDHaafHngw/80y08f8AcWvf/jtef0Vr7Nef3sVz0S1+InhKyuYri3+HFjFcQuJI5F1a9yrA5BH7zsa2PG/xm8J+OPEt1rt38MdPW+vAr3TDVboCWbGGkARlC7sA4x1ycnNeR16r+ztrXhWHxZqPh7xtFZR+HPElhLpr6pdwK7aXORugukYglNrgKSMfK7E9KznCMVz2bt5sChY/Ejwppt7Bd2vw5sre6gkWWKVNXvQyMDkEfvOxFfeV/wCEtJ/bf/Zc/tLSLeG28U2waSKEOM29/GOYieMJIpxzxh1PVa/M7ULT7Bf3Nt50Vx5MjR+dA26OTBxuU9weoNfTn/BP/wCPn/Cpfi0mg6pceX4c8SlbWYu3yQXGf3MvoOSVJ9Gz2rlxVFuHtKfxR1Ki+jPmC5tprO4lt7iJ4J4nMckUilWRgcFSDyCDxio6+zP+CkP7P3/CC+PoviFo9ts0TxHKVvhGvywX+Mkn081QW/3lkJ6ivjOuujVjXpqpHqS1Z2CiiitxBRRRQBY07TrnV9QtbGyge6vLqVYIIIhl5HYgKoHckkCv018VTWX7Bv7IUGi2csR8caypWSVCCz3kqjzXHqsS4RT3Cg9Sa8b/AOCbvwHj17xRefFDXoAuj6CWi03zhhHutuXl54IjQ8H+8wI5SvH/ANsv47yfHH4v309rMzaBpRNlp6Z+Uqp+aTHqx5/KvKq/7TXVFfDHV+vRGi0VzwmeaS5mkmldpJZGLu7HJYk5JNd/4e+E39pfCPxD4/1PVP7K0+wuYrCwg8jzG1G6fkxqdw2hUBYtz2GOa89r12w+J3hXXPhroHhTxhH4kmt9GlmktrbQpbS2twZCMu2+JneQ45Zj0wABjn0KjkkuUhFL4A/tK+OP2adT8SXfg2Hw/c/2/DaRXaa7Yz3Gz7O05QxmK4ixn7S+c56LjHOdf4Y/tp/HD4X+I9W1lfHEnjGXV0JvLHxekt7ZJMZC4ltoo5ovsuNzr5cRWPaVBQlEK432r4M/9Avx3/4MrL/4xR9q+DP/AEC/Hf8A4MrL/wCMVxTw1CcnKVN3f9dyrtdTz7XtcvvFPiTXdf1M251LWtTvNVuhaRNHCstxO8zqiszEKGkIALE4AyTVKu18RH4e6zYzWXhCw8VW2pqyCS+1S/tZLe2XgkBEgBeQr0XIC7g7ZAVJOXfwDJLeWkegvfvqM7/Z4rNUudSe5ZiMLHAHLtJkcbOcFuD28PE8R4DAYiOCldvZ2V7dk7a38ld9z9GyngDO85yqpnFCMY0o6rnkocyW7i5WjaPVylFb2baZ1Oi/CjUdY+FHiLx/9stLXSNHvLew8mYt511PL0WIBdp2rljkjgd66++/bI+L918GfDPwysdfsfC+haHaWVgupeGbe4stVuLe1iVI42uftD7A2xGcxKjNtK5Csynzm1sdUPhq40G/13WWtBevcPp32ie3tra6QGIsLR2KpIu0g71JzuB4O0b2jXPwws7O2svEeleL11xIgZpNP1G1FtcY4MkIeAsqk4yhJKFgCzDa7Y4PO8Bm+Ilh2nzRb5U9LrrZX8tU9fLcnPeBM54dy+jmWJUZUqiV3B83K3spNaa30lFuL2vqr9F4t/a7+K3j74GL8KvE2q6Tr2iZtVk1q+sZm1idLe6juIhJOJxG7/ukQyGLcwBLZclj5BXa+Ij8PdZsZrLwhYeKrbU1ZBJfapf2slvbLwSAiQAvIV6LkBdwdsgKknOW3w0v9W1SC08KWutalqzRu/2Cys7zWHkiBXc/kRlnG0lRvHA3EHqMVVz3LstxSwUYvme9le3ru/kl6iy3gTOc1ympnUOSFGOzqSUObWzcXK0bJ9ZSim9E29DNro/hp8RNc+EPxG8PeN/DY099a0SaaW3j1S3ee3fzbaa3YOqSRt92diMMOQOo4rKtPBgjS8j1Ca/TVEnlhnV0ltHtZYz5bRm3cnYyMhDI4J3BsjsOv0a5+GFnZ21l4j0rxeuuJEDNJp+o2otrgjgyQh4CyqTjKEkoWALMNrtrg+IMDmlaeDimpLo9L23t1+Ts/wARZ5wJnHD+X0M0xCjKlUSd4PmUb7czWmt9JRbi++qv1Wuftp/HDXPirZePT44k067snhEHh3Tkli0AwopDxS2RmbzvM3yFpHcyAldjp5abeR+Nnxs8VftCeP08X+Lk0eHUotMg0qOLRLSW3hEUUs8oYiSaUli1w4zkDAHHUnV+1fBn/oF+O/8AwZWX/wAYo+1fBn/oF+O//BlZf/GK9yGHo05KcKbTX9dz89bb6nmNFdv4qn+G0miyL4asfFUGr712Pqt7bSwbP4srHErZ6Y5rktLNkupWx1JLiSwEi+etqyrKUzzsLAgHHTIIrvTur2JKtFenfavgz/0C/Hf/AIMrL/4xR9q+DP8A0C/Hf/gysv8A4xUc7/lYWPMaK9O+1fBn/oF+O/8AwZWX/wAYrn/Gc3gKWwtx4TtPEdteiU+cdZureaMx442iONCGz6kjFNTu7WYHI0V1PgubwTFHdDxbaa/cuSPs50W6ghAHfeJI3z2xjFdL9q+DP/QL8d/+DKy/+MUOdnazA8xrvfgx8J5fjN4nvtAs9Ti07Uo9Nub6zjmiLi7khTeYBg/KSoYg8/d6Vo/avgz/ANAvx3/4MrL/AOMV1vwm+I/wn+F/xJ8O+KdOsPG0V1pt4ku6e/tHj2H5XDKsIJBRmBAIJB6ispzlyvkTuOx4KylGKsCrA4IPUUlesftUfD+L4a/HjxXpNqpGmy3P26yYkENBMPMUgjjHzED6VieHrn4Xro9uNd07xdJqoB899Ov7VICc8bVeEsOPUmtFUUoKaV7iscFRXp32r4M/9Avx3/4MrL/4xR9q+DP/AEC/Hf8A4MrL/wCMUc7/AJWFip4++Ey+FfAXg7xjpmpnWNE8QQyK7mHy2s7uM4kt3wzAkAqwPGQenFeeo7ROroSrqcgjqDXtNx8S/AMXw31DwZYr41XR7i4F9Ha3dxYTRpdKpVZM/Zw6jBwQrLkV4rSpuTT5gZ+qvwW8Y6X+2V+yre+F/EUwfWLa3Gm6hIcNJHKozb3QHHPyhvcqwPBr8wvGPhPUvAninVPD+rw/Z9S064a3nQHI3KeqnupGCD3BBr1L9kz43S/BP4q2l3cTMuhamBZakmePLY/LJ9VOD9MjvXsv7fXw4g1C9tPHOmorTBFt74xnIlj/AOWUvHXGdpPoV7LXn0l9Vrun9mWq9f6/Qt+8rnxhRRRXrGYV0Pw98Dan8S/GukeGdIj8y/1K4WFDjIjXqzt/sqoLH2Brnq+5f2E/ANj4E8Par8Sdf2QSS27i2aX/AJY2q8s49C5XH0Uf3q5sRV9jTclv0KSuz0f9qz4gaZ+zH+zro/wy8JuLe/vrX7HGVIEiwdZpm/2nYsc+rGvzTr0X4/fFq8+NHxO1bxFcOwtXcxWcJJxFAvCgD9fxrg9M0261nULaxsbeS7vLmQRQwRLuZ2JwAB61GFo+xp+9u9WEndnt/wCzlYaL4M8PeLfif4gSyuxolsbTRtNvNj/atQlBVG8tvvLGMuTjtXz9q3iGJbi7ubn7RIVLS3EsNtJKkZxuO5kUhTg5wccEHoRW14h8Ja1oPiy98L6jbtpWrWOPt6yFWe1BJAAAyC5KsAOQuCW6BWdp+t6XY2+q2lkjKmkIWlUAkMCGYsG53HcsgYk53K2eeT8dnPESy2q6WFj7Spo5dorotOrb/E/YODvD+XEVD67mFf6vQlzKm9HKpKKblyp2vGKjJt+TS2bWLcXcdq0KuHZ5n8uNI42dmbaWwAoJ6KT+FPhnSfeF3BkO10dSrIcA4KnBHBB57EHvXpHjb4OD4MeJ9P0+SxVLu7tXM93Fo8dnb7xFaytHBMszmYL9pAYMqEbUbGJFC8LcG18U3F7Lpkgj1PT5DbMZQVWYAnKsOpTdvUPjhlfGRuDcr4snRxvssTR5aaSu07tX2btpby39dj0cJ4b0M1yNY/LMZ7SvKUlCDjyKagryUb681k3fbZO25lIbk6INCMaJZbWjmuQfnuI26qR2dstvfvnK4L/u/SfgP4wtfCOqeENf1qO8u7T+z1t57q0l/wBJtDPGkUt0vyOXZYXnUqBuIkJU7gK87tblbqLeFZCGaN0bGUdWKspxkZDAjgkccEiv06/ZN+A/wf8ADn7IPhHxh8WPA3w/t5buO41S58Q+KdO09t9td30sllJLcyqcb4ZrcKHbI3KhAI2i8yybDU1Sr4JqL5nK9ubm5vnt2PBwvG2MVHE4HOYSqxnSjRSUvZuCg9NFBq997q72emh+dXxgvbXXJfFt5YmddK1XxBPLB5m6OR7WfUSRu4VhujfkEAgNgjrXNXl1e6pb29ndKjfZ5Vm+3jAd9v3QFH3WPKuRwVJAHzkJ+hv/AAUG+A/w70n9njwz45+Gfgbwfpdlba5ZXt1rvhnTrO38zT7i3ngiZZYlBliee4tMBCwO5XxtUsPz4rfJ8jwzi61f3pqo5p7WbS03el/yM8447x2LhHD4FOjS9hChKLkp80Yt+8/dilJp2ulda2epUQ3J0QaEY0Sy2tHNcg/PcRt1Ujs7Zbe/fOVwX/d+hfBrxK+i2dndXd3pkcOq+F59Lu5tdtZ7q3kSeOJmVliBbcxjwGYFQT8wwa4iv00/ZN+A/wAH/Dn7IPhHxh8WPA3w/t5buO41S58Q+KdO09t9td30sllJLcyqcb4ZrcKHbI3KhAI2iMyyXD4aVKrhfdalKT63v89kZUONsXXwmIweZp1oVKUKUbSUORQacWlyyTd1rom++1vzl+KtvoIi8TQeFreax8Iz63JHpVs4kiddPkvsRoQ2HUGJgMN8204bnNc/eXV7qlvb2d0qN9nlWb7eMB32/dAUfdY8q5HBUkAfOQn6G/8ABQb4D/DvSf2ePDPjn4Z+BvB+l2Vtrlle3Wu+GdOs7fzNPuLeeCJlliUGWJ57i0wELA7lfG1Sw/PSGGbVb82Ns/ksiLJPPgExIxIG0HqzFWA7DBJzwrc2Cy7A4PDzx2OafJNzTtazaWm7vrsu57FTijOOI8TRyjJISgqlCGHcHJT51DmfM24xSfK3d291Xd0npVvNYtrETNILhkgBaWSG2klSLAydzKpCnGDgnoQehFT3F3HatCrh2eZ/LjSONnZm2lsAKCeik/hW7pOpWWzUdL0iPM2mjbscnY7MCc7+d2XDqxPO5Xzzyegu/h5ovhHS/COu6NPHPH4jtb+RoZfD8Wl3Nqtvcrbgkx3dwJY5JFnAOU/1GcfMMcy4wxEoVp+wS5bNXdnZ7Nrr02sfSVfC7A0cTgMM8e5Ou5Rk4wbjzQ+OMZLRWakve7Xa3S4WGdJ94XcGQ7XR1KshwDgqcEcEHnsQe9SVauDa+Kbi9l0yQR6np8htmMoKrMATlWHUpu3qHxwyvjI3Bs+1uVuot4VkIZo3RsZR1YqynGRkMCOCRxwSK+syTOoZrTcZrlqxtzR9dmvJ/h9zf5zxfwjV4YxCnSmquGqN8lRbOzs4u2ilF6dnuuqU1FFFfTH56FFFFABRRRQAUUUUAetfG34s6N8V/C/w7eO2vYfFWh6Muj6tPPEghuViOIHRw5Zjs+9uVeemeteS0UVEIKC5UMKKKKsRoeH9am8Oa5YapbhWns50nVXUMrFTnBB4IPSvWP2n9I8O3fijTPGnhOWxTRvFVml++n2ciZsLrpPCyL9z58sAQOGHpXi9a/hbwhrXjfVRpmgabcatqBRpBa2qb5GVRliF6nA9KylFcyne1hmR0r6z+GvxOHxJ+D0vh/V3+032lQ/ZnWQ5M1uRhD+A+X8BXybJG0TsjqVdTgqRgg1u+CPFM3hHX4b2MkxMDHOg/jjPUf1/Cpq01Uj5oE7FHX9KbRdWubQkssbHYx/iXsaz67T4iLHd3ouYiHVhuVh3B5ri61i7oDb8GaAPEniK0s5Mi3LhpmHZB1H1PT8a+iv2g/i3/Y3w/sfBOkyCE3SL9pERwEhUAKg9M46egrwbwXqcehO90xAKjcT346CsLXdZuPEGq3F9csWklbPPYdhWMqfPNN7ILlCvbP2YPEPhb4d65rPjvxDe251DQbJ5NE0uTLPdXrDbGcY+6hO4k+leN6dp1zq9/b2VlA9zd3DiOKGMZZ2JwABWn4z8F6v8P/ENzoevWv2HVbbAnti6u0ZIBwdpIB56Vc0prkb3BaamV4hvbnxNrN1q15dT/wBpXMskst1HIVkYyHLgsOcN/MAjDKCNn4T/AAq8T/FLxlqfhnwd4am8R3txo4mNjZ3NtbeVbQyeXIxaeWNMZuoQApJ5PGBWBX0n+wR8Yfhr8Dfij4q8UfEHXL/RLoaNFpmki20y6vIbhJ5zJdb/ACIJCGQ2lptyV4kfhuNvi5vgqOIws4yjrLl1W+jutfI+gyfO8bk2LpYrDSu6fNyqWsVzxcZe69NVv6Lsb/jT9nz9pv4hjTF1r4TOiWDyz5stU0tGubiSG2heeQvqL/MY7OIbVCqCXOPmAX430uFb+xS9jklt2uZJ7mOSF9kgimkaTYSOmVYA46EAg5VWH6h/DH/gq54E8UeI9WtfGnhjV/h/ogQzaRqrpLqbXaCQrsuILaFmtpihRwo8xPvgyAqN/wCa9/aaPp+rarZeHLi6vPDdpf3NrpN1fRtHPcWMczpbSyKyIQ7xLGxyi8sflXoPKyzLqccRUnWi25Rs+ba2nS1jtxPEeMqYOjgqNqcKUnOPJdNSe75rt/joV4okgiSONFjjQBVRRgKB0AHYVe1HXda1rQdI0LVPEWvatoOkGJtO0jUtYurqzszHGY4jFBJI0aFEYquFG0HAxVSivsJU4Ss5JO2x8lctxa7rUHhJPCkfiLXo/CaSCVfDy6xdDTVYTeeMWvmeUB5v7zG3G7nrVSop5xAEARpZZG2RQxjLyN12j8icnAABJIAJqxceFL5bI3Tau0F2uJGgxGLUYOShYpvwQMF89Tu2j7teFj83wGTyjCs7OXRL8X5f0j7LIeEc54mp1auXUuaNNattJX35U3o5W6dOrV1dlW9R13Wta0HSNC1TxFr2raDpBibTtI1LWLq6s7MxxmOIxQSSNGhRGKrhRtBwMVS0rSLzV7lzcX0FpHCuGh0+YTOzNggsXjG0AA4GDu3ZyMcl1BNpV4LW6O9ZCfs9zjAlHXafRwAcjowBYfxKuNHPctxuL+qRlea2urJ+Sv1OnG8E55l+VRzmvR/ct2dmm1ra7SvaLel/S9rq92LXdag8JJ4Uj8Ra9H4TSQSr4eXWLoaarCbzxi18zygPN/eY243c9azbi1E7K6ySwSqColgco+0/eXI7ED8CARhlBE9Fe+8PRlB03Bcr3VlZ+p8TSrVaFSNWlJxlHVNOzT8mtjpPg58M/FfxG8eXug+CPDc3iHUm0lbkWVncWtt5MEEux3JuJY0wGuoQACTyeMCvdb/9k79ovWl0gah8KLonStJtdFtVtNU0qNFt4N5UkNqDku7ySSOwIDPIxCrnFQ/sEfGH4a/A34o+KvFHxB1y/wBEuho0WmaSLbTLq8huEnnMl1v8iCQhkNpabcleJH4bjb9NfDH/AIKueBPFHiPVrXxp4Y1f4f6IEM2kaq6S6m12gkK7LiC2hZraYoUcKPMT74MgKjf8DmeUUsTia07StO17eSVj9ByrjfNMpo4WlQ5P9n5/Ztxu4+0bcutne9rtaLRH5eaXCt/YpexyS27XMk9zHJC+yQRTSNJsJHTKsAcdCAQcqrDTiiSCJI40WONAFVFGAoHQAdhVi/tNH0/VtVsvDlxdXnhu0v7m10m6vo2jnuLGOZ0tpZFZEId4ljY5ReWPyr0EVfc4WhSpU4uEbPlSv1slpf0PhsVjK+Lk3Vk2uaUrdE5O8mlsr2V/RdgooortOEKKKKACiiigAooooAKKKKACiiigArpPhv45v/ht460XxNpshju9NuUnXH8QB5U+xGRXN0UmlJWYHqf7SX/CJX3xNvNb8FX8F1omtIuoC3hyDZyyDMsLA9Nr5x7Yryyuh8G+ANe+IFxe2/h/T31K5s7d7qWGJhv8tRlmAJy2B2GTXPMpViCMEcEVEEorkvewzTTUGudPEDnLRfdJ9PSs4qM0isVORS5qxD2nPleWDweTUVFFMD3b9lQ+HPCeu6z8QfEl7YKnhi0a407Tbi4RZby8IxEqRk7mAJBJAOOa8c8T+Ir3xd4i1HWtSma4vr+d7iaRjkszEk/zrMorJQtNz6sYUUUVqIKKKKACiiigCKxvjo19dztZtfXEyhLWRTgRjAzGx/gUkFy4BzjBBKxhtf4f39z9uZr7UE/0TXbZ/tdzHvit03QTMzJ1aJC7NsJPyDbms2vrX/gnn+zN4N+PF98SL7xx4f1DU9L0/wDs2GwubbUr2xg+0sLk3KbreWNZJBGLMsGyVVo+gYZ+DzrI6MubF0/4kpRd229ui7f10P1bIeOsVgKMMvxV3ho06tNRglFt1PtS6Sa8+3dtvjf2mvE+meLPivb3elala6jDFpUkTi21BNQaAnVdRkVZLhOHLJIkqr/AkiLj+JvmvRNbuLnwrBBqlvJrBvYVnjl3bT5j4cq7D/VhWO5XUfKFAA3Ku/8AVn42f8E/PhFoPwV8fX/g7wXrTeKrTw/qFxo8dl4h1e4la9W3kaAJCblhIxkC4TadxwMHOK/LK18n7ND9m8v7PsHl+VjZtxxtxxjHTFcGByKlj69eriurg1ZtNWv18/61szqXHuIyvLcFl+U3XsY1oz51FxqKq09Yar3dbXv56NplrHJFbQpNL58yoFeXaF3sBy2B0yecVLTJZUgieSR1jjQFmdjgKB1JPYVXg1OKe5W38u6hmZGkVbm1lh3KCASC6jOCy9PWv0V1KcJRpykk3sm9X6dz8ljRqzhKpGLcY2u7aK+130v0LdFVW1KBWuAfN2252zSiFzHGdob5nxtACsCSTwDzVqnCrTqNxhJNrR2ez8+w6lCrRjGdSDSkrptNXXdd16BRRRWpgFFFFABRRRQAUUUUAFFFFABRRRQAUUUUAFFFFAHZfB74h3Xws+I2ieJLVsfZJx5ydpIjw6n1BFa/7QWi+H9L+Jeo3PhXULW/8P6li+tfssqv5IkG4xNj7rKSRj2FebUqoz52qTjrgVnyLn5xiUUUVoIK9L+B9hY2muXPibVo0l03RIjc+XIMrLL/AAL+eK80AJ6DNbFvqWrPor6TbpKbKRxI8ccWS7DpkgZNRNcysMh8S69ceKNfv9VuyDcXczStgYAyc4HtWbWinhvVpBldLvWHtbuf6U//AIRbWv8AoEX/AP4DP/hTTS0QGXRWp/wiutf9Ae//APAZ/wDCj/hFda/6A9//AOAz/wCFO6EZdW9I0yfWtVs9Ptl33F3MkEajuzMAP1NWf+EV1r/oD3//AIDP/hXvX7Efwpu/Enx+0a81bTrm30nREfVLiS4gZUHljKg5Hc/yrKpUVODn2Glc4X9pH4P6f8C/iIvhKz1aXV7q3sYJr6WRFQRTyLuMagdgCvJ9a8rr0L4vajr3xN+KHijxTJpV+w1TUJbiP/RpOIy2Ix07IFH4VyP/AAiutf8AQHv/APwGf/Cim2oLneoMy67XwN8cviV8L/Cmu+GvBvjrU/DGia1NJc3dvp9va+Z5rwRwNJHO8LTRNsijAZHUqV3Lg81z3/CK61/0B7//AMBn/wAKP+EV1r/oD3//AIDP/hRUhTqrlmroE2tjc+EHxn+IP7P9jqNh8OfGN/4U0zUJI5rnT4YLa6t2lRdnmqlzFKEdl2hmTaXCJuztGOIsLNNOsbe1jLNHBGsSlupCjAz78Vt/8IrrX/QHv/8AwGf/AAo/4RXWv+gPf/8AgM/+FKFKlTblBJNhdsybJYTpo8QX4L2ESCe0tUwWmPBRyCeWY42J2JBPzYCd/wCDPBVl8YLwWJeNrBNKudd3tYC8kkjhjUhYoWZMyN5gxkjC7zg4weNTwPqyTBxpOpFFZpEhNu/lxu33nVccMc8/VsYLvu9c+Bn7O/xh8R+DvD3ibwz8LJfFOmQQT6dFNdalZ28TyRF7WZ0BvYZ42SSKQKSBxnKkNX5XmuU4lYynjMXL2l5Pa9oxXw6b+v67n9E5PxjgaOQ4rKMrhHDWpRac2nKpVbXO7u0dVor7JJrl2XD+NNJi+EOo+JdCvI4j/wAI5qd1pbjTbfYk7x3DRK0cYJx5h2kLngvyeCa4/ULKLRo4bqzdJdFuCgj8tgRAXICbMdY2LAAD7pIx8h+T1v8AaC+Cfxh8Owy+IPH/AIHvdIuvFHiMzNeC7sZ45Lx5ZL141it7maRV2QzbcggBFBavME8D6skwcaTqRRWaRITbv5cbt951XHDHPP1bGC77ryDKcVTryxmHn7Nc7TUtpQ0f3+v6a1xfxhluPy2jlOMhHESWHg4zg0nTr6qSvazg0ldJWdrLdONSitT/AIRXWv8AoD3/AP4DP/hWbe2Oo216tglg637IJfLut0KpHkgM52kgEggYBJIOBhWI/T6+Io4am61aSjFbtn4Bg8FicwxEMLhKbnUm7JJXb/rr2WrG0VUknvdPmkh1DTp0lBBRrGGa6jdcDncsfBzkYIB4z0INTSxajYWEd5qFnFbQlQZvKn80wZGSX+UDaOhYEgdfu5I83+2sufs7V4+/tr/VvnY97/VTPbV28HP9zrP3Xov12b0vprsS0Vqf8IrrX/QHv/8AwGf/AAo/4RXWv+gPf/8AgM/+Fe1dHyhl0Vqf8IrrX/QHv/8AwGf/AAo/4RXWv+gPf/8AgM/+FF0Bl0Vqf8IrrX/QHv8A/wABn/wo/wCEV1r/AKA9/wD+Az/4UXQGXQOD61qf8IrrX/QHv/8AwGf/AAo/4RXWv+gPf/8AgM/+FF0B61+0Z8F9E+HWi+AfE3hWa7uPDvinSI71TdMGaGfA3x5wOhP6V4jX19ouh6h8WP2FNS0iawu213wDqxubaOSJt5tZfmIUYzwWcfgK+VB4W1ojI0i/I/69n/wrmoTbTjJ6p2/y/ApmZRWp/wAIrrX/AEB7/wD8Bn/wo/4RXWv+gPf/APgM/wDhXTdEmXXSfD3xS3hLxPbXhAe3bMU8bDIZG4IrNbwxrK9dJvh9bZ/8Khl0XUIRmSwuYx/tQsP6UnaSsM0fG2kxaR4iuo7c7rSRvNgI/uHkVhVcvr27u0hS53HyV2qWXBA9Kp01otREkBcNlG245zXS6D8T/E3hhgdM1R7Ur0Kop/mK5jO1cetNpNJ7geyWH7YPxd0tAlt4xuYlHQCCL/4itIftxfG1Rx46uv8AwHh/+IrwmisvYUn9hfcO7Pdv+G5Pjd/0PV1/4Dw//EUf8NyfG7/oerr/AMB4f/iK8JopfV6P8i+5Bdnu3/Dcnxu/6Hq6/wDAeH/4ivo3wJ+0j8StF/ZE8a/EbxH4mub7Vr28j0vQJJIYh5MhIDuBtAOBuPIPSvz/AIIXuZo4oxukkYKozjJJwK+rf2wtTsvBHwp+E3ws0y7t7n+zrA6rqJtpQ48+QbVDYOM43/mK5a1Ck5QhGK1fbotSk3ucKP24/jcAB/wnV0frbw//ABFH/Dcnxu/6Hq6/8B4f/iK8Jorq+r0f5F9yJuz3b/huT43f9D1df+A8P/xFH/Dcnxu/6Hq6/wDAeH/4ivCaKPq9H+Rfcguz3b/huT43f9D1df8AgPD/APEUf8NyfG7/AKHq6/8AAeH/AOIrwmij6vR/kX3ILs92/wCG5Pjd/wBD1df+A8P/AMRX0X4A/wCChvgD4M/s2eFrTSf7Y+IXxKvG+36tpFzaXGnRxahezSXmoPJdyWwiWKOaadVEYkY/u1G4FpB+f1FctfA0q1raW7dSlJo+8fjx+334K+KvwK8Na54Z1PW/B3xh0TVLbU7LQG02eZbe5bzLG7R7ryDBJELW7upEcOhOIyQp3R14J/w3J8bv+h6uv/AeH/4ivCaKdDA0qKaa5vVIHJs9uv8A9un45QWrPD44umcFRn7LE+1SQGbaEy20ZbaOTjA5NeU+L/iTf634jGqXWoy+J9W1S9hk1TVbubzHl83ZGjbxxuwYtqKNqxoqgIvliseszXAtjot1cQoqNa/6aigYUyRt5oyB2LLz3OTznmvDzjI6eYJScrRipe6rJOVtG35f8NbW/wB/wpxZPhlz9hSj7SpKH7x6yjBO8oxW3vafrfS3034E+HfhDxB8MbHxHeaTcTaxZW/iI3oudVuDb6hNaRWT2+IkaMRon2t/lXltnzs44HlHxhaD4a/F/wAR+F9MhkuNF07XdVtUd5HmmjtYLgxooJJZ2XegJJLERtwzEV9uWP8AwS/8ZaVPDNp3x5fTXheWSEWfh+7iSJ5UVJWRF1MKpkRVVyB84UBsgCvkP9qT4CX/AOz38ZLXw1qfihPF1zJoq6x/aS2Mlq7tdXU6yiQSTzNI260D7y4JMjZB618hQyqOOdHC1aSS+01ZfZa0t52+4+spcYVsnxuOzHBY6U3P+HGXO960ZWlzaJciknZ3vJpPqWPC/wC1z8U/ANhYeG/C3ju7PhuytVFrBiOZLJODHCjspJj2NlEz+7UKBhDGq7v/AA3J8bv+h6uv/AeH/wCIrwaOJIVKxoqKSWIUYGSck/Ukk/jSXFwltEZJCQowOASSScAADkkkgADkkgCv0TBYCGCw0aVWXO4rWTS/rTz+8/Lc3x8M2zGri8PQVJVHdQjeyv29XrpZXeiSsj3a5/bt+M9lA01x8QJoIVxuklhgVRk4GSU9aZZ/t5fGTUYjJa/EKW5jB2l4YoHAPpkJ15FeNafawaXcWd7rMiW93cy+RZwOcrC7K2BkcGRgCM9BnapOSX6+4+DLa3pnh7xJd6houm6f4jlu7a1lXWLrzzNbCIGOaC2RsSuJogiklyCNwQAV8ouIsNVxUqWHw3PTX2lZXd7aXsred/kfoeK8PqmW5VTxuZ42FCtN/wAKSk2lbm95wU5KVrPl5LK6vJPQ7W2/b1+Md6cW/wARJJzjdiKO3bj14TpyKsf8NyfG7/oerr/wHh/+IryzxboNvoGs3Xg/WGtLPVdO1G60qNNNl8xFntXkjdoH2jKARtyVAwdrKMla5giezujZ3gVblQWV0GEmTpvTP1GV6qSOoKs3Zk+c4bMqksNWpKnVV7LTVLTR91Z3X3dbcPFHBFfIcLSzLB11iMNNRvOKtyuSUkpRu2lJSTi3bdJpNq/vX/Dcnxu/6Hq6/wDAeH/4ij/huT43f9D1df8AgPD/APEV4TRX1/1ej/IvuR+X3Z90fscftdfEHx98Y4/CnjDxVLf2mt2M9tZvLDGpgugpeN1KqOflYYOeoryjxt+158dvBXi/WdBuvHF4k+n3cluwe3hz8rEA/c9MV4X4D8WXXgPxroXiOzZludLvYrtNnU7HDEfiAR+Nexftr6h4U8TfGJ/FHhDVrXU9P1y1ju5ltmyYZ8YdX44PSub2FONf4FZrt1RV3Yrf8NyfG7/oerr/AMB4f/iKP+G4/jd/0PV1/wCA8P8A8RXhNFdP1ej/ACL7kTdnt9x+2r8Z7pcS+N7px7wQ/wDxFcxrX7RXxD8RIy6h4jmuVPUGKMfyWvN6KpUaa2ivuC7L9/rd7qkhe6uDKx6kgVSO71ptLurXYQlFFFMAoqnHrOnzXZtY762e6BKmBZlL5HUbc5yMH8qfPqVpayeXNdQwyYDbJJApwc4OCenB/Koc4pXb0KUXJ2SLNFFFWSFFFFABRRRQAUUUUAFFFFABRRRQAUUUUAFWtG1GLRvEGi6lcaVa69aWGpWl5c6RfMFgv4Yp0kltpCUcbJEVkOUYYY5UjiqtFRKKnFxfUZ9U/E7/AIKY/GPxZ4j0m/8ABttpHw/0vTkDy6O5XVl1WXzAxW4mkgjaOHYoQLCEcb3bzD8gXzz9qb9pqX9qLxP4Z1mbwLYeDrrSLO5s57i21Q3018kjxPCjsbaEhYis5UEtg3D4C5bPjNFcVPA0aclOK1RTk2FR3FulzEY5ASpweCQQQcggjkEEAgjkEAipKK7mlJWewoycWpRdmjL1cSiKO/v7lrp7WaCRpmUL5cEcyO5CjjO1CzYGWI4GAqr9N+ApfiH4FXQI5fgP461w6DqOparp90ujapZyxXV3BbQpKqtps6B4Ps5dCyuCzKdqlBn57tdIsfEWpaboup6vb+HtN1e9ttMutYuyoh0+K4mSF7l9zKNsayFyCyjCnLL1H62fE7/gpD8D/hn4j0nSl8QyeMYrtBNeap4Q8rU7LSYTIEElzJHJ/vt5cQkkCxsxQApu+IzHLqNKvT+r+7yxtZJWte/Z9T7CPEmLrYarh8bFVvaTVRym5uXMouK1jOOlns79Omh+S/jjwvqejeKLPTtb0HX/AA/PHaz3AtPElvPBfLFLOhhkaSWCBpWJhk/fJGmXjY4U1SWOaWf7ReXDXlyF8tZGULtTjgAcAnALEdT6AKq/V/8AwUf8WeB/Hvxm8JeJ/Bvjzw/4y+3aA+m3droWoQXn2H7JcGRHkeKRv9b9vcAELj7O2C247flavWynAYenQpzUbyi5WbSuuZtu2iOLM8+x2Yzqc0+SFRU1KMXLlfs4KEG0222kr6t669iKecQBAEaWWRtkUMYy8jddo/InJwAASSACai1O21HRRby3N7p0pkbmxQCKUjB4jkkkCuQcZyFyATwcCpdL1OHSnupJoGuNbdmjgj6IYScrsbB2qMKZCedwHBBiB9P+BfjiaD4efELRtR8RaLo19rem29vbXmqNDarPeW+s2qIwkYFwqxiWV0TKgB32/Lx87j81zGWNUaKdKlCXLdr45JN9fs2XRrffXT9BwOSZBhMiliMU1icVUgp8sJuKowc407tpO9TmmrxcZJWfu6Xl5fpFrf65JcMjw6dHEFXyZ0WabcckkhJMKpG3HOT83bGVjkkEslvcR+RdxY8yLORg5wynjcpwcH2IIBBA9d/aC8XPcnSb/wDtWDW9a0rwgI9QkOoJqLLdreX8rCW5jwJC+8ShRjYkqLjufH7/AFMXukxQXIZvEdsu23mVcCY4GZDgYEZwN6/wnAGW8pm58JnGZQzCpzr2lG8Yuy1i5LRpdu939x6Nfhzh3F8NYWrTn9WxjhUqLnk3GpGE2nFt2XM0rw5Vrqtd1YooqC8v7bTohJdXEVtGTtDzOEBPpk9+DX6Y2lqz8IJ6Kgjv7aa0N1HcRPagFjOrgpgdTu6YGD+VLb3tvd7vInim2/e8tw2Prip5o3SvuVytpu2xNRRRVkhRYWEmvzMiM0WnxsVmnQkNIwODHGR0x0Zx05UfNkoVVazcxy2yzsunzMXmtAPldj1GeytnLKOGI93D+Nm1LG18P7LAyUZSaTb6Lq15/wBLWx9Vw1icowWYLE5zSlVpwTagrWlNfCpX+y+tr9Lpq6O48J+DI/i3ptza+H20l7XT9JuNZT7VfmxzBbRM7pb7FMjS7EkGxAMAMHKLmptS+H8nwwtdJub59NW313SU1qC6tdVN8Ut/MliKTStwjo8UmUV3VcnkHcKf8DbTxhY297qnhrwF4j8YCFNZ0ec6VpF9cQRNe28yAmaC3lXekd1HL5fUggErnNWPizovjgfDSxh1z4deK/Dmn6DoUuhRalqOg6hBBO095cSxvJJLbRpATJdpEFLsCQDu+bA/IKmX8mHnhIqd+Zr7VnaSSdvh2P6JocWVaueYfNqlXDKn7KDf8FTi3Rk5U1JydVWqe7bfVK29/PLm2h0+zh1GwPmaDPGsy4BH2ZWGQwB5EWD0/g/3PuSVVazcxy2yzsunzMXmtAPldj1GeytnLKOGI93D2q/Wsow2NwlGVDFzU1F2i+rj0v5n8+8T4/Kc0xcMbldF0nOKdSGnKqmvNyf3Xv8APZbBRRRXvHxwUUUUAFFFFABRRRQAUUUUAfUnx1/Zc8JfDD9mf4ffEPTNQ1mfXfEVtYTXNvdzwtbIZrYSvsVYlYANwMseOuetfLdfcv7U9zcp+wp8DIruYyyyx2xDNjOwWx2DjsFKj8K+F5ZUgieSR1jjQFmdjgKB1JPYVxYWcpU25u+r/MqW4+iqkGpxT3K2/l3UMzI0irc2ssO5QQCQXUZwWXp60ralArXAPm7bc7ZpRC5jjO0N8z42gBWBJJ4B5q/rVDkVT2i5Xpe6tftc6/qWKdV0PZS50rtcrula92rXtbX0LVfVHh39lbwnrX7F998XH1DWV8TWyzkWqTxfYzsuTGMp5W/7nP3+vtxXyvX314Jnkl/4JaeJ0iYq0U8ikr/dN9GWH4gn86jFTlBQ5Xa8kjlifAtFFFdpAUUUUAFFFFABX1z+w5+xp4Y/aJ+G3ifXNa8U+KNEl07xHNpsFroklmsPl/ZbW4LHzraVixkuZP4sYwABivkavX/CX7XfxW8A/AxvhV4Z1XSdB0TN0setWNjMusQJcXUlxKI5zOY0f966CQRblBBXDgMPFzTBrG0o03TUrO+tu3menl+ZYzK6rrYKtKlJq14ScW1o7XTTtdLTyR9Aftc/sD+Dvgf+zz4m8W6P4v8AF+pXVnLY2wstTlsDbSx3F9BbSqwitI3+5M+Crgg4PtXxBXstj+2R8X7X4M+Jvhlfa/Y+KNC1y0vbBtS8TW9xe6rb291EySRrc/aE3hd7shlV2XcFyVVVHjVRleBWBU4qmo3fS2v3fqXmGaY3M5Rlja86rirLnlKVl2V27fIinnEAQBGllkbZFDGMvI3XaPyJycAAEkgAmtTTYLbQryEX0yS63eRSGKJOmxNpaOLOPVSScFsZwAoC5c8AnCEO0Usbb4pozh426bh+ZGDkEEgggkVHa2l1ceJtDn8q41PUJ79YitpbvLLK8kckUUUUSBmOZJVVUUE5fPJLMfD4lwWOxtKUacrUYxcmlfmlJbL0/rsfpXh9neT5HioVsRTvip1IQjOTSp06cmlOflJK+r0Ss725k/ZtH/ZatfFmt+HXXxVZjTdf0Rdckv4rC6NtDcPdy2v2H7O08Ynd5YnYuVQFUmbY+Pm8vmls/E0GnRmdLXWpLMXsIQbmjQ7Q24d0JIBBIzjIwVBX3PwjqHx48C3/AIcutE8E+N7MaBZvp9rbDwRrIhuYGmuZv9KQKPNdXu5CrLsA2rwec/POt+HL3RPFV1p1/Zapo+o6Za2ls8ep2ctneQTKJJMtFMqupMc0bfMuGWTuCRXyEMJPMK9GGFc4Tgm02pWVoqyu9lfT+tftcJnX9g4bGzzeWHxNGu4qUKc6LlJOcuaTVOzclF8ybel46pp2WOSQSyW9xH5F3FjzIs5GDnDKeNynBwfYggEECWoo45DLJcXEnn3cuPMlxgYGcKo52qMnA9ySSSSZa/XcJ7f2EPrVvaW1ttc/nvMfqf1yr/Z/N7HmfJzW5uW+l7aXsFFFFdZ5x99fsQ/tC/Cn9m79lPX9c8TePtJn1u/1q91WTwlY3MMmsI6GOxit47USeZI8v2RJAxVFAnG4hEMh6f8AaC/ax+EH7Tv7G3xBgsfG9j4P12GE3S+G/E1xb2uqyXFjPHeR26wed+8Fx5KIkkTSL++H3mVox+b1FeHLLOaTnz6t32/4Jrz9LBRRRXuGQUUUUAFFFFABRRRQAUUUUAFFFFAH3N+2nL5X7In7PFuTydLs2I+mnxD+tfC9ksJ00eIL8F7CJBPaWqYLTHgo5BPLMcbE7Egn5sBPuf8Ab6j/ALN+BfwI03GPI0qNcem21hWvhFLCNJg4Zyis0iQlv3cbt951Xsxzz9Wxgu+75PFYLE5hhI0KFTkjKT5+7jd6J/1fv0f2fDWb4HI8XPHYvD+2qRj+6Ta5Y1NLSkrapateaWl7OPqvw/8AhjZfHDTNTdda021SxXT7qCy1DSZLxruO5u4LUzLlkSMR/akPJLNyu0DLDH+I3h6P4JeINY0KZL6TT9MQGCV9CTTTdMbmaEm3hjurgPG0kWFcup3l1ZFKEntPgT8Cvjb4n+Fkep+CPh4df8O63po0S4vLi7sPLnS1vYy/lJJewuv7+y25dOU3YAyGFT9pX4VfFjwr4f8AD1/47+HcfgbQ0ng0TSYrS8tZraAi5uNQaPCXk8pLf6QQx+UBUXI6n87p5VTqUIYWVNqXMk9/5rN9vhP2arxrj6Ge1s0p4ynKj7Obirx+L2N4wsvfaVWySb6Xv1PIdQsotGjhurN0l0W4KCPy2BEBcgJsx1jYsAAPukjHyH5P0A+CUH9qf8E0/iHB18lr1+f9ho5P6V+e6WEaTBwzlFZpEhLfu43b7zqvZjnn6tjBd936JfssYu/+CevxciJz5cGrn8rNWFfo2Hw2KwWDjRxVTncZKz68vS/n/wANrufifEWY5dmuYPGZbh/YRnFOUb3XP9pxslaN9l89E+VfntRRRX1R8kFFFFABRRRQAUUUUAFFFFABXdfAAaGfj/8ADRvEniTT/COi22v22pXGsapMkVvD9j3Xqo7u6KvmtbLCCW4MoOGI2nhaKxqwdSnKCdrjTs7n6365/wAFIfgfonxVsvBY8QyajaTPDDP4w07yp9As5pVJSOW7En/XMNIitHGZVDumH2fAX7cGq+FfEH7UXifXfCPjDR/Gmm69ZWGpyXWiXcVzDaSiH7GbYyRu4ZgtkkuflOJwNvAZvDaK87D5f9XqKop3+RbndWCiiivXMwooooAKKKKACiiigAooooAKKKKACiiigAooooAKKKktovPuYo/77hfzNAH3j/wVEt10m0+GOlKRttbSZAB0wojX+lfBVfsj+0npnwG1nVNFT4wS6et9HC5sFvL24gPllhvIETrnkDrXjP8Awh37EX/PXRP/AAb3/wD8drwcLi1Toxi4SfojWUbs4b4Q/t4fDL9nL9k/wL4b8LW+r+OPHEUEcl7oNxa3OnxW13dSPdXpku5LYRiGKWWZU2CVmxGvzAtIMH9rL9sL4X/tPfsw6PAkus6B8SLHVLPU4fC0un3EiRXIdrW4R7oQGCSIW9xcSo4dC22IkKd0Ver/APCHfsR/89tE/wDBvf8A/wAdo/4Q79iP/nron/g3v/8A47XDGnTjJT5Z3TvsVdn5qV+gX7G7/av2FvjZb9SseqDH105K6oeDv2Iv+euif+De/wD/AI7Xrnw/0T4PR/A74iaZ8JJLOTQ7izuxfraXU86iZrUryZWYj5AvTj8a7sTilUgo8klqt0TGNmfjvRRRXvGQUUUUAFFFFABRRRQAUUUUAFFFGM0AFFFFABRRRQAUUUUAFFFFAE6mNbY/LmQ9/SoKUnNJQAUUUUAFFFFABRRRQAUUUUAFbXgezGo+NNAtSMifULeLH+9Io/rWLXQ/Du8XTviB4Yu3GUg1S1lb6LKpP8qmWzGfU3/BTLWV1b4keE1Vt3laW/APTMp/wr44r2z9q7xp/wAJt45065D+YIrIR5/4ETXidc+FhyUYxHLVhRRRXUSFfoR/wTYmFx8J/iZp5I/ezAYP+1Ay/wBK/PevsT9gzxxF4W0TxnbySbPPlgYZP+y4rgx0XKg0vL8y47nx3RSsMMR6GkrvICiiigAooooAKKKKACiiigAqa0n8iXJAYEYINQ0UAOmIMjEDAJptB5ooAKKKKACjFFFABRRRQAUUUUAFFFFABRRRQAUUUUAFFFFAChSams3a2u4ZhwY3DA59DmoM0ZNAGlrepS6xdiaQ7iFC5JrNIxRuNFLYAooopgFdt8OvGE/hNL7y3KLcbeh64z/jXE0oYr0OKmSUlZjHToySNnHXPXNMoJzRVCCiiigAowTRRQAuw+lL5be3503Jo3H1oAXYR/8ArpKKKACiiigAooooAKKKKAP/2Q=='%3E%3C/image%3E%3C/svg%3E)
The bruising game of rugby is one of the most physically exhausting games currently being played around the world. The amount of energy expended throughout a game is massive and the workload is almost the same for every member from 1 through 15.
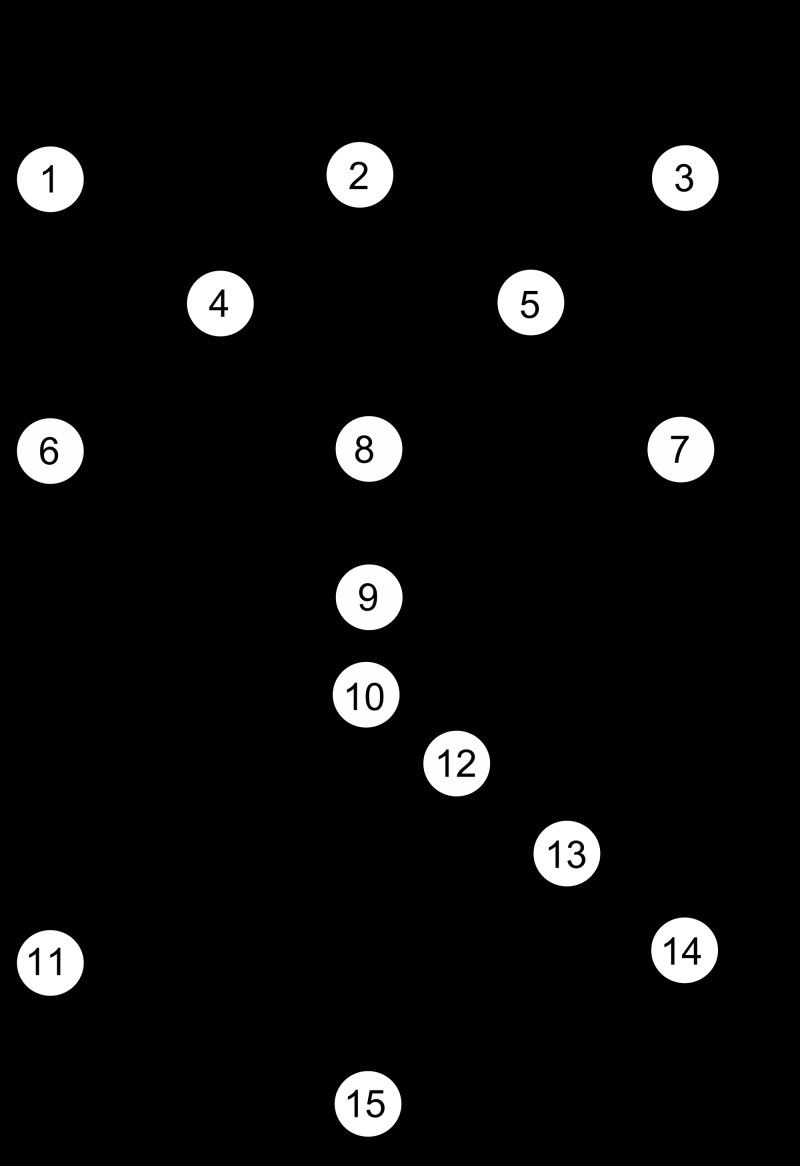
Now as we know, there are 15 players in total on each side in a rugby union game, but what are the various positions that they occupy? And what are the defined roles for players in each of these positions?
Each of these positions requires a specific set of skills and the spread is rather diverse and when one goes through the entire gamut, you get the feel of a number of moving parts made to fit perfectly into one fine machine.
Overall, a rugby union team is divided into two major groups – the forwards and the backs.
Forwards
There are totally 8 forwards in a team. More often than not, these forwards will be the biggest, heaviest and strongest players in the entire team. The key element for these players is their size and strength, which will be used in both attack and defence by a team.
While defending, these players will be key in nipping opponent attacks in the bud by putting in a series of tackles and preventing any yards being gained by the opposition. In attack, their strength will be put to use through short bursts in order to advance the ball a few yards and gain territory.
Collectively, these 8 players, are also referred to as ‘the pack’. That’s so because this ‘pack’ is the group that takes part in a set-piece play called a ‘scrum’ where the 8 players lock themselves together and go head-to-head against the opponents’ pack to fight for possession of the ball.
The other set-piece that the ‘pack’ takes part in is the line out throw, again, covered in the previous piece in this series. A line out is used to restart the game once the ball has gone out of play.
The front row
The front row consists of numbers 1, 2 and 3 – called the Loose Head Prop, Hooker and Tight Head Prop respectively.
Props – The two Props are mainly designated with scrummaging, tackling and supporting the line-outs while also quickly hitting the rucks and mauls when the team is in possession. Initially, hey were used only for their strength, but now they are used in attack as well to spring sudden runs and use their strength to good effect.
The Loose Head Prop plays on the left of the front row while the Tight Head Prop plays on its right. Both Props are in charge of protecting the Hooker.
Hooker – The Hooker occupies the middle of the front row and wraps his arms around both the Props when they come together for a scrum. Apart from helping in the scrum, the Hooker has a key role in the line-outs where he is the player in charge of throwing the ball back into play. So, as such,
Hookers are usually big and strong with good throwing ability. The Hooker will also be one of the last people to gather during a breakdown, to assist in carrying the ball short distances.
Second row
The second row features numbers 4 and 5. They are called the Locks. The Locks have one arm wrapped around their co-Lock and the other around the Prop in front of them during a scrum.
The Locks are entrusted with pushing forward in the scrum from behind the front row and at line outs winning the ball that is being thrown in. They are also instrumental in winning possession from game restarts and set-pieces. They are also master tacklers.
The Locks are not as big as the front row, but are generally fitter, with good body strength and pretty athletic. They also tend to be quite tall as their length is put to very good use.The number 4 Lock is on the left while the number 5 Lock is on the right in the second row.
Back row
The back row and last row of the forwards consists of numbers 6, 7 and 8. The number 8 (the position itself is called ‘the number eight’) lies in the middle flanked on the left by #6 and on the right by #7. In a scrum, the #8 wraps his arms around the two next to him while they in turn are holding onto the two Locks ahead of them.
#6 – The Blind Side Flanker – One of the most destructive positions on the field is that of the #6, called the Blind Side Flanker. #6 is primarily a defensive player, tasked with shutting down the opposition’s #8 and #9 and also pretty much cleaning up at every ruck and other breakdowns of play.
This guy is like the rock in the back row whose single mission is to repel every attack that comes and put tackles in left, right and centre. The #6 is usually one of the strongest players on the pitch.
#7 – The Open Side Flanker – In the right of the back row is the other flanker, the Open Side Flanker, of which the most notable example is All Blacks captain Richie McCaw. The #7 is the one who provides continuity in the side’s play by being a link between the forwards and the backs. In attack, the #7 tries to keep the game flowing at every breakdown as a ball carrier, using his strength and in defence, unlike the #6 who is out and out smasher, the #7 makes key tackles when necessary to haul a break-away runner to the ground and force turnovers.
The number 8 - #8 duties involve, once again, tackling, carrying the ball in the middle of the park and providing support to the backs in the final third. However, being in the middle, the #8 occupies a very pivotal position as he is able to read the game in front of him.
In the scrum, he is responsible for securing possession at the base of the scrum. Usually a master tackler, the #8 also quite often comes up with plays where he ends up ripping the ball away from the opposition and initiating an attack.
The #8s are also being used more and more in an attacking sense these days. That’s that as far as the forwards are concerned. In the next part on this subject, we shall get to know more about the backs.
In our first part on rugby positions, we looked at the big, burly men that are the forwards in every rugby union team.
Here, we will look at the other seven players in the team – the backs.
The seven backs in the team provide the speed, craftiness and ability that enables a team to score tries and score points. They are smaller and stature than the forwards (there are exceptions of course) and possess fantastic individual skill in high speed running or flawless passing or amazing catching ability or a combination of them all.
#9 – The Scrum Half
One of the most active players that you will see around on the pitch is the #9, especially in attack. He will be at the base of every scrum, ruck or maul to ensure that the ball is picked up and passed on to another player to continue the possession.
Passing along with kicking are the most important skills for a scrum half. By kicking skills, we don’t mean a penalty kicking sort of skill. The scrum-half will often be seen delivering little football type passes along the ground, long punts down the ground – in attack or in defence – and also quick tap penalties where the advantage is taken instead of a penalty kick.
The scrum-half also is a surveyor and man-manager on the field, constantly managing the lines, shouting out instructions to see if the forwards and backs are well aligned in position.
#10 – The Fly Half
The fly half is the general of a team. He usually orchestrates the attack of a team while also helping out in defensive duties. The tempo of a game is usually controlled by the respective #10s.
When you think of #10s, the first person that comes to your head is New Zealand’s Daniel Carter who is one of the superstars of rugby. England’s Jonny Wilkinson is another famous #10 from the last 15 years as he was instrumental in England’s run to the title in 2003.

The #10 will usually be the penalty kick taker for the team by virtue of being the best kicker. Like the #9, the fly-half also will have exceptional kicking and passing ability. On top of all that though, the fly-half will be known for his awareness and reading of the game.
The fly-half's provide the bit of ingenuity and inventiveness when the game requires it. A most pivotal position indeed.
The Wings - #11 & #14
The most electric guys out on the pitch, yes, that who’s the wings are. In the game of rugby, the key element is to look for space left by the opposition defence and exploit that space to get a breakaway. Using pace is one of the best ways of doing that, to split a defence or to get them discombobulated.
These guys are really fast, and are a little like the sprint runners you see from the athletics world. It is very tough to catch them once they take off. There was one, Patrice Lagisquet, a French legend, who could run the 100m in 10.2 seconds.
The wings occupy some isolated positions on the pitch in the far extremes but they are usually ready to plunge into action when called for. While attacking, a number of defenders will try grabbing hold of these wingers, as they dart their way through, while in defence, they will often be left with one-on-one situations with an opposition attacker, and would either be left embarrassed or make a heroic tackle. Either way, they are one of the most visible people in a game.South Africa’s Bryan Habana is one of the best in the world at this position.
#12 & #13 – The Inside Centre and Outside Centre
The #12 – the inside centre – is a lot like the fly-half, except he plays in midfield. The inside centre though is much better built than the fly-half and as a result, can carry the ball into tackles and defensive lines far more.
A good #12 will be adept at smart hand-offs of the ball when in attack and making powerful runs to smash into the opposition’s lines. He will also be good in the tackle, making it a very powerful position indeed.
Ma’a Nonu of the All Blacks is a fine example of one of the world’s best inside centres.
The #13 or the outside centre, does pretty much all of the same work as the #12, except that usually these guys are a little leaner and more agile than the #12 and not as powerful as them. They do a lot more straight-running than the #12 taking the ball into contact and put in hard tackles just like the #12.
#15 – The Full Back
The full-back along with the two wings are the most important players in the attacks these days thanks to their pace. They form a deadly triumvirate that every team looks to use to break down opposing defences.
The full backs are not only quick, they also have good kicking ability, both punting and while keeping it on the ground.
In defence, the full-back is usually the last line of defence, and so may be required to make same try-saving tackles and hasty clearances upfield.The wings and the full back in modern rugby often exchange positions since they share a lot of similar skills. They also end up being the ones to catch the high ball when the ball is punted long upfield.
And with that we come to end of the take on rugby positions. Stay tuned for more as we near the Rugby World Cup 2015.