
'%20x='0'%20y='0'%20height='100%25'%20width='100%25'%20xlink%3Ahref='data:image/jpg;base64,/9j/2wBDAAYEBQYFBAYGBQYHBwYIChAKCgkJChQODwwQFxQYGBcUFhYaHSUfGhsjHBYWICwgIyYnKSopGR8tMC0oMCUoKSj/2wBDAQcHBwoIChMKChMoGhYaKCgoKCgoKCgoKCgoKCgoKCgoKCgoKCgoKCgoKCgoKCgoKCgoKCgoKCgoKCgoKCgoKCj/wgARCAAGAAoDASIAAhEBAxEB/8QAFgABAQEAAAAAAAAAAAAAAAAAAAYH/8QAFQEBAQAAAAAAAAAAAAAAAAAABAX/2gAMAwEAAhADEAAAAMdvAd3/xAAhEAACAQMDBQAAAAAAAAAAAAABAwIABBEFBhIIEyFR0v/aAAgBAQABPwDa7o3sLazuVcw9kV8+5IYyfQp/TpuMuYV6powhnxks+K//xAAXEQEAAwAAAAAAAAAAAAAAAAABAAIh/9oACAECAQE/AKus/8QAGREAAgMBAAAAAAAAAAAAAAAAAQIABCJB/9oACAEDAQE/ALWEQA8n/9k='%3E%3C/image%3E%3C/svg%3E)

After having a lead of 402 after the third day, Australia were dominating the game. The last pair added 14 runs on the fourth morning before Pat Cummins became Keshav Maharaj’s 4th-second innings victim.
Chasing a mammoth total of 417, South Africa lost a flurry of wickets in the first session and were in big trouble at 49/4. But Aiden Markram and Theunis de Bruyn helped South Africa fightback with an 87-run partnership. Then de Kock joined Markram and counterattacked to put Australia under a little bit of pressure. Markram struck a superb 143 while de Kock scored an unbeaten 81.
However, Starc, like he did in the first innings, blew away the lower-order with a searing spell and it looked like Australia were going to wrap things up today. But bad light ensured Australia couldn’t bowl fast bowlers and spinners operated for the last few overs of the day but couldn’t get the final wicket. Hence, with only one wicket to get, Australia will look to wrap things up quickly tomorrow morning.
#5 Josh Hazlewood continues to have the wood over Hashim Amla

After the overnight pair of Pat Cummins and Josh Hazlewood added 14 runs to the score, the Australian team looked positive in the field. But like the first innings, South Africa got off to a steady start as they reached 29/0 in the 7th over. But Starc broke through for the visitors as Elgar edged one to the wicketkeeper.
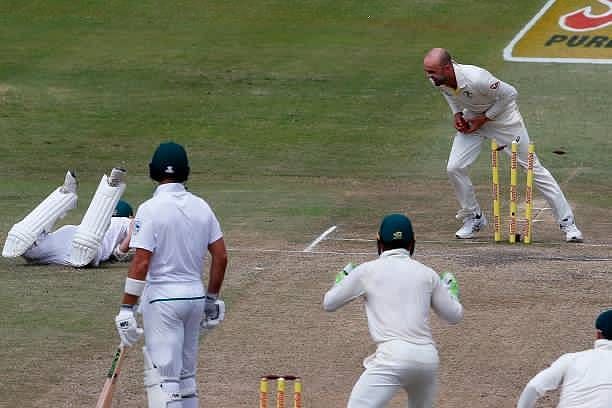
Amla who walked in at No. 3 looked good but his stay at the crease was cut short by his nemesis Josh Hazlewood. Amla was pinged right in front of a good length delivery that nipped back of the seam. The South African No. 3 decided to review the call but to no avail. It was the 6th time that the 27-year old right arm pacer got Amla in Test cricket. In fact, in the last 7 innings that Amla has played against Australia, he’s got out to Hazlewood on 6 occasions.
Hence, Hazlewood got his bunny once again and continues to have the wood over Amla.
#4 AB de Villiers commits hara-kiri
After a steady start, South Africa lost a couple of quick wickets as Mitchell Starc and Josh Hazlewood dismissed Dean Elgar and Hashim Amal respectively in the span of 4 overs. The two batsmen (Aiden Markram and AB de Villiers) who looked the most comfortable at the crease in the first innings were in. Markram was batting well on 21 and de Villiers who was left stranded in the first innings had just arrived at the crease. South Africa’s hopes of saving or even getting close to the huge target relied heavily on AB de Villiers. However, he committed hara-kiri in the 2nd over of the innings.
After playing out 5 deliveries off Nathan Lyon, Markram nudged a good length ball towards square-leg. AB de Villiers from the non-striker’s end set off for a non-existent single and had reached half-way down the pitch before the South African opener sent him back. However, David Warner was quick on the ball and fired a perfect throw at the non-striker’s end. Lyon calmly dislodged the bails and caught de Villiers short.
South Africa’s best batsman had been dismissed for a first-ball duck as he walked back dejected. After he was dismissed, Faf du Plessis also didn’t last long as Pat Cummins knocked his off stump and put the hosts in all sorts of trouble.
#3 Quinton de Kock finally gets back to form
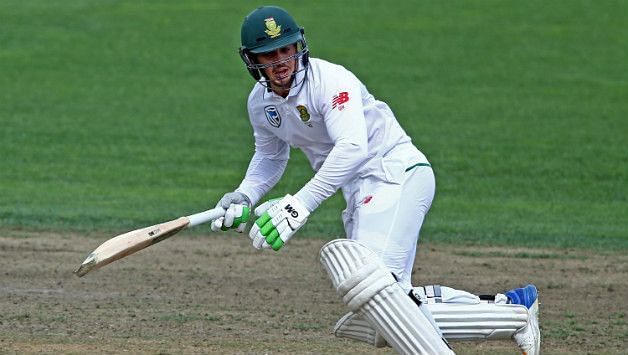
Even after a fighting stand of 87 between Markram and de Bruyn, South Africa were behind by a long way. A woefully out-of-form Quinton de Kock joined Markram who was looking solid. In his last 15 Test innings, de Kock had a highest score of 43.
However, de Kock came out with a positive intent. He unfurled his array of shots as he counterattacked along with Markram. His cover-drive was exquisite while the shots of the back-foot were very good as well. He used the pace of the bowlers brilliantly as he scored heavily through the point and third-man region. As the innings grew, de Kock grew in confidence. He looked settled and complemented Markram beautifully.
His knock of 81 included 11 boundaries. He looked like his old self once again. Along with Markram, de Kock did give South Africa that ray of hope of pulling off an unlikely win.
#2 Markram’s magnificent ton gave South Africa an iota of hope

With Hashim Amla, AB de Villiers and Faf du Plessis (along with Dean Elgar) gone inside 17 overs in a chase of 417, any sort of hope of South Africa winning (or saving) the Test match would’ve diminished. Hence, at 49/4, the game looked done and dusted.
However, Aiden Markram had other plans. In 6 Test matches before this one, Markram had already scored a couple of centuries and a couple of 90s. However, after his 94 against India in Centurion, the Titans opener was getting starts (across all formats) but wasn’t able to build on it. Hence, here he seized the opportunity and made it count.
With absolutely no pressure, Markram started to forge a fightback. He formed crucial partnerships with de Bruyn and de Kock. He first put on 87 with the former but the partnership which created a little tension in the Australian camp was Markram’s stand with de Kock. The duo forged a 147-run stand for the 6th wicket.
Markram, in particular, looked free-flowing right from the start. He struck a couple of delightful boundaries early on in the innings. Even after wickets fell, Markram didn’t get bogged down. He continued playing positively and kept the scoreboard ticking. He also found the boundary with ease. In his knock of 143, he struck 19 fours. However, with just 4 overs to go for the second new-ball, Markram edged one to the keeper off a Mitchell Marsh delivery.
#1 Mitchell Starc once again blows away the tail to put Australia on the brink of a win

The Australian team were worried when the partnership between Markram and de Kock flourished. Their counterattacked had left Australia with no answers. The bowlers looked out of ideas as the runs and boundaries started flowing.
However, Mitchell Marsh’s timely breakthrough opened the floodgates. Markram was out to the younger Marsh for 143. His knock had given South Africa a little bit of hope and with de Kock at the crease, the Proteas had hope. But that hope was crushed in just one over. Mitchell Starc was brought back into the attack in the 78th over. After a testing first over of a new spell, Starc ripped through the South African lower-order in his second over of the spell. He took three wickets and absolutely killed the small hope South Africa had.
First, Vernon Philander nicked an out-swinger from around the wicket. And then came the searing full deliveries. Keshav Maharaj and Kagiso Rabada were out bowled as Starc took 3 wickets in the same over to put Australia on the brink of a superb win.

Looking for fast live cricket scores? Download CricRocket and get fast score updates, top-notch commentary in-depth match stats & much more! 🚀☄️