'%20x='0'%20y='0'%20height='100%25'%20width='100%25'%20%0A%20%20%20%20%20%20%20%20%20%20xlink%3Ahref='data:image/jpg;base64,/9j/2wBDAAYEBQYFBAYGBQYHBwYIChAKCgkJChQODwwQFxQYGBcUFhYaHSUfGhsjHBYWICwgIyYnKSopGR8tMC0oMCUoKSj/2wBDAQcHBwoIChMKChMoGhYaKCgoKCgoKCgoKCgoKCgoKCgoKCgoKCgoKCgoKCgoKCgoKCgoKCgoKCgoKCgoKCgoKCj/wgARCAAGAAoDASIAAhEBAxEB/8QAFQABAQAAAAAAAAAAAAAAAAAABQb/2gAIAQEAAAAAmRv/xAAUAQEAAAAAAAAAAAAAAAAAAAAA/9oACAECEAAAAH//xAAUAQEAAAAAAAAAAAAAAAAAAAAD/9oACAEDEAAAAG//xAAgEAABBAIBBQAAAAAAAAAAAAACAQMEEgAFBhMkcXKC/9oACAEBAAE/ANpyVhyTLKdFbIpdQNoGBoKCCJ1Pew+MDbwKp2xr8Dn/xAAWEQEBAQAAAAAAAAAAAAAAAAACAAP/2gAIAQIBAT8AOZv/xAAWEQEBAQAAAAAAAAAAAAAAAAACADH/2gAIAQMBAT8ATWX/2Q=='%3E%3C/image%3E%3C/svg%3E)
Riot Games’ tactical first-person shooter Valorant became so very popular among FPS players, that fans from every known gaming platform wanted to get their hands on it as soon as the official release came out.
However, for now, Riot decided to launch the game for PC alone, but there are talks about a console and mobile release in the future. It does feel that the Mac Os is being left out once again by another developer, and the reasons for Riot doing so are pretty simple.
Mac is not compatible with Valorant’s anti-cheat Vanguard in any way. Vanguard is a kernel-level anti-cheat which is creating some problems in Windows itself, so it not being compatible with Mac doesn’t really come as a surprise to anyone.
That being said, you can still run Valorant on a Mac Os, but only by using a Boot Camp program which will allow you to install windows onto the system.
But before we learn how to do that, let’s first take a look at all the devices which can support Windows 10:
- MacBook 2015 or later
- MacBook Air/Pro 2012 or later
- Mac mini 2012 or later
- iMac 2012 or later
- iMac Pro (all models)
- Mac Pro 2013 or later
Setting up Windows 10 on your Mac
By preparing your system, we mean that you should make sure that the Mac system has enough space in the drive to support Windows. A 64-bit Windows 10 requires 20 GB, while 32-bit needs 16 GB. So download the required ISO file that you want to go for (we recommend going for a paid version and not a cracked one)
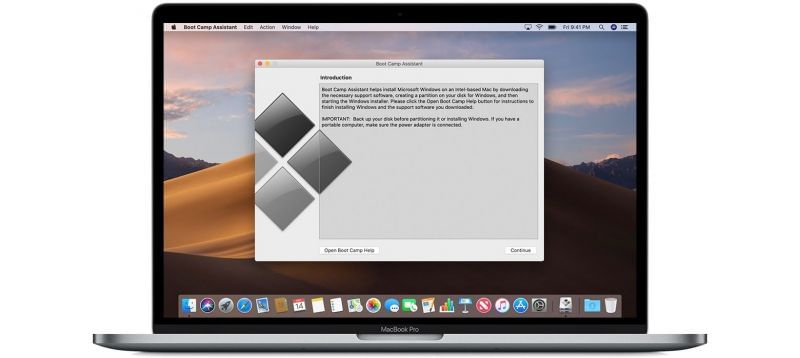
Step 2: Install Windows with the help of Boot Camp
Every Mac device comes with a Boot Camp program already preinstalled in the system.
When you run the software, it will prompt you to pick from a number of options, so remember to click on “Choose…” which is on the right side of the “ISO Image.” Then you Navigate to the ISO file, and Boot Camp will automatically copy the file contents onto a USB stick.
Step 3: Download Drivers
After Boot Camp pastes the ISO contents, it will then proceed to automatically download all the Windows 10 and 8.1 drivers onto the stick. However, if you’re opting to install Windows 7, which too Valorant supports, you will need to then manually download the drivers from Apple’s site.
Step 4: Partitioning and installing
To make room for Windows in your Mac, you will need to partition the disk space and allot a separate section of the system’s hard drive for the new OS.
After you’re done partitioning the disc space, Boot Camp will then shut down the system and automatically launch the Windows installer from the memory stick. All you have to do now is follow the prompts.
Step 5: Run Windows and Valorant
Once Windows is up and running, you can then dual-boot between the two OS by pressing the ‘Alt’ key whenever you want.
Now finally install Valorant in Windows and enjoy the game.