

'%20x='0'%20y='0'%20height='100%25'%20width='100%25'%20xlink%3Ahref='data:image/jpg;base64,/9j/2wBDAAYEBQYFBAYGBQYHBwYIChAKCgkJChQODwwQFxQYGBcUFhYaHSUfGhsjHBYWICwgIyYnKSopGR8tMC0oMCUoKSj/2wBDAQcHBwoIChMKChMoGhYaKCgoKCgoKCgoKCgoKCgoKCgoKCgoKCgoKCgoKCgoKCgoKCgoKCgoKCgoKCgoKCgoKCj/wgARCAAGAAoDASIAAhEBAxEB/8QAFgABAQEAAAAAAAAAAAAAAAAAAAYH/8QAFQEBAQAAAAAAAAAAAAAAAAAABAX/2gAMAwEAAhADEAAAAMdvAd3/xAAhEAACAQMDBQAAAAAAAAAAAAABAwIABBEFBhIIEyFR0v/aAAgBAQABPwDa7o3sLazuVcw9kV8+5IYyfQp/TpuMuYV6powhnxks+K//xAAXEQEAAwAAAAAAAAAAAAAAAAABAAIh/9oACAECAQE/AKus/8QAGREAAgMBAAAAAAAAAAAAAAAAAQIABCJB/9oACAEDAQE/ALWEQA8n/9k='%3E%3C/image%3E%3C/svg%3E)
#2 Tied Test 2 – India v Australia, Madras (Chennai), 1986
Australia in the mid-1980s were a very ordinary team struggling after the departure of top players. India, as always, were a tough side to beat at home. The first Test at Madras produced some astonishing performances and had an extraordinary finish.
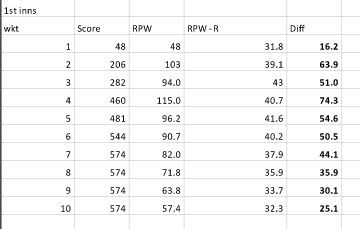
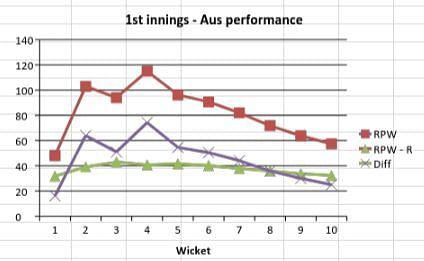
Right from the beginning, Australia had an RPW that was well ahead of their RPW – R leading up to the game. The difference (Diff) consistently remained over 50 and reached a peak of 74.3 at the time the fourth wicket fell. Australia declared seven down and left India requiring a massive 57.4 runs per wicket to establish parity. (Because the effective runs per wicket required for India does not change, the table of the 1st innings shows the last few wickets falling at the same score (574). However, Australia declared 7 down.
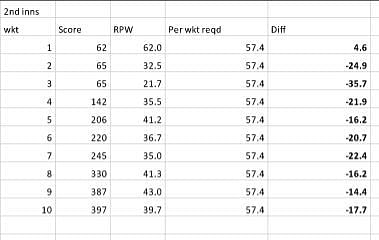
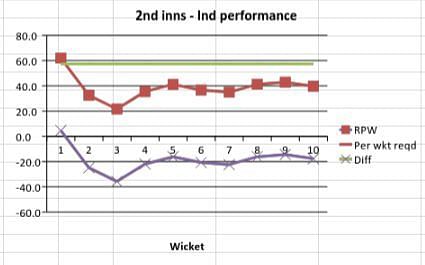
India, faced with a major challenge, started well but quickly found themselves behind the eight ball with an RPW well below the required RPW (57.4). The difference (Diff) was low throughout the innings (< - 15) and stayed there at the end. With a massive deficit (177 runs), India had more or less been batted out of the contest.
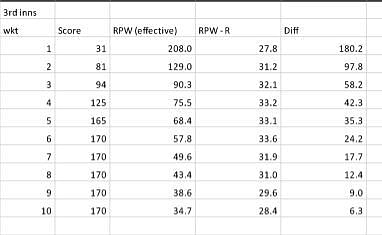
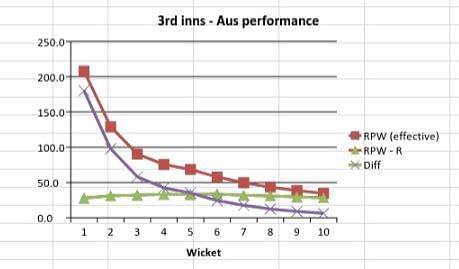
Australia, armed with a commanding lead, played well enough to move further ahead in the contest. Although they lost wickets at regular intervals, their RPW (effective) was extremely high (68.4) when the fifth wicket fell. Pushing for a win, Australia declared five down for 170 with an RPW (effective) of 34.7. This performance, however, was well above the RPW–R in the preceding ten years. The difference (Diff) was consistently over 20 and ended on +6.3 suggesting a relatively stronger position for Australia going into the fourth innings.
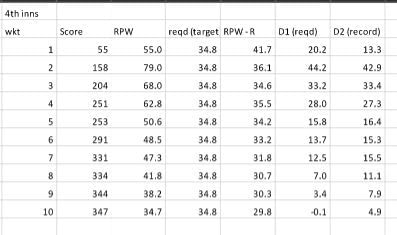
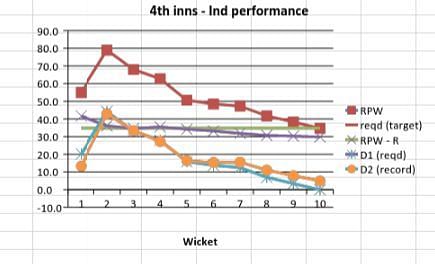
India started superbly. They maintained an RPW well above the required RPW (34.8) & RPW–R. Both D1 and D2 remained high (+12.5 and 15.5) at the time the seventh wicket fell at 331. However, a collapse at the end meant that the advantage was lost. We may never know whether Maninder Singh was actually out lbw or not but Australia had just about managed to come back from a position where the odds were heavily stacked against them. A see-saw contest ended in the best way possible. However, it is perhaps safe to suggest that Australia would feel slightly more aggrieved given that they lost only 12 wickets in the match and comfortably outperformed themselves (record leading up to the match) but could not haul themselves past the finish line.
Looking for fast live cricket scores? Download CricRocket and get fast score updates, top-notch commentary in-depth match stats & much more! 🚀☄️