

'%20x='0'%20y='0'%20height='100%25'%20width='100%25'%20%0A%20%20%20%20%20%20%20%20%20%20xlink%3Ahref='data:image/jpg;base64,/9j/2wBDAAYEBQYFBAYGBQYHBwYIChAKCgkJChQODwwQFxQYGBcUFhYaHSUfGhsjHBYWICwgIyYnKSopGR8tMC0oMCUoKSj/2wBDAQcHBwoIChMKChMoGhYaKCgoKCgoKCgoKCgoKCgoKCgoKCgoKCgoKCgoKCgoKCgoKCgoKCgoKCgoKCgoKCgoKCj/wgARCAAGAAoDASIAAhEBAxEB/8QAFQABAQAAAAAAAAAAAAAAAAAABQf/2gAIAQEAAAAADm3/xAAUAQEAAAAAAAAAAAAAAAAAAAAD/9oACAECEAAAAC//xAAUAQEAAAAAAAAAAAAAAAAAAAAD/9oACAEDEAAAAG//xAAgEAABBAIBBQAAAAAAAAAAAAABAgMEBQAREiEiUmHh/9oACAEBAAE/ALO9lTKi5enNsPLsocSK4pQPaOKiFgeQPXDAsAdC0Vr219z/xAAWEQEBAQAAAAAAAAAAAAAAAAARADH/2gAIAQIBAT8AXb//xAAYEQACAwAAAAAAAAAAAAAAAAAAAQISMf/aAAgBAwEBPwCKrh//2Q=='%3E%3C/image%3E%3C/svg%3E)
The first DLC character of Guilty Gear Strive has been hailed by many as a masterwork of design but not quite as exciting in terms of gameplay. Goldlewis Dickinson is a surreal-looking, hard-hitting character but will fail miserably in the hands of players who cannot account for his slow speed and mobility.
He uses a large coffin-shaped weapon to cover the space around him and a machine gun to deal with annoying projectile spammers. He's short on tricks, but the few tricks he does have are ridiculously over-the-top.
This guide will explain how to use Goldlewis Dickinson effectively in Guilty Gear Strive by going into his specials, overdrives and mobility. This will not explain the fundamentals of the game or detailed combo routes, so make sure to check out other guides as well.
Looking for Crossword hints & solutions? Check out latest NYT Mini Crossword Answers, LA Times Crossword Answers, and Atlantic Crossword Answers
Guilty Gear Strive: A guide to using Goldlewis Dickinson
Normally a guide should start off by explaining how to utilize a character's mobility well, to make the most out of whatever tools are available to them in Guilty Gear Strive. But it's no exaggeration to say that Goldlewis has the worst mobility in the game.
He has only a single jump, accompanied by a very slow walk / run speed. This automatically puts Goldlewis at a disadvantage. The main takeaway for Goldlewis players is to have a more reactionary style of gameplay whilst focusing on covering the area around them that an opponent wants to break through.
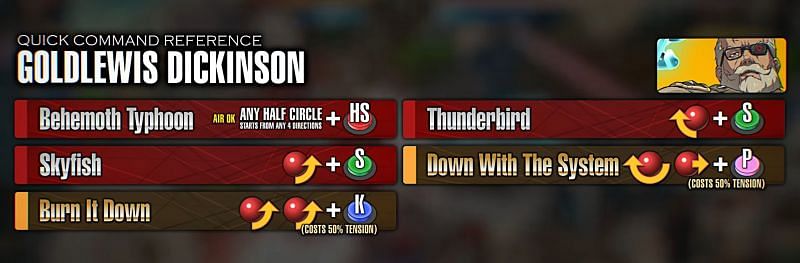
So the main tool a Goldlewis player can use to ensure survival in Guilty Gear Strive is the Behemoth Typhoon.
In this Behemoth Typhoon

The main tool Goldlewis has to depend on to control neutral gameplay is the Behemoth typhoon. There are eight different variants corresponding to the eight different ways a half-circle input can be performed on a stick. Each variant will hit the opponent in a different manner and cover a different area. Each variant also works when inputted in the air.
The intent with which this move was designed, it appears, is to give Goldlewis players an option against every option opponents will use to open up Goldlewis.
The problem is that most variants are so slow that they require the player to predict the opponent's movement in most cases to connect. There are variants that can be used in reaction, but in general it's tough to connect Behemoth Typhoon.
The move isn't too safe to perform even far away from opponents, as the player must hold the final direction of the input, for the Behemoth Typhoon to come out.
The different variants of the Behemoth Typhoon include:
41236H
It should mainly be used as a counter-hit tool. It can be guarded high or low.
63214H
Because of how fast this move comes out, it is very easy to cancel into. So it should be used primarily as a combo finisher. It can be guarded high or low.
23698H
Launcher variant. Players can juggle their opponents using this move. It can be guarded high or low.
21478H
Low hitting launcher that switches sides with the opponent. Side switches could potentially lead to positional disadvantage.
69874H
It's a long range move with a fast startup. Easy to confirm into, and also works as a launcher. It can be blocked high or low.
47896H
One of two overhead options available for the Behemoth typhoon. This one has a slightly longer range, and if mixed up properly, it can prove deadly to an opponent due to the different combo routes it opens up.
87412H
Short range low. Can mostly be used as a combo filler.
89632H
Goldlewis's second overhead option. Faster, but shorter, in comparison to the other overhead. Lesser combo options on hit as well.
Security Level and the rest of Goldlewis's specials
Goldlewis has only two other specials besides Behemoth Typhoon in Guilty Gear Strive, and they're both dependent on a meter that is exclusive to Goldlewis called the Security Level. Security Level fills with time and is not affected by any parameters. It gets reset upon using a special that is dependent on Security Level.
There are two other specials that Goldlewis has that have different effects, dependent on the Security Level Goldlewis had upon their activation. In general, these specials are more potent at higher security levels in Guilty Gear Strive.
Skyfish (236S)
Probably as effective as Ramlethal's Calvados in Guilty Gear Strive, this move sees Goldlewis take out a machine gun and hit his opponent with a spray of bullets. Beats almost every projectile in the game. It's a great tool to punish opponents attempting to exploit Goldlewis' slow walking speed by zoning.
Thunderbird (214S)
The only special Goldlewis can rely on for long range pressure in Guilty Gear Strive. Sends out a security drone that can either be ridiculously useless or effective depending on Security Level.
It hovers over the screen pretty slowly, forcing opponents to exercise caution around it.
Goldlewis's game plan and Overdrives
Goldlewis players have more barriers than other players of Guilty Gear Strive, and their highly damaging strikes are much harder to earn than people think.
In general, opponents will be forced to take him on mid-screen, but it is here that Goldlewis players will be forced into an intricate battle of 50-50s. So read your opponent in Guilty Gear Strive, use the right variants of the Behemoth Typhoon, and make sure to convert whatever raw hits are scored.
Goldlewis has two Overdrive moves in Guilty Gear Strive:
- Down With The System [632146P]
- Burn It Down [23636K]
Down With The System is Goldlewis' only reversal option in Guilty Gear Strive and a valuable tool to punish overly-aggressive players. It also functions as a combo finisher and can sometimes even be used to initiate combos.
Burn It Down is a more unreliable use of Tension, it simply summons multiple energy beams into the stage that strike from above. The amount of beams and damage is dependent on the Security Level. It can be used to force a knockdown or initiate an offense in Guilty Gear Strive.

Are you stuck on today's Wordle? Our Wordle Solver will help you find the answer.