
'%20x='0'%20y='0'%20height='100%25'%20width='100%25'%20%0A%20%20%20%20%20%20%20%20%20%20xlink%3Ahref='data:image/jpg;base64,/9j/2wBDAAYEBQYFBAYGBQYHBwYIChAKCgkJChQODwwQFxQYGBcUFhYaHSUfGhsjHBYWICwgIyYnKSopGR8tMC0oMCUoKSj/2wBDAQcHBwoIChMKChMoGhYaKCgoKCgoKCgoKCgoKCgoKCgoKCgoKCgoKCgoKCgoKCgoKCgoKCgoKCgoKCgoKCgoKCj/wgARCAAGAAoDASIAAhEBAxEB/8QAFgABAQEAAAAAAAAAAAAAAAAAAAUH/8QAFQEBAQAAAAAAAAAAAAAAAAAAAwX/2gAMAwEAAhADEAAAAJWdA1P/xAAgEAACAAUFAQAAAAAAAAAAAAABAwACBAURBhQVIqKy/9oACAEBAAE/ANR0nEpdu6hrEUyZGLCZQD2mIPzBuVuycm4eI//EABgRAAIDAAAAAAAAAAAAAAAAAAACAQNB/9oACAECAQE/AEuedP/EABgRAAMBAQAAAAAAAAAAAAAAAAECEQAD/9oACAEDAQE/AH5IIZv/2Q=='%3E%3C/image%3E%3C/svg%3E)
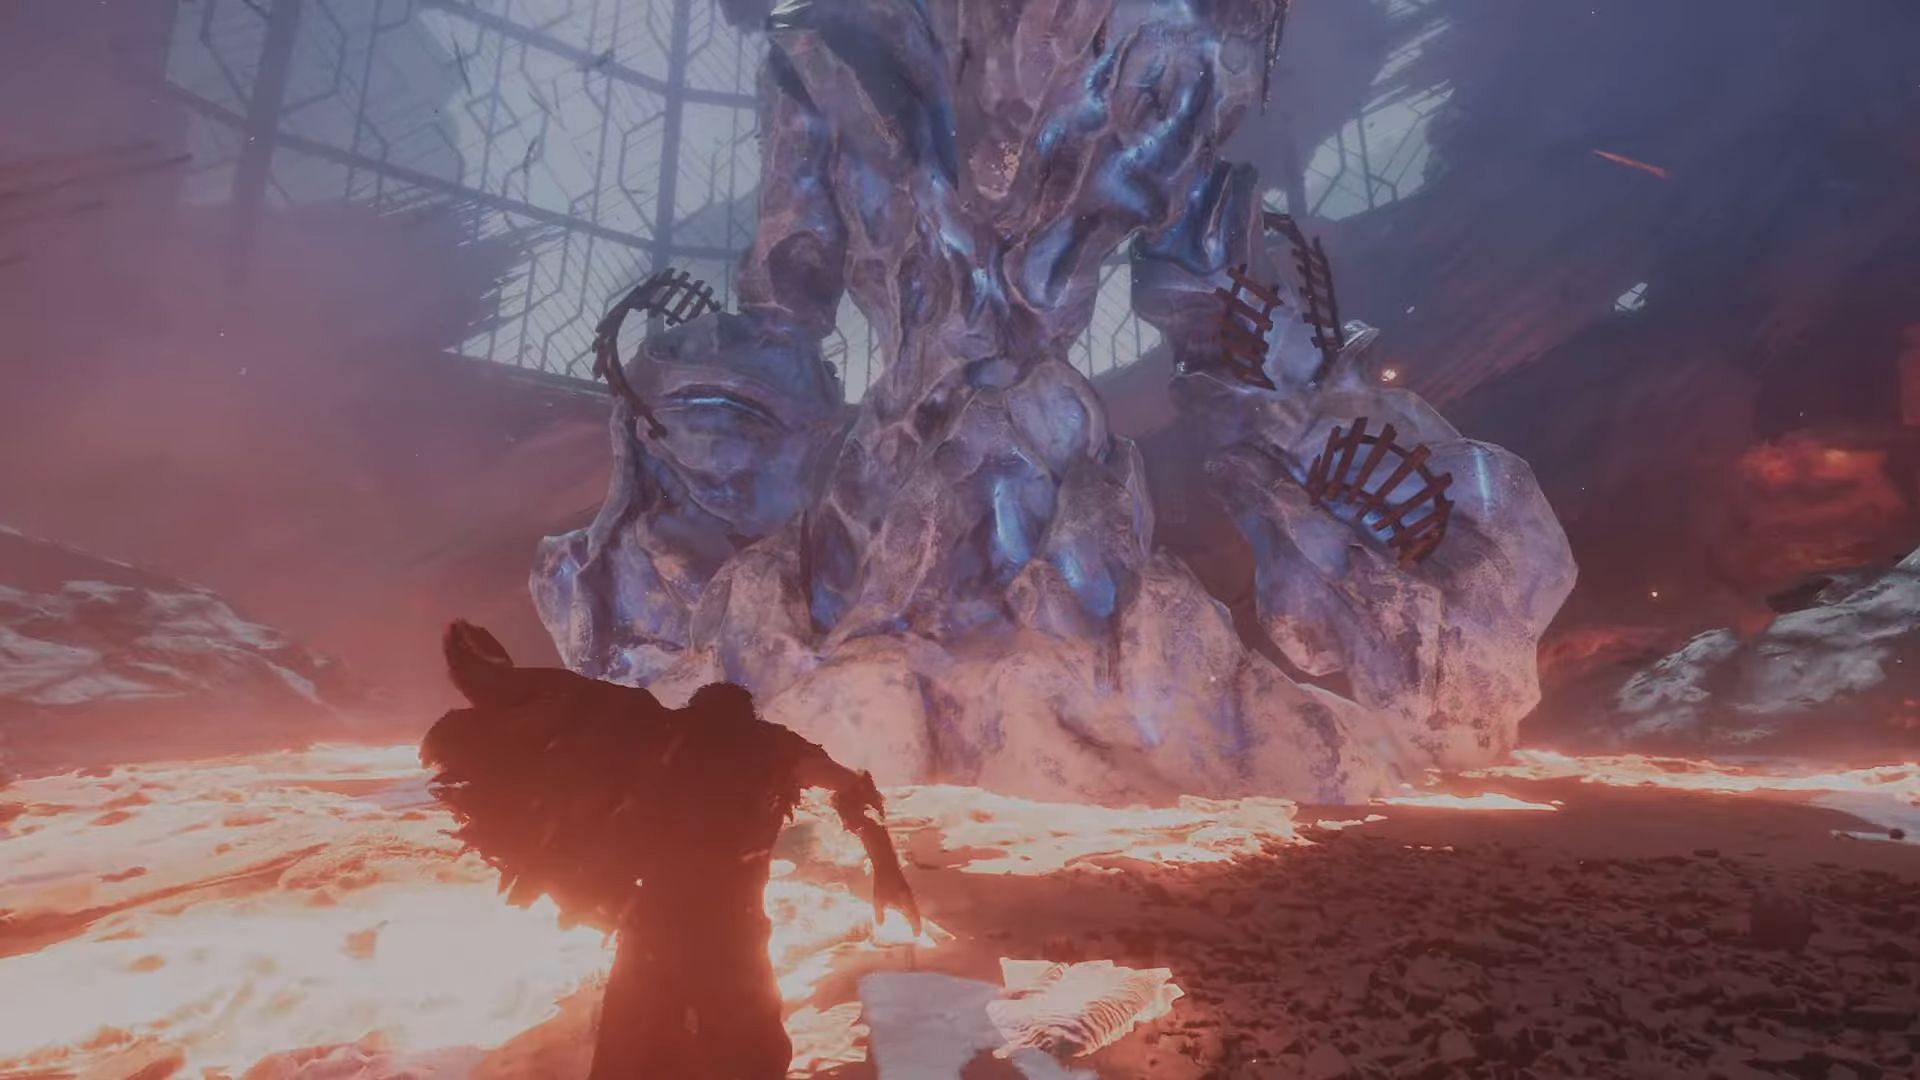
Gargant in Clair Obscur: Expedition 33 is a mid-game optional boss that you’ll encounter in three different locations. It may not pursue you like other enemies, but don’t be deceived — this massive statue can switch between Fire and Ice modes, punishing you severely if you attack carelessly.
This article breaks down everything you need to know to beat Gargant in Clair Obscur: Expedition 33 using the right strategy and real-time team swaps.
Note: This guide is a work in progress, and more details will be added later.
Looking for Crossword hints & solutions? Check out latest NYT Mini Crossword Answers, LA Times Crossword Answers, and Atlantic Crossword Answers
How to beat Gargant in Clair Obscur: Expedition 33
Where do you find Gargant (all locations)?

There are three places where you’ll fight Gargant in Clair Obscur: Expedition 33, but each version hits with the same mechanics — Stance swaps and punishing counters:
- Frozen Hearts: From Icebound Terminal, cross the bridge into the arena.
- The Monolith: Start at Tainted Hearts. Head through the arch, cross the bridge, then turn left when you see a broken train part. The shadow at the back is your cue — walk in, and the fight begins.
- Flying Manor: In the plaza where the bodies of the Nevrons are displayed, head to the back-right stairs — The boss is waiting below.
Read on: Clair Obscur: Expedition 33 walkthrough: How to complete Flying Casino
Gargant Boss fight
As you approach the area from the designated locations, you’ll see it hunched like a dormant statue — the moment you step closer, the fight begins.
Now here’s what makes this fight unique: Gargant swaps between Ice and Fire stances mid-fight, and only takes damage from the opposite element. If he’s glowing blue, he’s in Ice stance — use Fire. If he’s glowing red, that’s Fire stance— use Ice. Using the wrong type against him doesn’t just inflict no damage; it can heal him. So, you can’t simply spam your strongest skills.
Start the fight with Maelle, especially if Gargant opens in Ice stance. Use Brulerum, then chain into Breaking Burn and Combustion once he’s weakened. Her fire kit deals solid damage and helps fill the Break Bar quickly. When he switches to Fire stance, bring in Lune and go straight for Ice Lance or Crippling Tsunami. Ice Lance slows him down, making dodging easier during his big attacks.

Let’s review his movement pattern. This boss might seem slow, but he delivers some strong combos:
- Smash Combo: It begins with a significant wind-up, followed by a delayed multi-hit chain. Don’t mash parry — watch for the rhythm and time it correctly.
- Ice Beam: It shoots a long, freezing beam. If it lands, your character gets frozen. It’s best to sidestep this unless you have perfect parry timing.
- Spin Slam Combo: The Boss spins three times before slamming the ground, causing significant AoE damage. You need to maintain distance and only approach once it’s finished.
- Burn Blast: He yells, charges, and then fires a flame projectile that explodes. The parry window occurs when it glows blue mid-air — don’t parry too early.
Monoco is also a good support pick. Use his Sakapatate Fire in Ice stance and switch to Stalact Punches in Fire stance. His kit lets you stay on the offensive no matter the element.
Rewards
Defeating the boss in various locations will earn you:
- Resplendent Chroma Catalyst
- Grandiose Chroma Catalyst
- Chroma
- Eternal Ice
- Snowim
- Anti-Burn
- XP
Note: Rewards may vary by location.
Check out: How to defeat Monoco in Clair Obscur: Expedition 33

Are you stuck on today's Wordle? Our Wordle Solver will help you find the answer.