
'%20x='0'%20y='0'%20height='100%25'%20width='100%25'%20%0A%20%20%20%20%20%20%20%20%20%20xlink%3Ahref='data:image/jpg;base64,/9j/2wBDAAYEBQYFBAYGBQYHBwYIChAKCgkJChQODwwQFxQYGBcUFhYaHSUfGhsjHBYWICwgIyYnKSopGR8tMC0oMCUoKSj/2wBDAQcHBwoIChMKChMoGhYaKCgoKCgoKCgoKCgoKCgoKCgoKCgoKCgoKCgoKCgoKCgoKCgoKCgoKCgoKCgoKCgoKCj/wgARCAAHAAoDASIAAhEBAxEB/8QAFQABAQAAAAAAAAAAAAAAAAAABAX/2gAIAQEAAAAAuE//xAAUAQEAAAAAAAAAAAAAAAAAAAAC/9oACAECEAAAAD//xAAUAQEAAAAAAAAAAAAAAAAAAAAB/9oACAEDEAAAAH//xAAfEAACAQQCAwAAAAAAAAAAAAABAgMABAUGESISQXL/2gAIAQEAAT8A3/IbJjMvMljr1hksa4AFxLP4PF1+190luwRRLJE0gHZhHxya/8QAFBEBAAAAAAAAAAAAAAAAAAAAAP/aAAgBAgEBPwB//8QAFBEBAAAAAAAAAAAAAAAAAAAAAP/aAAgBAwEBPwB//9k='%3E%3C/image%3E%3C/svg%3E)
Steam Deck users will be happy to hear that they can increase the storage capacity on their device.
A huge problem with gaming machines these days is the insanely large download sizes of some of the most popular games. Running out of storage on PC, consoles, and handheld devices is a common issue for many gamers.
This issue, if faced on the latest device created by Valve, has a couple of solid solutions. Users who want to add on storage space can do so with an external SSD or a microSD card.
Looking for Crossword hints & solutions? Check out latest NYT Mini Crossword Answers, LA Times Crossword Answers, and Atlantic Crossword Answers
How to increase storage on the Steam Deck
MicroSD
Each version of the device comes with a high-speed microSD card slot. Users can insert a card into the slot and select it as their storage device. Additionally, multiple SD cards can be used and interchanged to store a large range of save files.
Users need to carefully open the slot on the device, slide in the microSD card, and choose it as the storage device through the Settings menu. To change it, users just need to press on it gently to pop it out, remove it, and put a new card in its place.
SSD
SSD stands for 'solid-state drive.' It is a type of storage device that uses integrated circuit assemblies to store data. It does so at a much greater speeds than a typical HDD.
The two most expensive Steam Deck options come with an SSD and all three versions can have an external one installed. Each model uses a socketed 2230 m.2 module for its SSD and is not intended for end-user replacement.
That means Valve does not officially condone the replacement of the SSD and the insertion of a new one, though it is possible. Users will just have to purchase the appropriate physical size and storage size that they need.
Users can follow these steps to replace it at their own risk:
- Unscrew the four long screws from the corners of the device
- Unscrew the four smallers screws in the middle
- Gently pry the case off with a plastic tool and don't insert it too far to avoid damage any cables
- Unscrew the three screws holding the metal shield that covers the battery
- Remove the battery using the pull tab
- Unscrew the SSD and lift it out of the Steam Deck
- Remove the metal shield from the SSD and place it on the new one
- Do the previous steps in reverse to input the new SSD into the system
Additionally, users will need to get a bootable USB drive and download SteamDeckOS onto it. They will need to insert the USB drive into the device, hold down the minus volume and power buttons to turn it on, and select the USB drive to install the OS.
Upgrade
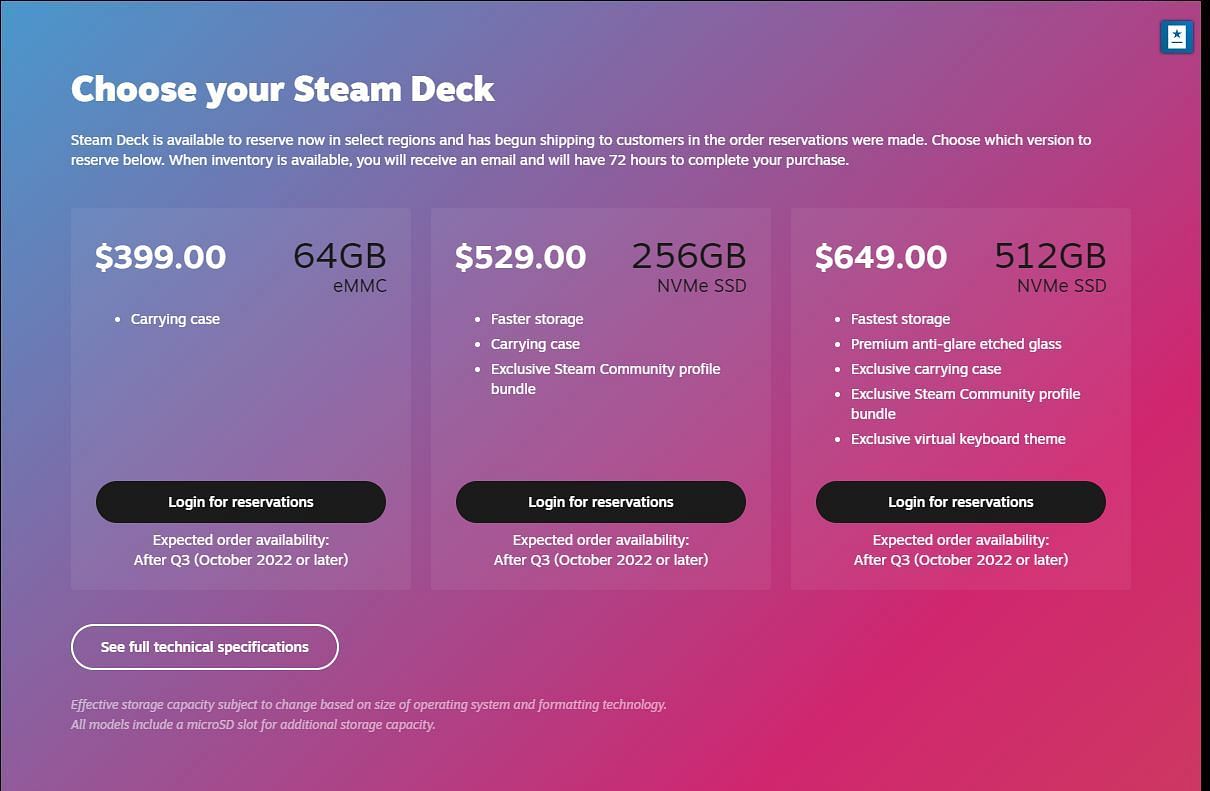
The final option to increase storage size might not be the most viable one for many users, but it is definitely the easiest way. There are three Steam Deck versions available, with the cheapest providing a 64GB eMMC storage unit.
The second-most pricey Deck gives users a 256GB NVMe SSD and the highest priced variant comes with a 512GB NVMe SSD. That's quite the leap from the lower price point.
Not everyone wants to fork out money for the higher-priced versions, so swapping out microSD cards regularly or completely changing the internal SSD unit, which can also be pricey, might be the way to go.

Are you stuck on today's Wordle? Our Wordle Solver will help you find the answer.