
'%20x='0'%20y='0'%20height='100%25'%20width='100%25'%20%0A%20%20%20%20%20%20%20%20%20%20xlink%3Ahref='data:image/jpg;base64,/9j/2wBDAAYEBQYFBAYGBQYHBwYIChAKCgkJChQODwwQFxQYGBcUFhYaHSUfGhsjHBYWICwgIyYnKSopGR8tMC0oMCUoKSj/2wBDAQcHBwoIChMKChMoGhYaKCgoKCgoKCgoKCgoKCgoKCgoKCgoKCgoKCgoKCgoKCgoKCgoKCgoKCgoKCgoKCgoKCj/wgARCAAGAAoDASIAAhEBAxEB/8QAFAABAAAAAAAAAAAAAAAAAAAAB//aAAgBAQAAAAAuVv/EABQBAQAAAAAAAAAAAAAAAAAAAAP/2gAIAQIQAAAAL//EABQBAQAAAAAAAAAAAAAAAAAAAAP/2gAIAQMQAAAAf//EAB4QAAICAgIDAAAAAAAAAAAAAAECAxEEBQAxBhMi/9oACAEBAAE/ANX4ym52GTr09cNOs0j32XcJQoCl+uuYmx3kOLDEsmE6ogUMymzQ5//EABcRAAMBAAAAAAAAAAAAAAAAAAACITH/2gAIAQIBAT8AS6f/xAAXEQADAQAAAAAAAAAAAAAAAAAAAiIx/9oACAEDAQE/AGnD/9k='%3E%3C/image%3E%3C/svg%3E)
In Sekiro: Shadows Die Twice, Genichiro Ashina is the same guy who took Sekiro's arm at the beginning of the game. If you're reading this, then you probably are thirsty for revenge and I don't blame you.
So how do we beat Genichiro Ashina? Well, you might have guessed that it's clearly not a walk in the park. In fact, Genichiro Ashina is the first boss in Sekiro that has three phases! Sounds impossible right? Well, it's actually not if you know what exactly to do.
Okay, so first thing's first. You will need the Firecracker prosthetic weapon and save it for later. Don't use it in the first two phases of the fight. Also, it's recommended to have at least seven healing gourds because trust me, you'll be needing them a lot. I personally had seven and it barely did the work.
Moving on, so keep in mind that this fight is probably the first one where you would actually need to have good deflection skills because otherwise, the fight is impossible to win. Now what's really good is that Genichiro's posture fills very quickly unlike other bosses like Lady Butterfly. You need to keep attacking him rigorously to fill them up and deflect them at the right time to protect yourself as well. I know it might sound overwhelming but trust me, you'll get used to his tricks very easily. I mean, you don't really have an option here now, do you?
Looking for Crossword hints & solutions? Check out latest NYT Mini Crossword Answers, LA Times Crossword Answers, and Atlantic Crossword Answers
So Genichiro Ashina has three major types of attacks in phase 1 and 2 of this fight that you need to be cautious about. They are:
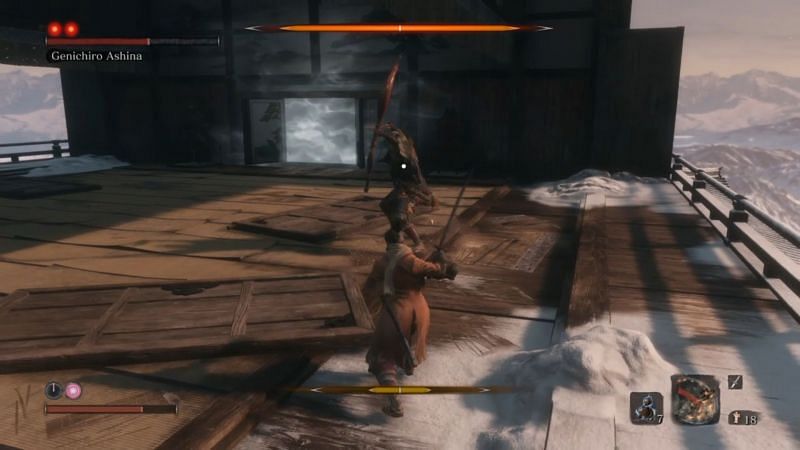
#1. A sweeping attack which you will know once the red kanji symbol appears.
#2. Air attack which does major damage as well as the consecutive thrust attack while another red kanji symbol flashes on the string.
#3.Consecutive range attacks from his bow which can be deflected but might fill up your posture meter.
Firstly, try and pin him at one end of the arena and start raining attacks.
So the first thing you need to keep in mind is that you need to corner him at the wall. Keep deflecting his attacks until you get him pinned to the wall. After that, start unleashing your attacks. He won't be able to perform much of his attacks once he's grounded, giving you an easy opportunity to fill up his posture fast.
Fill his posture meter fast by the help of Mikiri counter when the red kanji symbol flashes.
Moving on and talking about the attacks I mentioned above, you can't really deflect the sweeping attack. So. the only thing to do here is press O (on PS4) for the Mikiri counter. This will fill up his posture meter a lot and that my friend, is all you can ask for in such a critical situation.
Now moving on, once he's cornered, he will jump and perform an upwards attack. You can easily deflect this with your sword but he will come with a thrusting attack. Quickly counter it using the Mikiri counter by pressing O (on PS4) and boom! His posture will come down in no time.
Rest of his attacks are very basic and can be easily deflected, which shouldn't be much of an issue. Although, keep in mind that when hacking and slashing his posture down, stop after three or four attacks and press L1 (on PS4) to deflect them because that's when he swings his sword from the right side which can do major damage if you're not careful.
It's the only attack he will use against you while you are going for your usual attacks on him. Be careful and don't rush. It's not Devil May Cry 5.
Counter the lighting attack of phase 3 by jumping up and pressing R1 (on PS4)
After you have killed him twice (it will be easy if you're aware of all the three attacks I mentioned above) Genichiro Ashina will transform himself and add a new combat move to his arsenal. That means real danger for you if you don't exactly know how to counter it.
Now in addition to all the attacks I mentioned above, the only thing different in the last and final phase of this battle is his lighting attack. Once he prepares to do his lighting damage, simply jump up and press R1 (on PS4). This will not only protect you from some substantial damage but will also catch him off guard as the attack falls upon him rather than you. Now isn't that sweet?
Use the firecracker to distract him and do major damage to his vitality during phase 3.
By this time, your hands might get sweaty and the tension will be running high. I won't recommend you to go all in and start slashing away his posture since it's risky. Instead, it's time to use that Firecracker prosthetic I told you to bring.
Now deflect all his basic attacks and while he pauses for a second, simply use the firecracker to distract him and start slashing away at his health.
After churning out two or three attacks, simply dodge away to avoid any major damage. This might make things slow but at such a high panic situation, it's your best bet. Here's hoping it works for you.
If it doesn't, then you can watch the video given below which is of my very own playthrough of this battle. Enjoy!

Are you stuck on today's Wordle? Our Wordle Solver will help you find the answer.