
'%20x='0'%20y='0'%20height='100%25'%20width='100%25'%20xlink%3Ahref='data:image/jpg;base64,/9j/2wBDAAYEBQYFBAYGBQYHBwYIChAKCgkJChQODwwQFxQYGBcUFhYaHSUfGhsjHBYWICwgIyYnKSopGR8tMC0oMCUoKSj/2wBDAQcHBwoIChMKChMoGhYaKCgoKCgoKCgoKCgoKCgoKCgoKCgoKCgoKCgoKCgoKCgoKCgoKCgoKCgoKCgoKCgoKCj/wgARCAAGAAoDASIAAhEBAxEB/8QAFgABAQEAAAAAAAAAAAAAAAAAAAYH/8QAFQEBAQAAAAAAAAAAAAAAAAAABAX/2gAMAwEAAhADEAAAAMdvAd3/xAAhEAACAQMDBQAAAAAAAAAAAAABAwIABBEFBhIIEyFR0v/aAAgBAQABPwDa7o3sLazuVcw9kV8+5IYyfQp/TpuMuYV6powhnxks+K//xAAXEQEAAwAAAAAAAAAAAAAAAAABAAIh/9oACAECAQE/AKus/8QAGREAAgMBAAAAAAAAAAAAAAAAAQIABCJB/9oACAEDAQE/ALWEQA8n/9k='%3E%3C/image%3E%3C/svg%3E)

Antonio Conte brought in the old-school Catenaccio flavour all the way from the Italy of the 1980s to London of the current era. A solid 3–5–2, which thrives largely on discipline, organization and solidity seems to have fixed Chelsea’s woes.
The Italian tweaked his usual 3–4–3 to a 3–5–2 for the first time playing away against Spurs, wherein he slotted David Luiz into the midfield, which proved to be a masterstroke, given that he had to deal with the physicality of Dembele and Victor Wanyama.
Since then, the thought of 3–4–3 vs 3–5–2 had always been lingering in everyone’s mind and the answer to that seems to have become pretty obvious over time.
There were 2 major problems that Chelsea have undergone since the beginning of this campaign:
a) Lack of defensive diligence/focus
b) Lack of creativity when going forward
Both of these problems have been addressed as a one-stop solution by Conte, with the introduction of 3–5–2, and in this article, let’s look at the first part - defending:
Defensive Shape
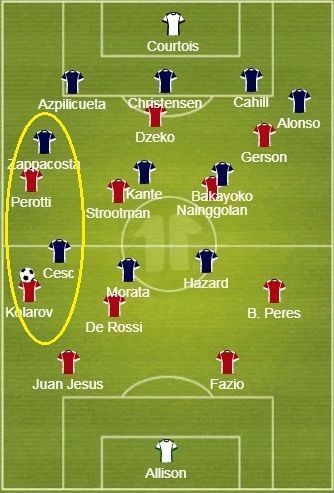
We now consider and analyse the following game between Chelsea and Roma, to assist the narrative.
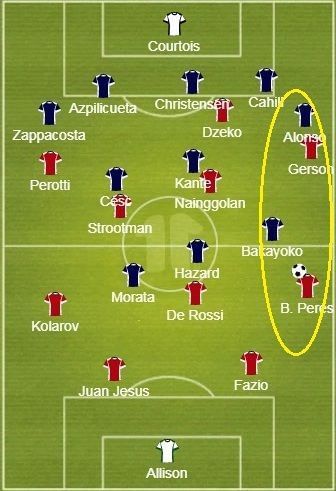
The Blues have been extremely organized as a unit while they are not on the ball, forming 3 lines of defence in the form of a 5–3–2.
- The wing-backs join the back three to make it 5.
- N'Golo Kante in the middle is accompanied by Cesc Fabregas and Tiemoue Bakayoko on either of his sides
- Alvaro Morata and Eden Hazard form the front two.
The shape has brought discipline, focus and clarity to the players as to what each one is supposed to be doing on and off-the-ball. We saw a carbon-copy of this system with Italy in UEFA Euro 2016 and no wonder it has worked wonders for Conte yet again.
Objective
The priority off-the-ball is simple yet one of the hardest things to do and that is to protect the middle. Conte’s men try to screen the opponents from playing through the centre in an attempt to force them wide and cut down the space available to create an attack.
For this purpose, we can see the front two of Morata and Hazard cutting off passing lanes from the centre-back to the central midfielders. Chelsea go one step further and leave the opponent full backs completely free, to allow them to receive the ball from the centre. Once the ball goes wide, the Blues change shape and become more active in closing down space.
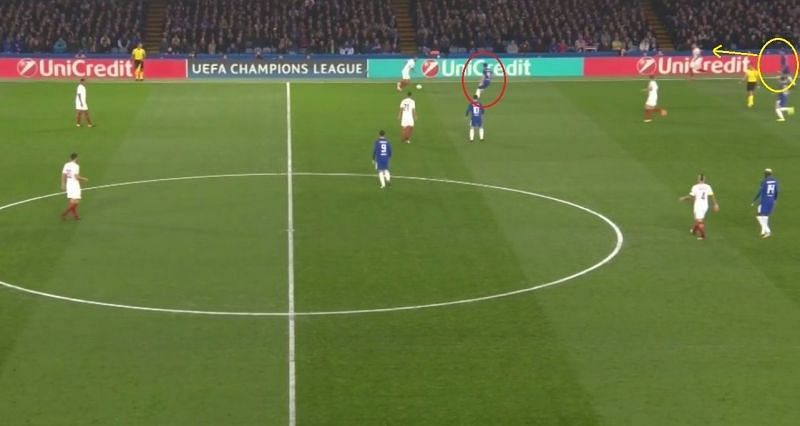
As you can see, once the ball goes to the opponent right-back (Bruno Peres), the near-side central midfielder (Bakayoko, in this case) goes from the centre to close down space.
Both Alvaro Morata and Eden Hazard hold their positions to avoid the ball entering the central area. This leaves Peres with one option - to move the ball forward and that is by linking up with the right winger (Gerson).
But since it’s Bakayoko who goes to close down Juan Jesus, Marcos Alonso is available to mark Gerson tightly. It wouldn’t be an easy task for Gerson to receive the ball with Alonso’s tight man-to-man marking, thus leaving Peres with the safest option of a pass back to the central defender who gave it to him in the first place.
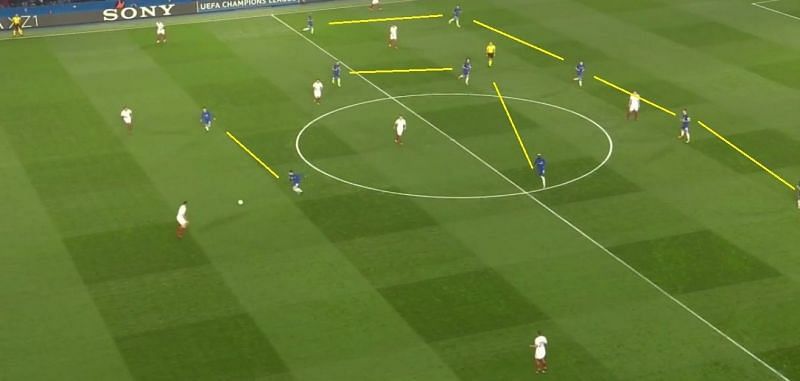
The same is the case when the ball goes to the other wing back (Aleksandar Kolarov). Cesc Fabregas (circled red) comes from the centre to close down space, while Morata and Hazard hold their positions.
This is a method by which Conte tries to disrupt the opponent’s build-up play, forcing him to be more adventurous and risk losing possession while trying to attack.
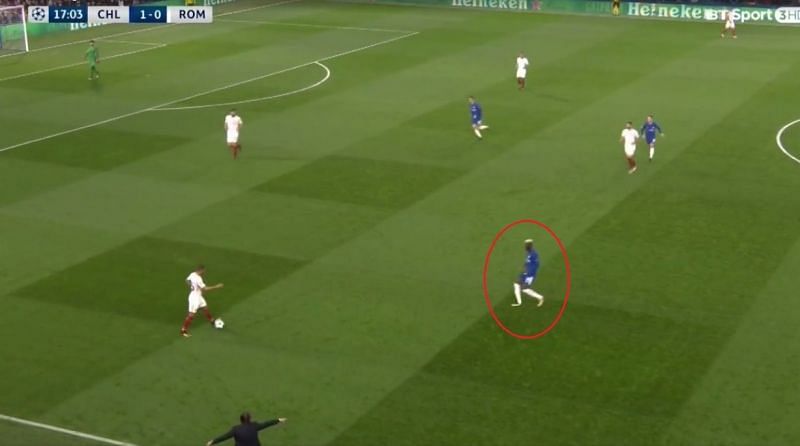
This is exactly what happened even in the game against Roma. The second of the 3 goals they scored, came from an adventurous ball surpassing Chelsea’s midfield and defence to find Edin Dzeko, who found the net with his first touch.
The Triangle
The principle remains the same - to not allow the ball to enter and be played through the centre and force the opponent wide. Once the ball is forced wide, the triangular shape formed by the wing-back, near-side centre-back and near-side midfielder team up to squeeze out the space available.
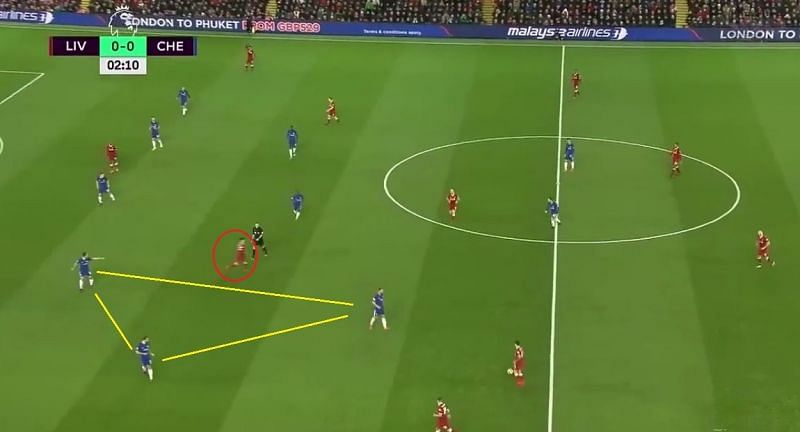
The above image is from the 1–1 draw against Liverpool. Here, Alex Oxlade-Chamberlain (circled red) comes short to open a passing option and pull Chelsea out of shape, but Azapilicueta does not follow him and keeps the triangle (along with Davide Zappacosta and Danny Drinkwater) intact.
This is the triangle which is key to Chelsea’s defensive system as after the ball is forced wide, it is a challenge for any attack to outnumber three players defending the wide areas, as the attacking team would already lack space when they go wide with the touchline serving as a boundary.
Flexibility against different opponents
Impressed already? Well, there’s more to come if we dive deep into the game against Manchester United, where Chelsea triumphed 1–0 and, arguably, were in command across all departments.
Here it was a different beast that Conte had to handle, as Manchester United decided to field a 3–5–2 of their own and hence the game was tactically poised.
Chelsea changed their shape and movement off-the-ball this time and this is how:
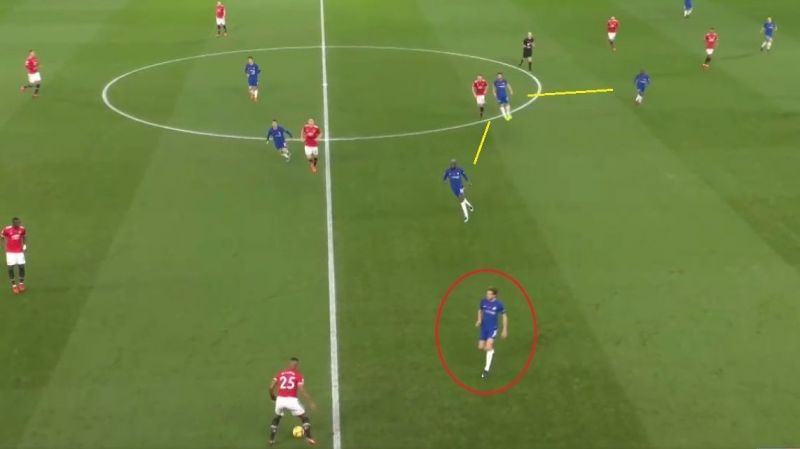
Morata and Hazard sat in the middle to block the passing lanes from the centre backs (Eric Bailly, Chris Smalling, and Phil Jones) to the central midfielders (Nemanja Matic and Ander Herrera). Hence, the back-three of Manchester United had a much safer option of using the wingbacks (Antonio Valencia and Ashley Young).
As you can see in the picture above, right-wing-back (Valencia) receives the ball out wide from the centre-back and now he isn’t closed down by a Chelsea midfielder, but Alonso himself decides to come out of position all the way to close him down.
In this case, there was no need for Alonso to stay back like he did in the Roma game as he had to deal with a winger then. While here, Manchester United had a front two and the wing-backs being the only source for width.
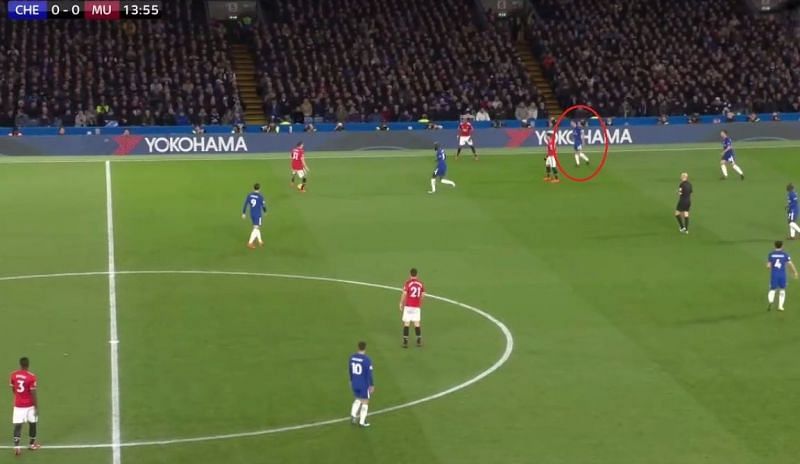
As you can see, Zappacosta and Alonso advancing to mark Young and Valencia, would still keep Chelsea out of danger as they have an extra man advantage at the back with 3 central defenders.
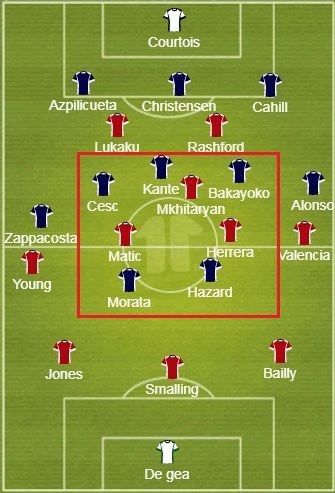
The midfield (red box) has been clearly outnumbered by Chelsea with Morata-Hazard dropping in front of Matic-Herrera and their midfield trio is also intact, leaving no space for Manchester United to attack through the middle.
Conclusion
These are examples as to how Conte has taken care of the Blues as far as the defensive unit of the 3–5–2 is concerned. To sum it up, it has been all about being organised, disciplined and playing the respective roles precisely, to maintain the shape and force the opponents wide and deny them space.
Images source:
www.fullmatchreplay.com
