
'%20x='0'%20y='0'%20height='100%25'%20width='100%25'%20%0A%20%20%20%20%20%20%20%20%20%20xlink%3Ahref='data:image/jpg;base64,/9j/2wBDAAYEBQYFBAYGBQYHBwYIChAKCgkJChQODwwQFxQYGBcUFhYaHSUfGhsjHBYWICwgIyYnKSopGR8tMC0oMCUoKSj/2wBDAQcHBwoIChMKChMoGhYaKCgoKCgoKCgoKCgoKCgoKCgoKCgoKCgoKCgoKCgoKCgoKCgoKCgoKCgoKCgoKCgoKCj/wgARCAAHAAoDASIAAhEBAxEB/8QAFQABAQAAAAAAAAAAAAAAAAAABAf/2gAIAQEAAAAAkwP/xAAUAQEAAAAAAAAAAAAAAAAAAAAE/9oACAECEAAAAA//xAAUAQEAAAAAAAAAAAAAAAAAAAAE/9oACAEDEAAAAF//xAAeEAACAQMFAAAAAAAAAAAAAAABAgQABxEDBRMUMf/aAAgBAQABPwBLYzkjP25S6MkZGFAdKS3G/soZFilT4eWv/8QAGBEBAAMBAAAAAAAAAAAAAAAAAgABA0H/2gAIAQIBAT8A21QBVdn/xAAYEQACAwAAAAAAAAAAAAAAAAAAAgEDIf/aAAgBAwEBPwCK1bD/2Q=='%3E%3C/image%3E%3C/svg%3E)
Given the plethora of information and the various schools of thought on fitness, it can be easy to find yourself in a state of analysis-paralysis during the formative stages of your fitness journey. “Where do I start from?”, “Which gym should I join?”, “Should I focus on cardio or weight training?” make up a rather small subset of the host of questions that spring to mind early on.
Well, fret not! The following set of tried-and-tested beginner workout tips is designed to separate the signal from the noise and dispel any initial confusion you may have whatsoever. A gym membership is not a prerequisite; you can get started as early as today in your home, regardless of your current fitness level. Moreover, these home exercises require no fancy equipment; a yoga mat would be a nice-to-have but is not a must. Lastly, the workouts have been cherry-picked such that they maximize impact to all parts of your body.
I know that you are excited to hit the ground running; however before you get started, I would recommend a 5-10 minute warm-up routine to further enhance the effectiveness of your workout and minimize the risk of injury.
Without further ado, let's dive into 6 of the very best home workouts for beginners!
#1 High Knees
Instructions
Step 1: Stand upright with your feet approximately hip-width apart.
Step 2: Drive one knee up in front of your body to hip-height, while swinging the opposite arm. Bring the same leg back down and repeat this same motion for the other knee.
Step 3: Once comfortable with your balance and form, gently pick up the pace and alternate knees with a hopping motion, while ensuring that the thigh is parallel to the ground when that knee is raised.
Sets and Reps: Once comfortable with the exercise, perform 3 sets in total going from 15 reps to 20 to 30 (each leg).
Important Tips: When bringing down your knees, do not rest your heels on the ground; instead, finish the descent on your toes. Contract your abdominals while performing this motion to engage the core. Keep your torso straight; do not bend or curve your back.
Also, read 6 Explosive Home Workouts To Hit Every Muscle.
Modification: If you are unable to complete this movement, try slowing down the pace by reducing the intensity of the hopping motion.
Merits
- Improves coordination, which also improves efficiency while running
- Optimizes flexibility and endurance
- Strengthens the lower body (glutes, hip flexors, quads)
- Improves overall cardiovascular health
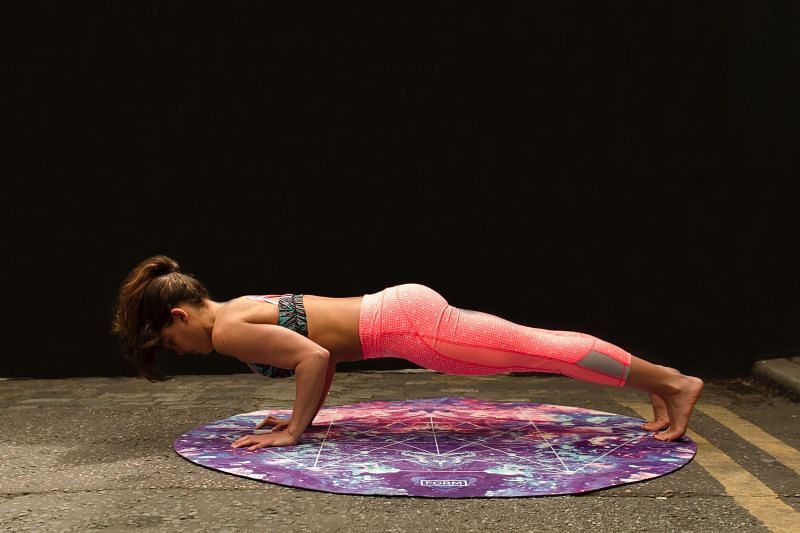
#2 Pushups
Instructions
Step 1: With your knees resting on the ground, place the heels of your hands underneath your shoulders and just a tad wider than shoulder-width.
Step 2: Come into the high plank position by walking the feet back until your legs are fully stretched and you are on the balls of your feet. Make sure that your back is flat and your head, spine and hips are all in a straight line.
Step 3: Keeping your core tight, slowly lower yourself by bending your elbows without flaring them out too wide. Keep them compact and close to your body. Try lowering yourself until your chest is a couple of inches away from the ground.
Step 4: Lift yourself back up to the high plank position by pressing the heels of your hands against the ground and maintaining the activation of your core. Exhale as you push yourself back up.
Sets and Reps: Once comfortable with the exercise, perform 3 sets in total, going from 10 reps to 12 to 15.
Important Tips: Do not bend your back or lift your pelvis too high. Your head, torso, and hips should all be aligned. Constantly maintain your abdominals and glutes tight. Do not strain your neck by trying to look forward; always stare at a fixed point on the floor.
Also, read 5 Explosive Push Up Workouts To Build A Strong And Muscular Chest.
Modification: If you are unable to complete this movement, rest your knees on the ground while performing the movement.
Merits
- Tones and strengthens the entire body, especially the upper body and core, thereby reducing the risk of lower back and shoulder injuries
- Improves overall posture, balance, and stability
- Improves cardiovascular health
#3 Jump Squats
Instructions
Step 1: Stand upright and position yourself such that your feet are approximately shoulder-width apart.
Step 2: Keeping your back straight and chest up, bend your knees and lower your hips towards the ground, as if you are about to sit on a chair. Continue going lower until your upper thighs are at least parallel to the ground. Make sure that your knees do not flare out beyond your toes. You should feel your weight concentrated in the heels of your feet. Inhale while going down. This is the regular squat position.
Step 3: While transferring your weight from the heels to the balls of your feet, jump as high as you can while swinging your arms overhead for momentum and maintaining your abdominals and glutes well contracted. Exhale while jumping up.
Step 4: Land quietly and softly back into the regular squat position, while keeping your feet straight. Make sure that your toes make contact with the ground first before transferring your weight to the heels of your feet. Immediately jump back up again.
Sets and Reps: Once comfortable with the exercise, perform 3 sets in total, with each set comprising 10-12 reps.
Important Tips: Keep your back straight while squatting down and really engage the core. To prevent strain on the back, try to prevent your shoulders from leaning out beyond your knees.
Modification: If you are unable to complete this movement, bend your knees less during the downward movement. Alternatively, try regular squats instead of jump squats.
Merits
- Improves agility and explosive power
- All else being equal, jump squats burn more calories than regular squats
- Increases lower-body and upper-body strength
- Improves flexibility in the ankles and hips
#4 Mountain Climbers
Instructions
Step 1: With your knees resting on the ground, place the heels of your hands underneath your shoulders and shoulder-width apart. Your fingers should be facing forward.
Step 2: Come into the high plank position by walking the feet back until your legs are fully stretched and you are on the balls of your feet. Make sure that your back is flat and your head, spine ad hips are in a straight line. Keep your core tight by squeezing the stomach muscles.
Step 3: Pull one knee up from the ground and thrust it forward as far as you can. Keep your core contracted throughout this motion.
Step 4: Straighten your leg by pushing this knee back to the starting position. Simultaneously, drive your other knee forward in the manner described in Step 3.
Step 5: Once comfortable with your form and balance, continue alternating the movement with both knees while gradually increasing the speed of motion.
Sets and Reps: Once comfortable with the exercise, perform 3 sets in total, with each set comprising 25 reps (each leg).
Important Tips: When driving the knee forward towards the midsection, aim to touch the top of your thigh to your chest. Always keep the core activated.
Modification: If you are unable to complete this movement, try slowing down the pace. Alternatively, complete the full range of motion for one leg before commencing the range of motion for the other.
Merits
- Works all of the body's major muscle groups (quadriceps, hip flexors, glutes, chest, deltoids, lats, lower back)
- Effective form of cardiovascular training
- Improves stamina and strengthens the core
#5 Lunges
Instructions
Step 1: Stand upright with your feet approximately shoulder-width apart. Your hands could either be hanging by the side or placed on your hips. Keep your core and torso tight.
Step 2: Lift one foot a few inches off the ground and slowly take a big step forward while simultaneously lowering the body. The heel of the foot should make contact with the ground first.
Step 3: Continue to lower the body until the forward thigh is parallel to the ground and your shin is vertical, with the weight concentrated in the heel of the foot. Try to prevent the knee from flaring beyond the toes. Inhale as you lunge.
Make sure the other knee is just above the ground, with the thigh approximately perpendicular to the ground and the calf parallel to it.
Step 4: Press against the heel of the front foot to get yourself back into the starting position. Breathe out when coming back to the starting position. Either complete the recommended number of repetitions for one leg before moving on to the other or alternate between the two legs.
Sets and Reps: Once comfortable with the exercise, perform 3 sets in total, with each set comprising 10-12 reps (each leg).
Important Tips: Contract your abdominals while performing this motion to engage to core. Keep your torso straight; do not bend or curve your back.
Modification: If you are unable to complete this movement, take a smaller stride forward and reduce the bend in your front knee. Simultaneously, do not take your back knee all the way to the ground.
Merits
- Helps develop lower-body strength and endurance by working the hips, glutes, quads, hamstrings, and inner thigh
- Improves flexibility of the hips
- Speeds up metabolism and improves overall cardiovascular health
#6 Burpees
Instructions
Step 1: Stand upright with your feet approximately shoulder-width apart.
Step 2: Squat down by bending your knees and then move your hands towards the ground, with your palms facing the ground. Ensure that your palms are shoulder-width apart and placed below the shoulders.
Step 3: Right at the time your palms make contact with the ground, push your knees backwards to come into the high plank position that you assume before the start of a push up.
Step 4: Complete a pushup and then thrust your feet forward towards your hands. As soon as your feet make contact with the ground upon completion of the forward motion, jump up as high as you can.
Step 5: Land in a controlled manner back into the squat position and then repeat the full range of motion.
Sets and Reps: Once comfortable with the exercise, perform 2 sets in total, with each set comprising 10 reps. Finish on a high!
Important Tips: While performing Step 3, keep your core tight and do not excessively arch your lower back. Make sure you lower your body in one straight line to the ground. Keep your elbows and knees soft and relaxed as your complete the full movement. Remember to breathe.
Also, read 6 Intense Burpee Workouts You Should Do For Maximum Impact.
Modification: If you are unable to complete this movement, skip the pushup between the high plank position and the motion of pulling your feet forward towards your hands. Alternatively, avoid the push-pull motion of the feet altogether; simply step them back into the high plank position and step them forward again.
Merits
- Full-body movement which strengthens every major muscle group
- Very effective at burning fat due to the intensity that this movement entails
- Improves stamina and endurance
- Elevates metabolism and improves cardiovascular fitness
After completing your workout cycle, it is imperative that you spend at least 5 minutes cooling down to aid in muscle recovery and to minimize soreness. Remember that your fitness journey is a marathon and not a sprint and as much as you would like to sprint your marathons, doing so would be detrimental in the long-run. Taking proper care of your body through exercise coupled with active rest and repair is the key to sustainable results.
