

'%20x='0'%20y='0'%20height='100%25'%20width='100%25'%20%0A%20%20%20%20%20%20%20%20%20%20xlink%3Ahref='data:image/jpg;base64,/9j/2wBDAAYEBQYFBAYGBQYHBwYIChAKCgkJChQODwwQFxQYGBcUFhYaHSUfGhsjHBYWICwgIyYnKSopGR8tMC0oMCUoKSj/2wBDAQcHBwoIChMKChMoGhYaKCgoKCgoKCgoKCgoKCgoKCgoKCgoKCgoKCgoKCgoKCgoKCgoKCgoKCgoKCgoKCgoKCj/wgARCAAGAAoDASIAAhEBAxEB/8QAFgABAQEAAAAAAAAAAAAAAAAAAAYH/8QAFQEBAQAAAAAAAAAAAAAAAAAABAX/2gAMAwEAAhADEAAAAMxly6b/xAAeEAACAgICAwAAAAAAAAAAAAABAgMRBAUAIQYSUf/aAAgBAQABPwDXeUYm4SDA2uuiYtGkQdBbJb+tKzGwvd1zYQ48GfkxAuRHKydr8PP/xAAZEQABBQAAAAAAAAAAAAAAAAAAAQIDESH/2gAIAQIBAT8AZsSWf//EABcRAQEBAQAAAAAAAAAAAAAAAAECAAP/2gAIAQMBAT8Au17Lv//Z'%3E%3C/image%3E%3C/svg%3E)
Valorant is a competitive multiplayer shooter game, and keeping the computer optimized to run the game as smoothly as possible has always been a concern for serious players.
For performance concerns or due to lack of space in the particular drive the game is installed in, a player often wonders how to move the game to another drive. With the increasing number of updates and advanced graphics, the game takes up quite a bit of space in the disk drive, and it is only increasing by the day.
For a drive to work at its best performance, it takes at least 25% of its maximum capacity to be free. But, if for some reason the drive gets filled up, the performance of the game drops drastically, and it shows. Being a competitive game, the player will obviously seek better performance.

Here is how one can move the game to a different drive.
How to move Valorant to another drive without reinstalling
Valorant can be moved to another drive, SSD, or even another PC in two distinct processes. The easiest way is deleting the game from the previous drive and re-installing the game in the desired drive. However, the whole process takes too long to execute, making it time-consuming.
The other process, however, takes a little bit of knowledge to perform this particular feat. It requires the person to be able to open up two important files and rewrite the system path within them. The exact steps required to move the game to another drive are-
- Cut the “Valorant” and “Riot Client” folders and paste them into the series drive
- Open “C: Disk”
- Click and open the “ProgramData” folder
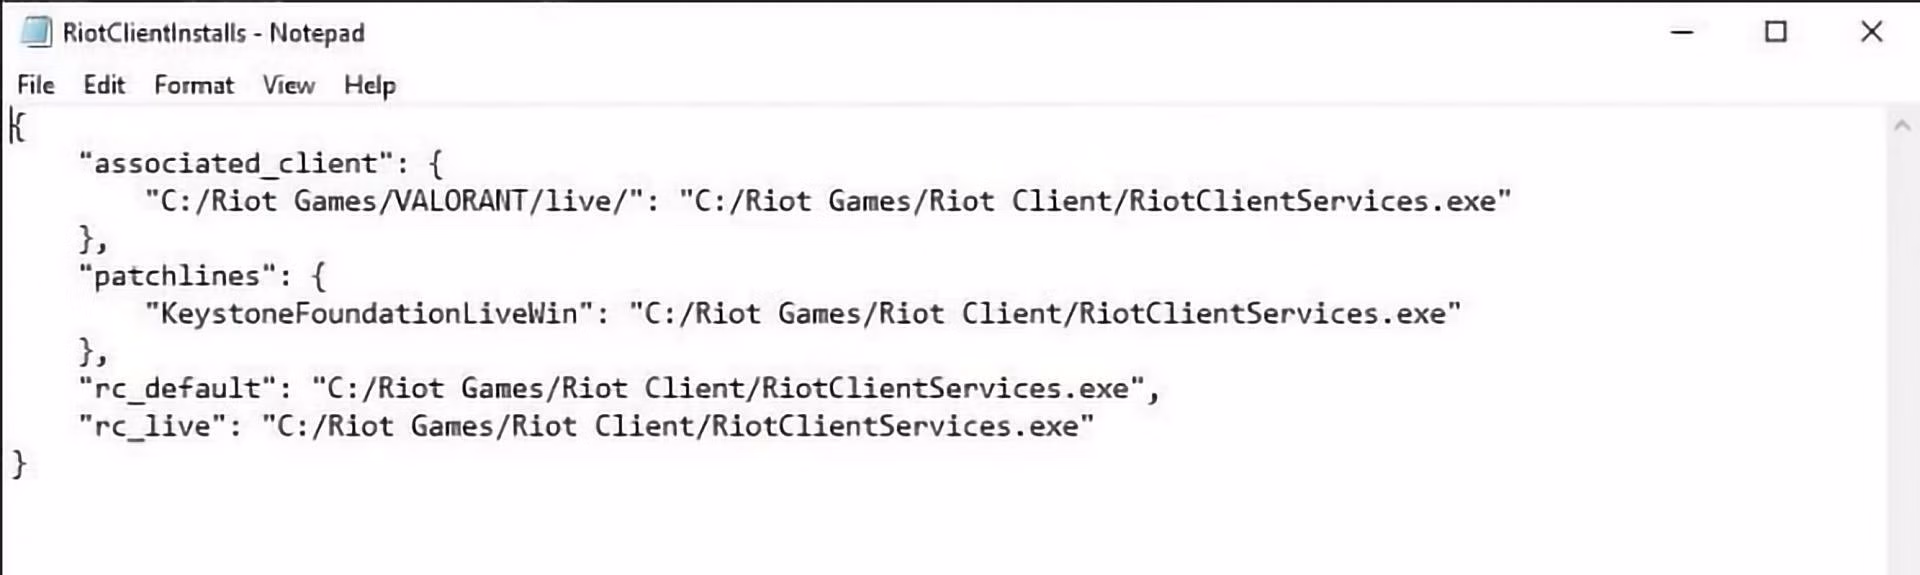
- Open the “RiotClientInstalls.json” file using notepad and replace the path here with the new path and save the file.
- Go to the “Metadata” folder inside the “Riot Games” folder
- Open the “valorant.live” folder
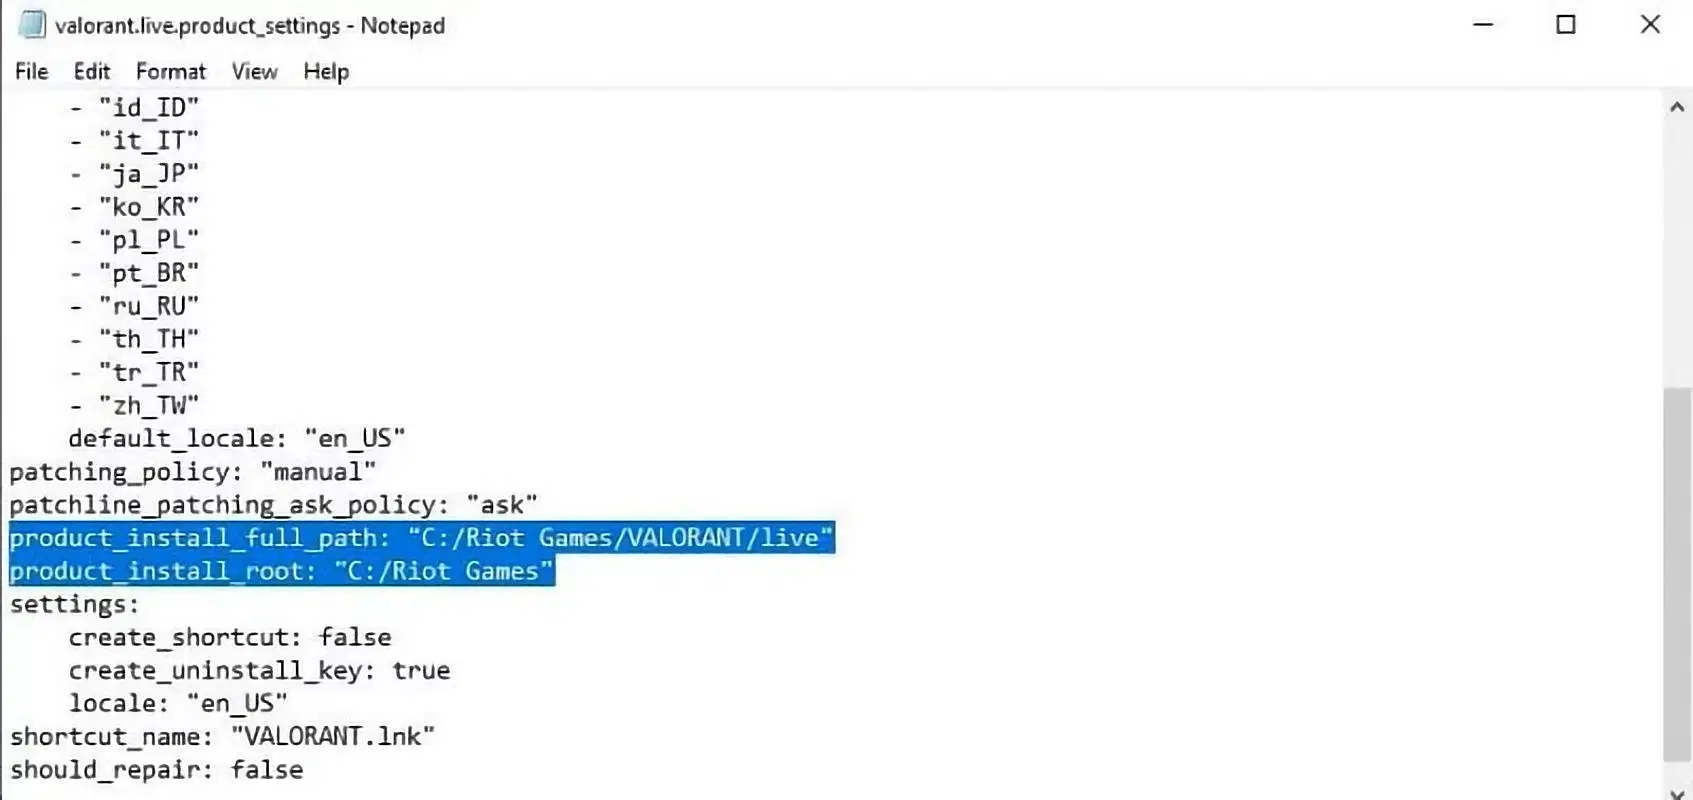
- Within it, open the “valorant.live.product_settings.yaml” file using notepad
- Change the “product_install_full_path” and “product_install_root” lines with the new desired path and save the file
In the off chance that the “ProgramDate” folder is not visible, then navigate to the “View” options of the drive and tick on the “Show Hidden Items” option. Following these few easy steps, one can easily move the game to any other drive without the hassle of reinstalling the whole game. However, if the whole process feels too complicated for someone, they can always take the slower but safer method of re-installing the game.
