
'%20x='0'%20y='0'%20height='100%25'%20width='100%25'%20%0A%20%20%20%20%20%20%20%20%20%20xlink%3Ahref='data:image/jpg;base64,/9j/2wBDAAYEBQYFBAYGBQYHBwYIChAKCgkJChQODwwQFxQYGBcUFhYaHSUfGhsjHBYWICwgIyYnKSopGR8tMC0oMCUoKSj/2wBDAQcHBwoIChMKChMoGhYaKCgoKCgoKCgoKCgoKCgoKCgoKCgoKCgoKCgoKCgoKCgoKCgoKCgoKCgoKCgoKCgoKCj/wgARCAAGAAoDASIAAhEBAxEB/8QAFgABAQEAAAAAAAAAAAAAAAAAAAYH/8QAFAEBAAAAAAAAAAAAAAAAAAAABv/aAAwDAQACEAMQAAAAxmtERj//xAAgEAACAgEEAwEAAAAAAAAAAAACAwEEBQAGERIjMUJh/9oACAEBAAE/ANvZBuOy9fIElDzaBFK55COYj3yP7EToMltJ4C69tQLVtkd3PZes9mn9HPl1/8QAGBEBAAMBAAAAAAAAAAAAAAAAAgABBBH/2gAIAQIBAT8AymmeKf/EABcRAQEBAQAAAAAAAAAAAAAAAAECAAX/2gAIAQMBAT8A6FVKVKjv/9k='%3E%3C/image%3E%3C/svg%3E)
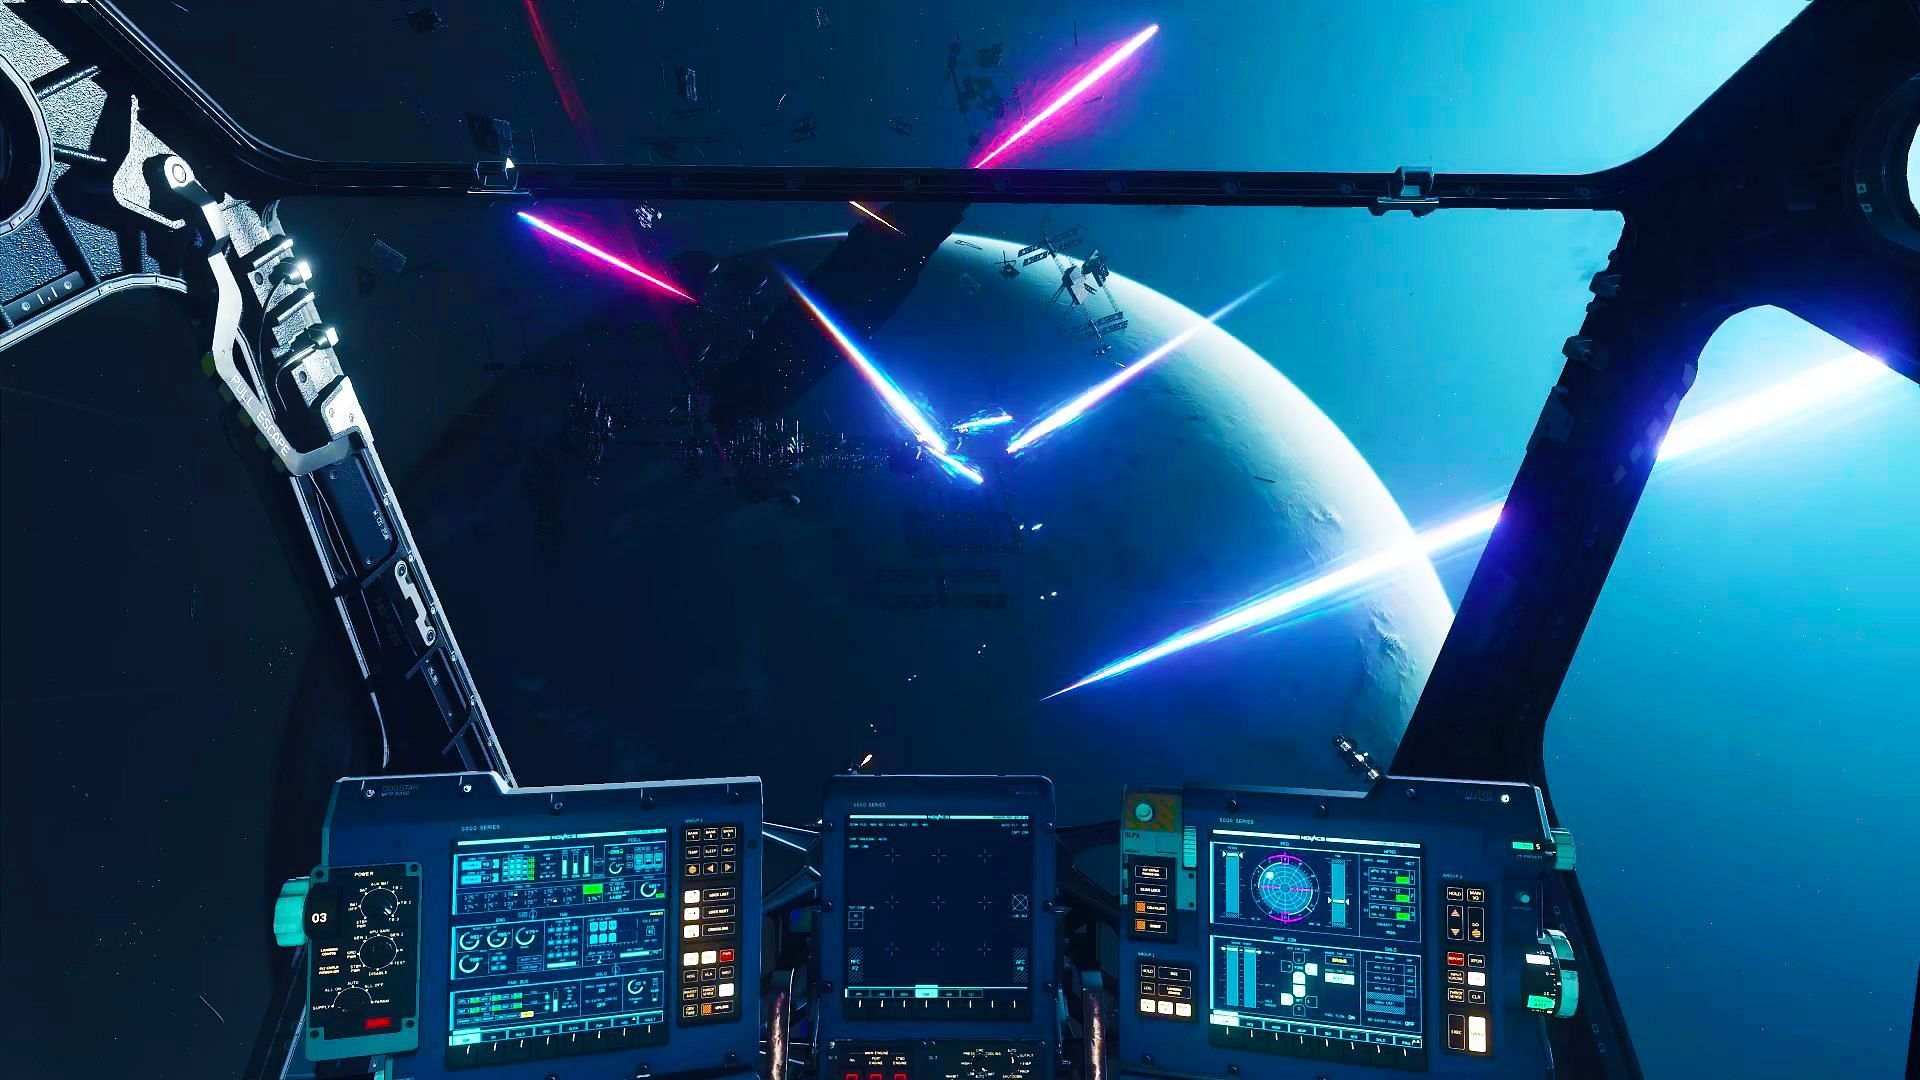
In Bethesda's highly anticipated RPG, Starfield, an exceptional space voyage experience awaits players that includes impressive vehicular combat. Whether engaging in the main story or side missions, one must put their ship's dogfighting skills to the test against various hostile factions. Victorious players receive valuable rewards and cargo, but defeat brings a fiery end to your ship and any crew members aboard.
Important in Starfield's space battles is the learning curve, as it can greatly enhance your ship's capabilities. Dominating the stars will come easily with the right skills.
Hence, we've curated an elaborate manual to equip you with all the requisite information. Below, you'll find a detailed guide that covers every aspect of flying a spaceship on Starfield.
Looking for Crossword hints & solutions? Check out latest NYT Mini Crossword Answers, LA Times Crossword Answers, and Atlantic Crossword Answers
Starfield's best spaceship controls
Learning how to control a spaceship is crucial to Starfield's guide to interstellar travel. When controlling the spaceship, you can access both first-person and third-person views. Subsequently, each perspective offers a unique experience, as some may prove to be more advantageous and fruitful than others.
While the first-person view reveals plenty of combat-related information via the player's HUD, the third-person view offers a broader field of vision, making it advantageous while scanning uncharted territories.
Although your companion, Vasco, will give you a tutorial on how to control a ship, here are the controls for operating it using the Xbox controller and keyboard:
Spaceship (Flight):
- Fire Boosters: Left Stick Button/Left Shift
- Switch Flight Modes: RB/Space
- Toggle POV: View Button/Q
- Fire Weapon 0: RT/Mouse 1
- Fire Weapon 1: LT/Mouse 2
- Fire Weapon 2: Y/G
- Ship Action: 1: X/R
- Select Target: A/E
- Cancel: B/Esc
- Increase System Power: Up (D-Pad)/Up Arrow
- Decrease System Power: Down (D-Pad)/Down Arrow
- Previous System: Left (D-Pad)/Left Arrow
- Next System: Right (D-Pad)/Right Arrow
- Open Scanner: LB/F
- Repair: Right Stick Button/O
- Ship Alternate Control: Hold Left Alt
Spaceship (Locked/Grounded):
- Undock/Take-Off Ship: Y/Space
- Get Up: B/E
- Exit Ship From Cockpit: X/X
- Zoom Camera In: LT/Mouse 1
- Zoom Camera Out: RT/Mouse 2
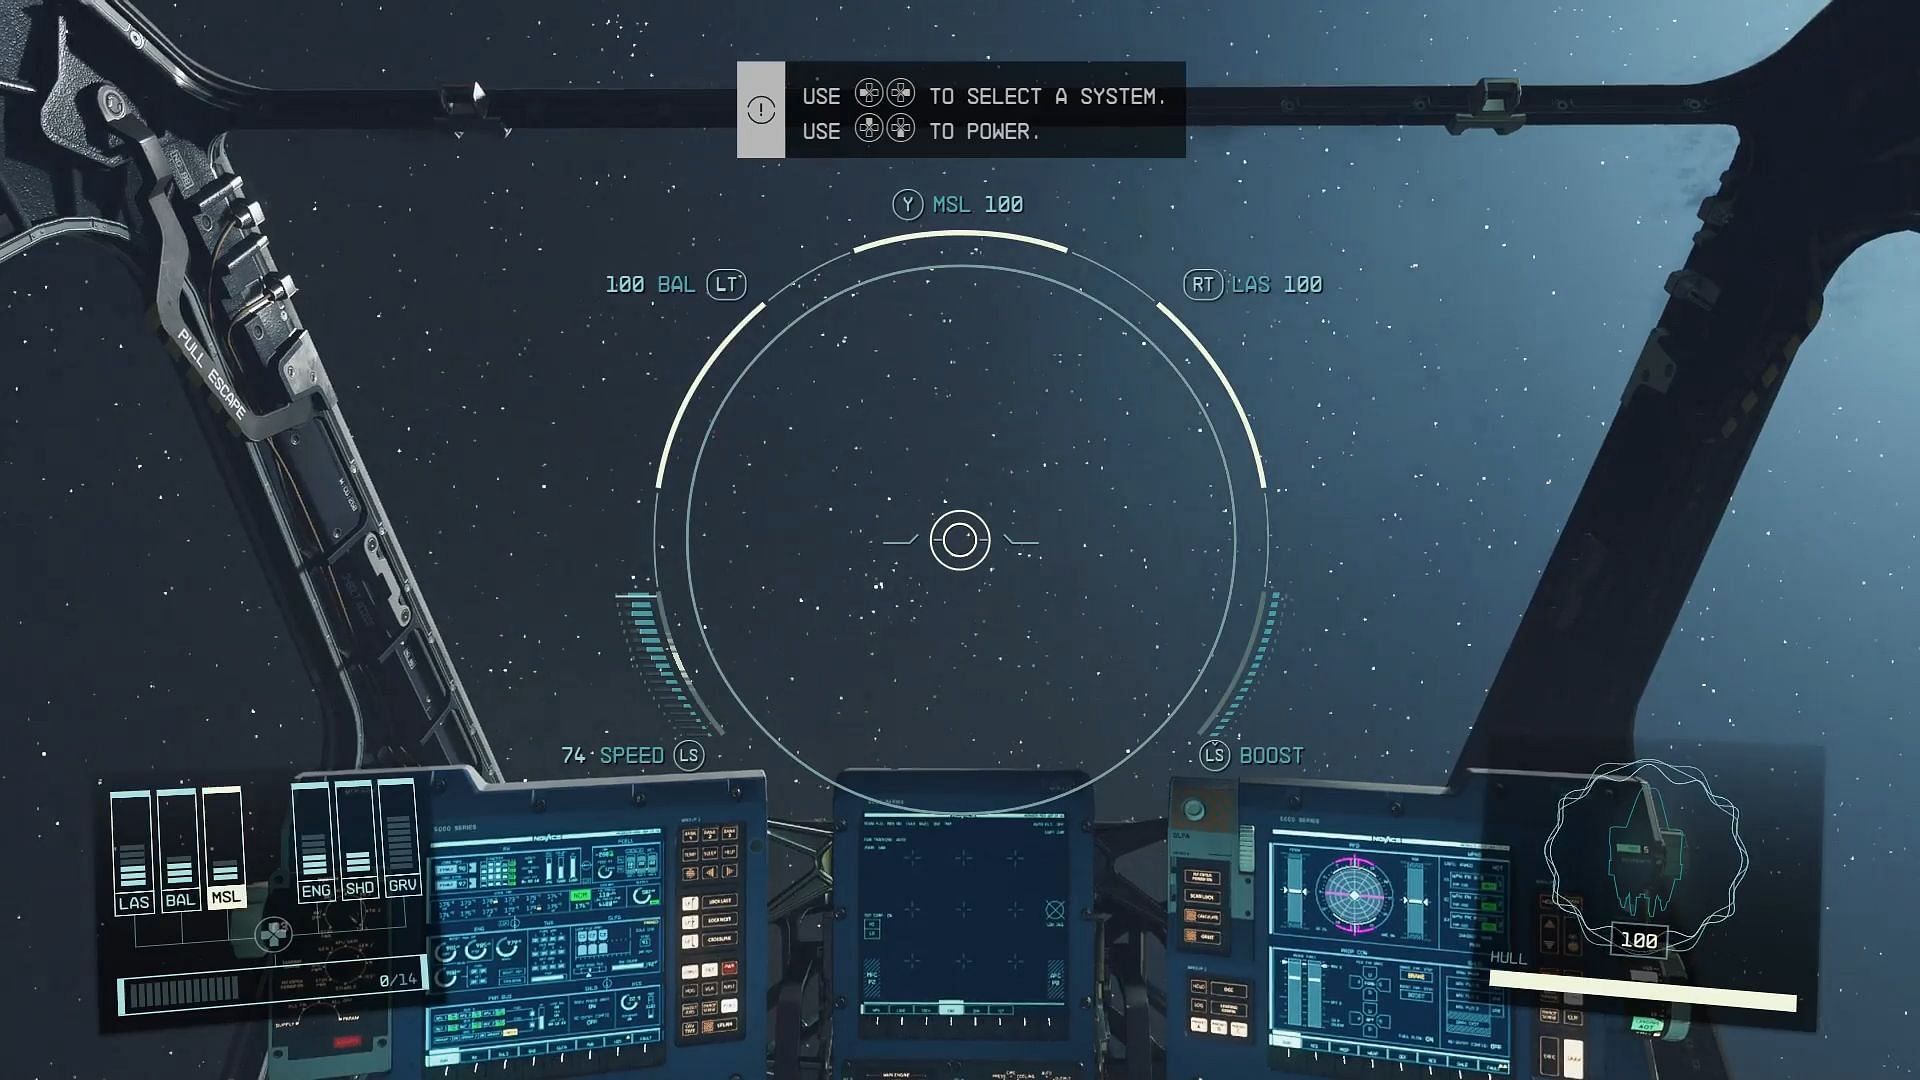
Spaceship systems and power allocation explained
By using Starfield power allocation, you'll be able to distribute your available energy across all your ship's systems. You can even adjust it when flying, prioritizing certain systems over others depending on the situation. The total power available is illustrated at the bottom left of your screen as blue bars.
Here are all the available options:
- LAS: Laser weapon damage and recharge rate
- BAL: Ballistic weapon damage and recharge rate
- MSL: Missile damage and recharge rate
- ENG: Maximum speed
- SHD: Shield strength and recharge rate
- GRV: Jump charge rate
However, don't funnel all your power in one area. Imagine if you simply relied on lasers, ballistics, and missiles, that would increase your damage but diminish your abilities in other departments.
If your engines are weak, you'll suffer through sluggish speeds, and with fewer shields, enemies will enjoy an easier target. Additionally, a GRV with subpar power will cause your getaway to be delayed.
Giving a damaged system more power is the key to repairing crippled systems. Power allocation plays an important role as it hastens the repair of damaged systems, ultimately bringing them back to full strength.
Starfield space combat guide: How to dogfight in space
Weapons
Your vessel in Starfield can come equipped with an array of different weapons, such as missiles, ballistic rounds, and lasers. Enemy shields can be dismantled with lasers, whereas the hull is dismantled by either ballistic rounds or missiles, which inflict tremendous damage.
Acquiring advanced weaponry is also possible after a while, such as particle beam weapons, EM weapons, and automated turrets. Instead of making upgrades to pre-existing systems, you can replace them with these new additions via the expertise of a Ship Services Technician.
With particle beam weapons, you'll be able to attack several sections of a rival vessel. Automated turrets, on the other hand, work automatically and fire at any nearby threats. Lastly, there are EM weapons that can debilitate specific components of an opponent's ship.
Combat
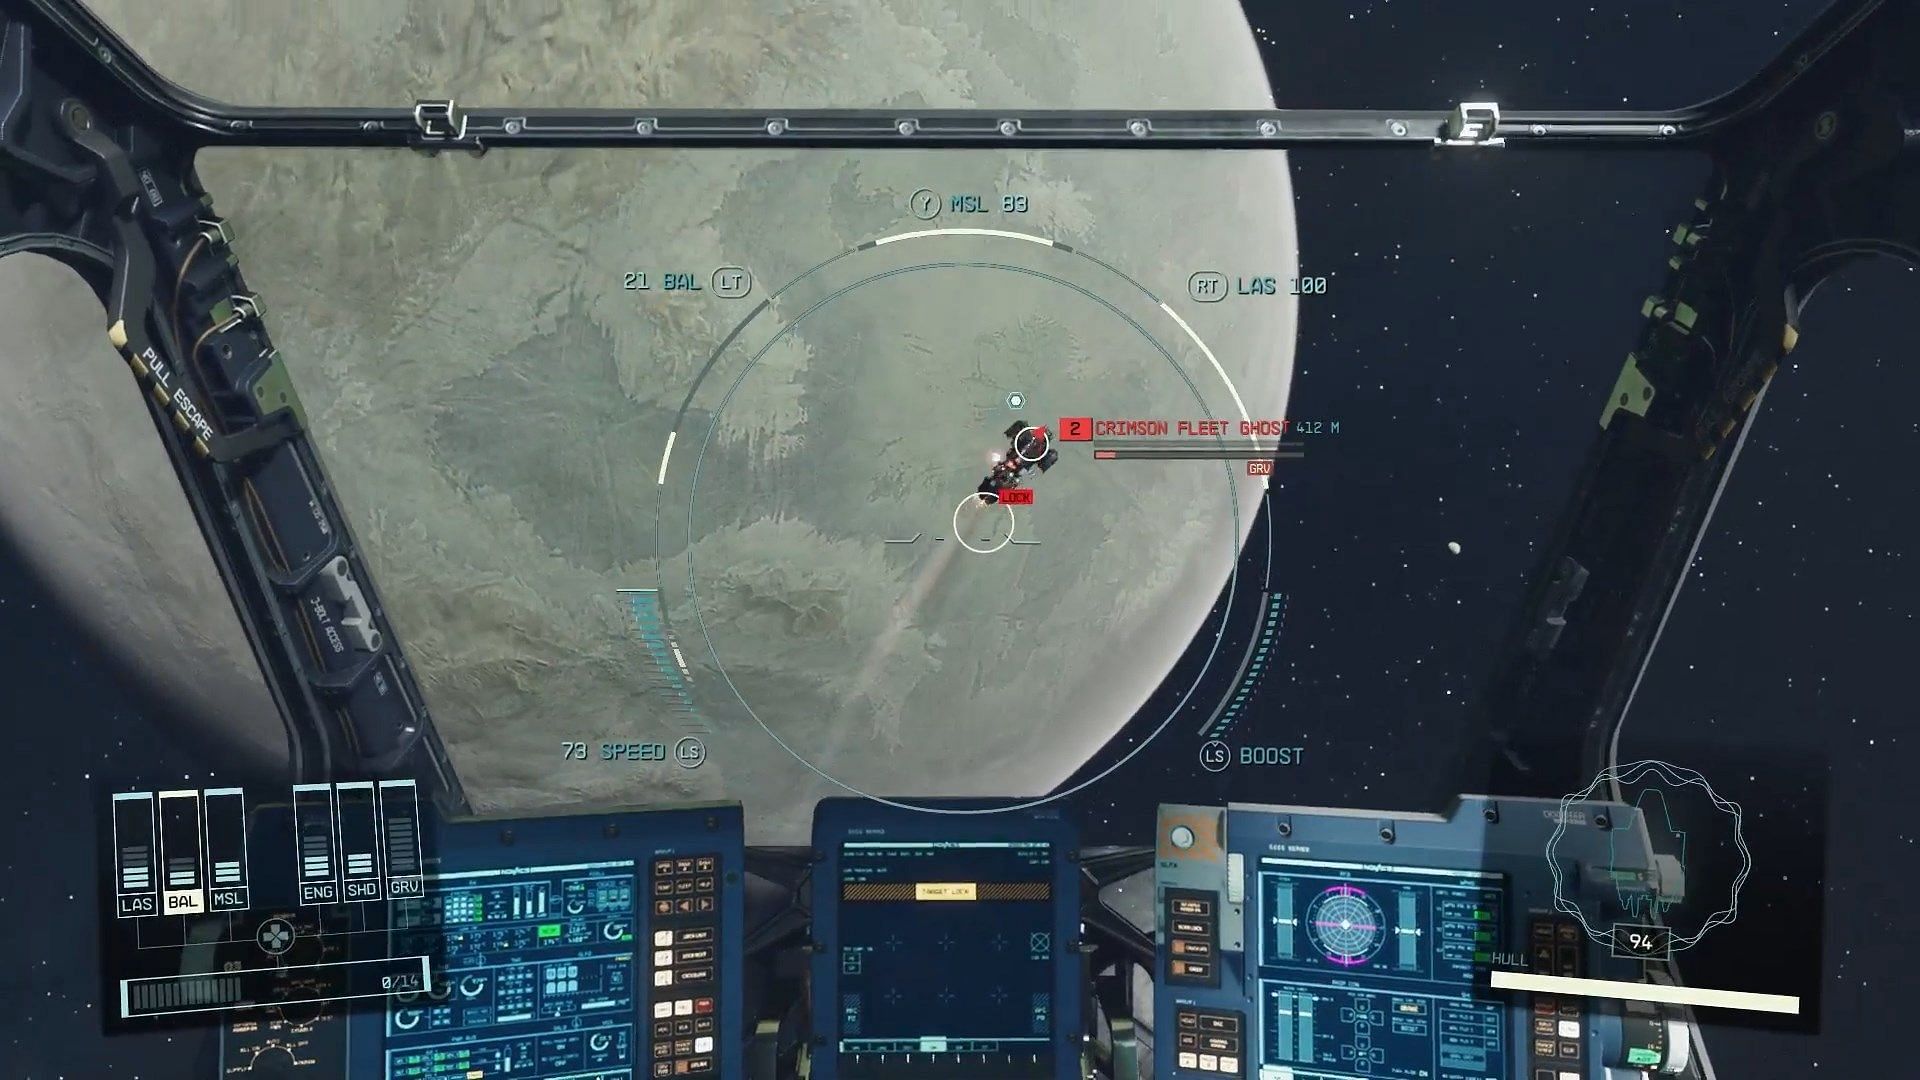
Press the target input during space combat, but remember to cycle through targets by pressing it repeatedly. You can then aim and fire at the target marked by a white circle.
Your ship's targeting mechanism is crucial to ensure your shots hit their mark. You first need to approach the target and have it in your sights before the lock-on feature engages. From thereon, every shot you fire will hit until the lock is disengaged.
Preventing an enemy from fighting by inflicting enough damage is key. When weapons are disarmed, and shield generators are damaged, they are unable to recover. The enemy's ability to move can also be hampered by disabling engines or crippling their GRV drive, preventing their escape from the system.
Importantly, your ship's systems can also be taken out by enemies. To throw an enemy missile off, using your boosters is a highly effective strategy. When in combat, you can repair any hull damage by accessing the ship parts in your Cargo Hold.
How to customize Starfield ships
Class
Starfield places great significance on the ship class that a player chooses to explore the universe in. Various classifications cater to different explorers and ultimately determine the foundational structure that later upgrades will build upon.
Intrinsic stats to build on are different for each class of ship. Take, for instance, crew capacity, as some vessels offer more than others. This feature becomes useful when the player adds companions and NPCs to their crew.
Parts
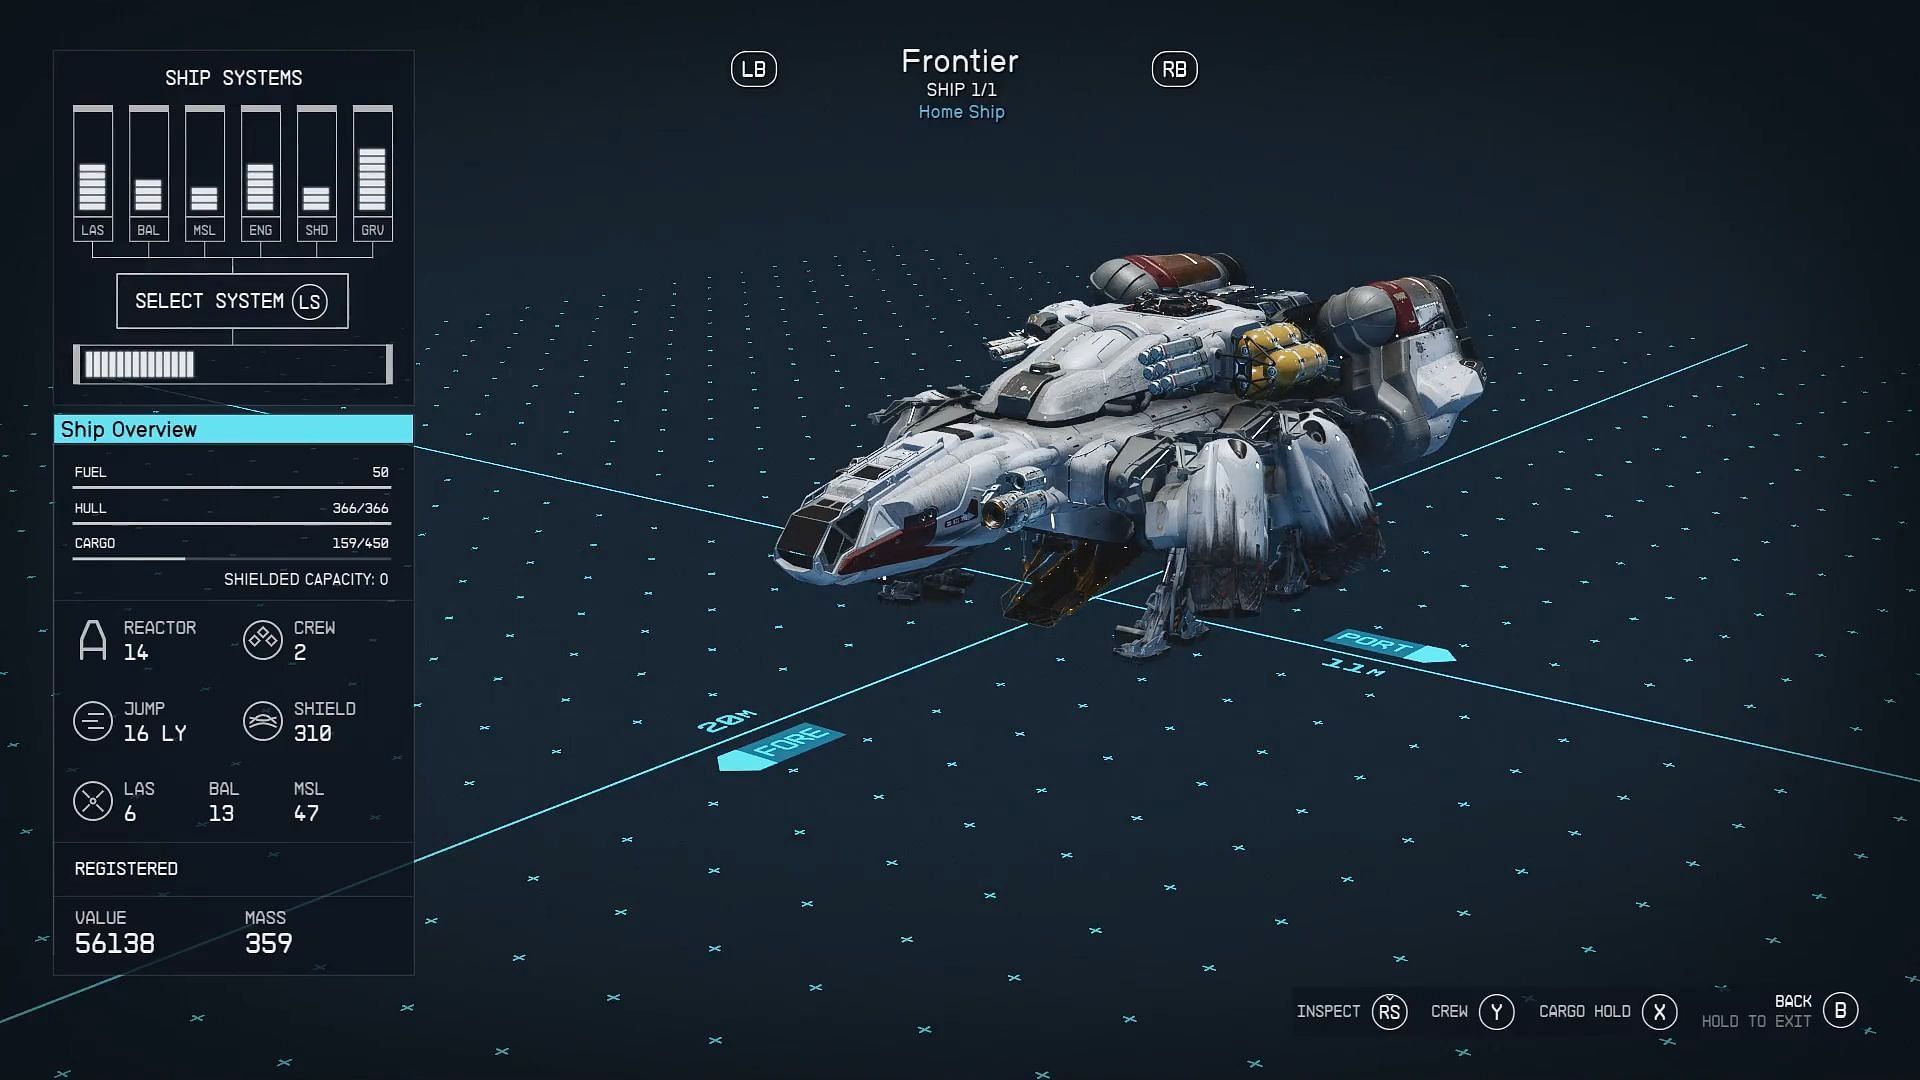
Buying and upgrading parts for their ship is where players can get into the thick of things after acquiring their vessel. Alterations to the ship's layout and functionality occur with different parts.
A ship in Starfield consists of various parts, such as:
- Cockpit
- Engine
- Tank
- Lander
- Cannon
- Modules
- Reactors
- Control Station
Thanks to the countless spaceship manufacturers out there, you have a range of ships and components at your disposal. Opting for more expensive parts means you can equip a greater number of modules and enhance your ship's safety.
Color
By choosing a module in the shipbuilder, Starfield players can personalize the aesthetics of their spacecraft, altering its coloration by section. Coupled with that, there are plenty of fresh coats of paint available.
This wraps up our comprehensive Starfield spaceship guide, covering all its different features and aspects. Be sure to explore our comprehensive guide to the best Starfield ships, as well as expert insights on constructing your starship build.

Are you stuck on today's Wordle? Our Wordle Solver will help you find the answer.