The latest map of Valorant's current rotation, Pearl, has opened the game's competitive meta to unique possibilities. Pro-athletes have already discovered a bunch of Agents who are overpowered in Omega Earth's first in-game representation. One of the best Initiator Agents for Pearl is Fade, who joined the game's roster a few months back.
Pearl features unique characteristics, including a huge mid-section with many angles to lurk from. Based on the real-life location of Lisbon, Portugal, it can be deemed one of the most inspiring map designs in the game. Then again, the community is divided on Pearl's concept, with many criticizing its complexity.
Valorant's underwater paradise requires teams to bank on able Initiators and Sentinels to win games. Fade's Haunt and Prowler can do wonders to clear out defenders and also stop a lurker from executing plans.
In addition to using her utilities as and when required, one can learn lineups for her Haunt to gain an immense upperhand amidst Pearl's never-ending possibilities.
Here are five of the most useful Fade lineups for Pearl in Valorant
The eighth map of Riot's popular hero-shooter may seem to favor defenders at times, but can easily become attacker-centric with the right Agents. One of the most fitting heroes for Omega Earth's underwater city, Fade, can perform as an independent Initiator on the team, or form an unbeatable duo with Agents like KAY/O and Skye.
5) A-Site Full Reveal (for attack)
This is a great reveal for A-Site if your team plans on pushing through A Main. That said, one needs to have control over A Main for this lineup. If not, opponents may push unpredictably and eliminate you.
Align yourself with this line on the right wall of A Main, as shown below.

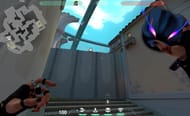
Equip the Haunt and aim the crosshair at this edge. You can remember this position by aligning the crosshair with the faint vertical line, as shown above.

Next, run and jump-throw the Haunt - throw the Haunt when the crosshair reaches the edge of the faint reference line. The watcher will land on top of the roof, revealing almost every important angle of and near A-Site.

4) B-Site and B Link Reveal (for attack)
Like the previous reveal, this lineup is immensely helpful when your team wants to push B-Site aggressively. However, you will need to have control over B Screen and the left-opening of B Hall to avoid offering enemies a free kill.
Align yourself with this corner in B Main as shown.

Equip the watcher and aim the crosshair in the middle of this vertical bar, as shown.

Do a simple jump throw. The Haunt will land on top of the roof, revealing some critical corners of the site alongside enemies pushing through B Link.

3) A Main Full Reveal (for defense)
This is a godly reveal for A Main and will catch any attacker in the vicinity offguard, revealing their positions. The Haunt will land on top of the roof, covering pretty much every angle in the area.
Line yourself up with the A-Site entrance Buy Phase barrier.

Aim the right corner of your left HUD at this faint line on the stairs, as shown.

Do a simple jump-throw to reveal and mark enemies on A Main.

2) B-Site Retake Reveal (for defense)
Another godly reveal for retaking B-Site, this Haunt lineup will definitely help you mark opponents holding positions during post-plant. Such a reveal can help facilitate a retake through B Link and B Main.
Line yourself up with this corner in B Link.

Equip the Haunt and aim the right corner of your left HUD at this point, as shown.

Do a simple jump-throw and the watcher will land on top of the B-Site roof.

1) Mid-Reveal (for defense)
This is, hands down, one of the most useful Haunt lineups on Pearl. It is capable of revealing enemies by pushing through Mid or planning to push through Mid Shops or B Club.
Stand in the corner of the wooden box situated right outside the mid-doors.

Aim at the edge of the roof right above the third light bulb from the left.

Do a jump-throw to reveal unsuspecting enemies and also secure some impressive wall-bang kills.

Note that these lineups can take considerable time to master and hence, it is always a good idea to practice such tactics in custom matches beforehand. Sufficient practice will help players remember all lineups effortlessly, while also letting them chalk out the most effective plan according to the situation.
