
'%20x='0'%20y='0'%20height='100%25'%20width='100%25'%20%0A%20%20%20%20%20%20%20%20%20%20xlink%3Ahref='data:image/jpg;base64,/9j/2wBDAAYEBQYFBAYGBQYHBwYIChAKCgkJChQODwwQFxQYGBcUFhYaHSUfGhsjHBYWICwgIyYnKSopGR8tMC0oMCUoKSj/2wBDAQcHBwoIChMKChMoGhYaKCgoKCgoKCgoKCgoKCgoKCgoKCgoKCgoKCgoKCgoKCgoKCgoKCgoKCgoKCgoKCgoKCj/wgARCAAGAAoDASIAAhEBAxEB/8QAFQABAQAAAAAAAAAAAAAAAAAAAgf/2gAIAQEAAAAAnz//xAAUAQEAAAAAAAAAAAAAAAAAAAAE/9oACAECEAAAAAf/xAAUAQEAAAAAAAAAAAAAAAAAAAAD/9oACAEDEAAAAF//xAAgEAABBAIBBQAAAAAAAAAAAAACAQMFBgAEERIhImGB/9oACAEBAAE/AJGRsO1aY9wJRwH9bTBsngcVpTRDNfIU7H9w7ZYkMkKxzHV6e4z/xAAaEQACAgMAAAAAAAAAAAAAAAACAwAEERJB/9oACAECAQE/ACstZjYuT//EABgRAAIDAAAAAAAAAAAAAAAAAAECAAMx/9oACAEDAQE/AFrUYJ//2Q=='%3E%3C/image%3E%3C/svg%3E)
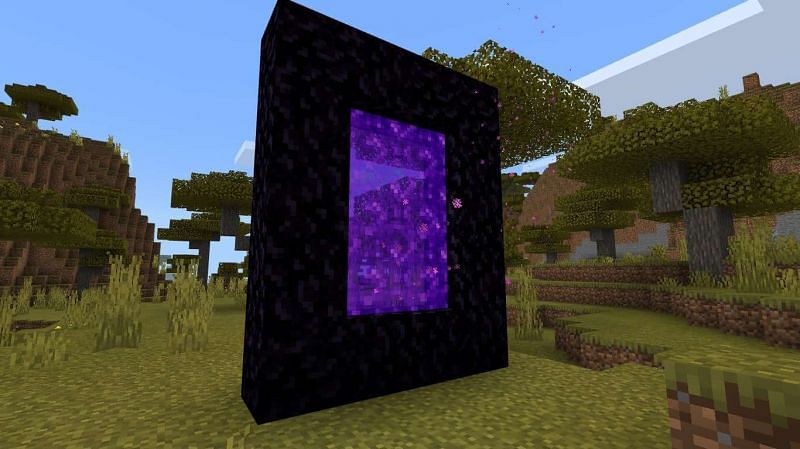
Obsidian is a sturdy Minecraft building block that is vital to creating things like Nether Portals, enchantment tables, and Ender Chests. Nether Portals are necessary for Survival Mode players to defeat the Ender Dragon and "beat" the initial game.

Obsidian is created whenever a lava source block has water poured on top of it. It must be harvested with a diamond or Netherite pickaxe, otherwise the broken obsidian block will not drop anything and will simply be destroyed.
Chart New Territories with the ultimate Minecraft Seed Generator!
Because of the block's strength as well as its usefulness in crafting, many Minecraft players have come up with methods to farm or generate it both manually and automatically.
Minecraft: Making an automated obsidian farm
While the Minecraft community has come up with dozens of designs to farm/generate obsidian both actively or AFK (away from keyboard), one popular design has automated the process using redstone and pistons to selectively control water flow.
This allows for obsidian to be harvested in a rather safe and controlled manner than potentially letting it fall into lava inside a cave or mineshaft underground.
To create this obsidian farm, Minecraft players can follow the steps below:
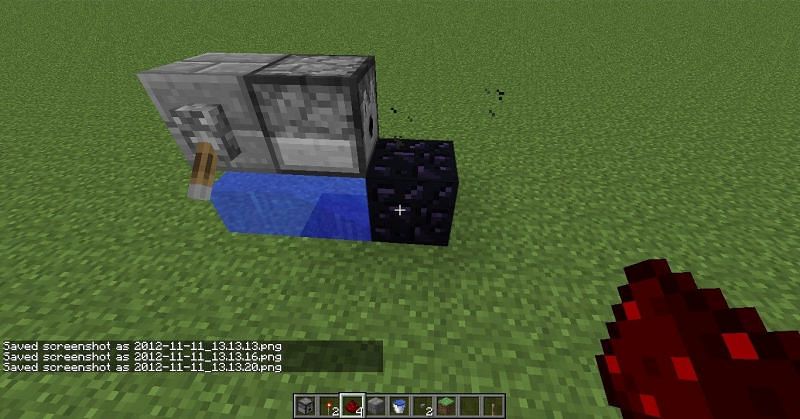
- Dig a hole three blocks wide and one block deep. Surround this hole with non-flammable blocks such as dirt, cobblestone, iron, andesite, etc.
- Use water buckets to create a water flow that enters the 1x3 hole. Make sure it doesn't flow elsewhere such as over the non-flammable blocks.
- On the side opposite to the water flow, place three piston blocks facing inside atop the non-flammable blocks. Place redstone repeaters behind each piston and link them with redstone dust. On the other side, place a block with a stone button and run a redstone chain to it from the repeaters. Place a fourth piston at the end of the trench between the water and pistons. Make sure this piston faces inward as well. Activate this piston with a redstone torch and ensure that the piston, when extended, has one extra block of space in front of it. Run redstone dust from the redstone torch to the front of the generator and place a connected lever.
- Above the fourth piston on the end of the trench, create an enclosure that leaves a block of empty space. This should allow lava to be placed atop the piston safely, so make sure this enclosure is also non-flammable. Fill the space with lava from a bucket.
- Line the trench between the water and the pistons with redstone dust.
If done correctly, when Minecraft players activate the outside lever, it should create obsidian blocks over the spots in the trench where the element has been laid down. Once the lava has stopped flowing, simply switch the lever again to allow for safe mining of the obsidian blocks.
Before mining, pressing the stone button should use the pistons to remove the lava presiding over the blocks. Afterwards, simply harvest the obsidian and replace the trench's redstone dust. Minecraft players can rinse and repeat this method at their leisure.
Read More: How to get better FPS in Minecraft

Uncover new worlds with our Minecraft Seed Generator!