'%20x='0'%20y='0'%20height='100%25'%20width='100%25'%20%0A%20%20%20%20%20%20%20%20%20%20xlink%3Ahref='data:image/jpg;base64,/9j/2wBDAAYEBQYFBAYGBQYHBwYIChAKCgkJChQODwwQFxQYGBcUFhYaHSUfGhsjHBYWICwgIyYnKSopGR8tMC0oMCUoKSj/2wBDAQcHBwoIChMKChMoGhYaKCgoKCgoKCgoKCgoKCgoKCgoKCgoKCgoKCgoKCgoKCgoKCgoKCgoKCgoKCgoKCgoKCj/wgARCAAGAAoDASIAAhEBAxEB/8QAFQABAQAAAAAAAAAAAAAAAAAABQf/2gAIAQEAAAAAhZ3/xAAUAQEAAAAAAAAAAAAAAAAAAAAC/9oACAECEAAAAH//xAAUAQEAAAAAAAAAAAAAAAAAAAAC/9oACAEDEAAAAH//xAAeEAACAQMFAAAAAAAAAAAAAAABAwIAERIEBRQiMf/aAAgBAQABPwBer4qFNkleZUIwEfALWvUtzOR6V//EABYRAQEBAAAAAAAAAAAAAAAAAAEAEf/aAAgBAgEBPwAMv//EABcRAAMBAAAAAAAAAAAAAAAAAAABAhH/2gAIAQMBAT8Ad01h/9k='%3E%3C/image%3E%3C/svg%3E)
In tactical first-person shooters like Valorant, the importance of crosshair settings is criminally overlooked. Most average players believe that unlike frame rates and mouse sensitivity, the crosshair is not all that integral to their gameplay.
However, that’s a very wrong perception to have. Ask any pro gamer or streamer that you follow, and they will definitely tell you just how important the right crosshair settings are, irrespective of which first-person shooter you play.
In CS: GO, Call of Duty, Overwatch, or even Valorant (in this case), having the perfect crosshair settings that reflect your play-style is integral to your in-game mechanics.
But, the crosshair settings menu in Valorant can be a bit complicated, and you may not be able to tinker with it right away. That is why we will help you set up the best crosshair settings that fit your Valorant play-style.
Accessing the crosshair settings in Valorant
In Valorant, you will be able to customize your crosshair at any given time. You can either do it in the main menu of the client or while inside a game.
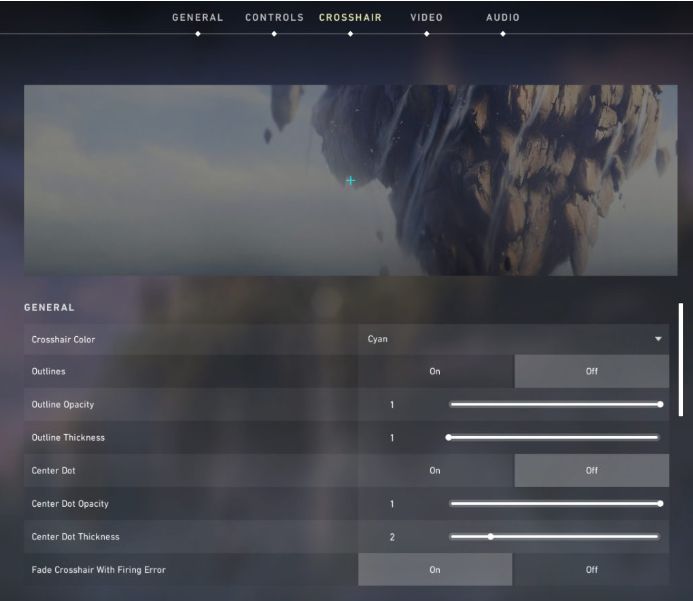
If you’re inside the game then press ‘ESC’, then click on ‘Settings’ and navigate to the ‘Crosshair’ tab at the top of the screen.
The ‘Crosshair’ tab might feel quite complicated at first, but it’s really not all that difficult to understand once you start tinkering with the settings.
1. Crosshair Color: You can stylize how your crosshair will look by selecting from a range of eight different colors. However, do make sure that you pick a color that has a higher contrast with the background environment, as losing sight of your crosshair will get you killed instantly in any situation.
2. Outlines: Outlines is a great tool to have for your crosshair, as it will provide it with a black border on all sides. You will be able to customize the opacity of it, and never lose sight of your crosshair during those heated clutch situations.
3. Centre Dot: Enabling the Centre Dot will provide your crosshair with a dot in the middle. This acts a lot like a double-edged sword and can either help you get very accurate shots over great distances or just cause a lot of visual clutter, making you miss easy frags.
4. Fade Crosshair with Firing Error: Enabling this setting will make the top line of the crosshair disappear when continuously firing with an automatic weapon. Once you stop firing, the line will immediately return.
5. Show Spectated Player’s Crosshair: This setting is more ornamental in nature, and it won’t impact your gameplay in any way. With this enabled, you will be able to see how other players whom you’re spectating have their crosshair setup.
6. Inner Lines and Outer Lines: This setting will give you sets of lines to tinker with. You will be able to set their opacity, their length, thickness as well as their distance from the center. Each set adjusts dynamically to movement (movement error) and/ or firing (firing error).
Understanding Movement and Firing Error
‘Inner lines and Outer Lines’ are by far the most important tools to understand if you want to completely master your crosshair settings. Even with all the Agent abilities, aiming and gun accuracy are still integral to Valorant’s gameplay, and this setting will help you to improve it significantly.
Like in CS: GO, Valorant weapons too have diminishing accuracy while you’re moving or firing multiple shots in a very small period of time. The movement and firing error settings will display a visual indicator that will help you to get an idea of how these two instances affect your accuracy.
When you strafe to the sides, the outer lines will expand while the inner ones will stay in their original position. This is because the outer ones react to movement error and the inner ones don’t.
However, while shooting and moving, both the lines will be expanding outwards, as they both react to firing error.
How do these visual indicators help in Valorant?
The movement and firing error indicators are particularly useful for newer players who haven't played many first-person shooters in the past.
Firing and moving have a profound impact on shooting accuracy in games like CS: GO and Valorant. So, for newer players who are visiting such genres for the first time, enabling them is crucial for learning some of the core mechanics of the game.
However, once you become more experienced and grow accustomed to different gun accuracies in Valorant, you can switch this setting off and reduce a lot of the visual clutter.
What settings do the professionals run?
To help you get a better idea of how the crosshair settings look like in the competitive scene, here are some examples from professional Valorant players and streamers:
Aceu Valorant crosshair settings
- Color: Green
- Outlines: Off
- Center Dot: Off
- Lines: 1 | 6 | 2 | 3 | Off | Off
Shroud Valorant crosshair settings
- Color: Cyan
- Outlines: 1 | 1
- Center Dot: Off
- Lines: 1 | 10 | 3 | 5 | Off | Off
Skadoodle Valorant crosshair settings
- Color: White
- Outlines: 1 | 1
- Center Dot: Off
- Lines: 1 | 5 | 1 | 3 | Off | Off
Summit1g Valorant crosshair settings
- Color: White
- Outlines: 1 | 2
- Center Dot: 1 | 4
- Lines: Off
Dafran Valorant crosshair settings
- Color: Green
- Outlines: Off
- Center Dot: Off
- Lines: 1 | 11 | 3 | 4 | Off | Off