
'%20x='0'%20y='0'%20height='100%25'%20width='100%25'%20%0A%20%20%20%20%20%20%20%20%20%20xlink%3Ahref='data:image/jpg;base64,/9j/2wBDAAYEBQYFBAYGBQYHBwYIChAKCgkJChQODwwQFxQYGBcUFhYaHSUfGhsjHBYWICwgIyYnKSopGR8tMC0oMCUoKSj/2wBDAQcHBwoIChMKChMoGhYaKCgoKCgoKCgoKCgoKCgoKCgoKCgoKCgoKCgoKCgoKCgoKCgoKCgoKCgoKCgoKCgoKCj/wgARCAAGAAoDASIAAhEBAxEB/8QAFAABAAAAAAAAAAAAAAAAAAAABv/aAAgBAQAAAABUb//EABQBAQAAAAAAAAAAAAAAAAAAAAb/2gAIAQIQAAAAQ//EABQBAQAAAAAAAAAAAAAAAAAAAAT/2gAIAQMQAAAAX//EACAQAAIBAwQDAAAAAAAAAAAAAAIEAQAFMQMREiEkYaH/2gAIAQEAAT8Au4quC1oM6BKmtIgDCxCRzx9SMZ3xvNHZ0oMvPuBd5kB7+1//xAAYEQACAwAAAAAAAAAAAAAAAAAAAQISMf/aAAgBAgEBPwCzhh//xAAVEQEBAAAAAAAAAAAAAAAAAAAAAv/aAAgBAwEBPwCn/9k='%3E%3C/image%3E%3C/svg%3E)
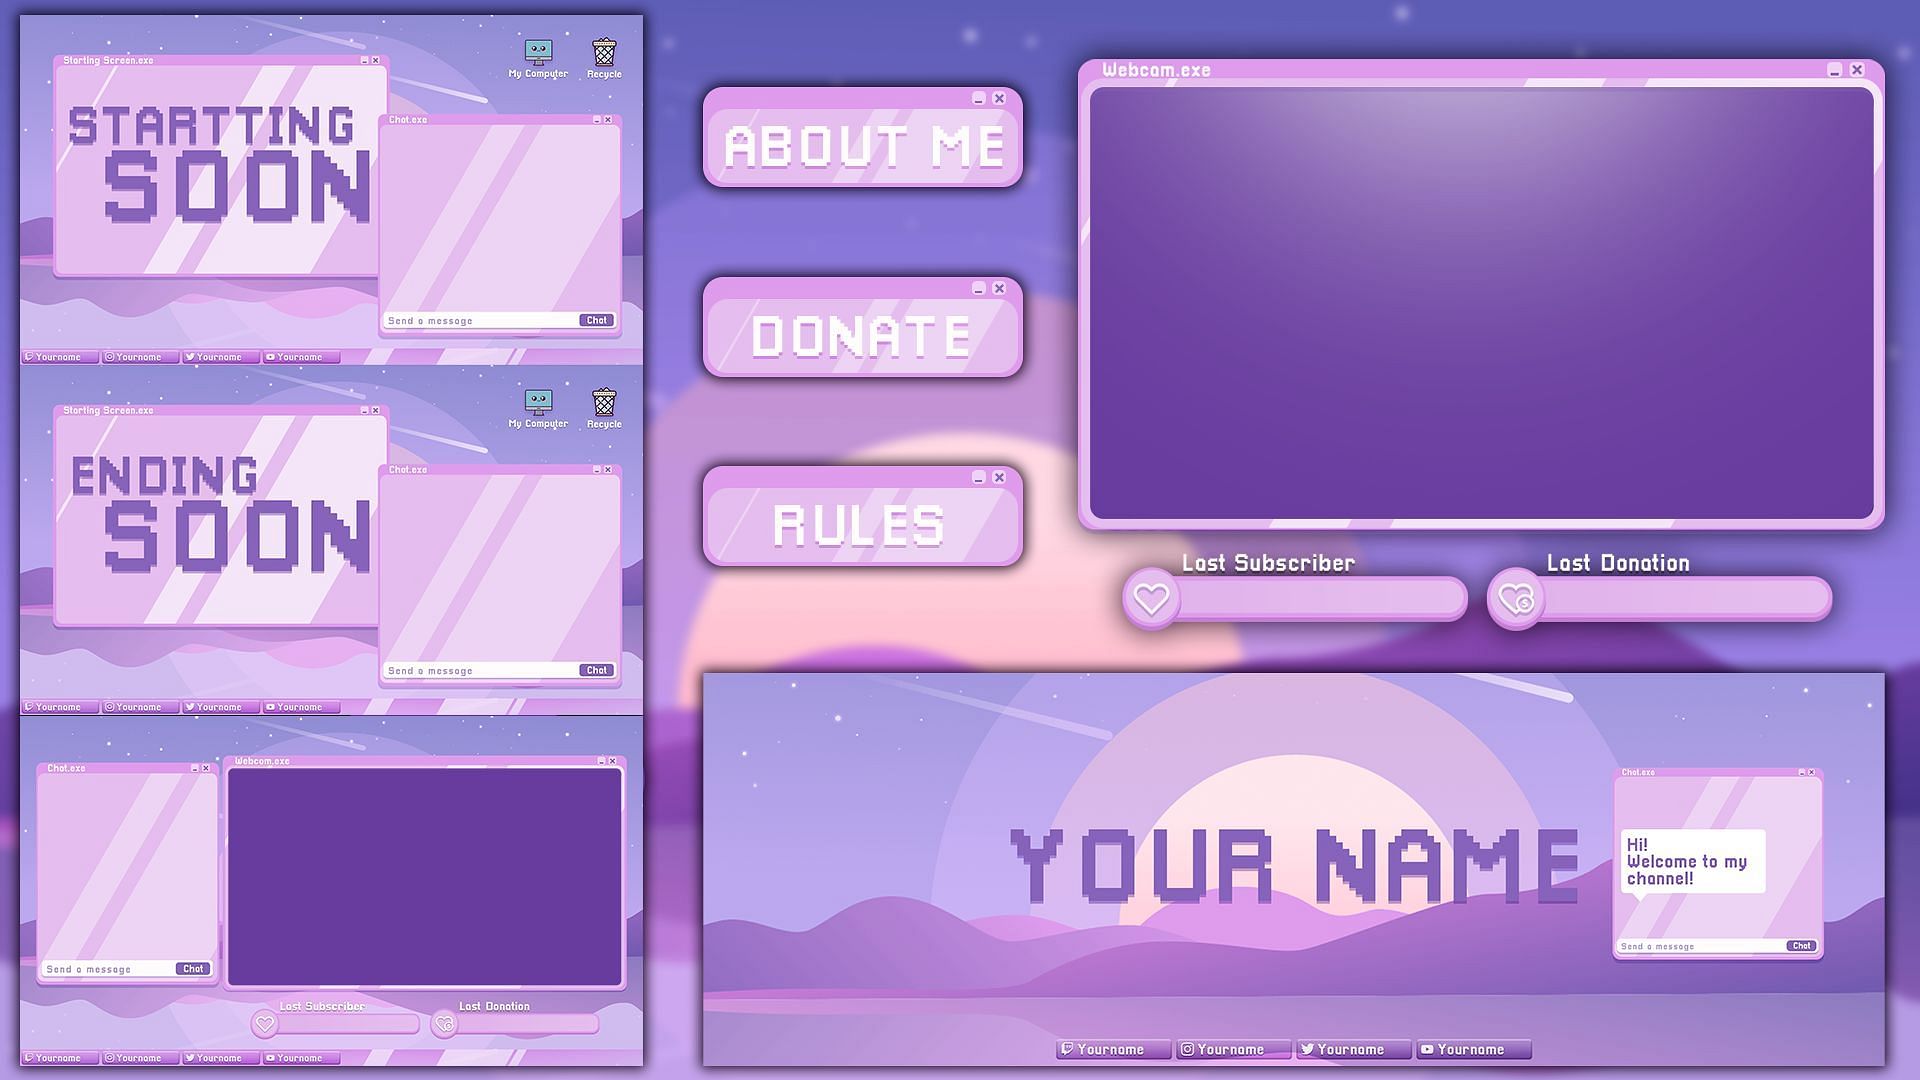
Streaming is a task that puts your overall personality on display on a platform on the internet, and one way of doing that is by having a unique overlay. A stream overlay can be customized according to your preference by combining various graphic elements that can be used to put a border on your webcam screen, highlight the latest donations, subscribers, and followers, and keep your sponsor logos on display.
A good overlay always helps to catch the eyes of viewers from the get-go. The best streamers hire freelance designers to make an informative Twitch overlay, but that is a convenience that not everyone can afford. Additionally, there are multiple ways to create a Twitch overlay from scratch, and it does not have to be the most flashy. It can be a minimal one that gets the job done.
A good overlay helps boost viewer engagement and provides real-time information
This article will explain the steps to make an overlay for Twitch streaming from Streamlabs OBS, which is the most popular streaming software used by a majority of streamers due to its easy navigation and features. Also, keep in mind that you need to have a basic knowledge of Adobe Photoshop or any other photo editing software to create an overlay.
1) Decide which graphic elements are needed
A lot of information can be highlighted in your stream, but too much of it can make it cluttered and hard for viewers to follow. You can create an overlay that displays your social media accounts, your latest followers, subscribers, and donations, a chat window, a subscriber goal, a starting screen, and an ending screen.
2) Download graphical assets
To have a unique look, you also need to download all the graphic elements you will need, such as social media icons, flashy fonts, a webcam placeholder image, and more. The downloaded fonts will also need to be installed on your system for your editing software to detect them. Other elements can simply be dragged and dropped into the software, where they can be resized and adjusted according to your preference.
3) Create graphic elements
After choosing the graphical elements that you will be adding to your overlay, you need to create them in an editing software, and the recommended one for this task is Adobe Photoshop. The best way to do so is to assign a limited amount of space from the whole screen to specific elements so that it's readable and cohesive while leaving out the middle of your screen for your gameplay.
Alternatively, you can also create various elements individually so that every element can be controlled and easily hidden during a stream without interfering with the rest of the graphics.
4) Import graphics into Streamlabs OBS
First, you need to ensure that you are logged into Streamlabs OBS so that all your widgets are accessible. After this, create a new scene under the 'Scenes' panel on the bottom left and name it.
Next, add a source by clicking on the plus sign in the 'Sources' panel, select 'Image' as the source from the options, name it according to the individual graphic you will be assigning it to, and import the respective graphic file by clicking on the browse button.
Position the graphic element on the screen by dragging and resizing it. This will be directly visible to your viewers on top of other sources.
Repeat the process for each graphic element and fill your screen by positioning them accordingly.
5) Assign widgets to graphics
After adding every element that you have created, you need to assign the text it will display and bind it to your stream. Click on the plus sign in the 'Sources' panel, select 'Stream Label' under the widgets panel, click on 'Add Source,' name it accordingly, and you will see plenty of options.
For example, if you are assigning a graphic element to display your latest follower, you need to select 'Most Recent Follower' under the label type and the text's attributes can be modified to fit inside your graphics. Click 'Done' when you have edited it. Lastly, you need to resize it and drag it to the top of your graphics, which is where the text will be displayed once you get a new follower.
Repeat this process for all the dynamic content until you have covered each of the required graphical elements.
