'%20x='0'%20y='0'%20height='100%25'%20width='100%25'%20%0A%20%20%20%20%20%20%20%20%20%20xlink%3Ahref='data:image/jpg;base64,/9j/4AAQSkZJRgABAQAAAQABAAD/2wCEAAMDAwMDAwQEBAQFBQUFBQcHBgYHBwsICQgJCAsRCwwLCwwLEQ8SDw4PEg8bFRMTFRsfGhkaHyYiIiYwLTA+PlQBAwMDAwMDBAQEBAUFBQUFBwcGBgcHCwgJCAkICxELDAsLDAsRDxIPDg8SDxsVExMVGx8aGRofJiIiJjAtMD4+VP/AABEIAAYACgMBIgACEQEDEQH/xABcAAEBAQAAAAAAAAAAAAAAAAAABgkQAAEEAgMBAAAAAAAAAAAAAAEAAgMEBRETIlFBAQEBAAAAAAAAAAAAAAAAAAABAhEBAQEBAQEAAAAAAAAAAAAAAQIhABGB/9oADAMBAAIRAxEAPwDOHD5fAVMLerWqBlszxlrJeNj+PwtLjsHfijnPj2en1EUzEw1Qbb6784JBU913e//Z'%3E%3C/image%3E%3C/svg%3E)
Nvidia regularly pushes out driver updates to ensure that the latest games work flawlessly on their GPUs. However, due to unknown technical problems, the driver update procedure has been failing for some users. One of the most common issues that has been plaguing the community recently is the 'Nvidia Installer cannot continue' error.
This error message shows up when users try to install an Nvidia driver through GeForce Experience. Gamers have reported that the 'Installer cannot continue' error is generally seen in the driver installation step after the successful download of the driver software.
Although the Nvidia GPU driver update process is generally easy and quick, these kinds of issues often result in underwhelming experiences. This guide takes a closer look at some of the potential fixes that could resolve this problem.
Three potential solutions for the 'Nvidia Installer cannot continue' error in Windows 10/11
This particular installation failure message often occurs due to corrupted driver files, outdated Windows versions, and failed operation of the Windows Task Scheduler. These culprits can lead to other system stability issues as well. Before trying out all of the fixes provided below, users are advised to update their Windows to the latest version.
Here are three potential fixes that are likely to eliminate the 'Nvidia Installer cannot continue' error in Windows 10 and Windows 11:
1) Restart the Task Scheduler
Although this solution can be slightly complicated, it will most likely work and resolve any driver installation errors. To execute this fix, you must first press 'Win+R' to bring up the Run window. Here, type in 'services.msc' and click on Enter. A list of all the services will now appear. Find 'Task Scheduler' from this list, right-click on that item, and select 'Start.'
Doing so will open up the Windows Task Scheduler. If a failure message appears, you will have to tweak a few entries within the Windows registry. To do so, press 'Win+R' again and type in 'regedit' to access the Windows Registry Editor.
Disclaimer: Please edit the registry files at your own risk.
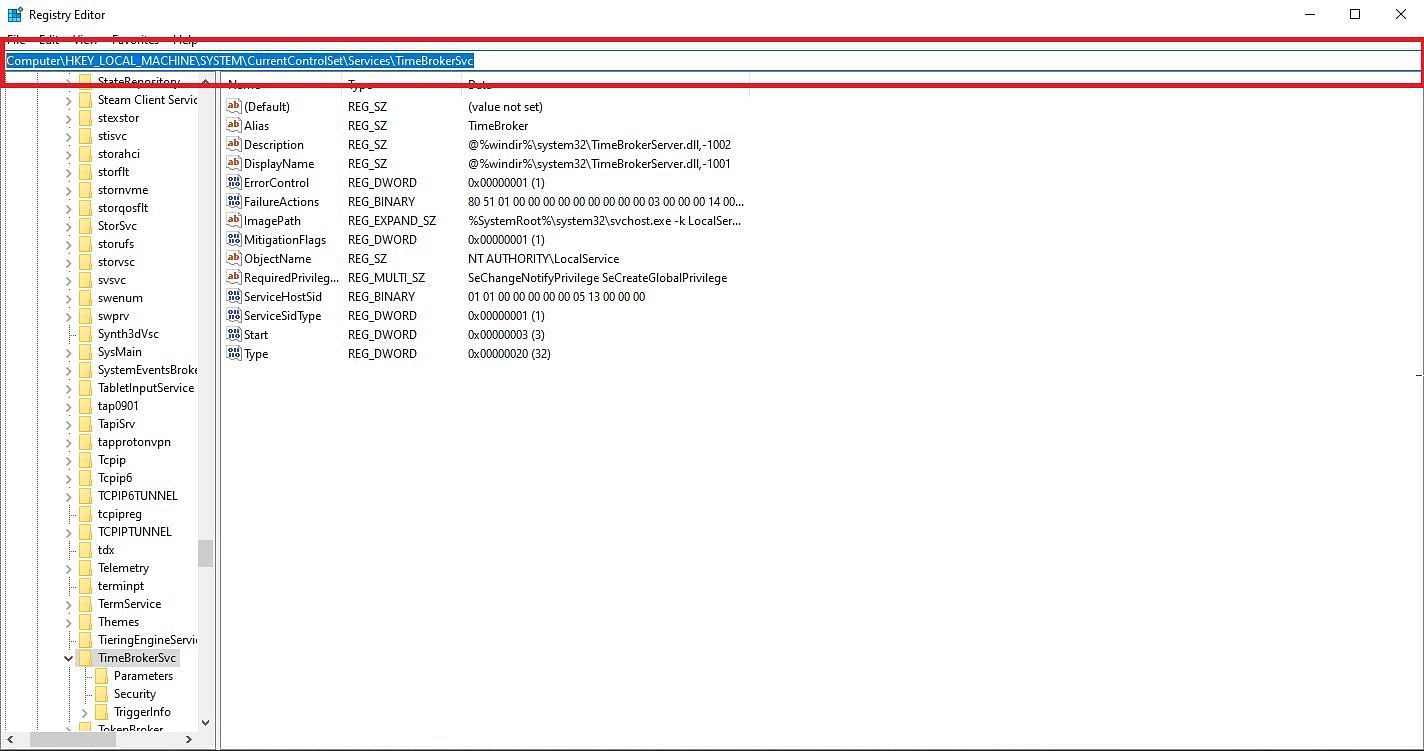
Copy and paste the following text into the Registry Editor's address bar and click on Enter:
Computer\HKEY_LOCAL_MACHINE\SYSTEM\CurrentControlSet\Services\TimeBrokerSvc
Locate the 'Start' file at this destination before right-clicking it and selecting 'Modify.' In the new window that opens up, change the value to 3. By default, it should be at 4. Click on 'OK' and restart your PC after this step. This process will ensure that the installation process works as intended.
2) Using Windows driver updater
Although this isn't the ideal way to install GPU drivers, it should automatically replace any corrupted driver files and install the latest drivers from the Windows repository. To update drivers using the system's own updater, you must first go to the Windows search bar and look up 'Device Manager.' From the new window that opens up, expand the 'Display Adapters' section to reveal all of the GPUs in your system.
Double-click on the GPU that you wish to update and select the 'Driver' tab, where you must select 'Update driver.' At this point, another window will pop up with two options: Search automatically for updated driver software and Browse my computer for driver software.
You must select the first option here, which will automatically search, download, and update to the latest drivers for you. Once done, you should be able to access the Nvidia Installer to update new GPU drivers in the future.
3) Doing a clean install of GPU drivers
Finally, one of the most common and easiest fixes to this error is using DDU (Display Driver Uninstaller) to completely remove all traces of Nvidia files from your system. It should be noted that using DDU will also remove the GeForce Experience app from your system, which means you'll have to manually install the drivers again.
To do so, head over to Nvidia's official website and proceed to the drivers section. Here, input your system's information such as GPU, Windows version, and more, to download the appropriate driver package for your PC. Once done, continue installing them normally. This process will likely resolve the installer error.
These are some of the possible fixes that should fix the 'Nvidia Installer cannot continue' error. If the problem persists, it's recommended that users directly contact the system's manufacturer or the Nvidia support team for further assistance.