Bunny is the most-played class in the First Descendant, and for good reasons. Even an incomplete Bunny build can decimate mobs in The First Descendant as you blaze through the campaign, and the skillset is quite straightforward. Bunny is also the very first Descendant you meet during the game's prologue, where she is established as a critical part of the plot to claim the Ironheart.
As the tutorial establishes, Bunny is a jovial speedster, comparable to Volt/Gauss from Warframe. She is all about maintaining her top speed, which in turn fuels all of her abilities. In this guide, we will discuss all about Bunny: how to build her, how to unlock her, and how to play her.
How to unlock and craft Bunny in The First Descendant

Like Warframes, Descendants in The First Descendants can be built with four parts: core, catalyst, stabilizer, and cells. These must be crafted in advance and require their own specific set of resources.
The very first sidequest you get involves crafting Bunny as your recommended second Descendant after picking a starter.
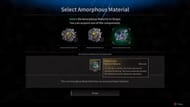
You have to obtain three blueprints that drop from different missions in Kingston and do a Normal Gravewalker Intercept by talking to Seneca in Albion, which will give you the Amorphous Material. You can then also open the Amorphous Material immediately, and pick Bunny code as a guaranteed reward.

Other Descendants and weapons have a long research time that you have to wait out - but quite characteristically, crafting Bunny is super-fast. Once you get all the parts, you can go to Annais (Research Lab) in Albion to Request Research for Bunny. This costs 400,000 Gold, and you only need to wait 1 minute of real-time before it's complete.
After you unlock this Descendant, you also gain access to Bunny's personal Quest starting with 'Follow Their Traces'.
How to play Bunny in The First Descendant

Here's all of Bunny's Skills in The First Descendant:
Barring skill modules, playing Bunny is quite simple once you understand her skills.
Bunny's bread-and-butter is the Electricity passive, which benefits her main skill (Lightning Emission) vastly. The gist is to keep moving, and don't run out of this secondary resource (visible under the MP bar).
In my time playing Bunny in the betas - and now in the full release - I have very rarely used her first skill, if ever. Here's the basic Bunny skill combo you'll need to do in The First Descendant:
- Activate Light Speeding (second skill) and run around a bit till you get Electricity Resource. You don't have to always get it to full - you keep gaining this Resource even without sprinting, as long as you stay on the run.
- Spam Lightning Emission (third skill) off cooldown. Since it only costs Electricity, you almost never have to worry about MP sustain.
- For bossing or single-target DPS, you can simply run circles around the target for sustained long-term damage, or pull out your Maximum Power (fourth ability) for higher burst damage.
The First Descendant Bunny build: Best module setup for nuking

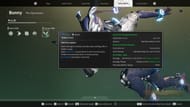
The Bunny build shown in the image above is what we're rocking with the Descendant at the moment. However, the general build idea is to pump skill power as much as you can. Note that your skill power is dependent on your Reactor, so make sure to use the best one available.
Module set-up to use:
- Skill Module Slot: I haven't come across any, but you can try 'Electric Transition' or 'Electric Condense' depending on your needs
- Sub Attack Module Slot: Shock Punch
- Strong Menality
- Increased HP
- Maximize Conservation
- Electric Master
- Electric Specialist
- Skill Expansion
- Nimble Fingers
- Maximize Efficiency
- Increased DEF
- Emergency Measures
Also Read: How to get Kuiper Shards in The First Descendant
Characters in the First Descendant have MP as the primary resource to use in their abilities. Bunny, however, belongs to a subset of Descendants that needs to manage more than one resource for casting abilities. She can gather electricity charges by staying on the run, indicated by a secondary bar under her MP bar.
The bread-and-butter of Bunny's gameplay is to use her second ability to gain speed and charge up the electricity required for her third ability, Lightning Emission. It is one of the best horde-clearing nukes in the game, making short work of missions where enemies clump together.
Pumping skill modifier modules benefit Bunny's Lightning Emission across the board. More skill power means one-shotting mobs with one pulse, while more range means hitting more enemies without having to zig-zag too much. There is a slight downtime between Lightning Emission's cooldown and the duration it covers after a cast, but one can easily manage without modding skill duration.
It is generally a better idea to cover Bunny's blind spot: survivability. Pump HP, DEF, and Shields, and throw in Strong Mentality for easier resource management. While mediocre at bossing, this build can deliver great results in nearly all other content available so far.

As you approach end-game, here's what your Bunny build should look like. However, you can run a less potent version of this without upgrading your Modules as much. This is in case you want to get Ultimate Bunny as soon as possible and save your Crystallization Catalysts for that.
Check out our other guides on this game:
- How to get and open Amorphous Material in The First Descendant
- How to destroy Void Fragments in The First Descendant
- The First Descendant Battle Pass: Pre-Season schedule and rewards
- 5 things you should know before you start The First Descendant
