
'%20x='0'%20y='0'%20height='100%25'%20width='100%25'%20%0A%20%20%20%20%20%20%20%20%20%20xlink%3Ahref='data:image/jpg;base64,/9j/2wBDAAYEBQYFBAYGBQYHBwYIChAKCgkJChQODwwQFxQYGBcUFhYaHSUfGhsjHBYWICwgIyYnKSopGR8tMC0oMCUoKSj/2wBDAQcHBwoIChMKChMoGhYaKCgoKCgoKCgoKCgoKCgoKCgoKCgoKCgoKCgoKCgoKCgoKCgoKCgoKCgoKCgoKCgoKCj/wgARCAAHAAoDASIAAhEBAxEB/8QAFQABAQAAAAAAAAAAAAAAAAAAAwb/2gAIAQEAAAAAkA//xAAUAQEAAAAAAAAAAAAAAAAAAAAE/9oACAECEAAAAFf/xAAUAQEAAAAAAAAAAAAAAAAAAAAC/9oACAEDEAAAAF//xAAeEAACAgICAwAAAAAAAAAAAAABAgMEBREAEiIxkf/aAAgBAQABPwBcrjKiY1qlCrLTUOtoTIe8ml34/eSJi3kZhjAATv2Of//EABURAQEAAAAAAAAAAAAAAAAAAAEA/9oACAECAQE/ABW//8QAFhEAAwAAAAAAAAAAAAAAAAAAABJh/9oACAEDAQE/AGh//9k='%3E%3C/image%3E%3C/svg%3E)
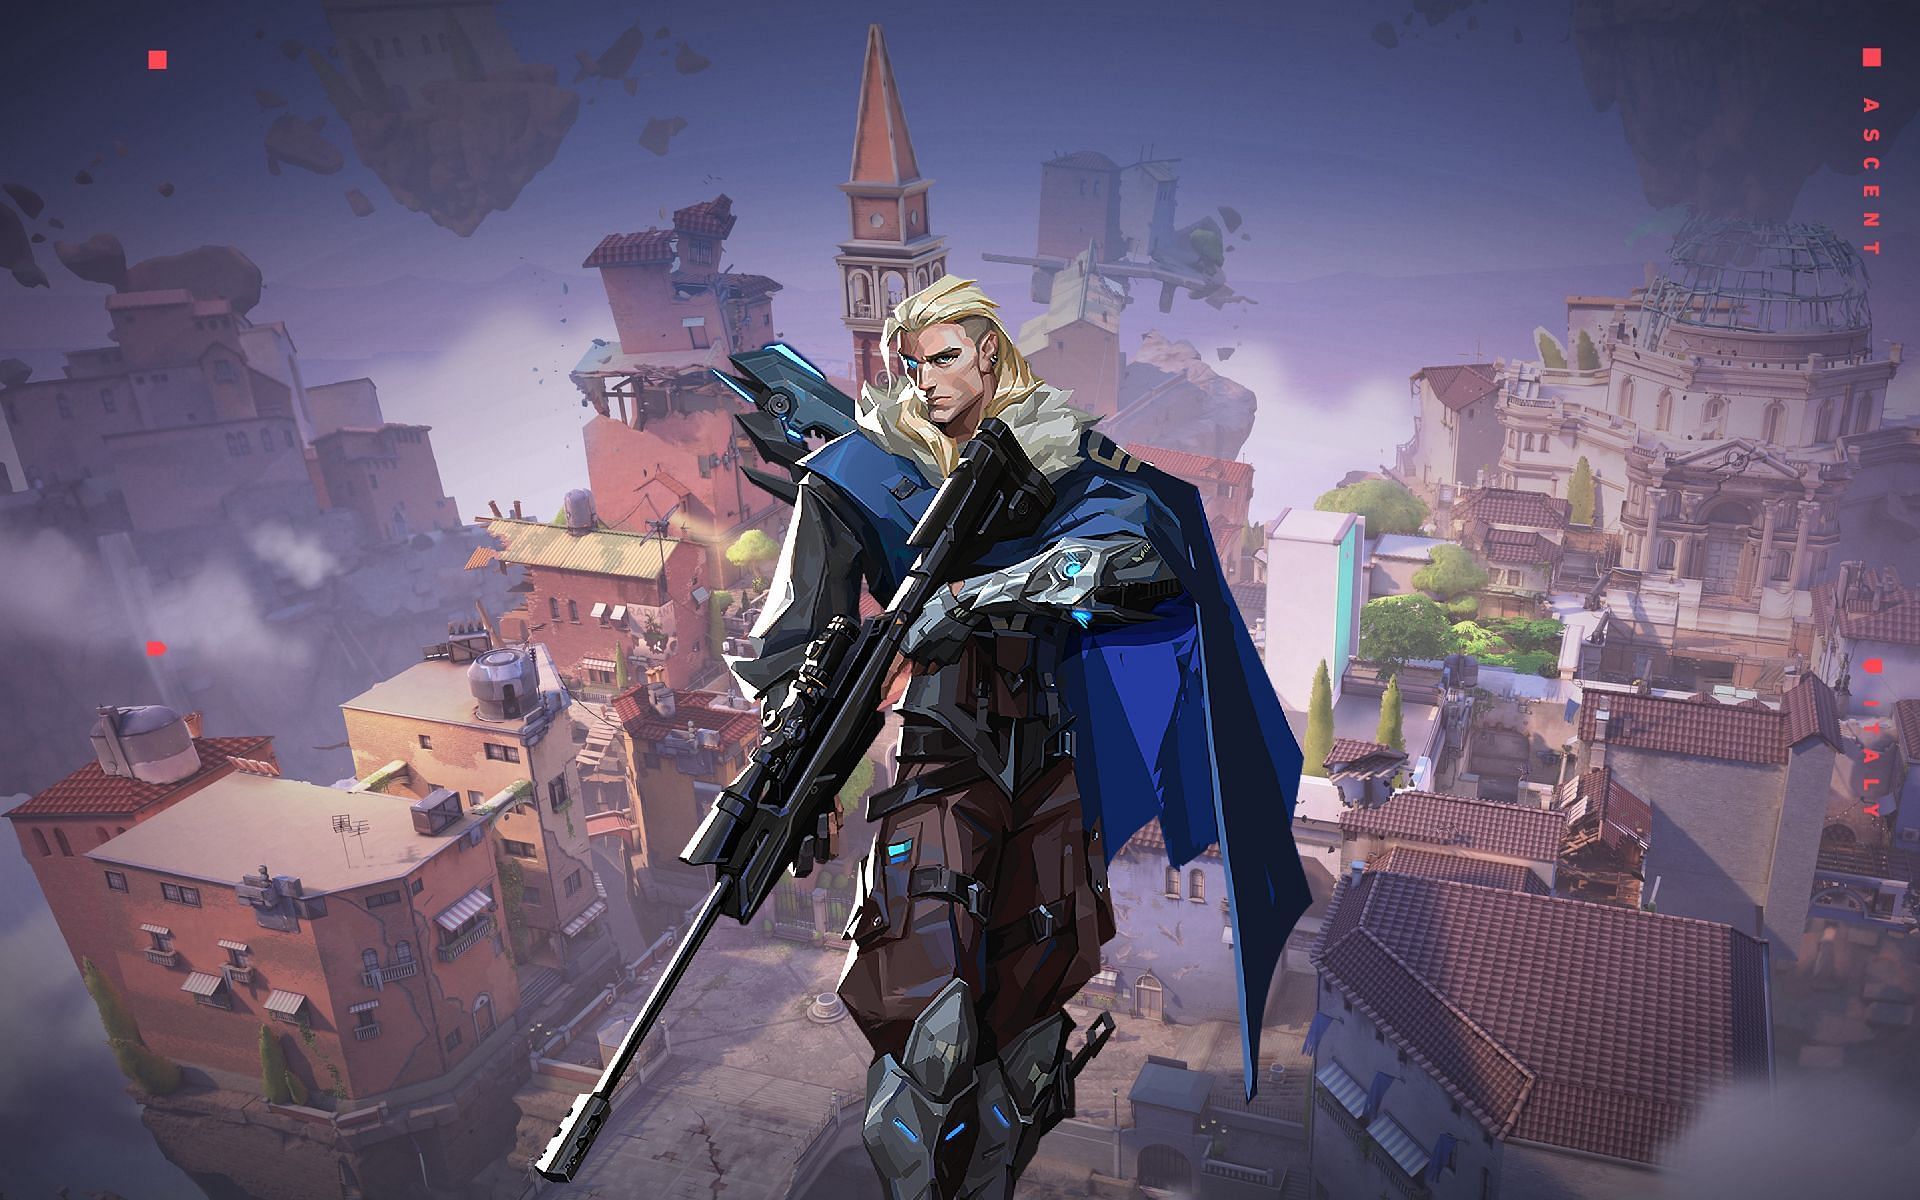
Valorant is one of the most creative first-person shooter games and caters to a wide range of players. While some aren't afraid to face opponents head-on, others are more cautious in their strategy. Agent choice is largely determined by players' tactics and gameplay approach.
Agents like Sova shine the brightest in long-range engagements. His abilities allow him to inspect and clear areas while maintaining a safe distance from opponents.

Ascent is one of the maps where Sova is most useful. This article discusses a few double Shock Dart (Shock Bolt) lineups that can fatally affect an enemy team on this map from a distance. It is important to note that these lineups were performed in LOW Graphics Settings.
Note: This article is subjective and solely reflects the author’s opinion.
Mid Market to Mid Link Tiles and other great double Shock Dart lineups for Sova in Valorant's Ascent
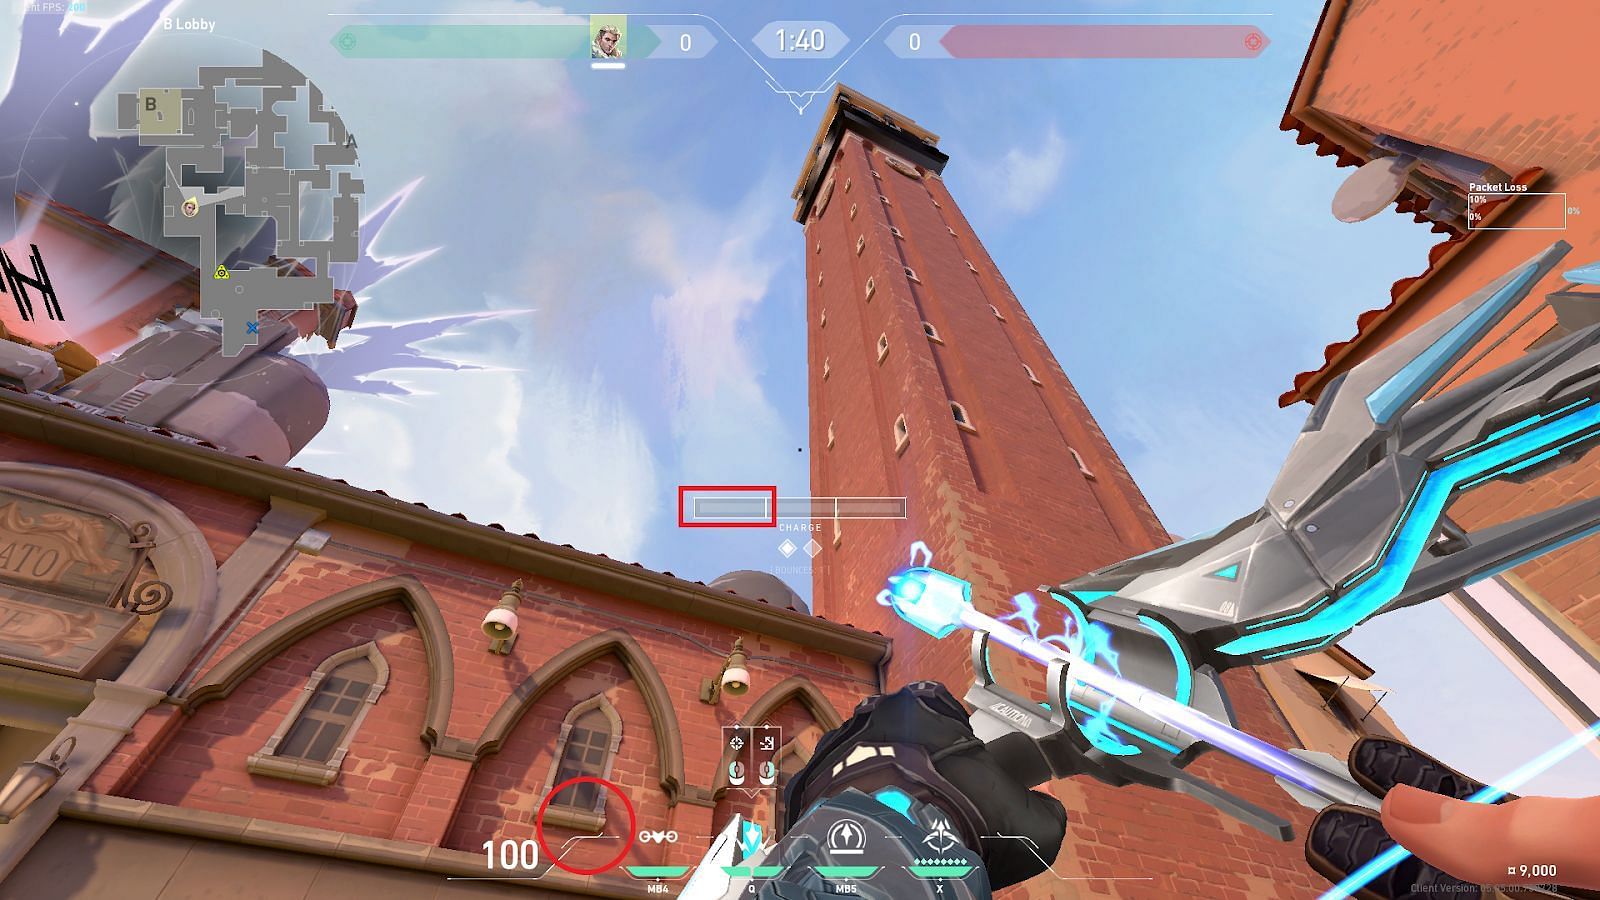
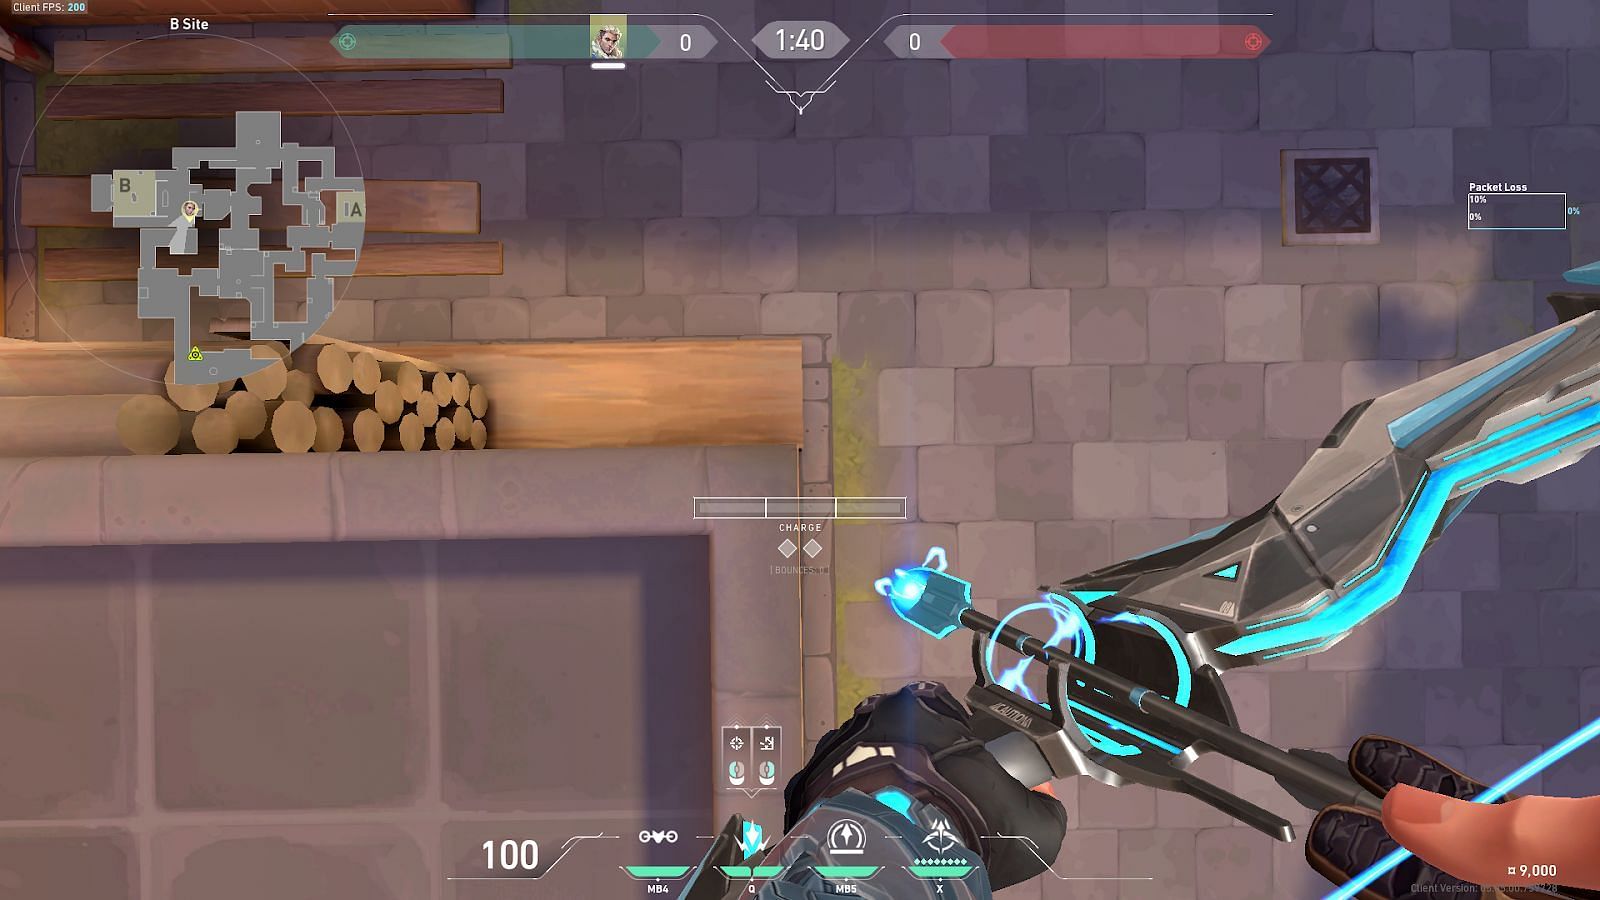
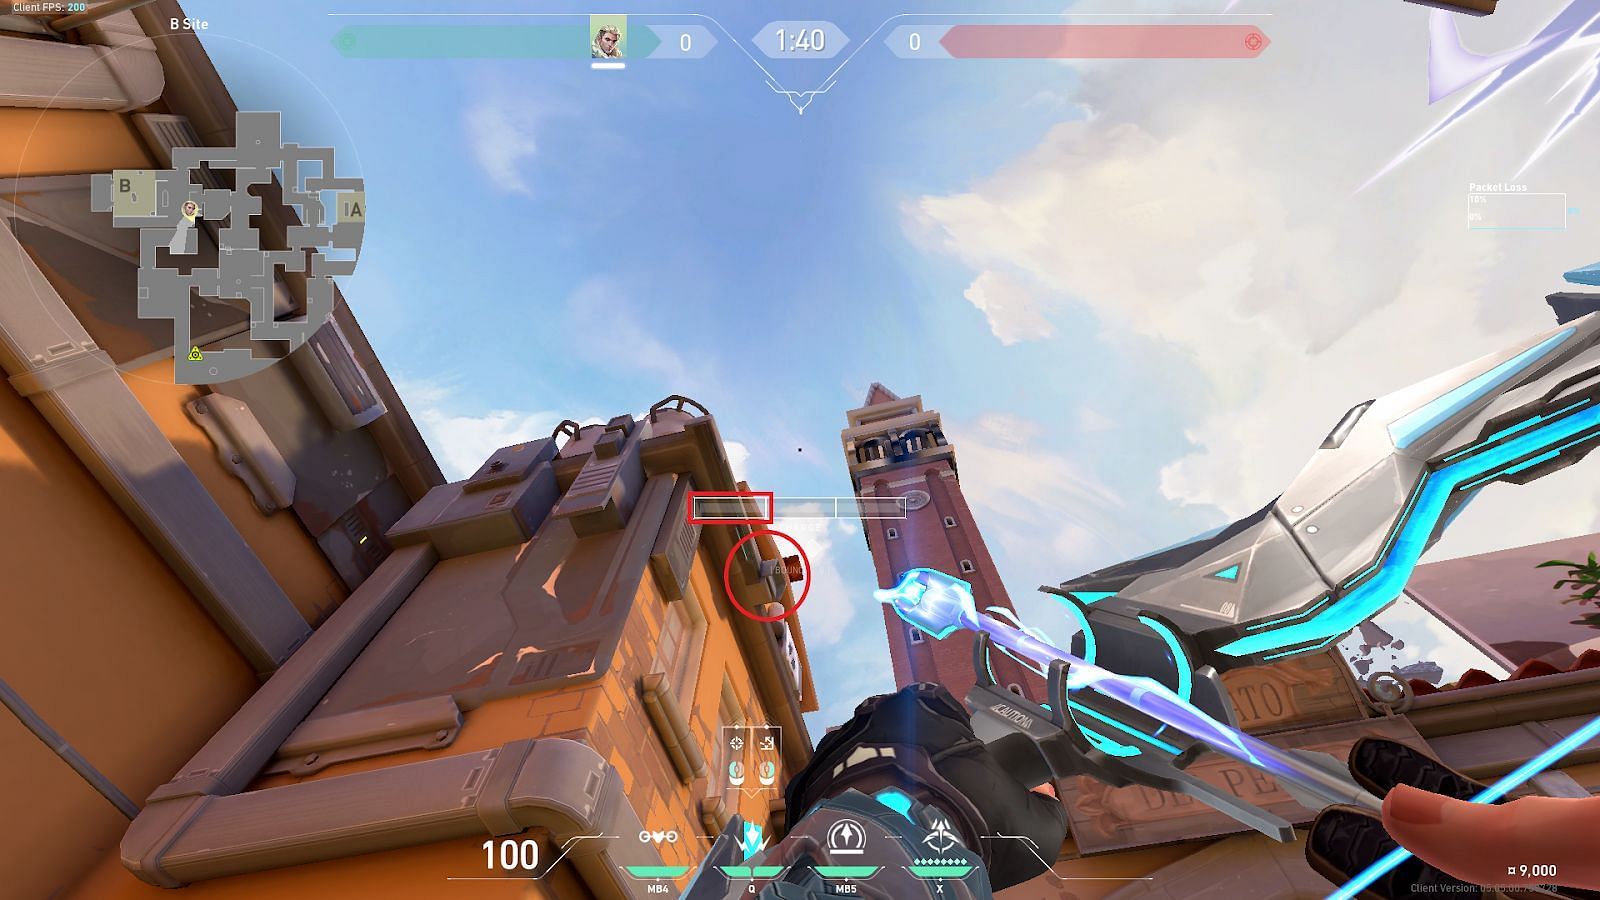
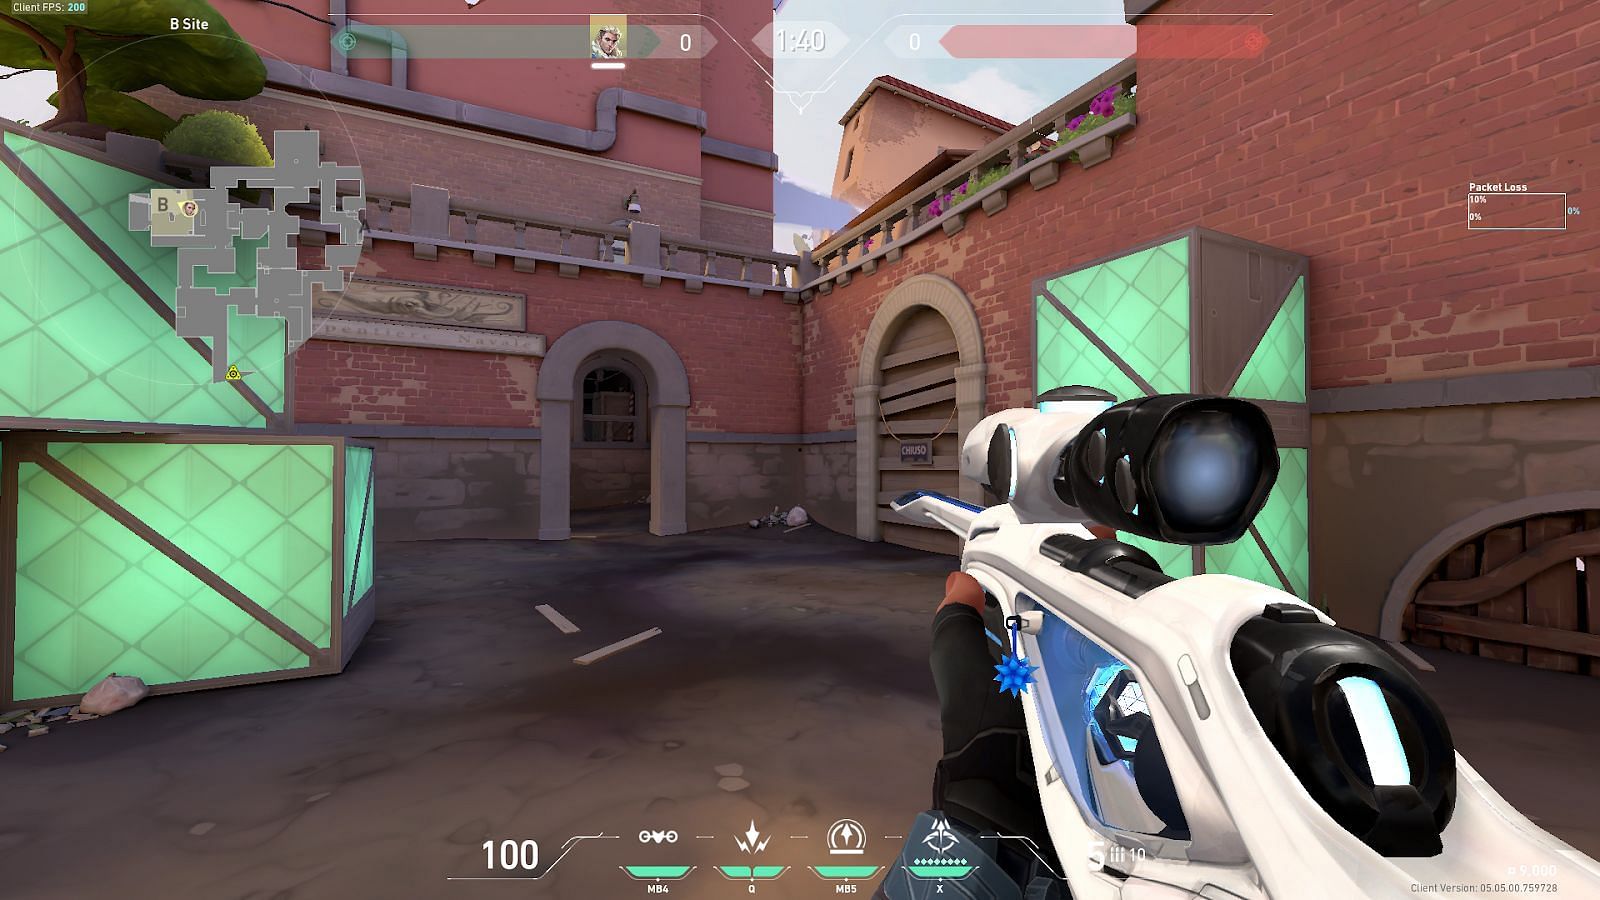
1) B-Lobby to Mid Market
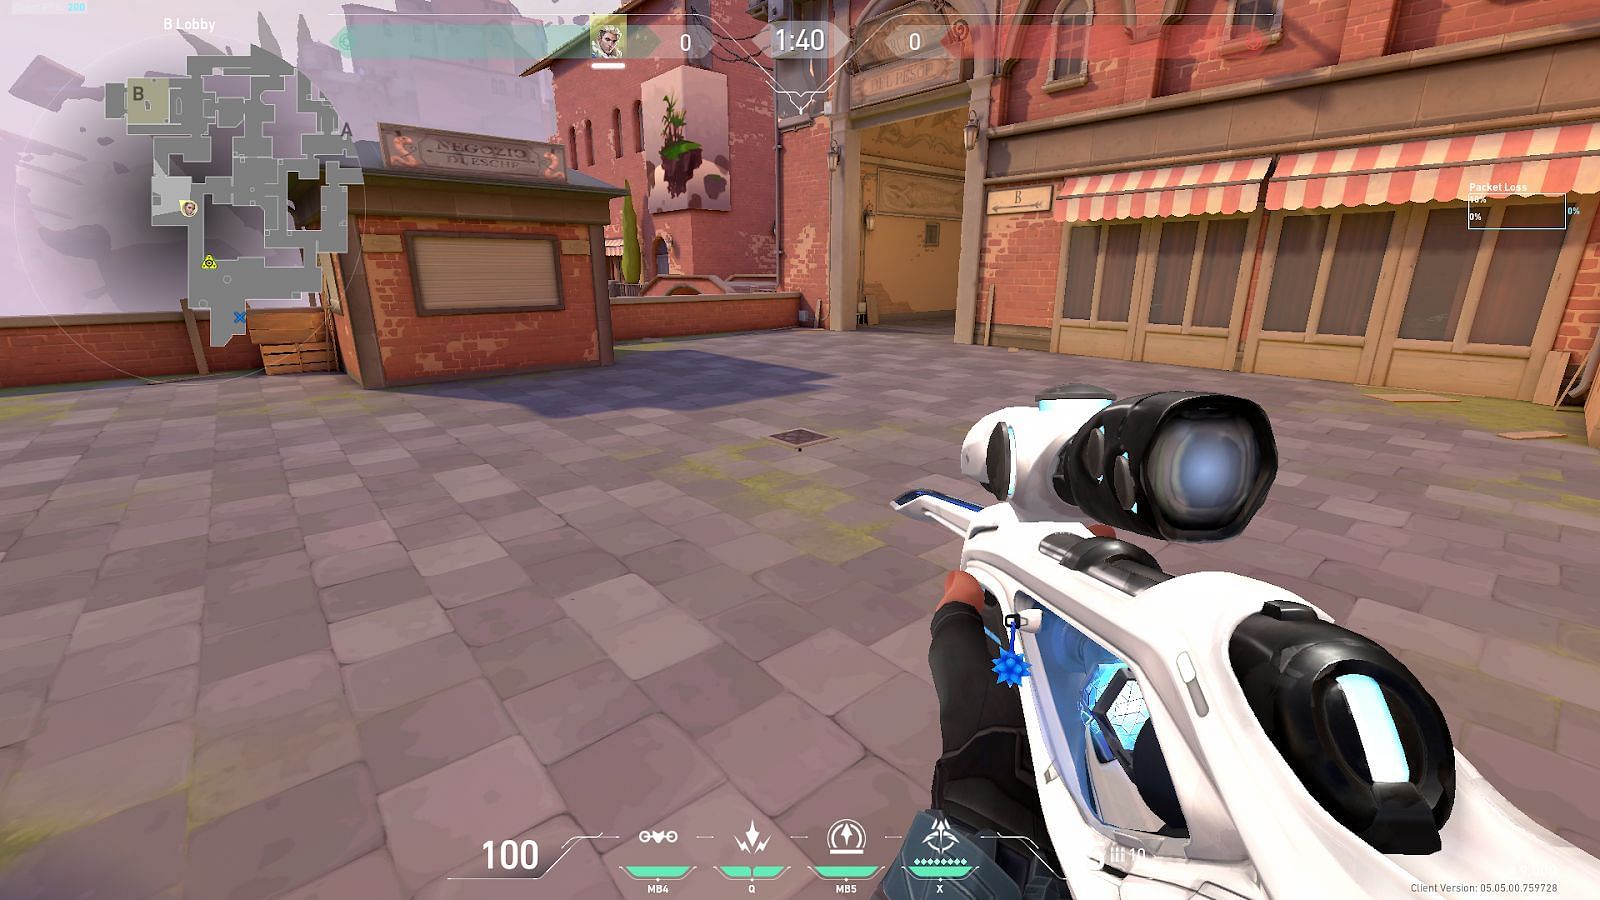
For this lineup, players will need to find the dark tile in B-Lobby, as shown in the image above.
Players should then align themselves right above the tile by placing their crosshairs in the middle of the dark tile.
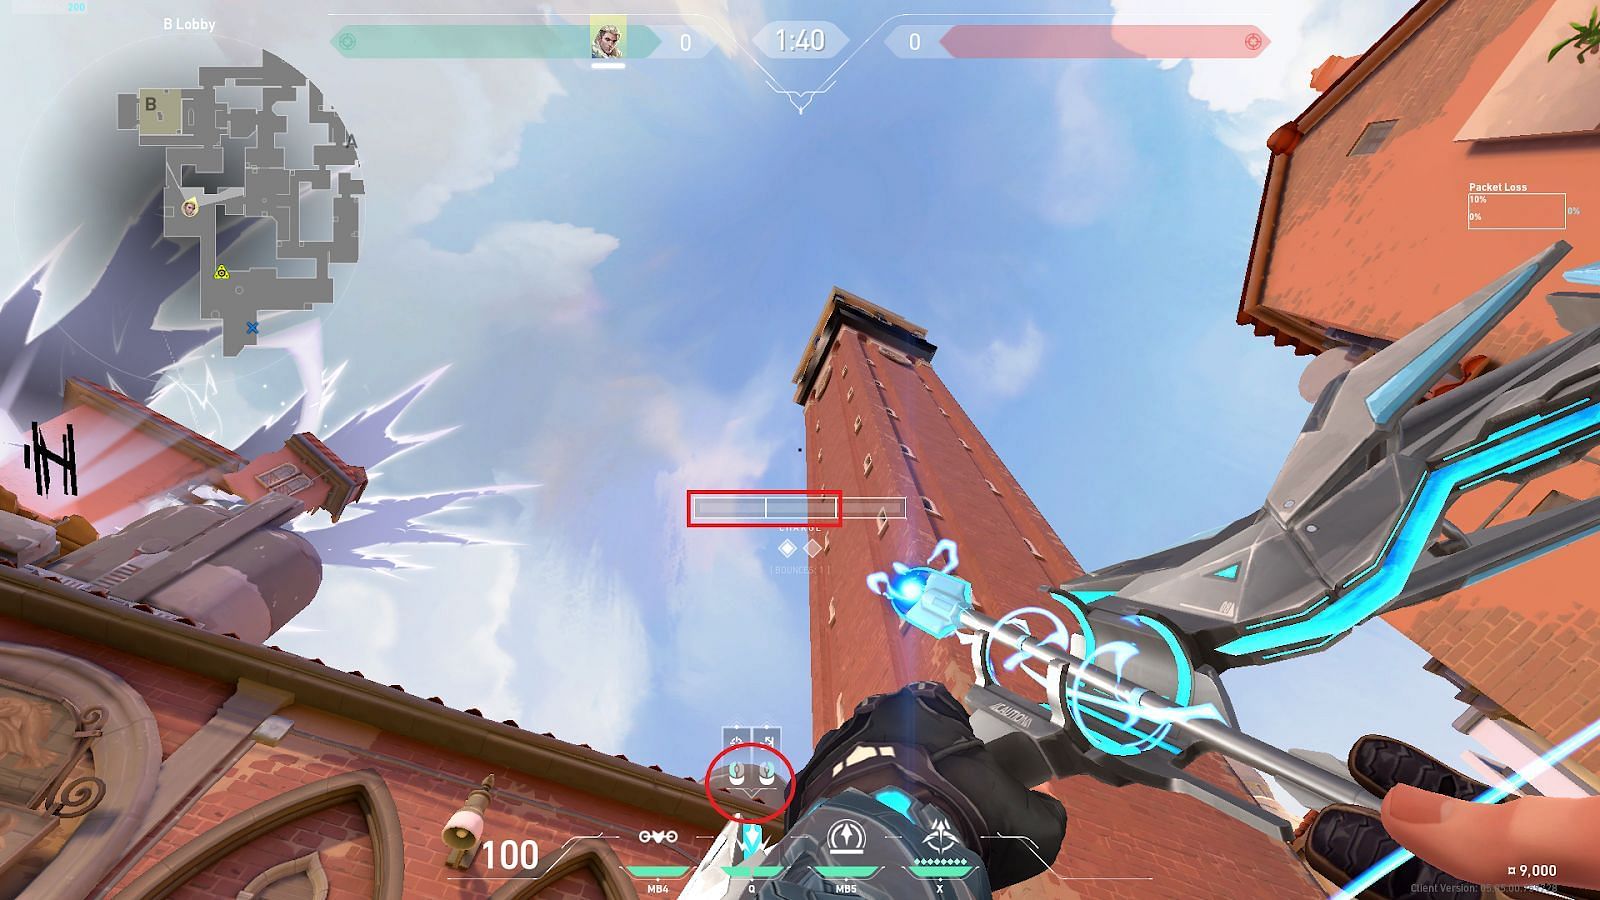
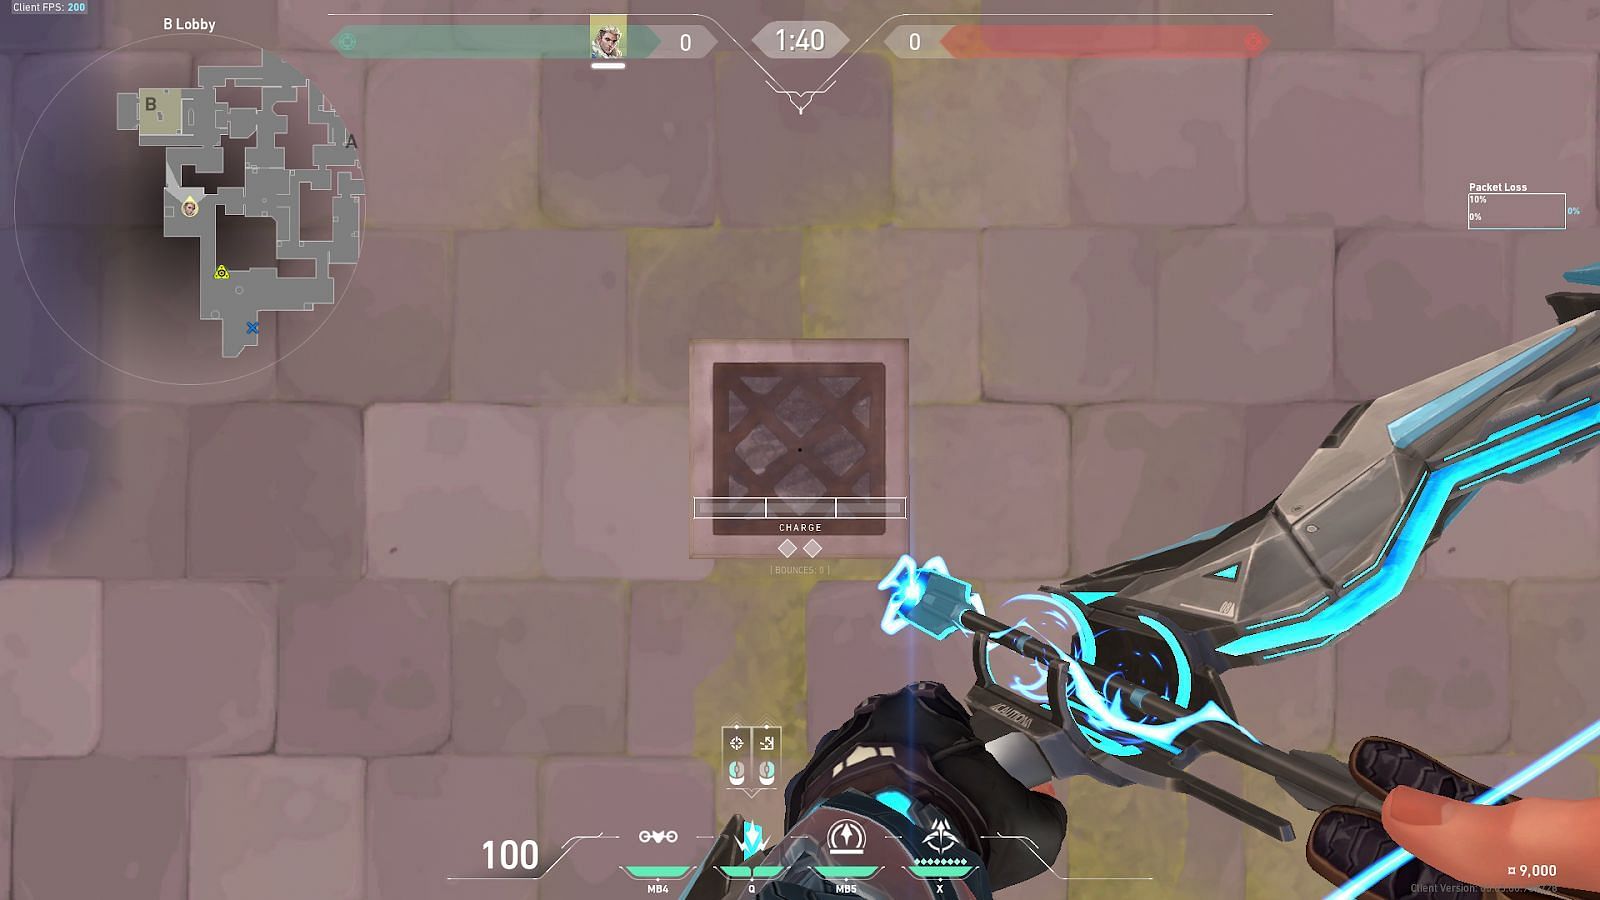
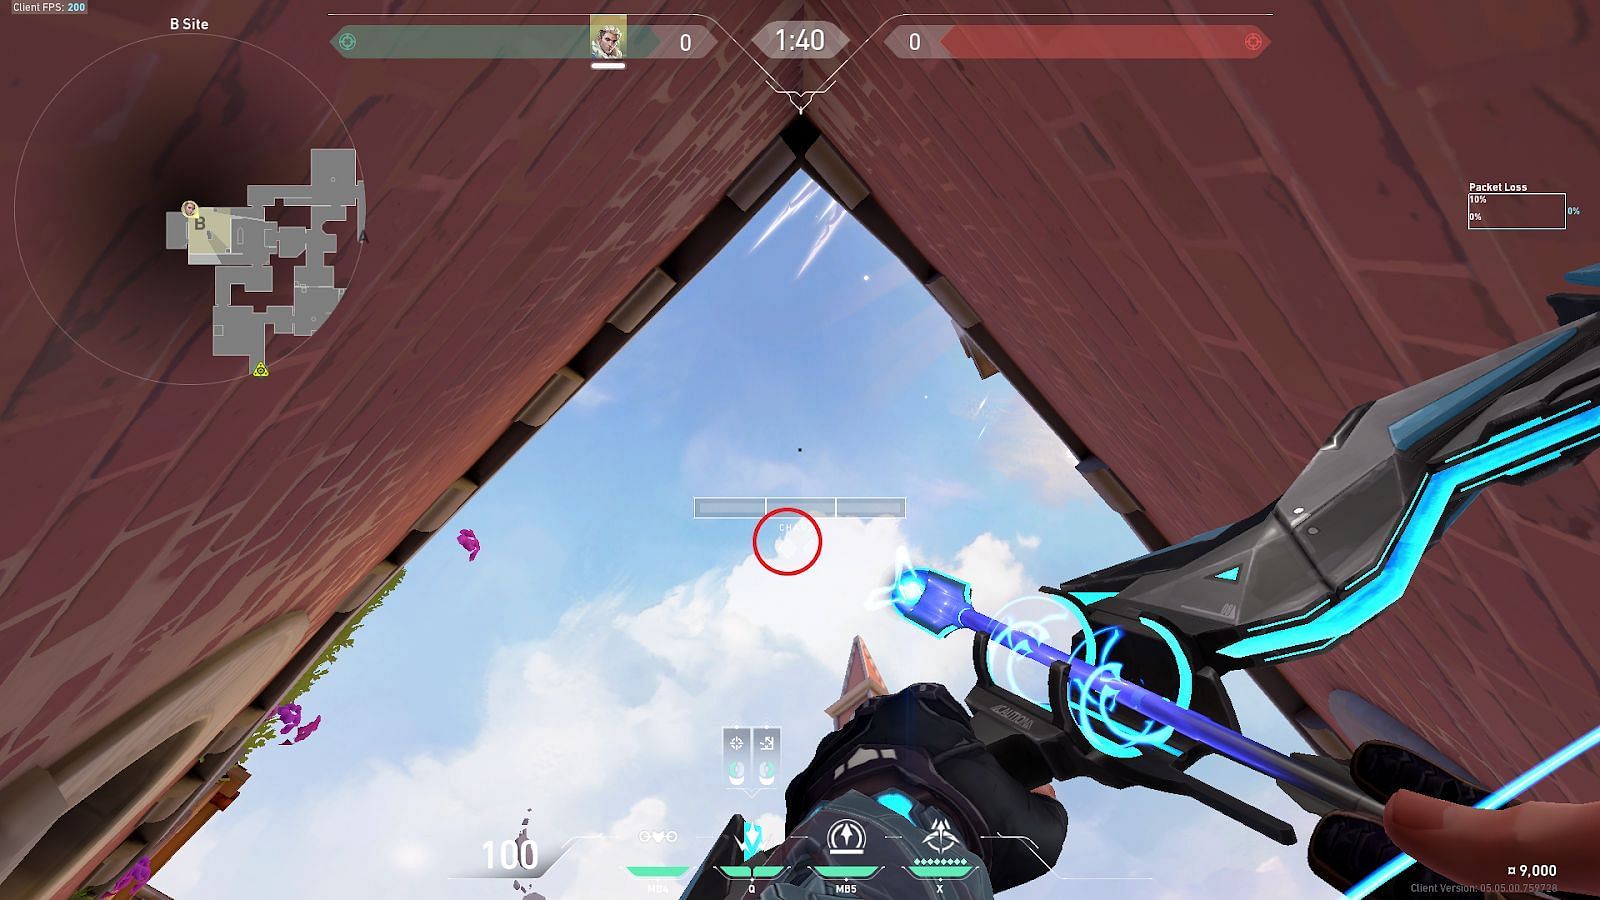
Players must align their mouse indicator above the Shock Bolt ability icon (shown with a circle). They can then deploy the first Shock Bolt with one bounce (one right-click) and two bar charge (shown with a rectangle).
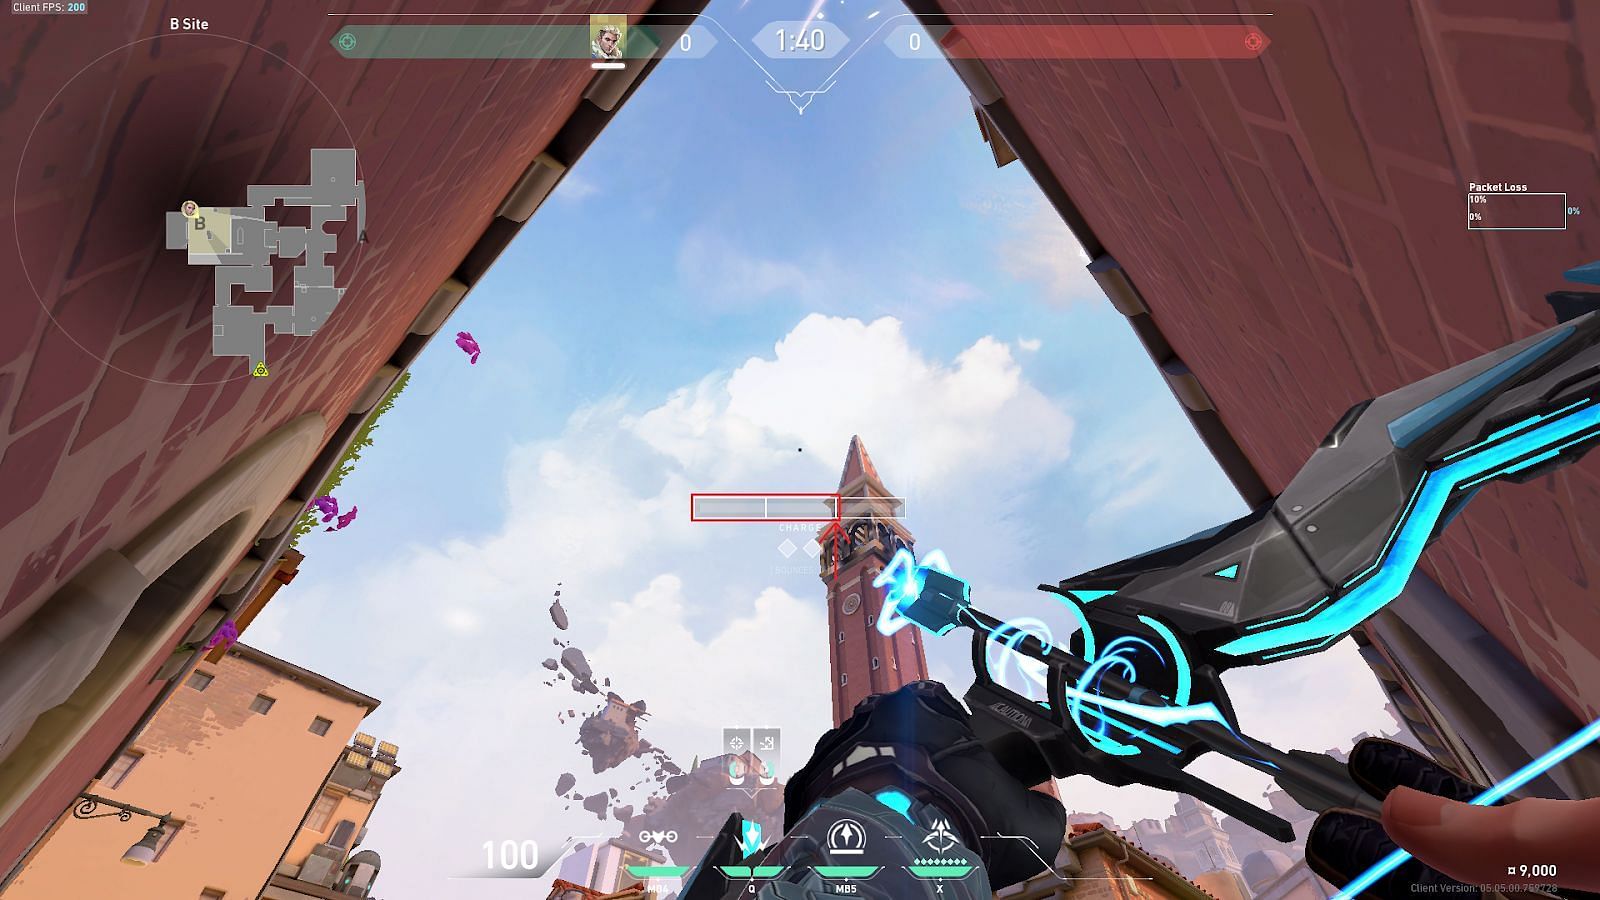
The second Shock Bolt will need to be aligned with the right curved line beside the HP count (shown with a circle) below the middle window ledge.
The ability has to be deployed with one bounce (one right-click) and one bar charge (shown with a rectangle).
By timing the second bolt a second after the first one is deployed, both the Shock Bolts land together inside Mid Market through the roof gap.
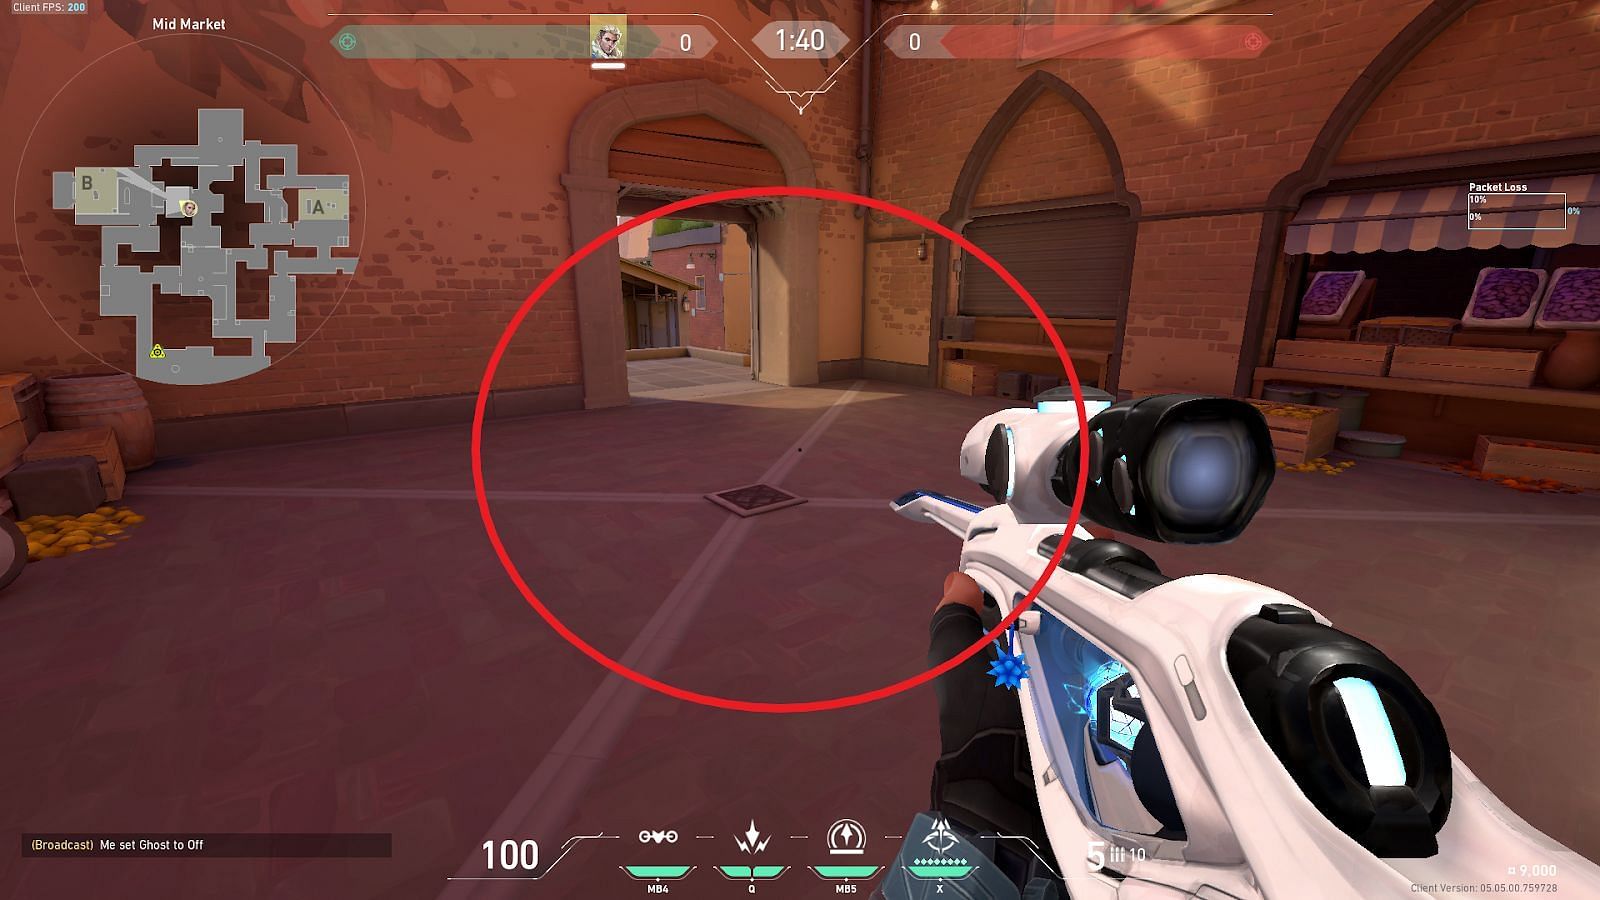
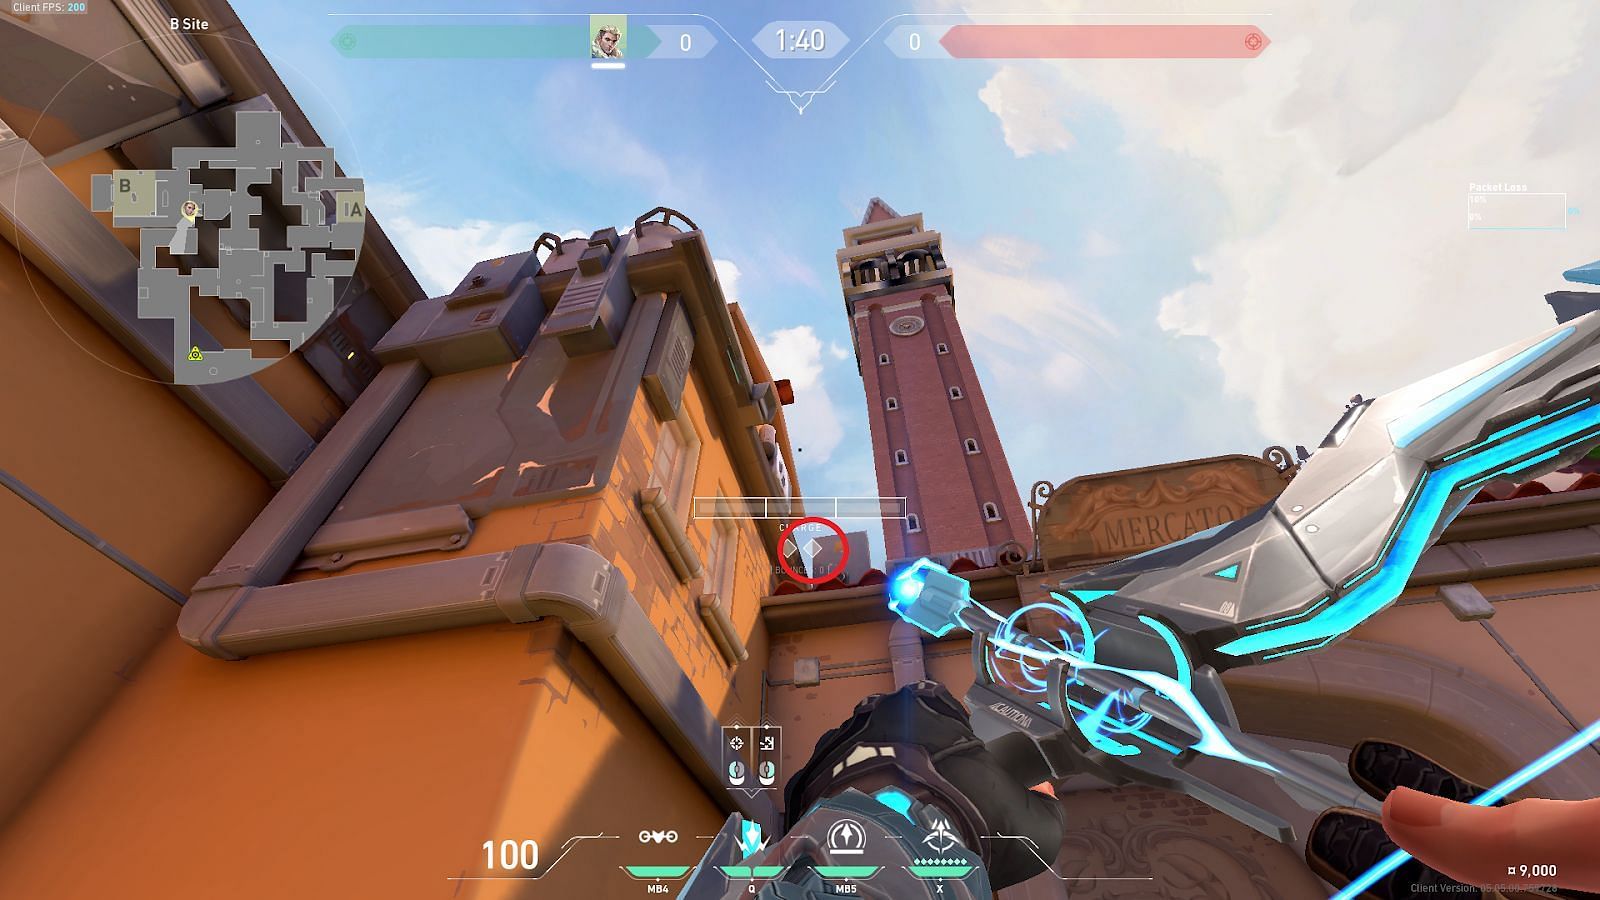
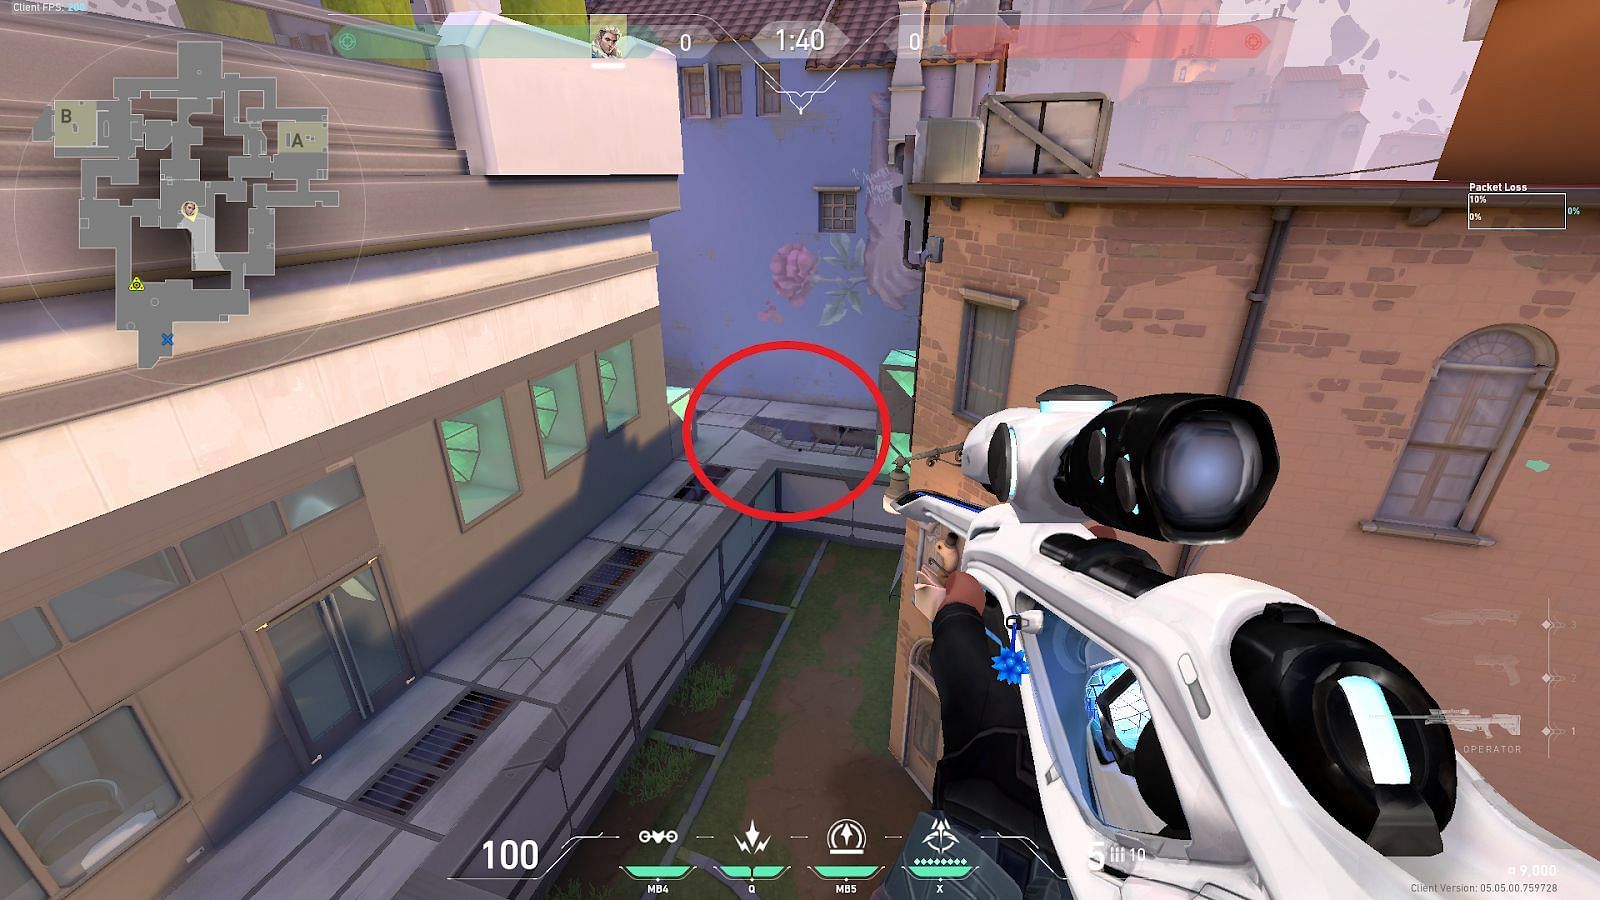
2) Mid Market to Mid Link Tiles
For this lineup, players will need to first find the corner that is outside Mid Market in B-Site (shown in the image above).
Players will need to align themselves directly above the corner by placing their crosshairs on the edge. There is little tolerance for the lineup, so players being slightly to the left or right will not affect the outcome.
Players must align the left bracket near the “BOUNCE” text below the charge bar (shown with a circle) on the ledge of the roof. The first Shock Bolt then needs to be deployed with one bar charge (shown with a rectangle).
For the second Shock Bolt, players must align the top corner of the right bounce diamond indicator (shown with a circle) with the top-left corner of the distant tower. The second Shock Bolt needs to be deployed with a simple left-click.
Consecutively deploying both the Shock Bolts will result in them landing simultaneously in Mid Link Tiles.
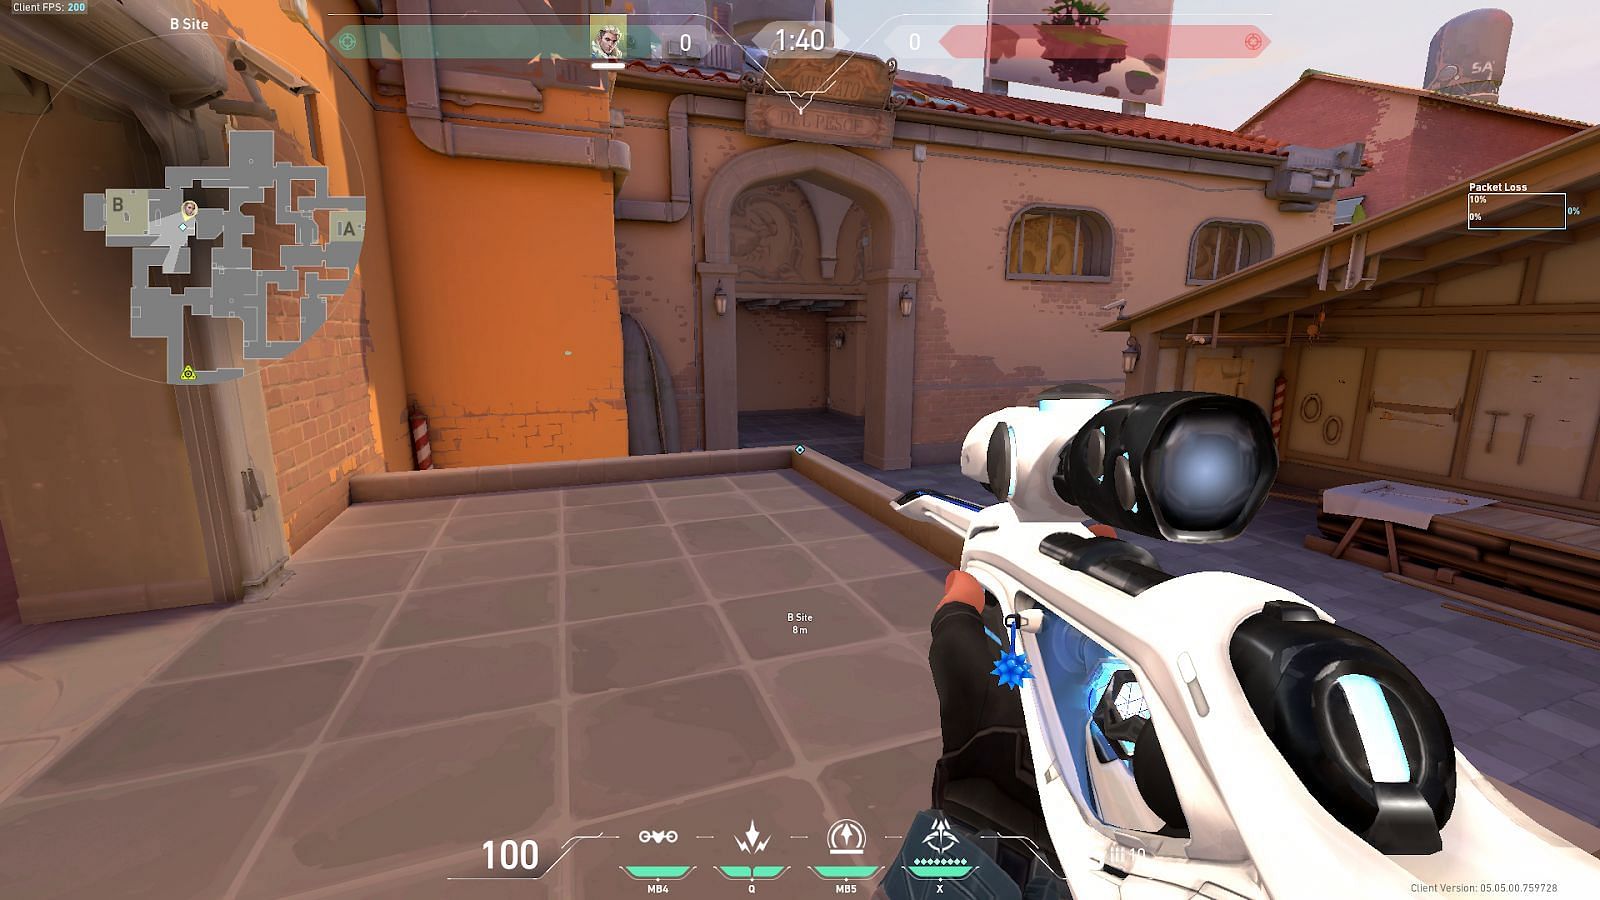
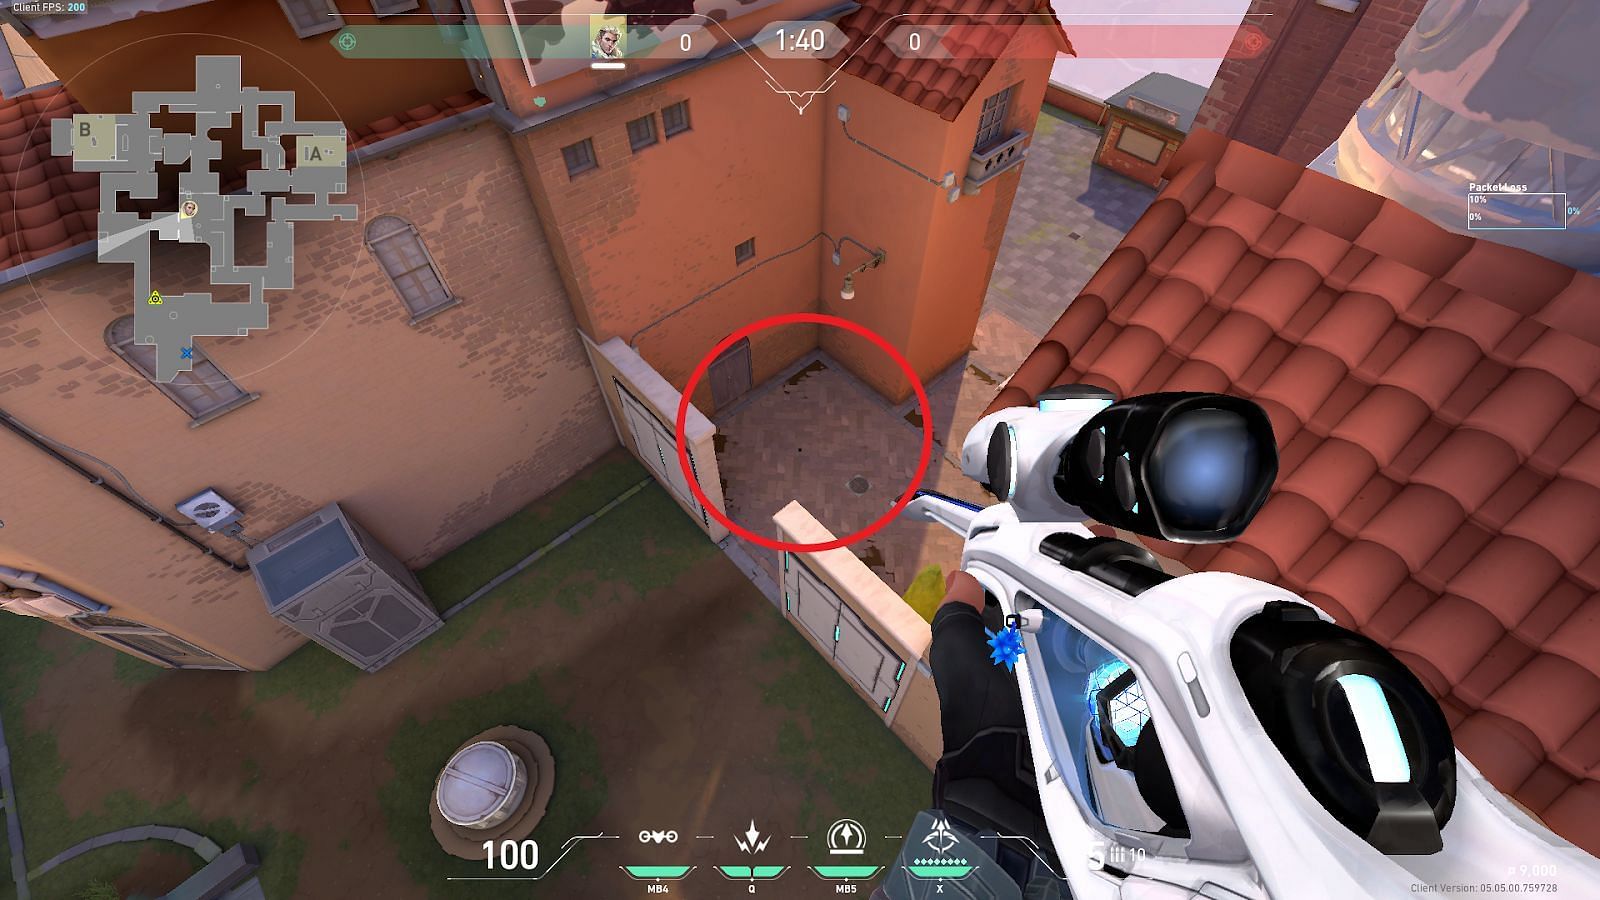
3) B-Site to Top Mid
For this lineup, players will need to position themselves in the B-Site and tuck themselves inside a corner near B-Boat House (shown above).
For the first Shock Bolt, players will need to align the letter “H” (shown with a circle) of the “CHARGE” text below the charge bar on the cloud. The Shock Bolt has to be deployed at full charge.
For the second Shock Bolt, players must align the second bar of the charge bar (shown with an arrow) with the corner of the clock tower. The second Shock Bolt needs to be deployed with two bar charge (shown with a rectangle).
Timing the second Shock Bolt three seconds after the first one will result in both the Shock Bolts landing simultaneously on Mid Top.
4) Mid Market to A-Main
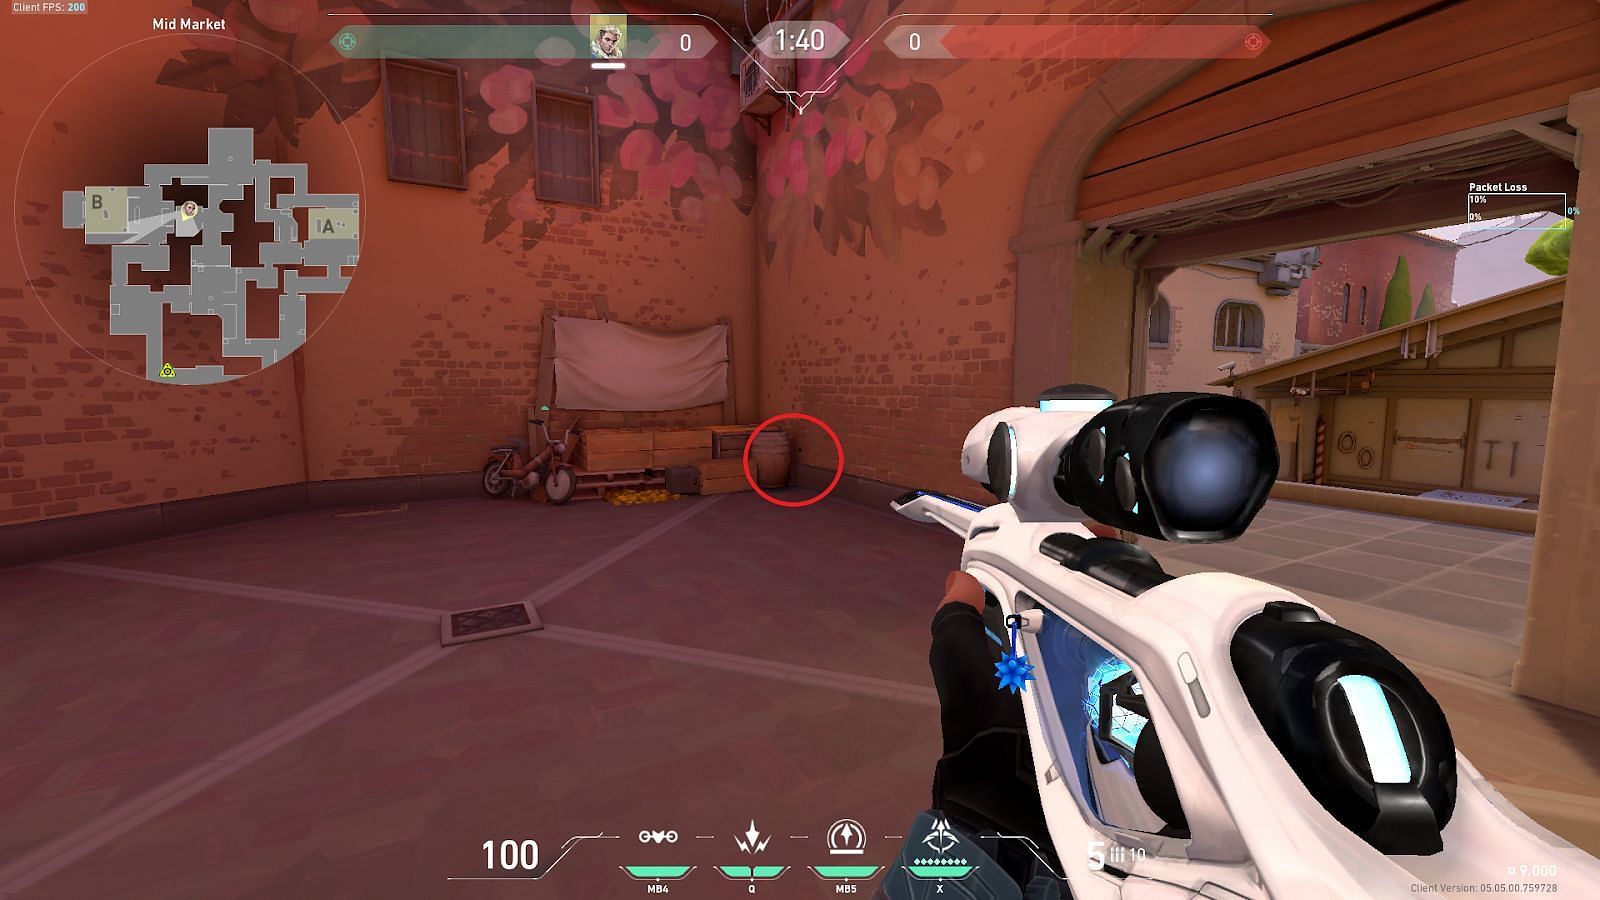
For this lineup, players will need to position themselves in Mid Market and tuck inside the corner near the barrel (shown with a circle).
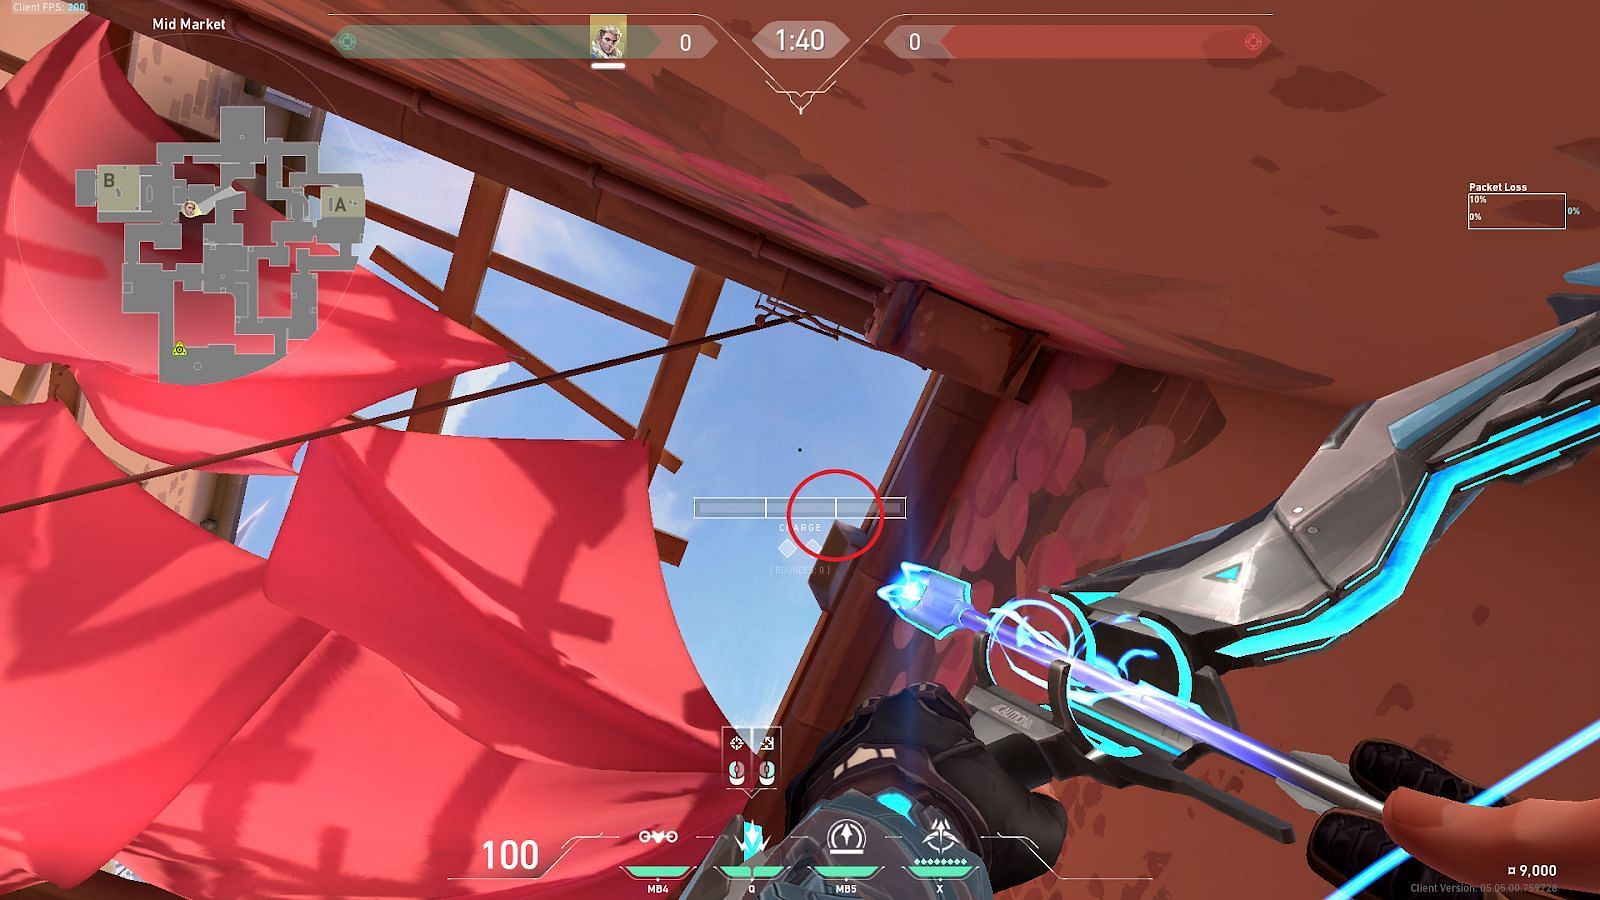
For the first Shock Bolt, players will need to align the second bar (shown with a circle) of the charge bar on the top-right corner of the roof ledge. They must then deploy the first Shock Bolt with a full charge.
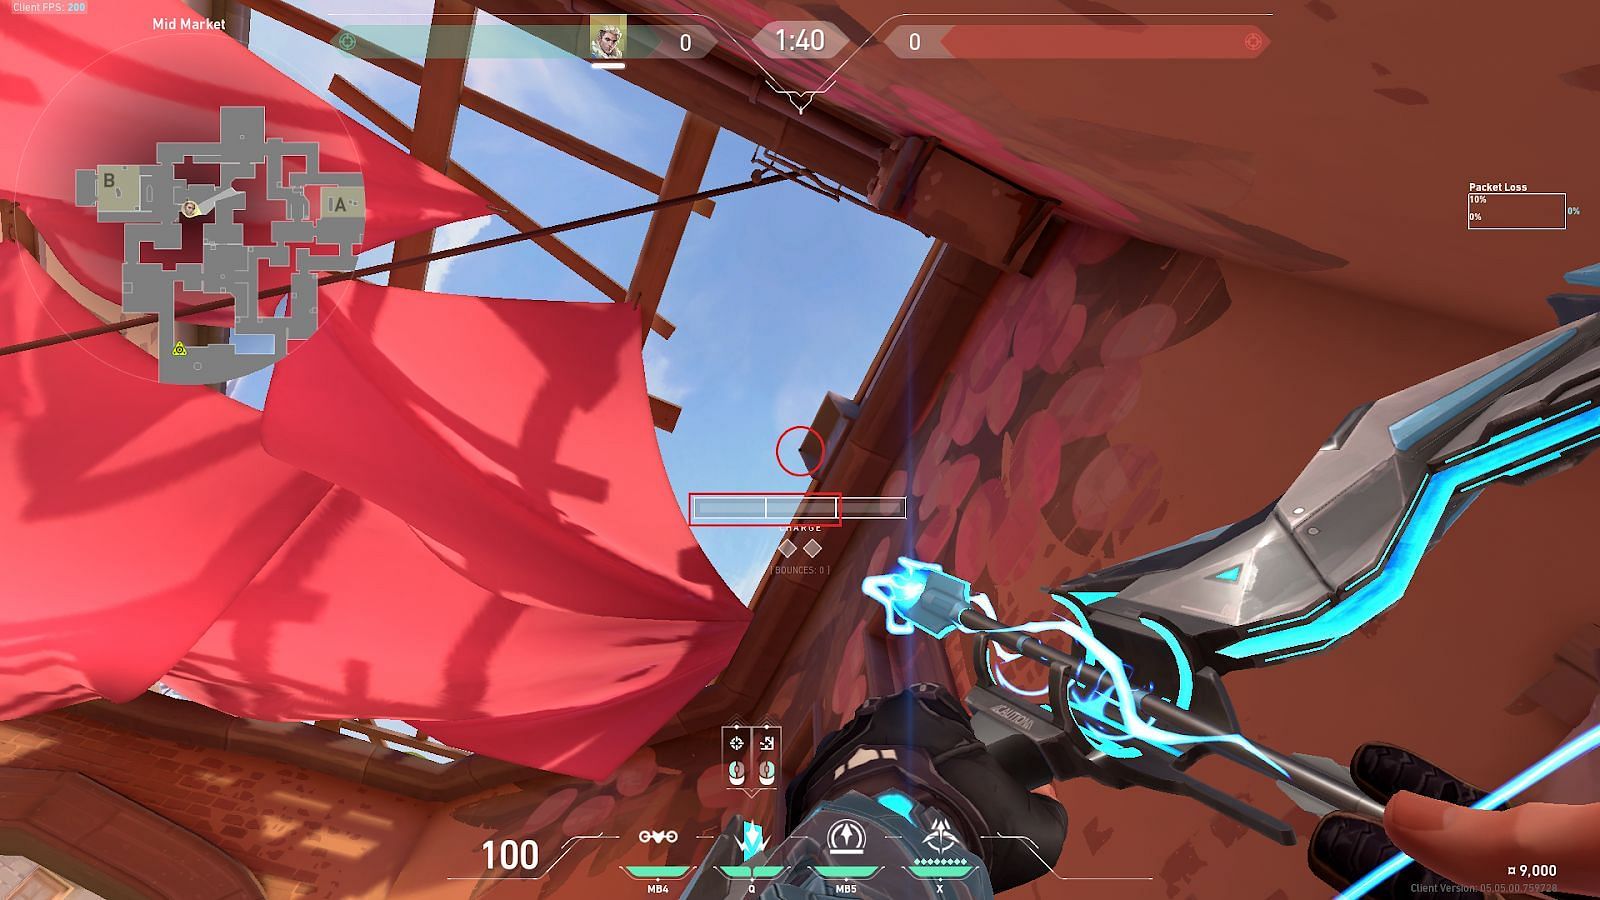
For the second Shock Bolt, players will need to place their crosshairs in the top-left corner of the roof ledge (shown with a circle) and deploy it with a two bar charge (shown with a rectangle).
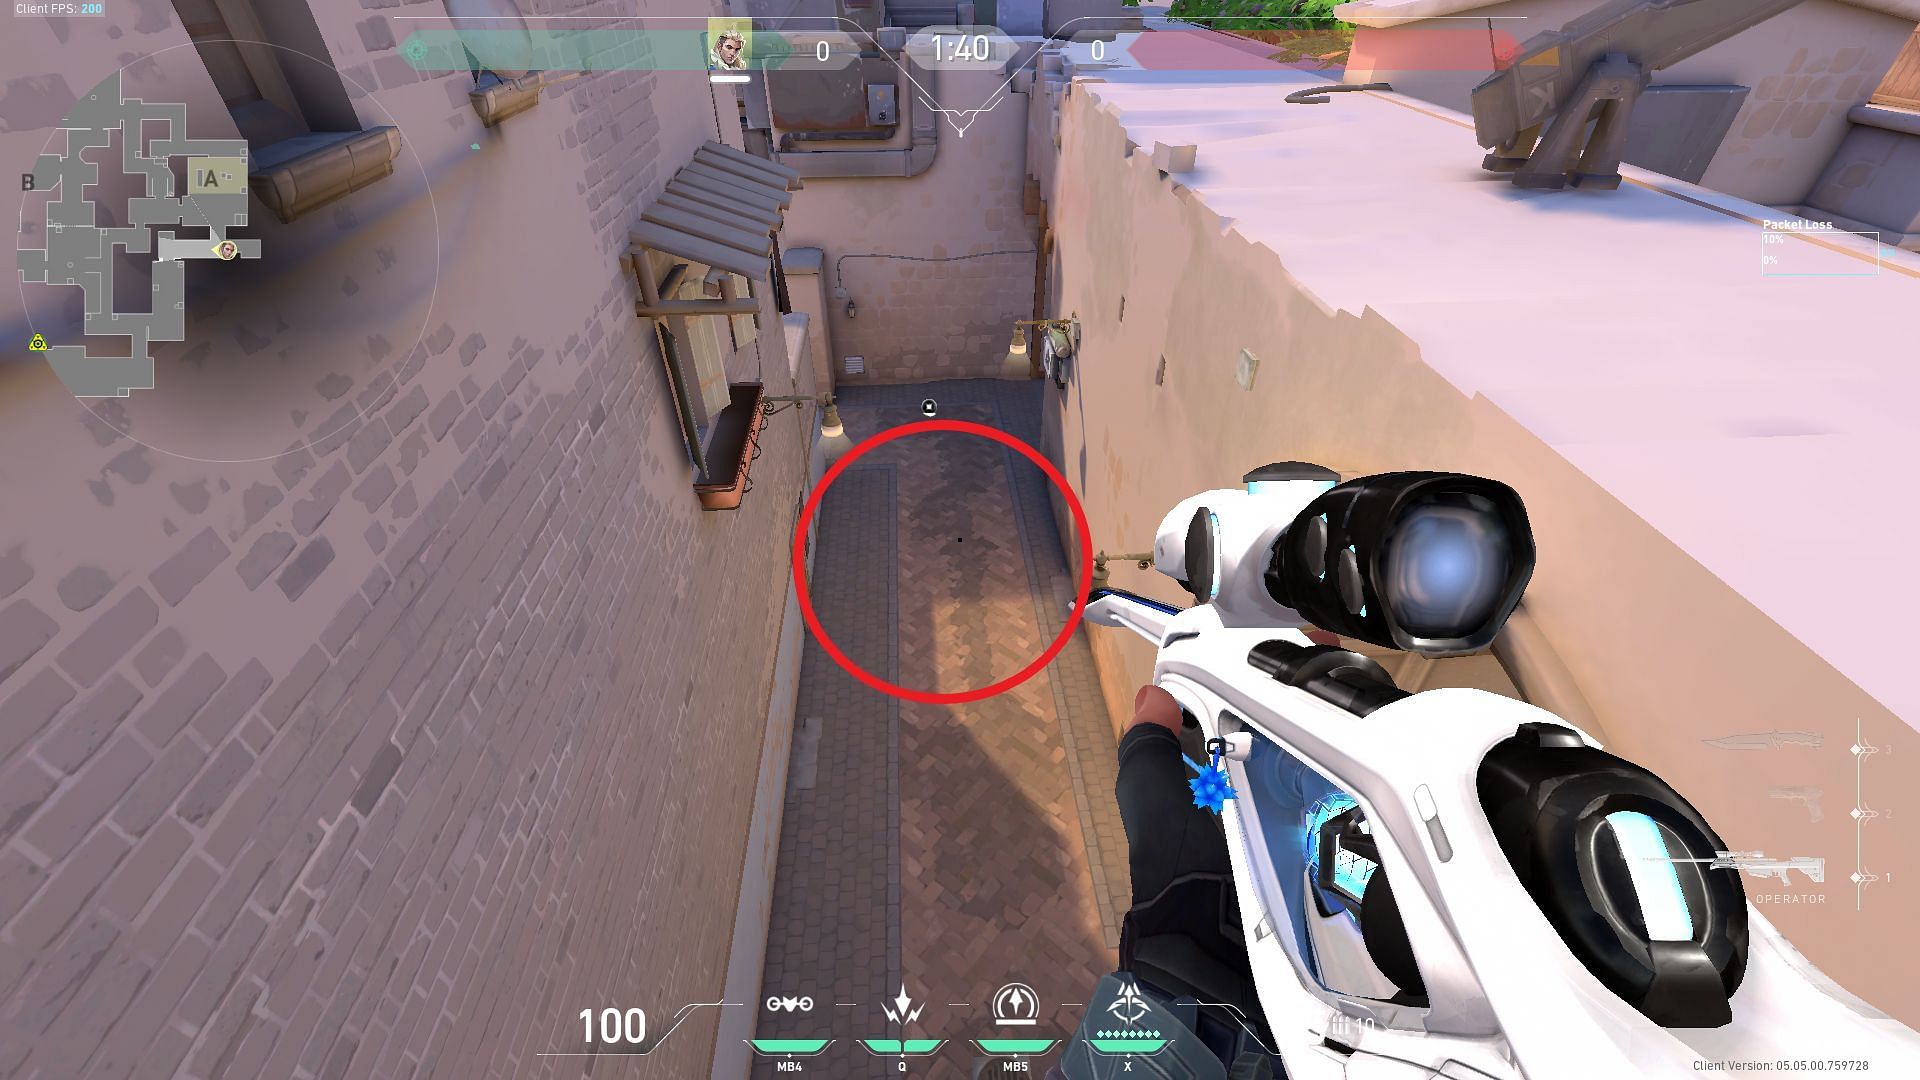
Timing the second Shock Bolt exactly four seconds after the first will result in both Shock Bolts landing in A-Main (shown with a circle) simultaneously.
