
'%20x='0'%20y='0'%20height='100%25'%20width='100%25'%20%0A%20%20%20%20%20%20%20%20%20%20xlink%3Ahref='data:image/jpg;base64,/9j/2wBDAAYEBQYFBAYGBQYHBwYIChAKCgkJChQODwwQFxQYGBcUFhYaHSUfGhsjHBYWICwgIyYnKSopGR8tMC0oMCUoKSj/2wBDAQcHBwoIChMKChMoGhYaKCgoKCgoKCgoKCgoKCgoKCgoKCgoKCgoKCgoKCgoKCgoKCgoKCgoKCgoKCgoKCgoKCj/wgARCAAFAAoDASIAAhEBAxEB/8QAFQABAQAAAAAAAAAAAAAAAAAABAX/2gAIAQEAAAAAkE//xAAUAQEAAAAAAAAAAAAAAAAAAAAF/9oACAECEAAAAD//xAAUAQEAAAAAAAAAAAAAAAAAAAAE/9oACAEDEAAAAAf/xAAjEAACAAUCBwAAAAAAAAAAAAACAwABBAUGERITFBUhMUHR/9oACAEBAAE/AK/I7pcLpQPRU8kS58OQIHVZ7vZiWu6H5FkIOYPVvBTl2pV/I//EABkRAAEFAAAAAAAAAAAAAAAAAAABBBMUMf/aAAgBAgEBPwC+52RT/8QAFhEAAwAAAAAAAAAAAAAAAAAAAAEx/9oACAEDAQE/AFD/2Q=='%3E%3C/image%3E%3C/svg%3E)
Curved roofs give Minecraft builds a dynamic, dimensional look. Given that the game is based entirely on square shapes, beginners may be wondering how to make a roof in Minecraft that isn’t flat or boxy.
Building a curved roof in Minecraft is far from complicated. In fact, there are many different curved roof designs that players can utilize in their builds.
This article will provide the basics of building a curved roof in Minecraft. The building strategy can be applied to any roof design. However, for the purposes of a tutorial, this article features a simple roof.

Chart New Territories with the ultimate Minecraft Seed Generator!
A step-by-step guide to building a curved roof in Minecraft
Step 1
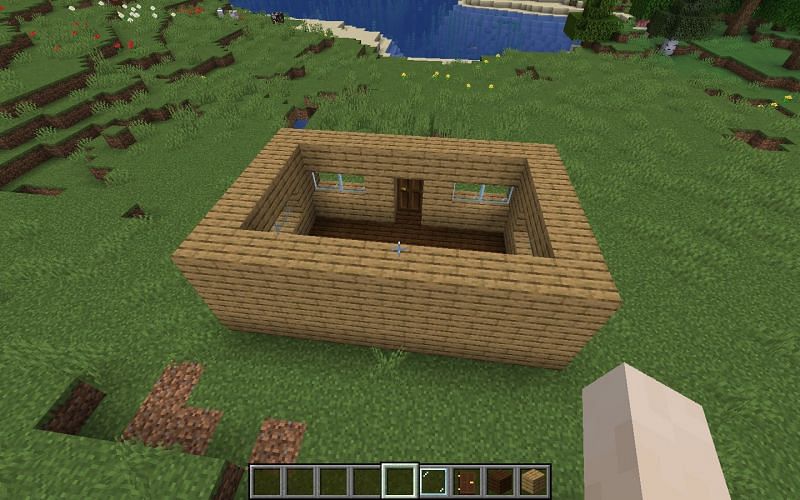
Image via Minecraft
To start, make the base and walls of the house first. This will be the foundation to build the roof off of. The house or building can be as tall and wide as a player prefers.
Step 2
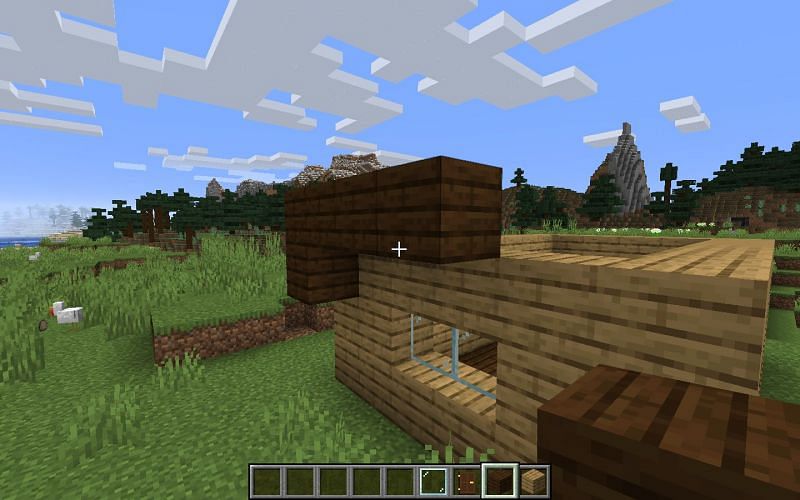
Image via Minecraft
To begin the roof in Minecraft, players must place a temporary block as a starting point. It’s up to the player to decide at which level a roof will start, but regardless, there will be plenty of temporary blocks used for a curved roof build.
On top of the temporary block, place another block on top. Then, start to make a permanent row coming off of the second block. The beginning of a row on top of a temporary block is featured in the image above.
Once this gets started, the original temporary can be broken. For those building in survival mode, the block can be collected and used later on in the build.
Step 3
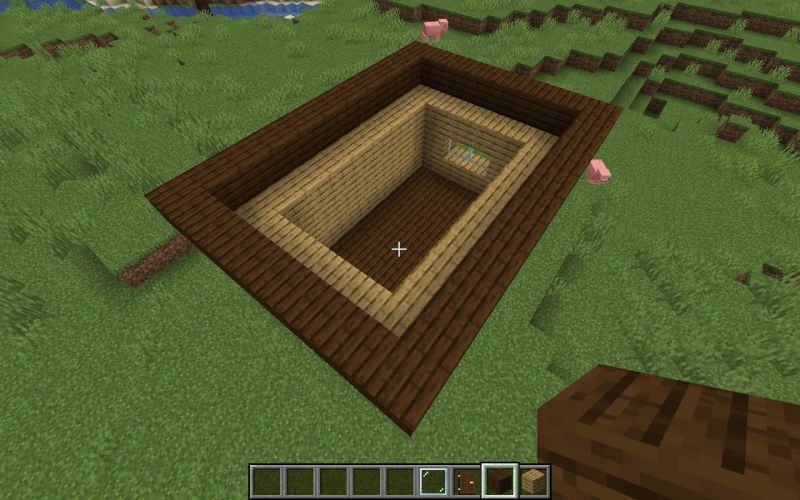
Image via Minecraft
Now that there is a row in the chosen starting location, complete that all the way around the house to create the base of the roof. It only takes a single temporary block to place an entire layer above and around where it was placed.
Step 4
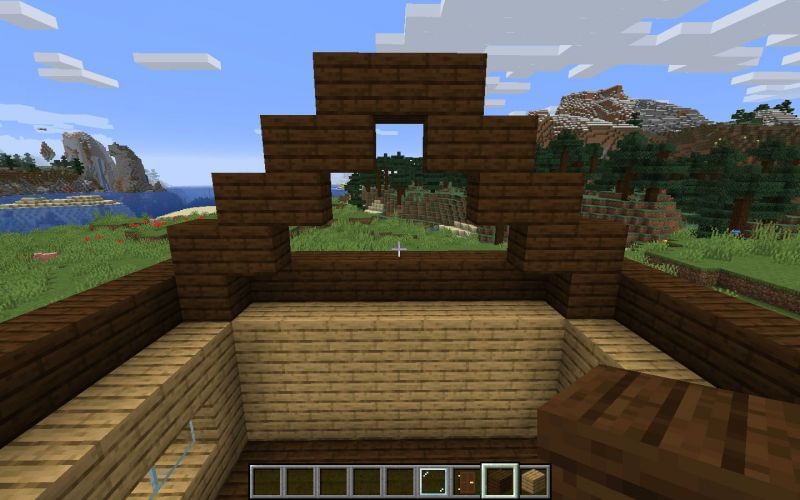
Image via Minecraft
This is when the curve begins to happen. It is now time to build up and inward.
Continue the temporary block trick to make what looks like a staircase until the blocks meet in the middle. It is up to the player to decide how high the roof goes. The middle section can come to a point like a triangle, or it can be longer and more flat with curved edges to round out the sides.
Step 5
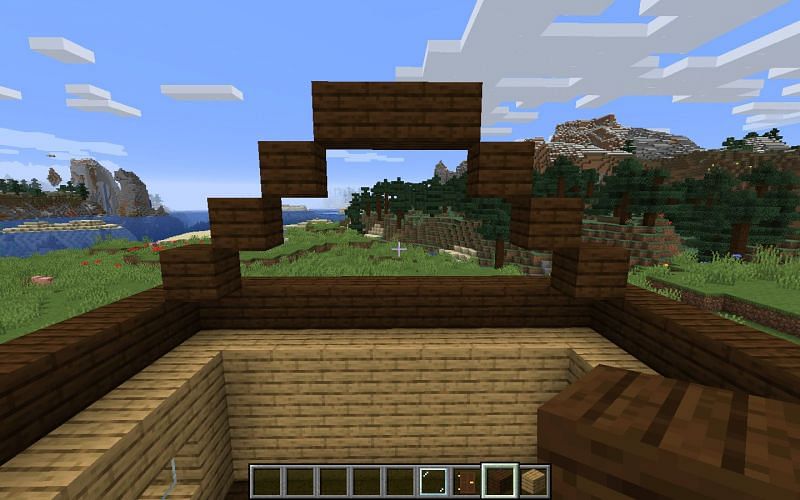
Image via Minecraft
Now that the foundation of the curve has been placed, those temporary blocks that helped create the staircase shape can then be removed. This step is not entirely required; however, consolidating blocks used in the build will later create more space inside the house. Plus, the next steps will be a bit easier without those unnecessary blocks.
Step 6

Image via Minecraft
Starting from each block that remains, create rows roughly as long as the width of the house. This step is what puts the curve into full effect. With each row added, the roof begins to take shape.
Step 7
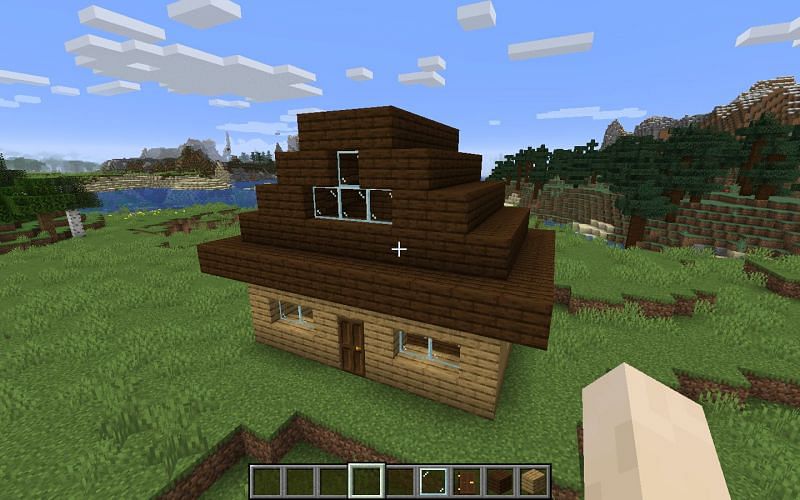
Image via Minecraft
From here, the rest of the roof needs to be filled in to avoid any holes. At this point, the rest of the design is entirely up to the player’s discretion. Once every hole is filled, the roof is complete and should have a successful curve shape.
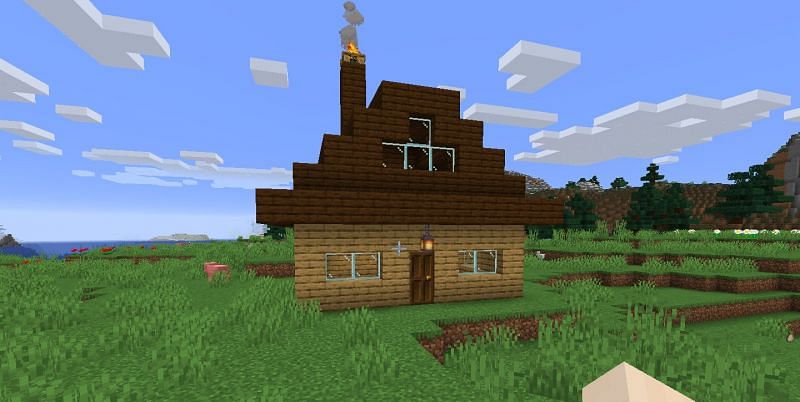
Step 8
Image via Minecraft
Once the roof is complete, players will be able to see how curved roofs add flair to a Minecraft build. Because curved roofs add height to a house, players can decide whether or not to add a second layer or leave the ceiling nice and tall.
Check out this video for a ton of different roof styles that Minecraft players can use in their builds:

Uncover new worlds with our Minecraft Seed Generator!