
'%20x='0'%20y='0'%20height='100%25'%20width='100%25'%20%0A%20%20%20%20%20%20%20%20%20%20xlink%3Ahref='data:image/jpg;base64,/9j/2wBDAAYEBQYFBAYGBQYHBwYIChAKCgkJChQODwwQFxQYGBcUFhYaHSUfGhsjHBYWICwgIyYnKSopGR8tMC0oMCUoKSj/2wBDAQcHBwoIChMKChMoGhYaKCgoKCgoKCgoKCgoKCgoKCgoKCgoKCgoKCgoKCgoKCgoKCgoKCgoKCgoKCgoKCgoKCj/wgARCAAGAAoDASIAAhEBAxEB/8QAFAABAAAAAAAAAAAAAAAAAAAABf/aAAgBAQAAAAAlL//EABQBAQAAAAAAAAAAAAAAAAAAAAT/2gAIAQIQAAAAJ//EABQBAQAAAAAAAAAAAAAAAAAAAAP/2gAIAQMQAAAAH//EACMQAAIBAgQHAAAAAAAAAAAAAAECAwQRAAUGIRMWIjFDgdH/2gAIAQEAAT8Al1/SCsm4WVRxs1WJ2YL5QbF+9vWOdZH6jVZhc77LF8x//8QAFhEBAQEAAAAAAAAAAAAAAAAAAQAD/9oACAECAQE/ANFv/8QAGBEAAgMAAAAAAAAAAAAAAAAAAAECERL/2gAIAQMBAT8Am8ukf//Z'%3E%3C/image%3E%3C/svg%3E)
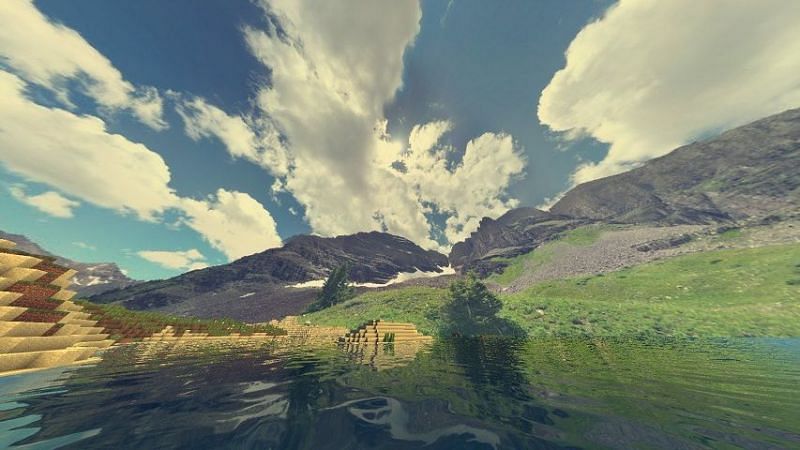
Realistic skies in Minecraft are popular among players, especially those in the PvP community.
Using and installing a realistic sky for Minecraft does require a few steps, but luckily isn't overly difficult. There are also lots of different types and styles of realistic skies freely available on the internet for players to use.
This guide will explain exactly how Minecrafters can install a realistic sky to their game.

How to get a realistic sky in Minecraft Java Edition?
Java Edition Minecraft players can follow this guide; Bedrock players can check further below for a guide.
Realistic sky Minecraft Java Installation guide:
Step 1
The first step to obtaining a realistic sky for Minecraft Java Edition is to install optifine. Optifine is one of the most popular Minecraft mods of all time and sets out to improve the performance of the game, offering massive FPS boosts.
Optifine can be downloaded here. Installing it is straightforward, but those confused can check out this helpful guide:
How to install optifine for Minecraft?
Step 2
After installing optfine, gamers will now need to download a realistic sky texture pack. One of the most popular ones is called "Fancy Skies," and can be downloaded here.
If this doesn't satisfy, players can also search for PvP texture packs. Many of these packs come with built-in realistic skies. Some of the best Minecraft PvP packs can be found here:
Top 5 best Minecraft PvP Texture Packs
After downloading the pack, it can be installed like any other resource pack. Those confused on how to do this can check out this helpful video:
Step 3
After the resource/texture pack has been installed, players now need to modify a few optifine settings.
The settings that need to be changed are as follows:
options -> video settings -> details -> clouds -> switch to OFF
options -> video settings -> details -> Fog -> switch to OFF
After this, players should ensure that the resource pack is activated. If it is, everything should be good to go, and a realistic sky should now be seen in-game.
How to get a realistic sky in Minecraft Bedrock Edition?
Bedrock Edition players can follow this simple guide in order to obtain a realistic-looking sky:
Step 1
The first step is to download a mod that imports realistic skies into Minecraft Bedrock. One of the most popular of such mods is called "Realistic Skyboxes" and can be found here.
Step 2
To install, players can simply double click the .MCPACK file that was downloaded in the previous step. Once this is done, a new resource pack should appear in the "my packs" menu.
The newly installed resource pack called "Better Skyboxes" needs to be activated.
Step 3
After enabling or "activating" the resource pack, players can now navigate to their "active" resource packs. Inside this menu, if all has been done correctly thus far, there should be an option called "Better Skyboxes."
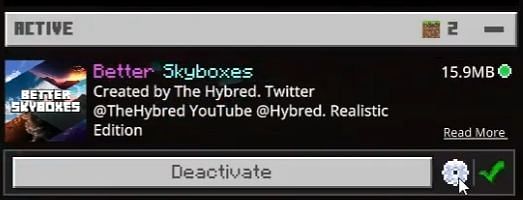
In order to change the specific sky in effect, players can hit the gear icon as shown above.
