

'%20x='0'%20y='0'%20height='100%25'%20width='100%25'%20%0A%20%20%20%20%20%20%20%20%20%20xlink%3Ahref='data:image/jpg;base64,/9j/2wBDAAYEBQYFBAYGBQYHBwYIChAKCgkJChQODwwQFxQYGBcUFhYaHSUfGhsjHBYWICwgIyYnKSopGR8tMC0oMCUoKSj/2wBDAQcHBwoIChMKChMoGhYaKCgoKCgoKCgoKCgoKCgoKCgoKCgoKCgoKCgoKCgoKCgoKCgoKCgoKCgoKCgoKCgoKCj/wgARCAAGAAoDASIAAhEBAxEB/8QAFQABAQAAAAAAAAAAAAAAAAAABgf/2gAIAQEAAAAAXUX/xAAUAQEAAAAAAAAAAAAAAAAAAAAD/9oACAECEAAAAE//xAAUAQEAAAAAAAAAAAAAAAAAAAAC/9oACAEDEAAAAB//xAAgEAABAwQCAwAAAAAAAAAAAAACAQMFAAQREwYHIqKx/9oACAEBAAE/AIxm9e7TCO27BSHN/Wbxa18/tN8IlTbElvYwVJM4S2Jce1f/xAAXEQEBAQEAAAAAAAAAAAAAAAABAgMA/9oACAECAQE/AI30kQrv/8QAFhEBAQEAAAAAAAAAAAAAAAAAAgAB/9oACAEDAQE/AEDt/9k='%3E%3C/image%3E%3C/svg%3E)
While Minecraft does have a proper day and night cycle, keeping precise track of time isn't a straightforward process. As you enter a new world for the first time, the day starts with sunrise. Soon enough, the sun sets and the moon rises, indicating nighttime. Though you can simply see the sky to determine the time of day, you can also make a clock that automatically chimes after every few minutes to indicate the passing of time.
Each day in Minecraft is approximately 20 minutes in real life and time in the game is determined by the number of ticks rather than minutes or hours. Those looking to decorate their base with a properly functioning clock can create one acts as a real-life self-chiming clock.

Steps to create an automatic chiming clock in Minecraft
1) Items to build the clock
Chart New Territories with the ultimate Minecraft Seed Generator!
First, you need to gather all the items needed to build the clock. Here is a list of all the necessary items:
- Observer
- Daylight sensor
- Bell
- Clock
- Item Frame
Apart from the required items, you can select other blocks and items to decorate the area around the clock. Here are all the optional items that you can use:
- Door
- Slab
- Trapdoor
2) Choosing a place to build the clock
Though you can choose any area to build the clock, make sure that there is no vertical obstruction between it and the sky. This is because a daylight sensor, which essentially detects a change in the time of day, will be used to build the clock.
If you are making the clock inside a structure, make sure to build a one block wide hole right above the daylight sensor that can directly detect the sky.
3) Building the clock
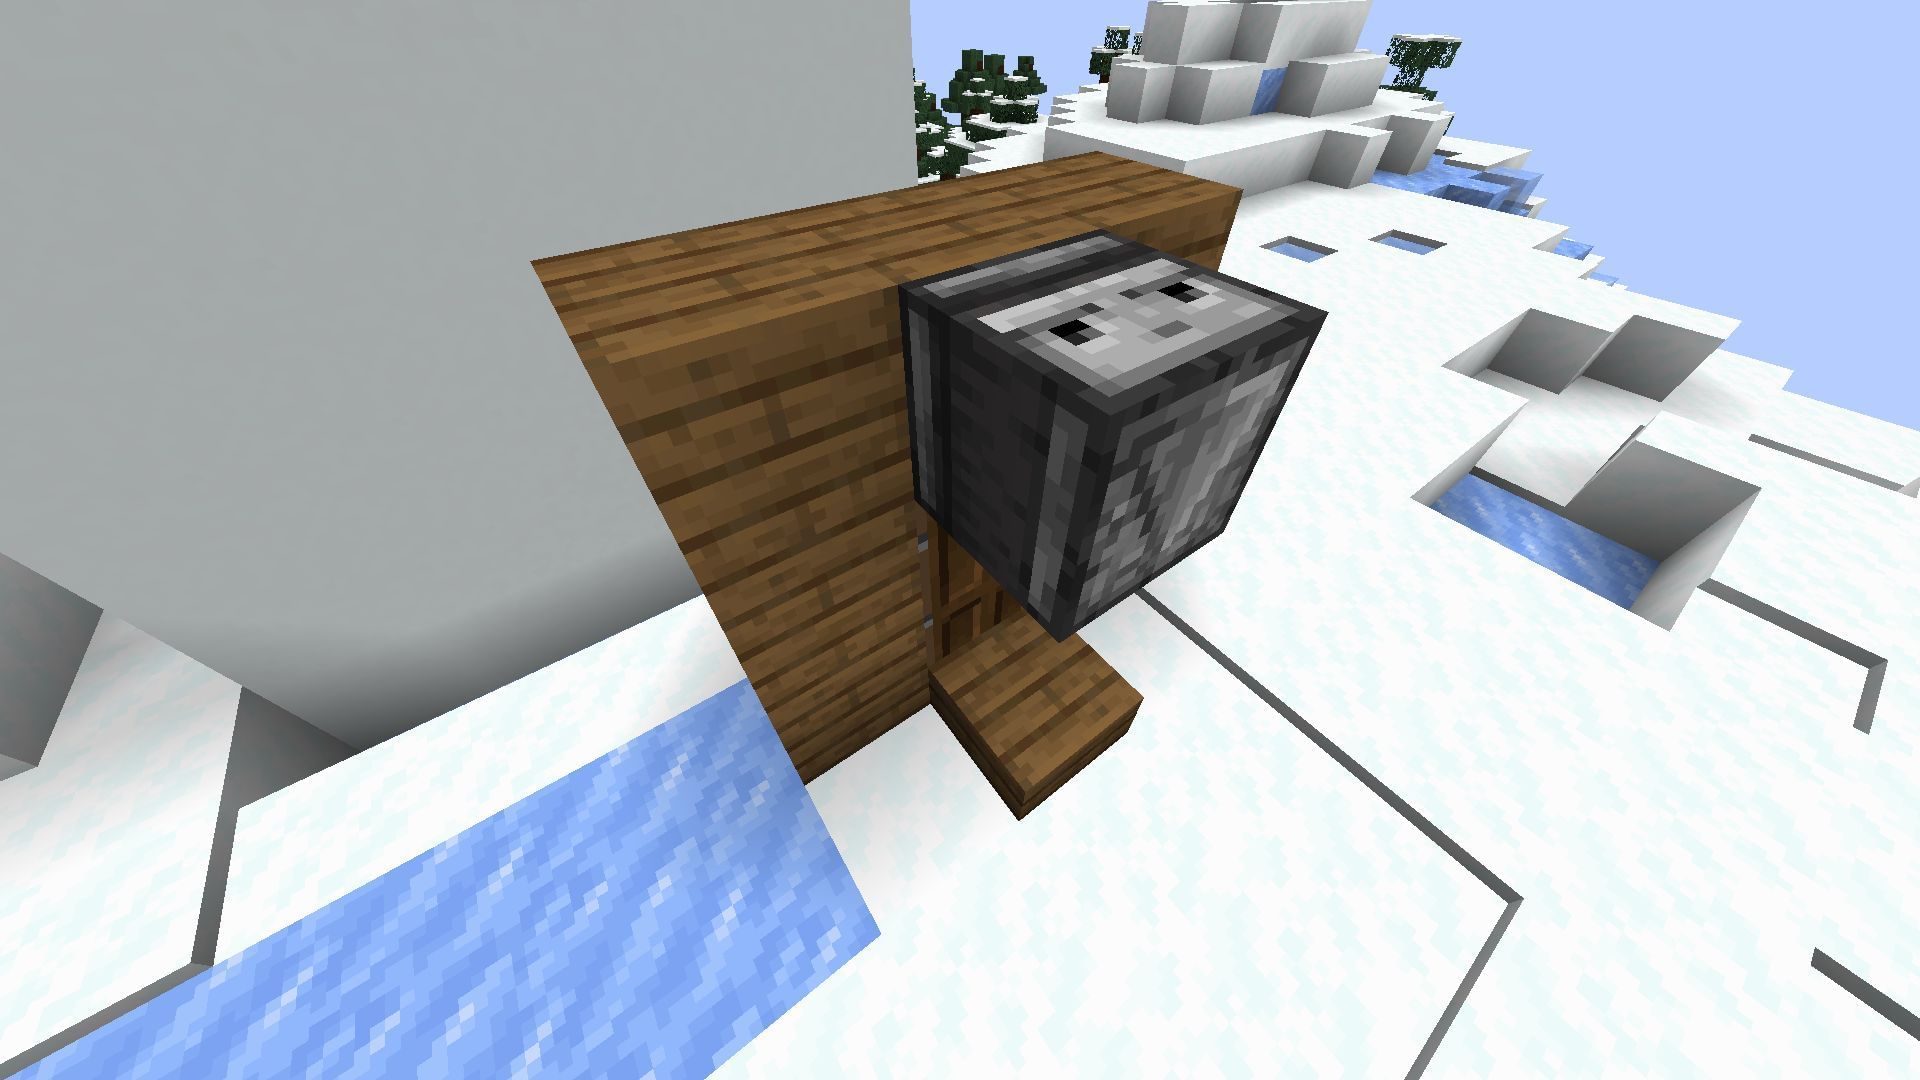
Even if you are new to this game, it will be extremely easy to build this clock. Simply place an observer two blocks above the ground such that the observing side of the block faces upward and the red dot faces downward. Once this is done, place the daylight sensor right above the observer, over the observing side of the block.

Then, place the bell below the obvserver block where the red dot is located. Finally, place the item frame on the observer and put the clock inside it. The clock is now ready to be used.
If the daylight sensor has direct access to the sky, it will keep changing its state. This change of state will be detected by an observer and will send a redstone signal to the bell, causing it to ring. Along with the chime, you will also be able to see the time change in the clock placed in the item frame.

Uncover new worlds with our Minecraft Seed Generator!