'%20x='0'%20y='0'%20height='100%25'%20width='100%25'%20%0A%20%20%20%20%20%20%20%20%20%20xlink%3Ahref='data:image/jpg;base64,/9j/2wBDAAYEBQYFBAYGBQYHBwYIChAKCgkJChQODwwQFxQYGBcUFhYaHSUfGhsjHBYWICwgIyYnKSopGR8tMC0oMCUoKSj/2wBDAQcHBwoIChMKChMoGhYaKCgoKCgoKCgoKCgoKCgoKCgoKCgoKCgoKCgoKCgoKCgoKCgoKCgoKCgoKCgoKCgoKCj/wgARCAAGAAoDASIAAhEBAxEB/8QAFgABAQEAAAAAAAAAAAAAAAAAAAIG/8QAFAEBAAAAAAAAAAAAAAAAAAAABv/aAAwDAQACEAMQAAAAychlD//EACIQAAAFAwQDAAAAAAAAAAAAAAECAwQSAAUGERQiMiQxkf/aAAgBAQABPwDHMif39V4xZq7VoCg6zkc8gDkbtypawLisfyy9h9JxD5X/xAAZEQABBQAAAAAAAAAAAAAAAAACAAEDERL/2gAIAQIBAT8AkfB0K//EABgRAAIDAAAAAAAAAAAAAAAAAAECAAMh/9oACAEDAQE/AEqRhon/2Q=='%3E%3C/image%3E%3C/svg%3E)
Grounded 2 is an enhanced version of its predecessor, introducing several new features. One of the most notable additions is the inclusion of mounted rides, with the Red Ant Buggy being a key example. In addition to this, players can now adopt certain insects as pets in the current version.
If you're wondering how to unlock the Red Ant Buggy, you're in the right place. It’s not available right from the start, and you’ll need to progress through the story to a specific point before you can access it.
This article offers a detailed guide on how to obtain the Red Ant Buggy in Grounded 2.
Grounded 2: Procedure to obtain the Red Ant Buggy
First, it's important to know that to acquire the Red Ant Buggy, you'll need to hatch a Red Soldier Ant Egg. This turns the ant into your pet, and it can then also be used as a mount.
Step 1: Progress through the story
Before attempting to obtain the Red Ant Buggy, you must progress in the main storyline and complete the "Missed Connection" mission. During this quest, you'll acquire the Snackbar Turbo Optical Disk, which must be inserted into the terminal at the Ranger Station. Once you do this, you’ll unlock the ability to purchase the Hatchery from the Science Shop for 500 Raw Science.
Step 2: Build the Hatchery

After purchasing the Hatchery, you can access it from the Construction menu. To build it, you’ll need the following materials:
- 6x Weed Stem
- 1x Acorn Top
- 5x Acorn Shell
- 5x Mite Fuzz
Also read: All Workbench crafting recipes in Grounded 2
Step 3: Gather the required materials for the Red Ant Buggy
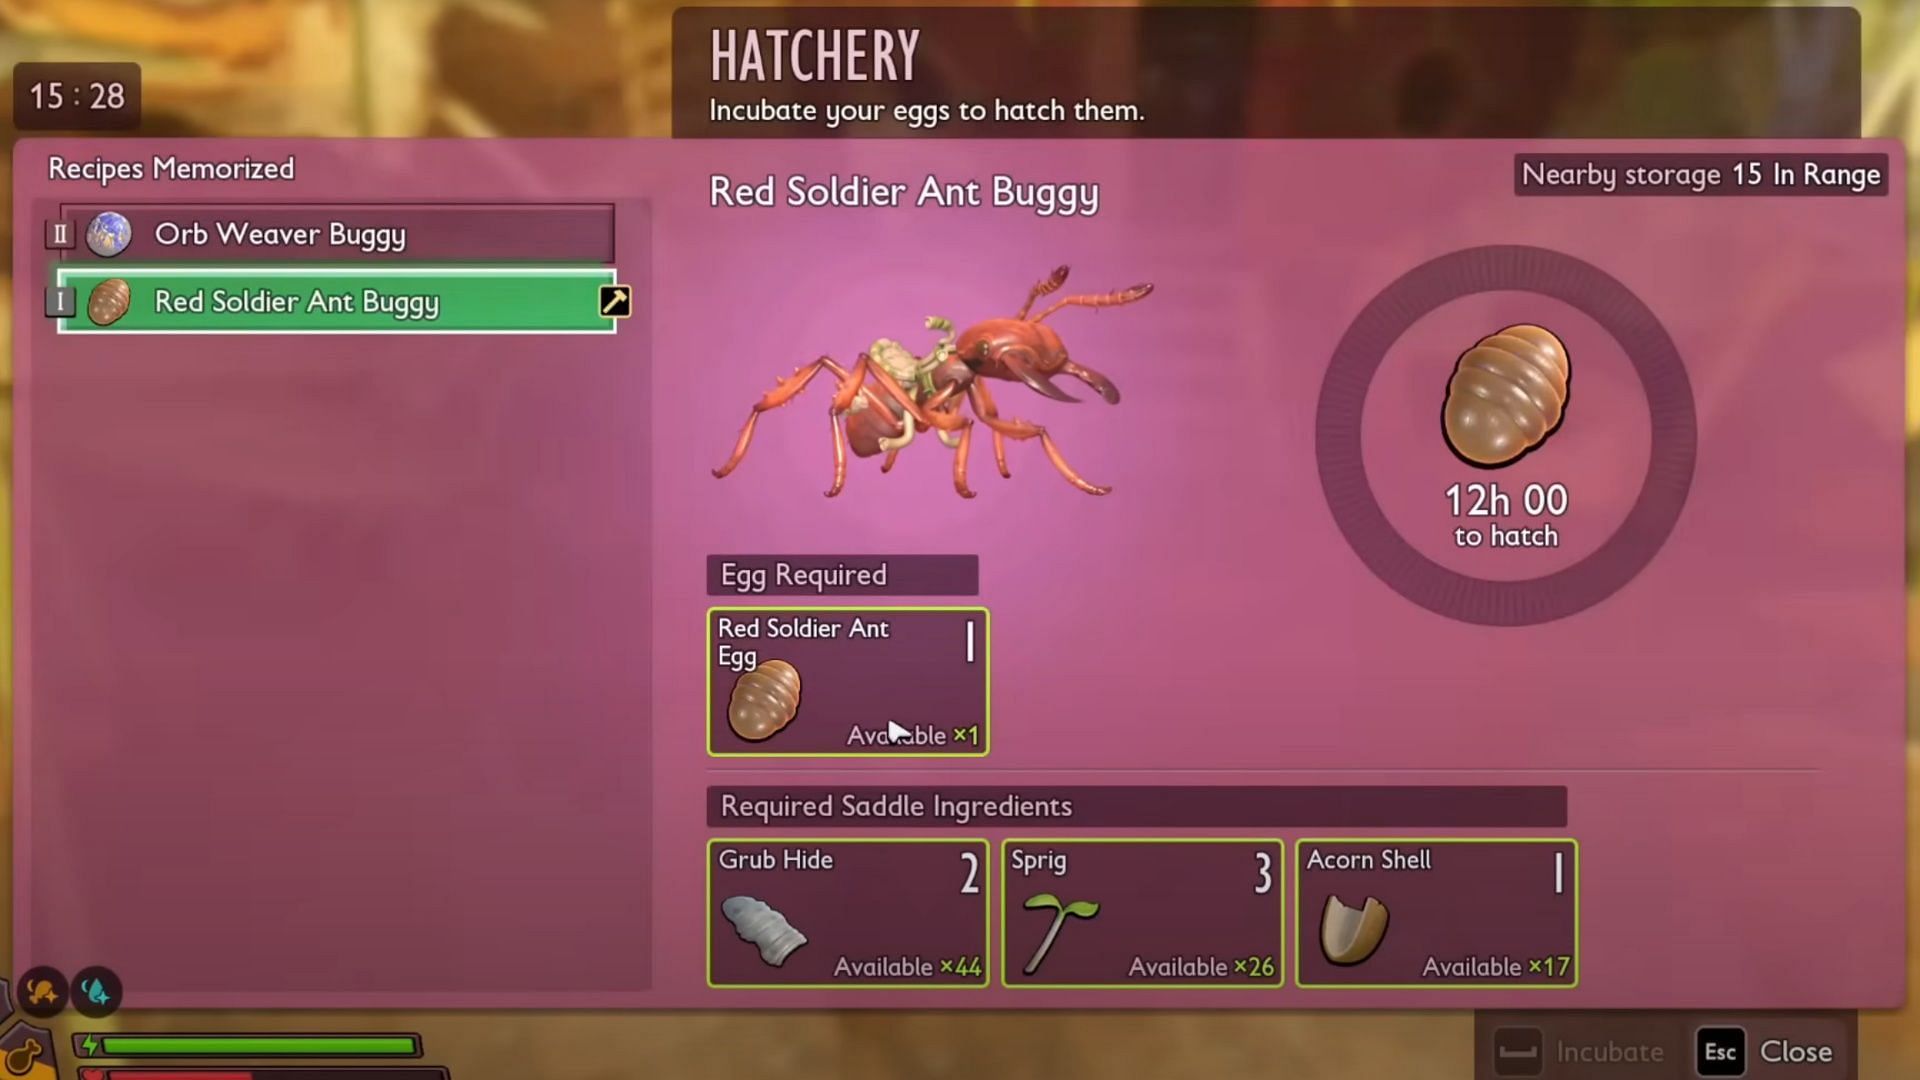
In addition to the Hatchery, you’ll need the following materials to hatch the Red Soldier Ant Egg and unlock the mount:
- 1x Red Soldier Ant Egg
- 2x Grub Hide
- 3x Spring
- 1x Acorn Shell
It's highly recommended that you craft the Hatchery first and gather all required materials before going out to find the Red Soldier Ant Egg.
Also read: Grounded 2: Where to find Lingonberry?
Step 4: Find a Red Soldier Ant Egg

Red Soldier Ant Eggs are found deep inside ant nests, and there are a few notable locations on the map:
- Hatchery Anthill: North entrance, east of the Snackbar Front, near the map's border.
- Toxic Anthill: East entrance, located on the west side of the Grass Games region.
- Spider Den Anthill: North entrance, in the northern part of the Pine Hill region.
Inside each Anthill, you'll need to navigate through narrow tunnels; carry a light source, as the inside will be dark and filled with hostile ants, including Red Worker Ants and Red Soldier Ants. Clear them out as you proceed deeper, and eventually, you’ll find orange-colored eggs. Each location contains up to four eggs, but you can only carry one at a time.
Once you pick up the egg:
- You cannot use weapons or tools.
- The egg cannot be stowed and must be carried.
- There is a time limit, roughly three in-game days, before the egg rots if not placed into the Hatchery.
Also read: All Mutations in Grounded 2
Step 5: Hatch the egg
After safely delivering the egg to the Hatchery along with the required materials, the hatching process will take 12 in-game hours. To speed this up, you can sleep in your bed for 12 hours, and when you wake up, the egg will be ready.
Select the Retrieve option to claim your new Red Soldier Ant pet, which you can now mount and use as the Red Ant Buggy.
That covers everything you need to know about obtaining the Red Ant Buggy in Grounded 2.