'%20x='0'%20y='0'%20height='100%25'%20width='100%25'%20%0A%20%20%20%20%20%20%20%20%20%20xlink%3Ahref='data:image/jpg;base64,/9j/2wBDAAYEBQYFBAYGBQYHBwYIChAKCgkJChQODwwQFxQYGBcUFhYaHSUfGhsjHBYWICwgIyYnKSopGR8tMC0oMCUoKSj/2wBDAQcHBwoIChMKChMoGhYaKCgoKCgoKCgoKCgoKCgoKCgoKCgoKCgoKCgoKCgoKCgoKCgoKCgoKCgoKCgoKCgoKCj/wgARCAAGAAoDASIAAhEBAxEB/8QAFgABAQEAAAAAAAAAAAAAAAAAAAMH/8QAFAEBAAAAAAAAAAAAAAAAAAAAAv/aAAwDAQACEAMQAAAAxKAF/8QAHxAAAgIBBAMAAAAAAAAAAAAAAQIDBBIABREhIkFh/9oACAEBAAE/ANm35qlG7AasEofxyPIYfQfWlnV1D4IMu+MNf//EABgRAAIDAAAAAAAAAAAAAAAAAAACAQMS/9oACAECAQE/AFrXUn//xAAXEQEAAwAAAAAAAAAAAAAAAAACAAER/9oACAEDAQE/AE1lT//Z'%3E%3C/image%3E%3C/svg%3E)
To unlock the Guac is Extra trophy in Borderlands 4, you’ll need to find and shoot golden wrapped Burritos hiding across Dominion. Each district within the area contains five Burritos, and to unlock the door leading to Dave the Burrito, you’ll need to destroy them all. The task is easier said than done, as the Burritos aren’t marked in the game and do not leave a highlight when scanned.
It’s easy to miss them even when you are standing right beside them, as they are tucked into a corner and blend well with the environment. This guide will show you the locations of all the Burritos and help you get the Guac is Extra trophy in Borderlands 4.
All Dave Burrito locations in Borderlands 4
Finding all the Dave Burritos by yourself can take hours, so follow the instructions below and save some time to make the new character build you've been planning.
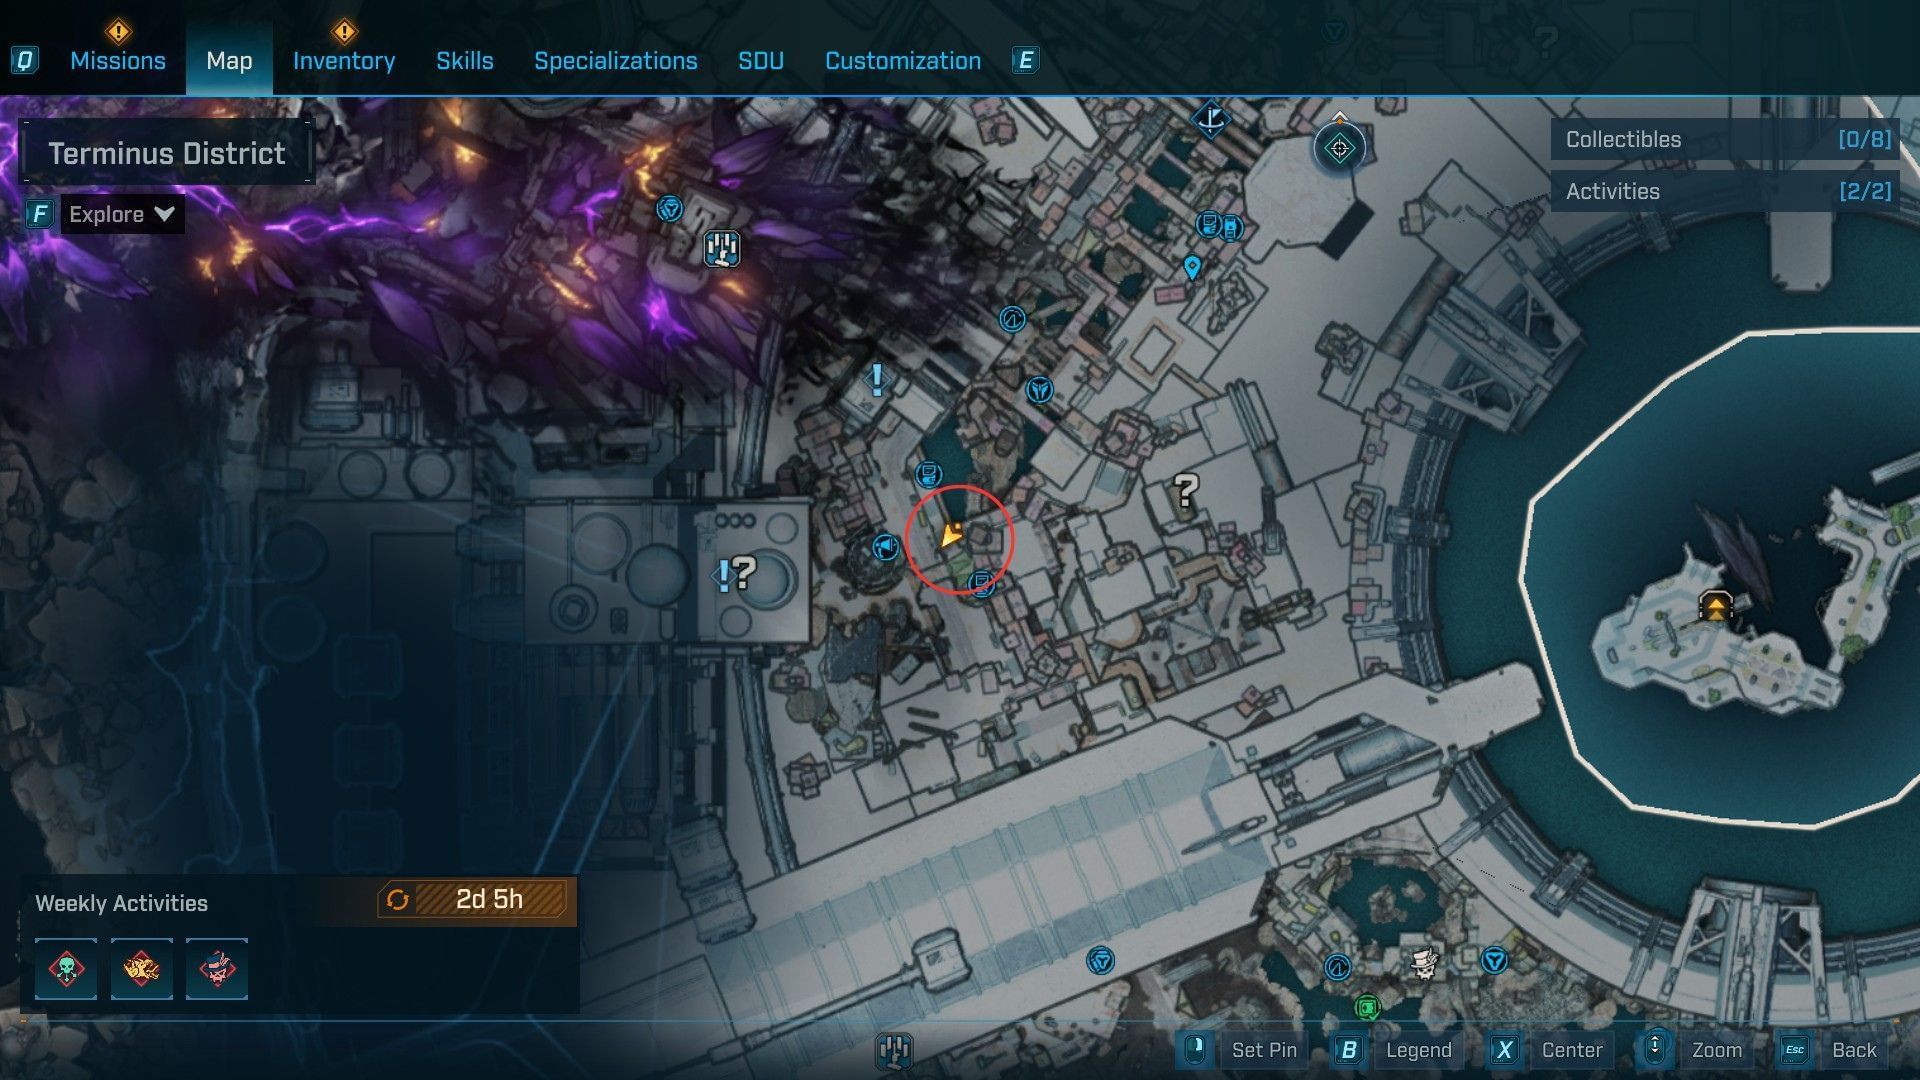
All Burritos within the Carcadia district in Borderlands 4
Here are all the Burritos in the Carcadia district within Dominion
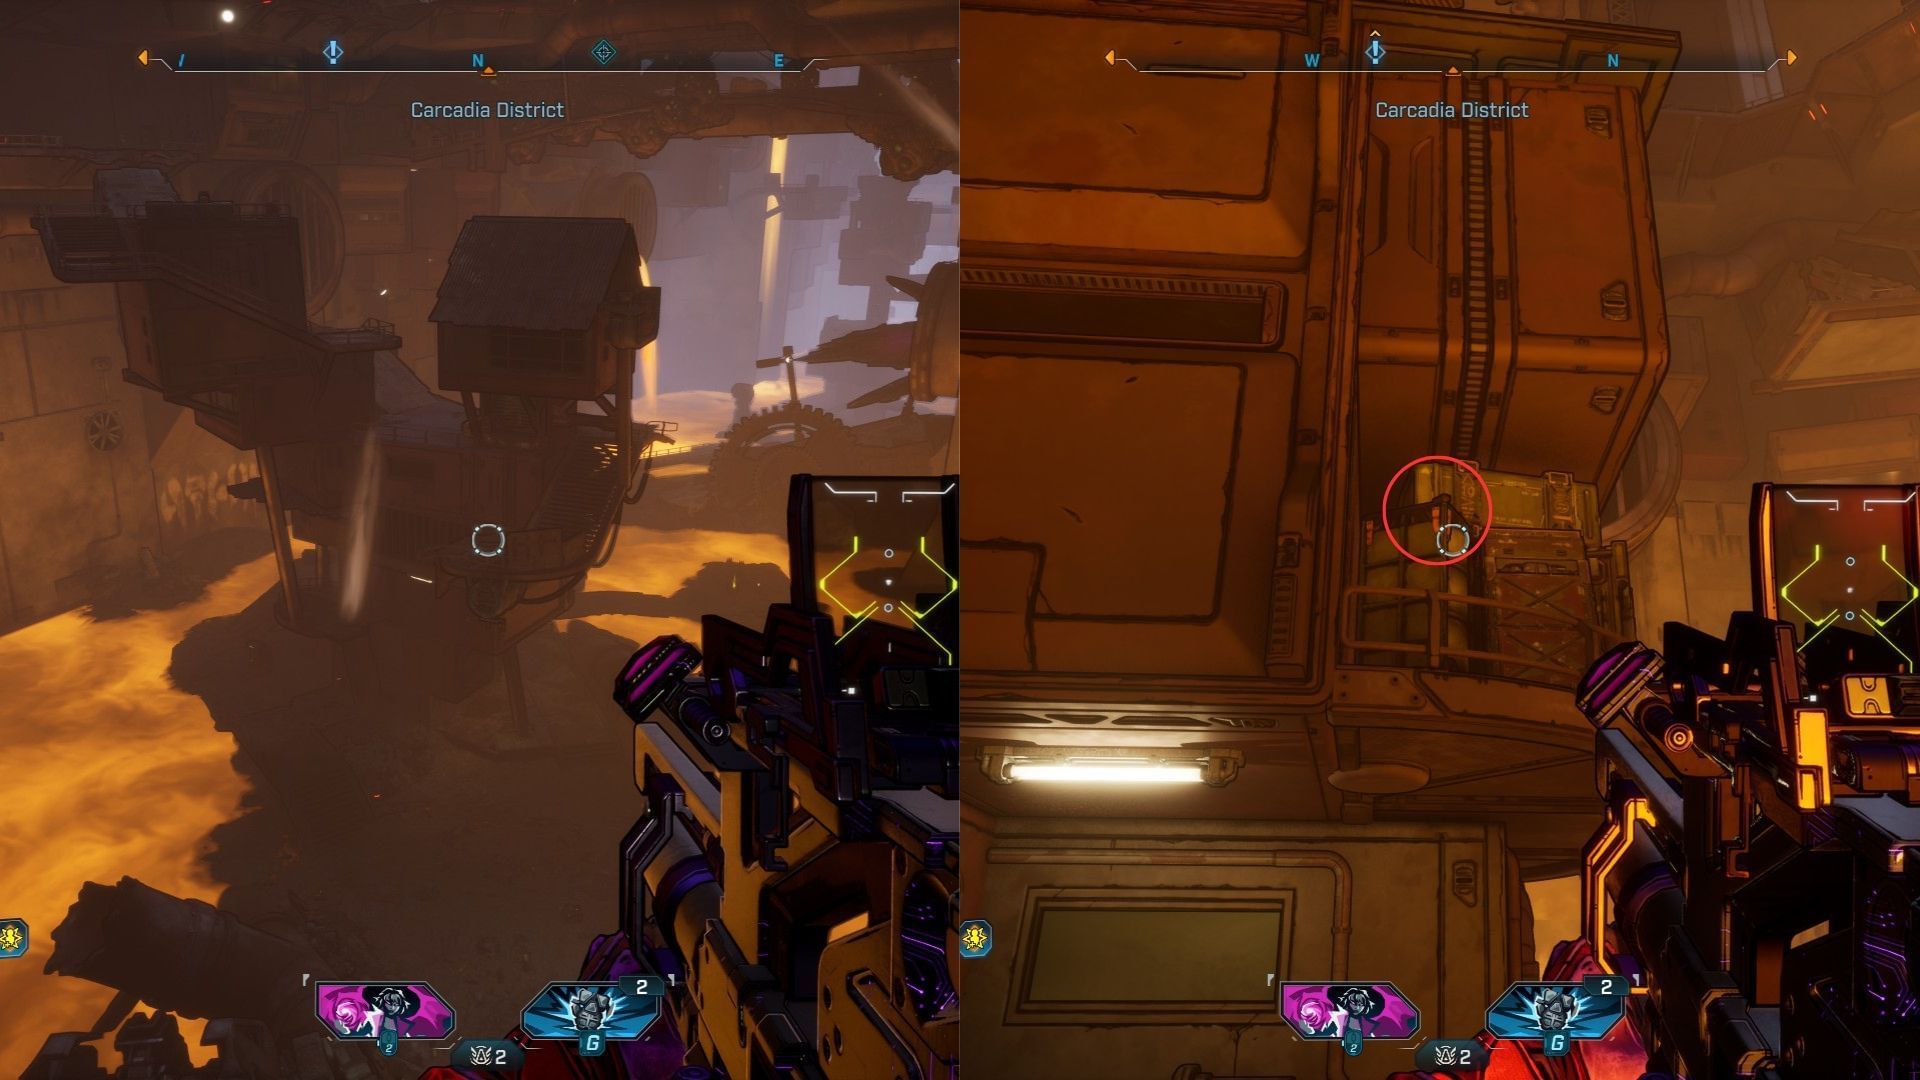
Burrito #1
This Burrito is near the divider between Carcadia Burn and the Fades district doorway in Borderlands 4. If you’re reaching Dominion for the first time, the door will be closed, but that won't be a problem.
At the door, face North to find a stairway on the left side. Follow it up and cross the bridge on the right, heading towards the civilians as marked on the image.
At the location, you’ll find two NPCs arguing and another sleeping. Look behind the orange shed to see the first Burrito hiding.
Burrito #2
Moving on to the second one, climb the shed and jump into the lava river swarming with Kratcheson on the right side to find a building with a jump pad made out of a pipe leaking air.
Head to the right side of the building and look to the left to find the Burrito on top of some containers. Use your double jump to climb the spot and destroy the item.
Burrito #3

The third Burrito is also within the lava river. Keep moving forward from the Burrito #2 until you reach the two pipes coming out of ‘The Lockway’ safehouse. You can also use the safehouse fast-travel and then jump down the river again.
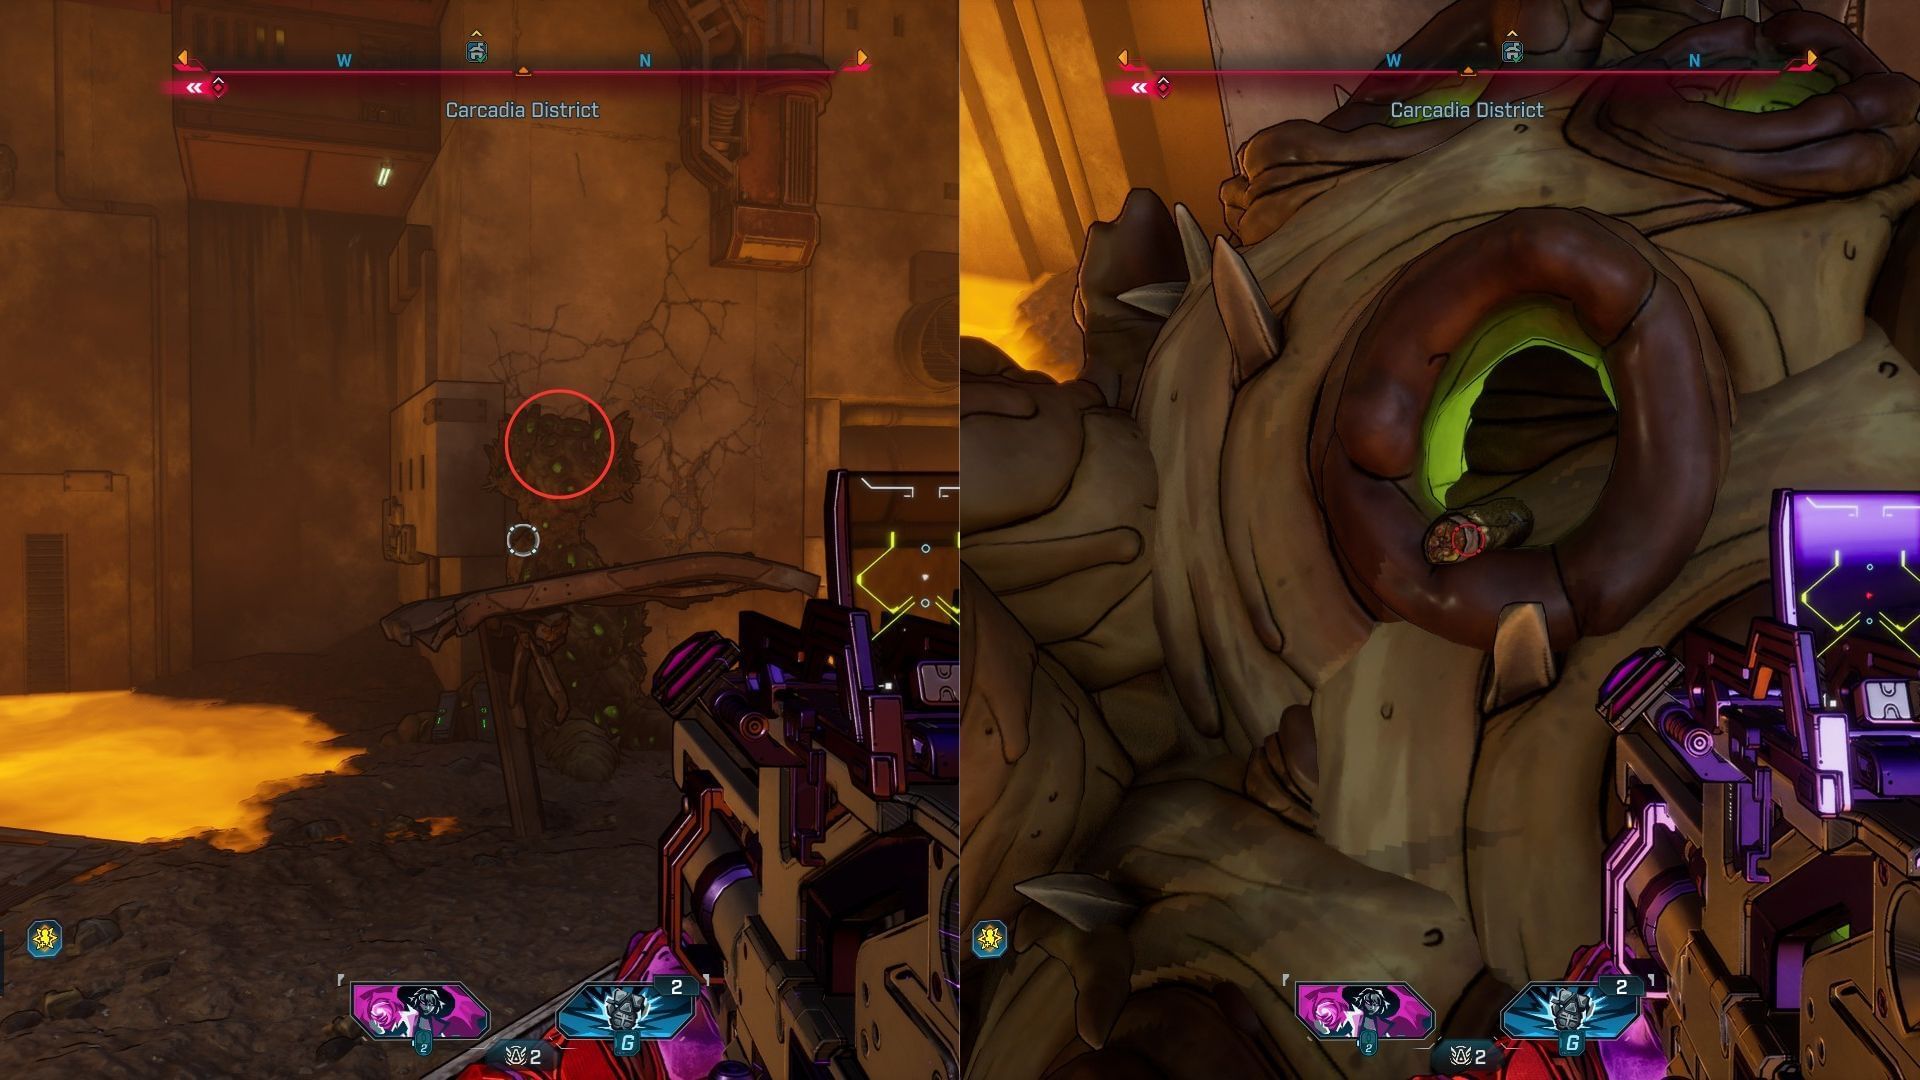
Look for a Kratch nest with a platform in front of the only cracked wall in the area. Climb the nest to find the Burrito hiding inside.
Burrito #4
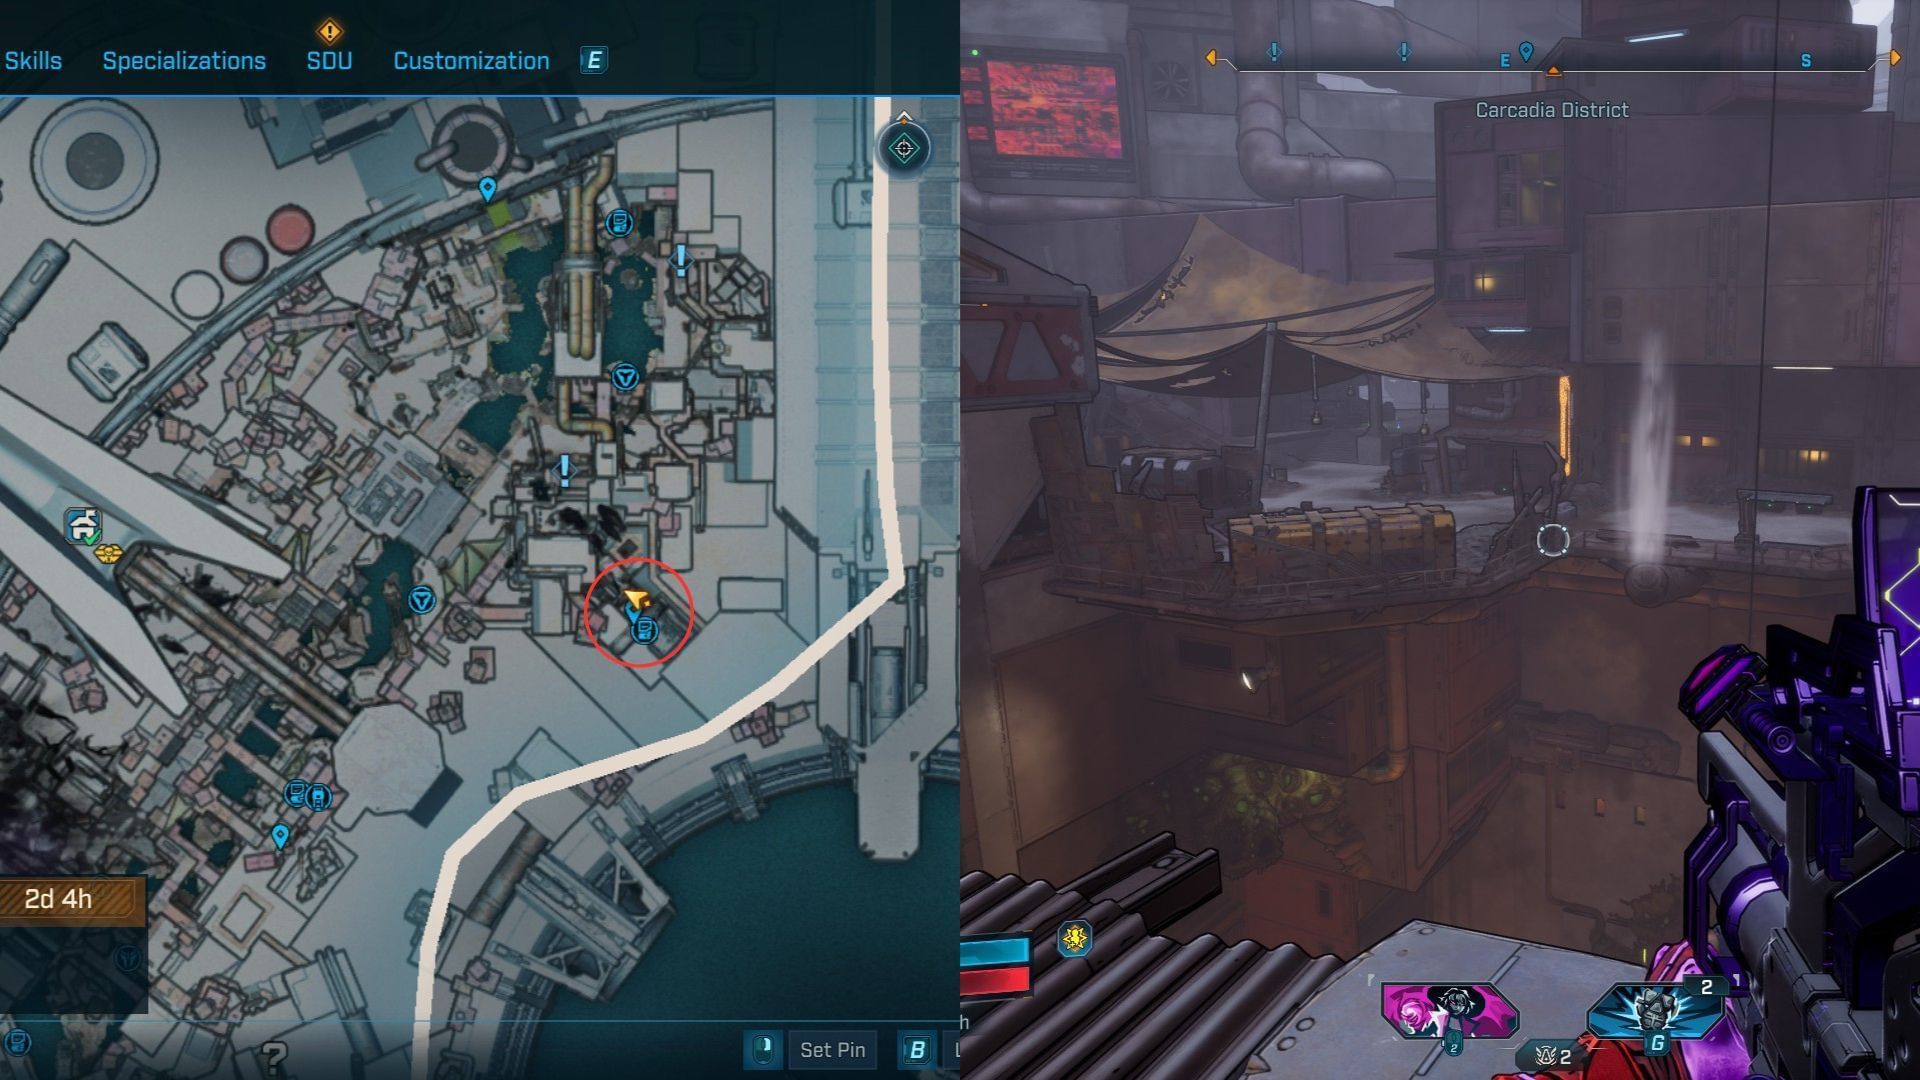
The fourth Burrito is near the Mossmellow Retreat point of interest. Once again, fast-travel to ‘The Lockway’ safehouse and cross the lava river gap into a neon-lit alley.
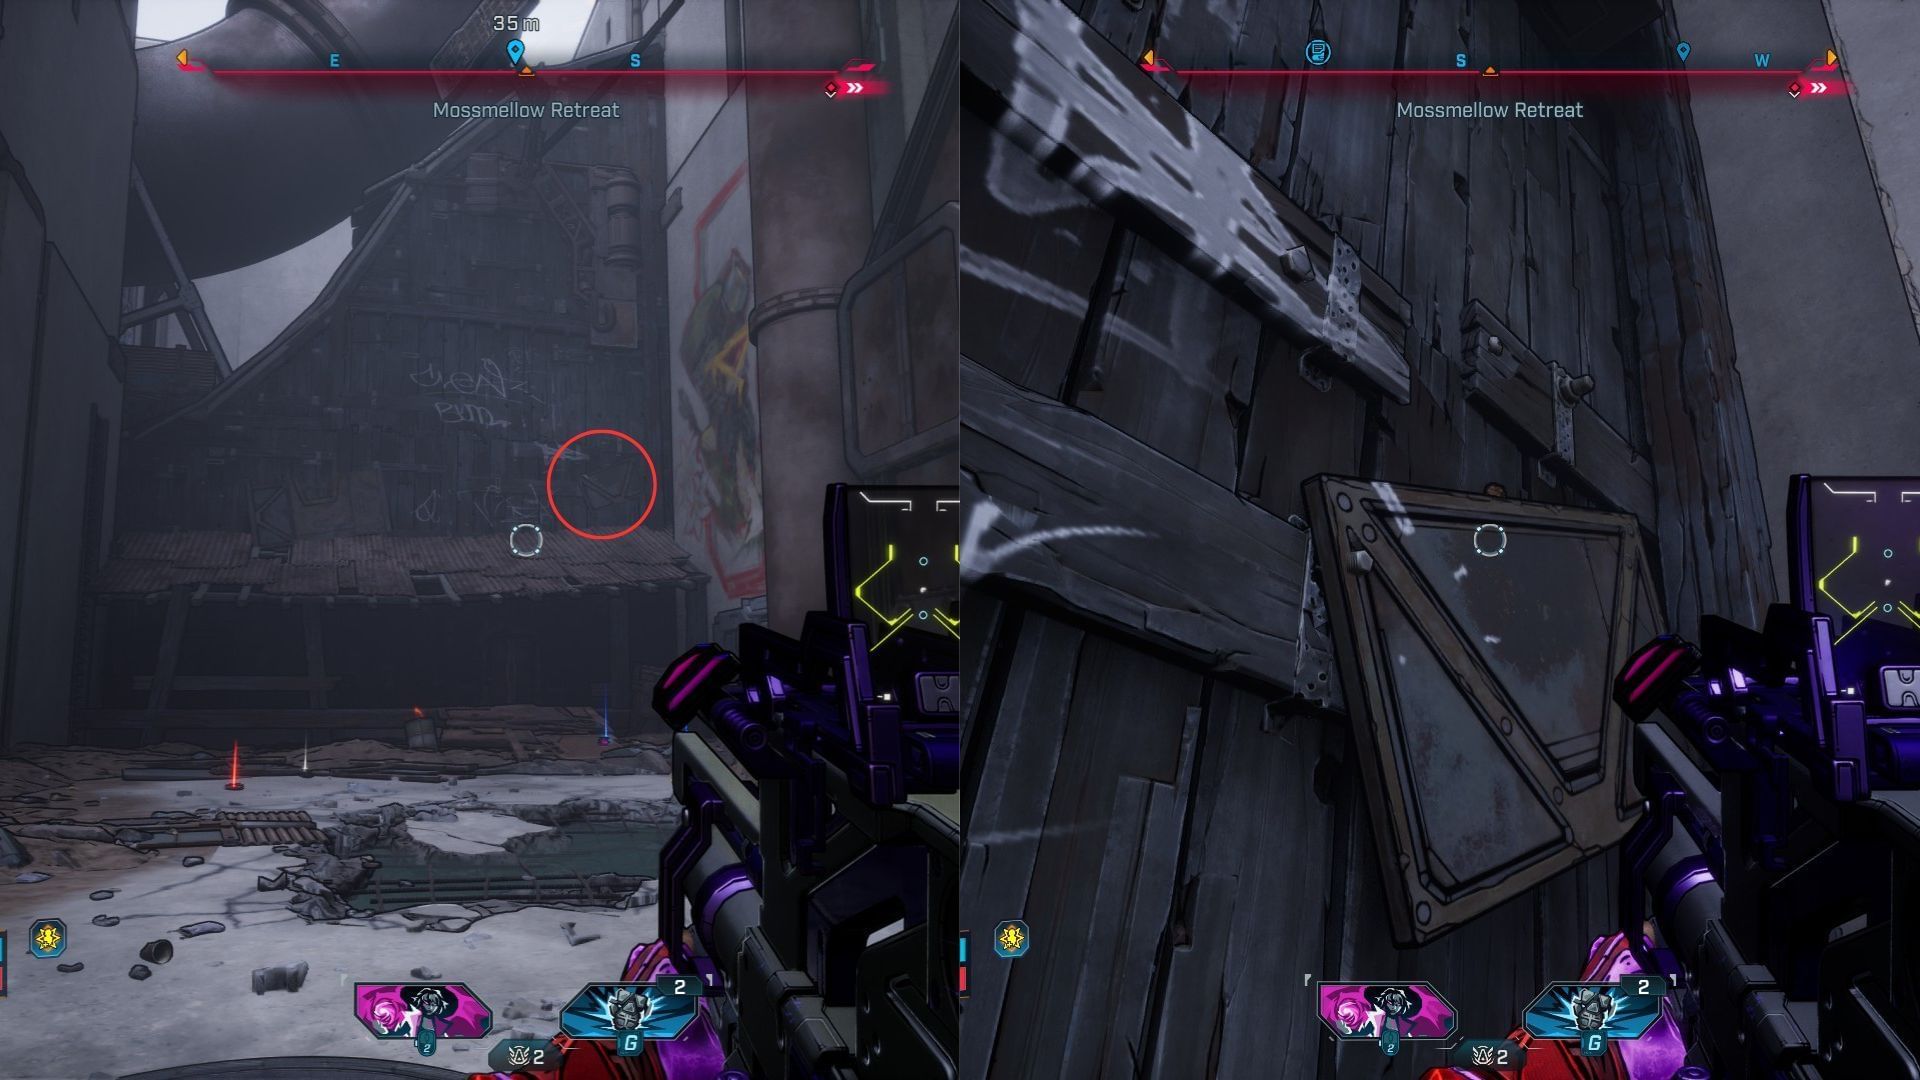
Halfway through, look to your keep to find an old shack that does not blend with the environmental theme. Climb on top of the shack to find the Burrito on a board to the right side of the white graffiti on the wall.
Burrito #5

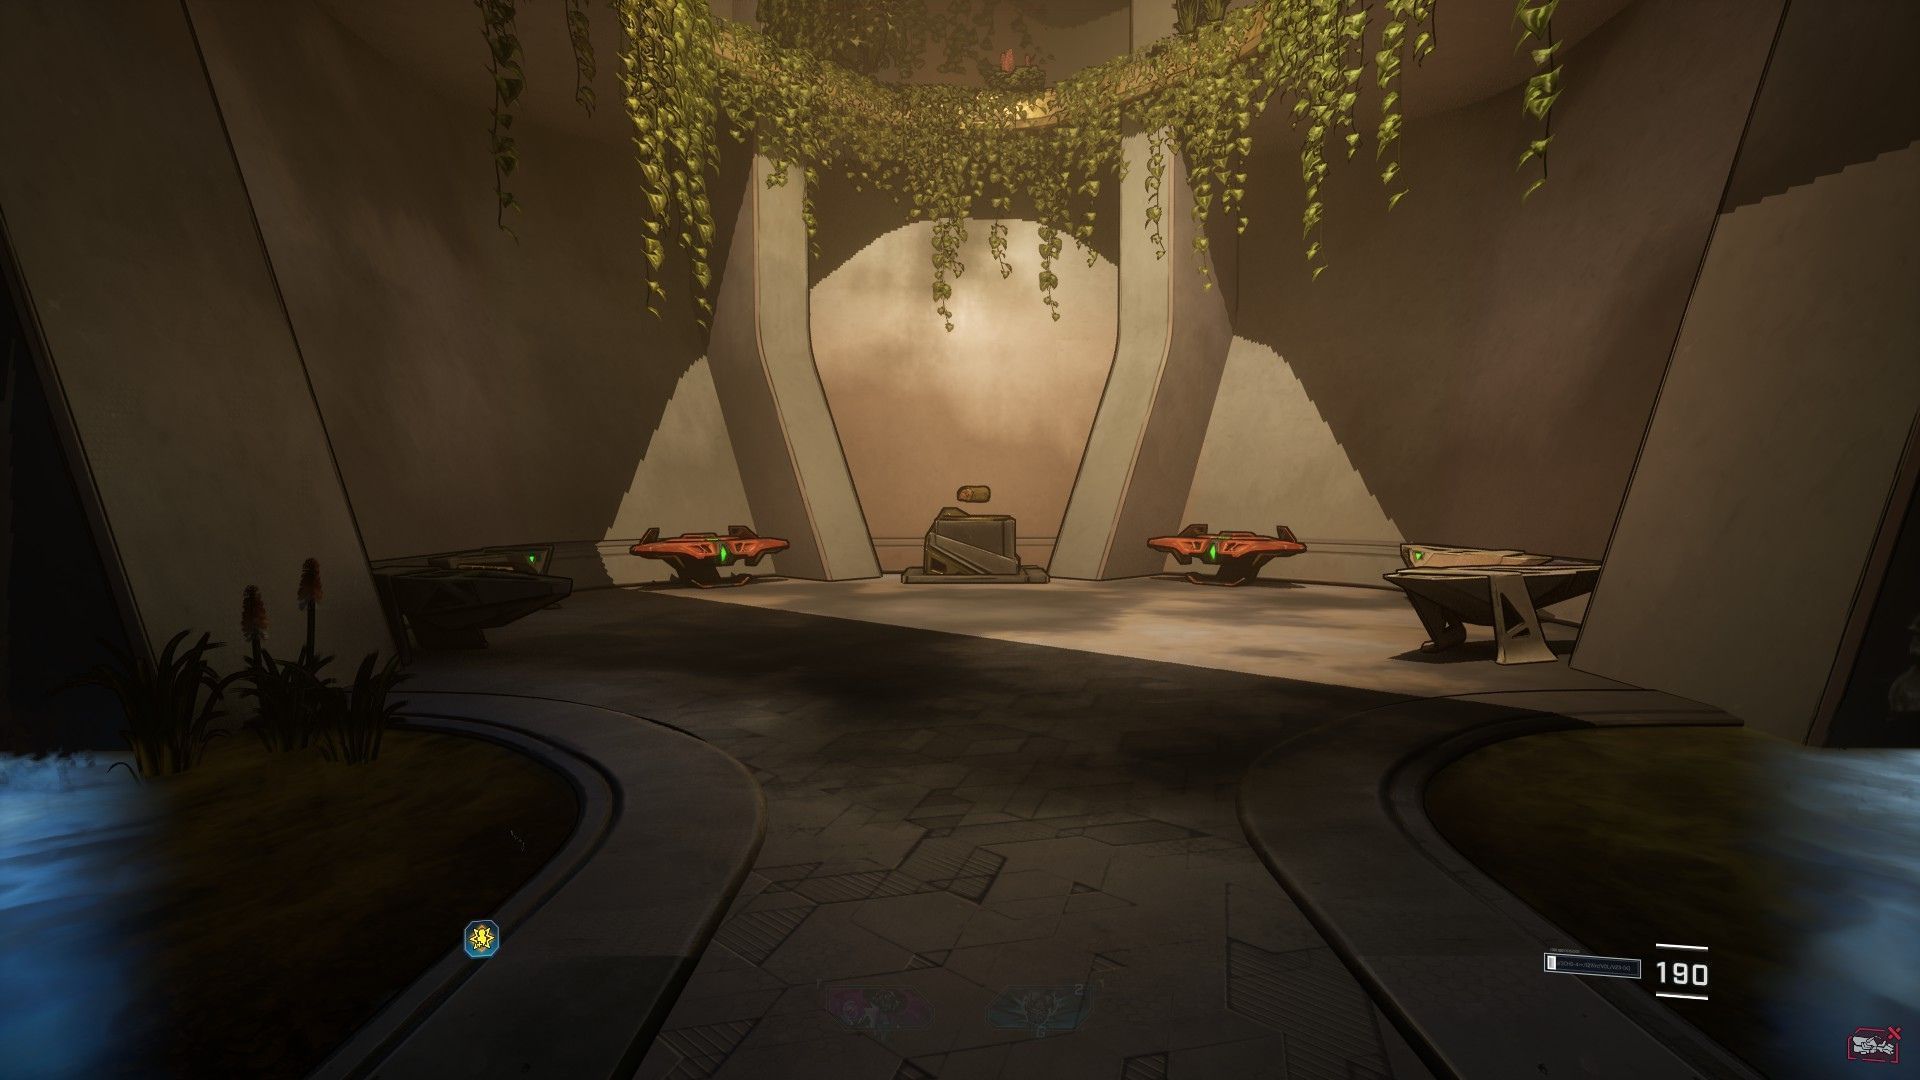
The last Burrito in the Carcadia district is at the Groaning Core point of interest. It’s the origin spot of the lava river. Look for an opening on the right and use the climbable walls inside to reach the top of the structure.
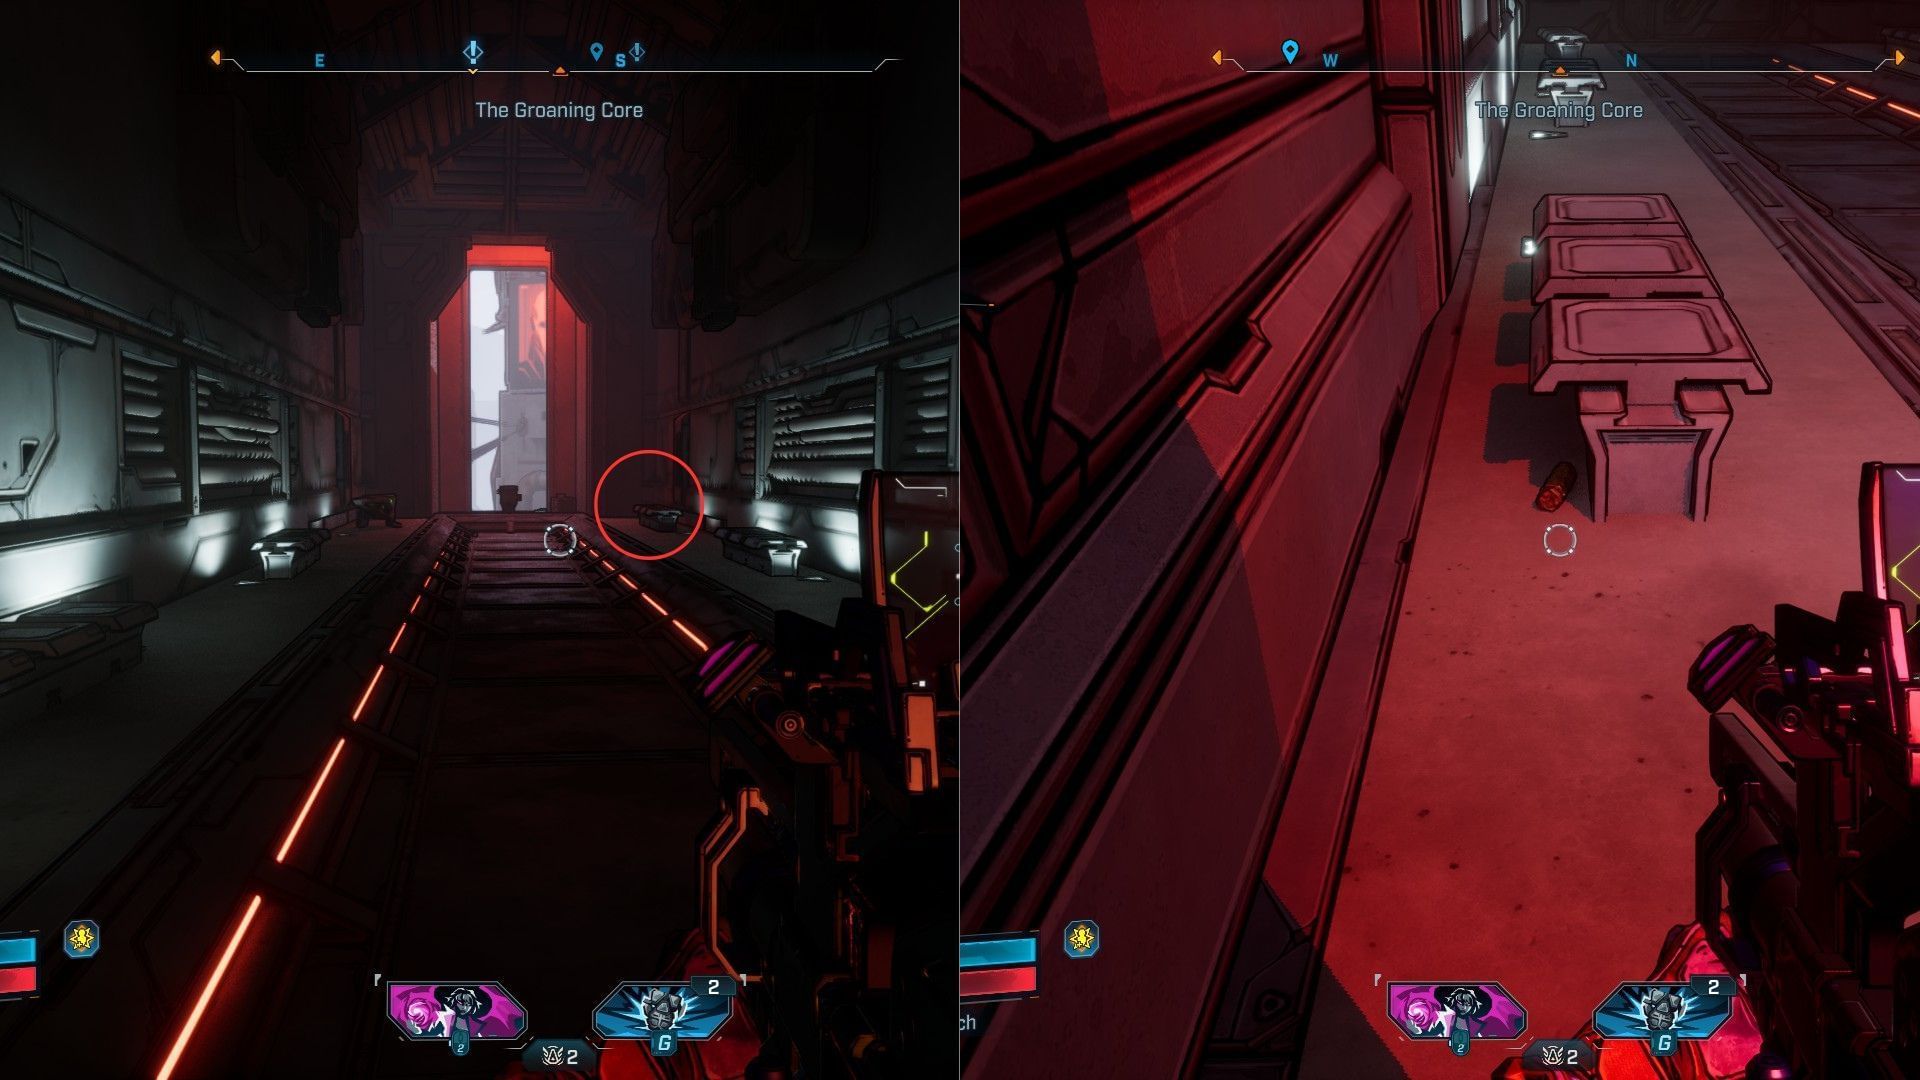
Locate a room with a toilet seat facing towards the city. There are multiple Burritos to its right, but the developers only put them there to fool you. The real one is hiding behind the bench opposite the loot chest.
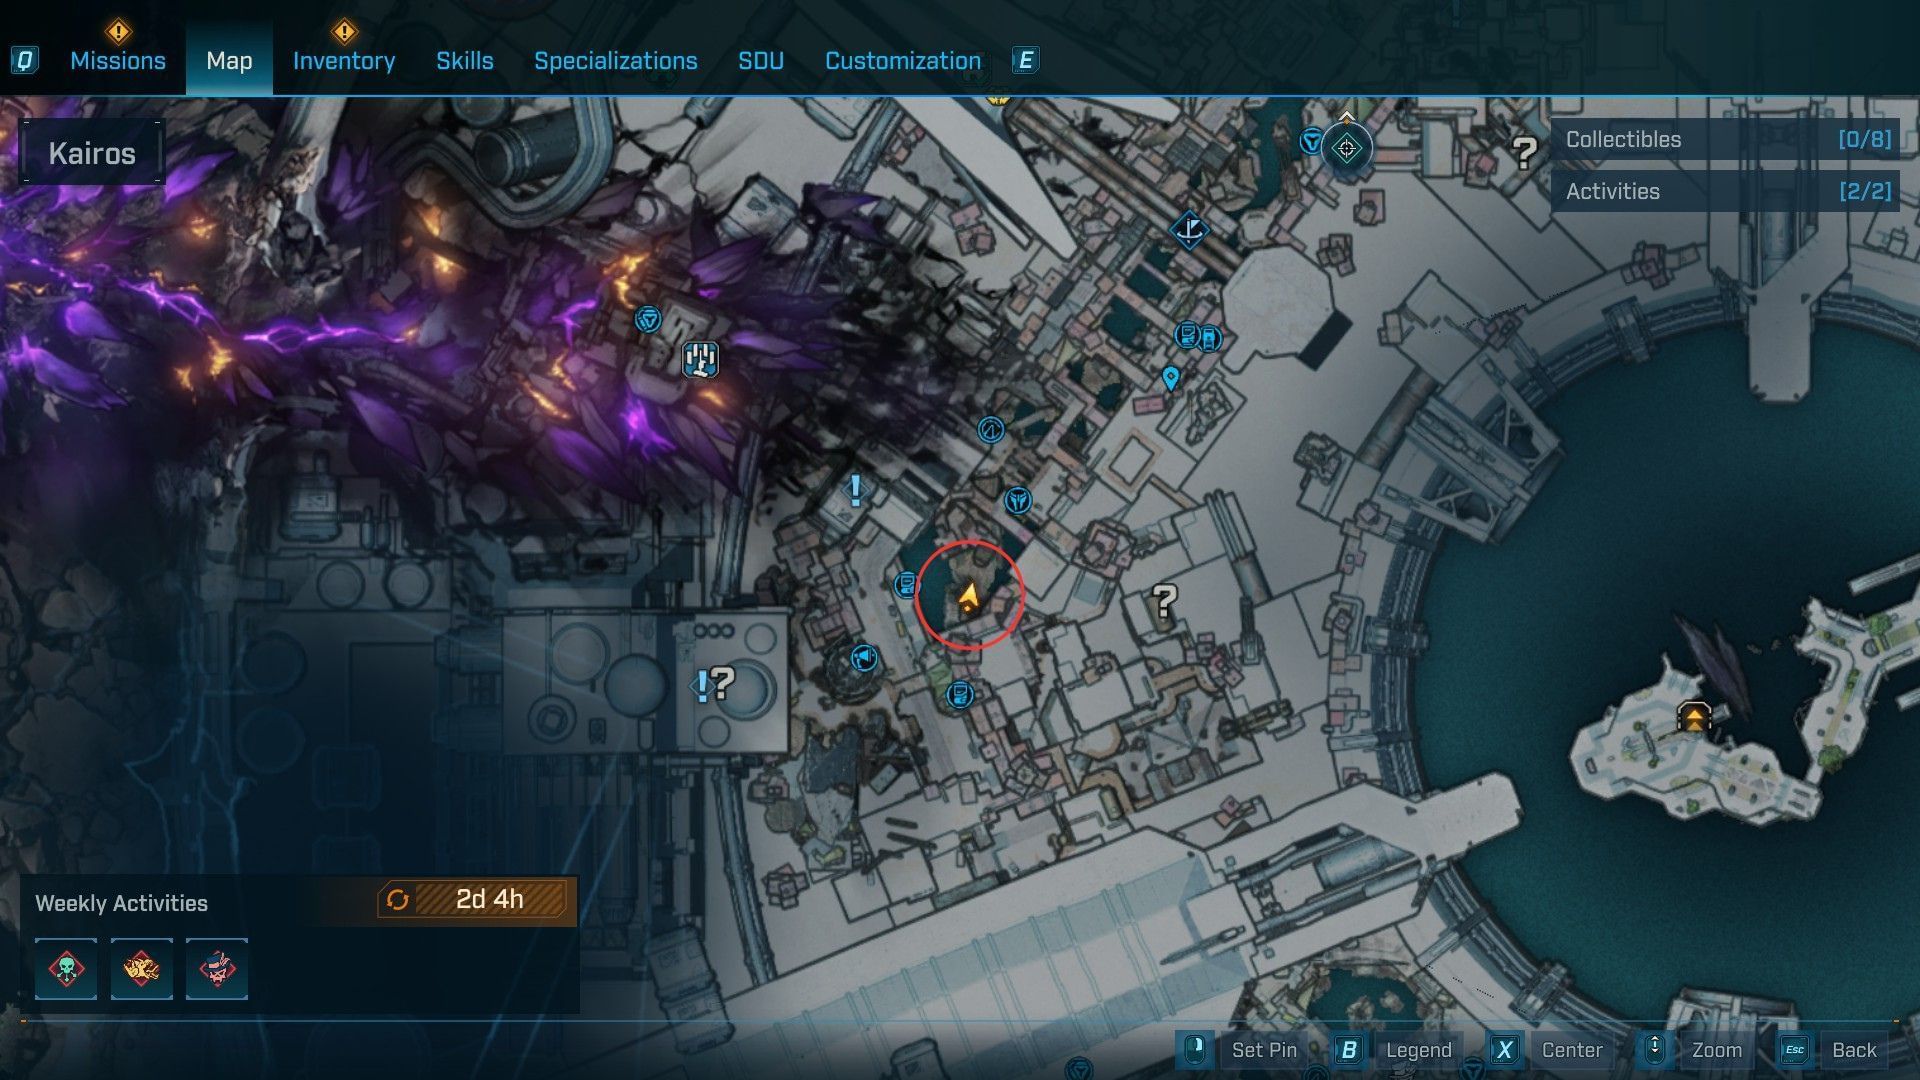
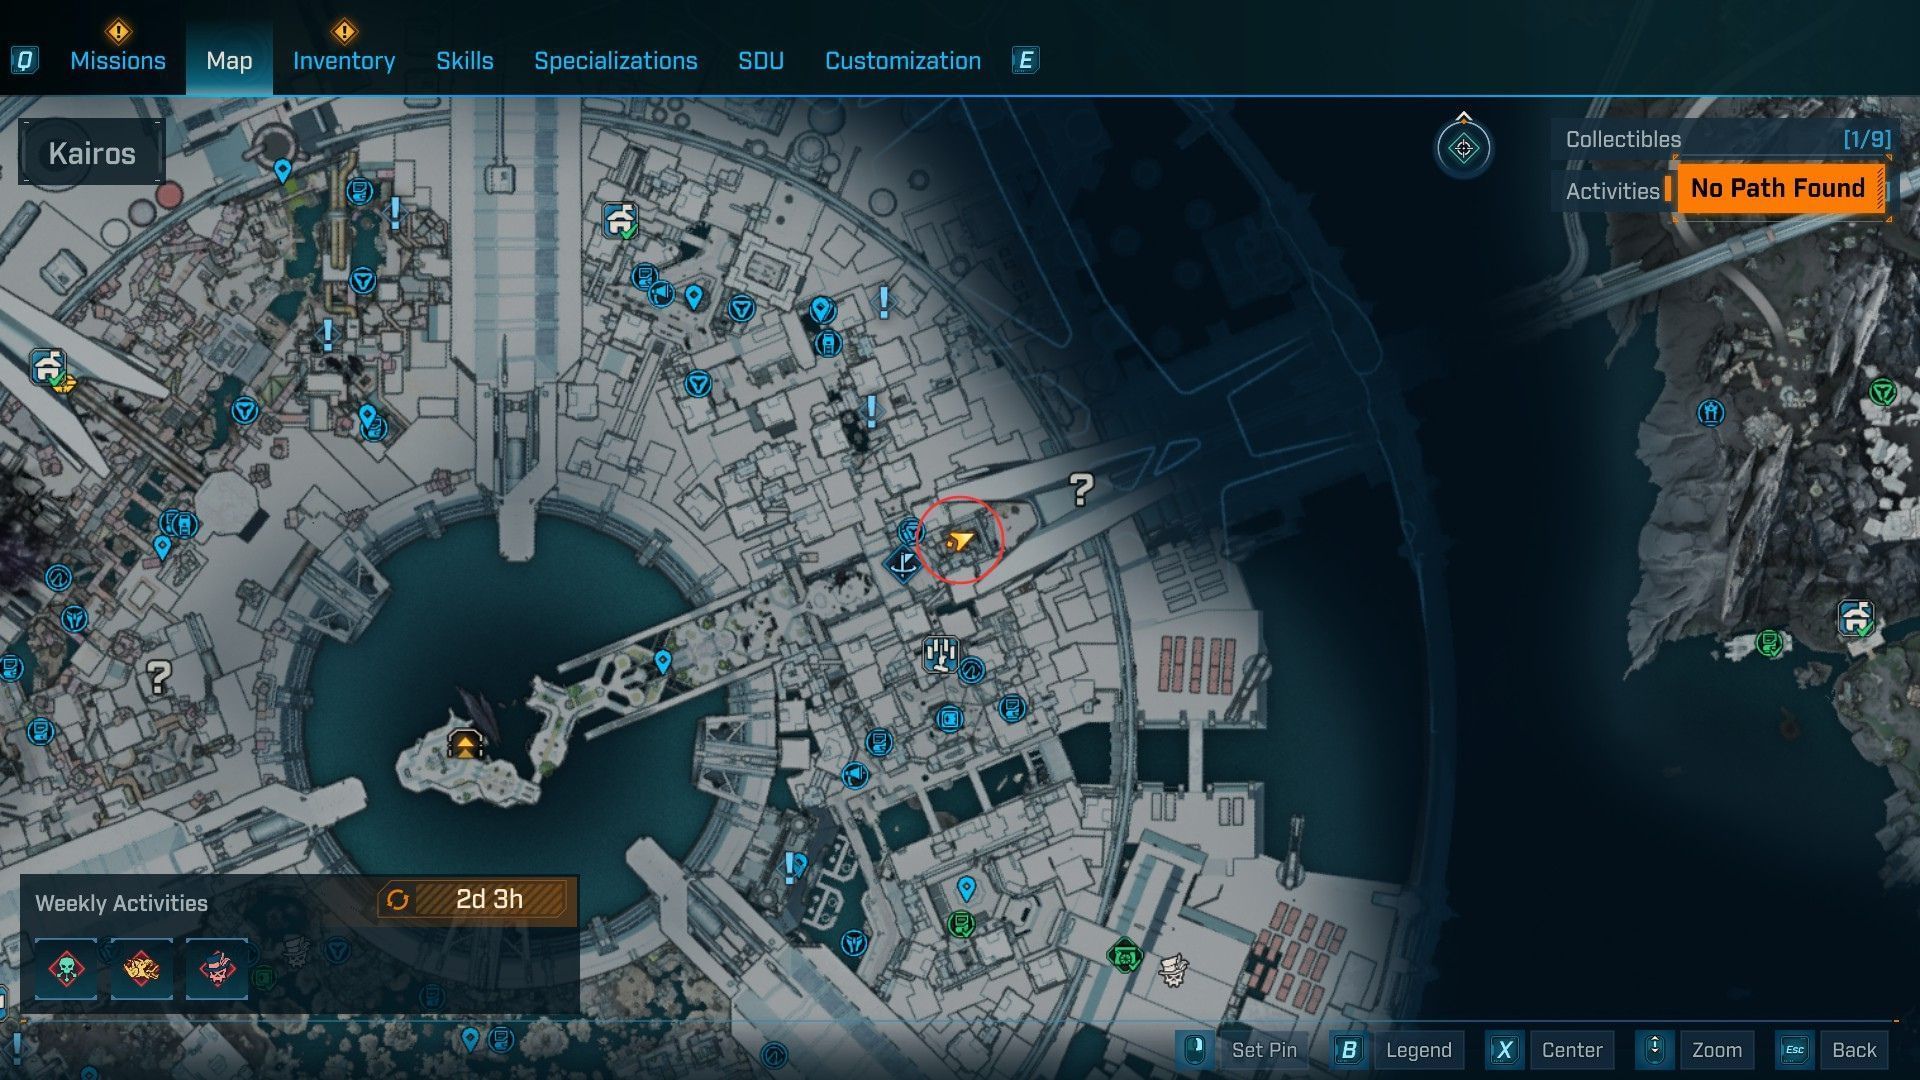
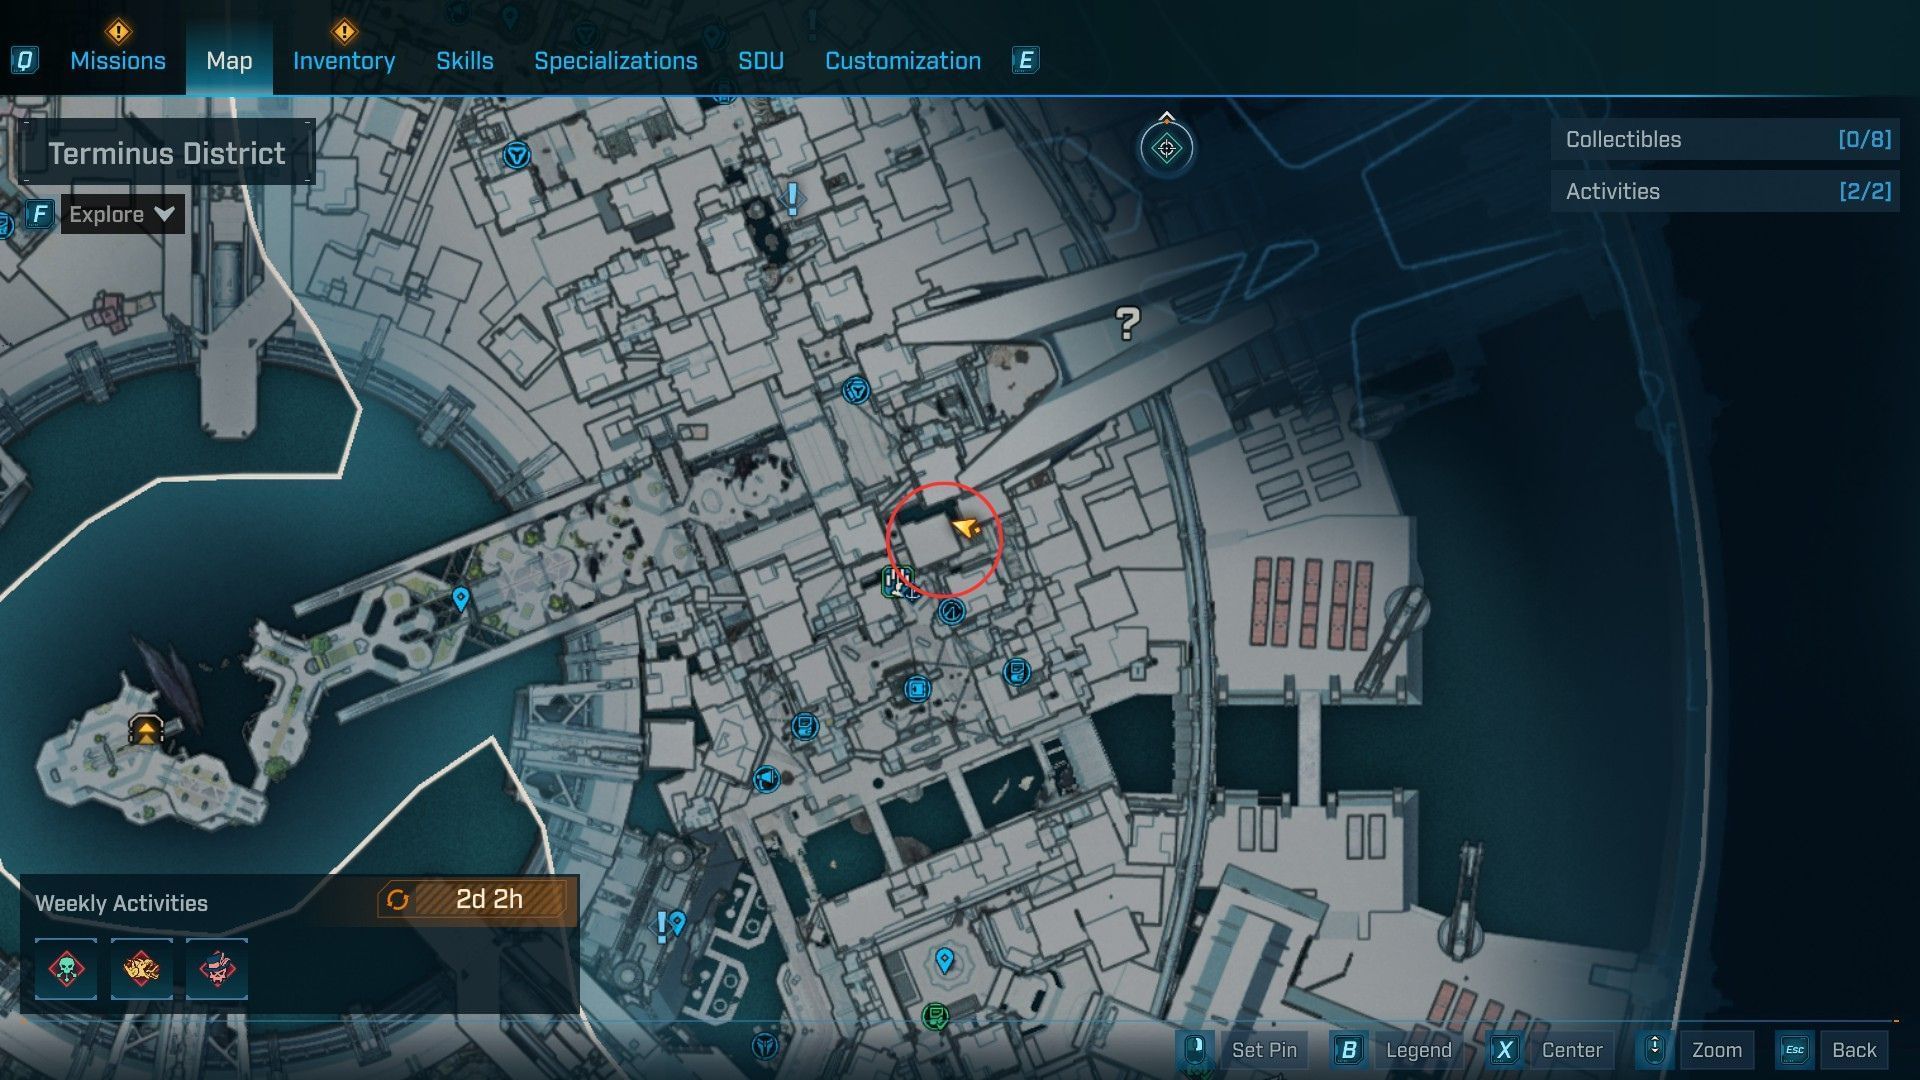
All Burritos within the Terminus district in Borderlands 4
Here are all the Burritos in the Terminus district within Dominion
Burrito #1
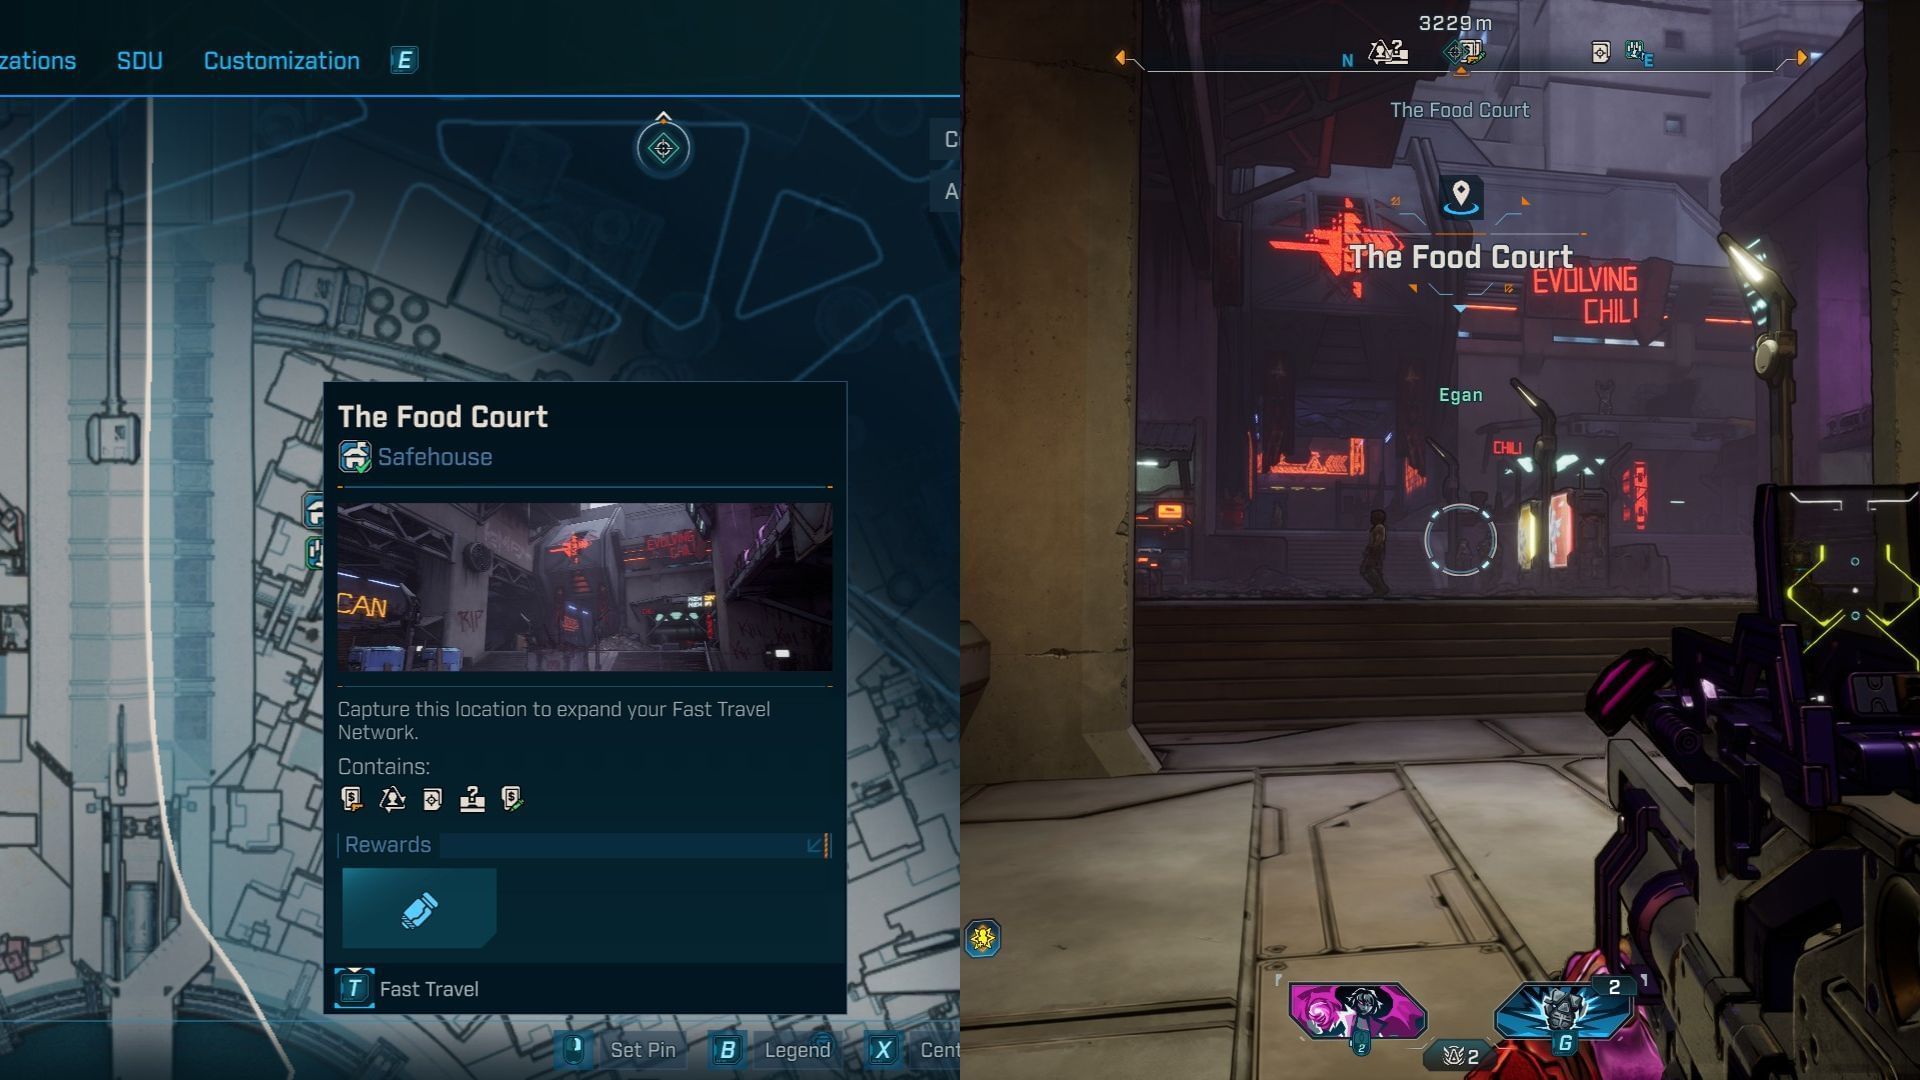
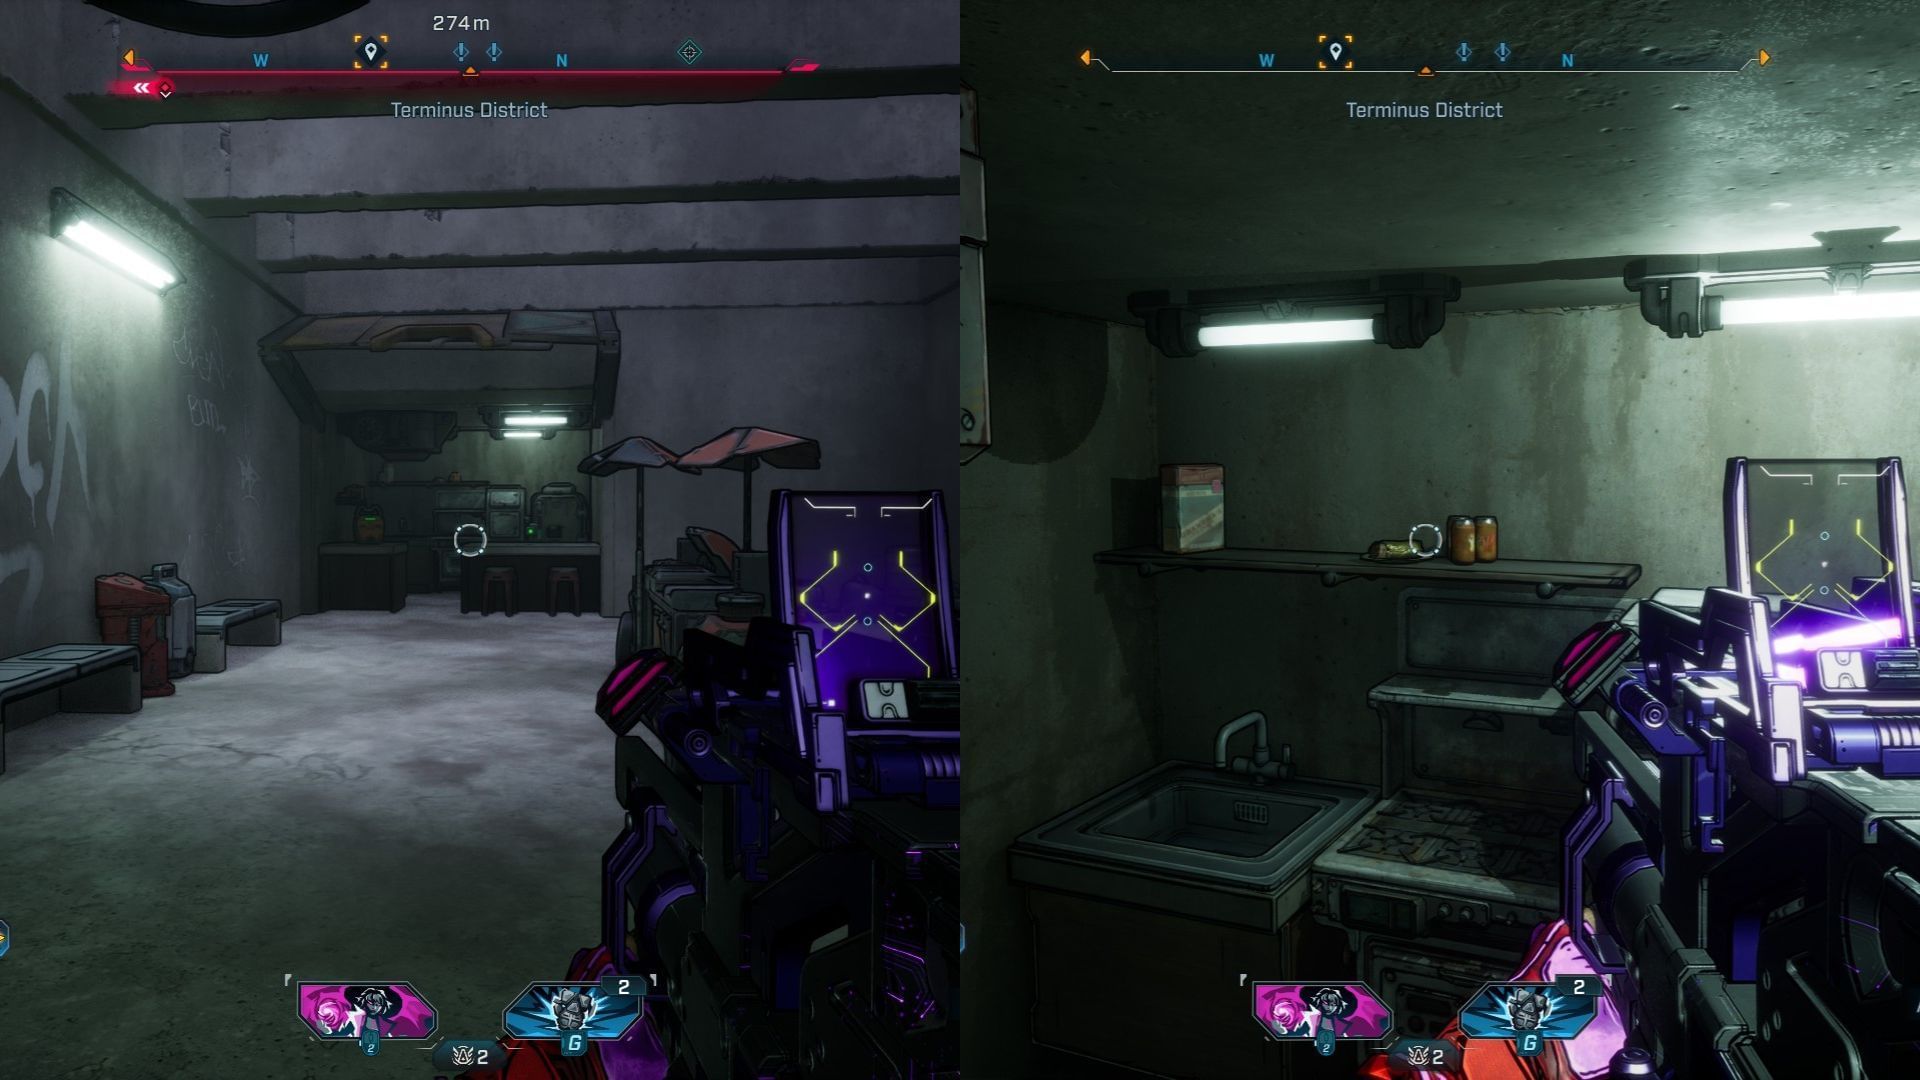
The first Burrito of the Terminus district is at ‘The Food Court’, which isn’t surprising until you find out it’s a safehouse. Despite being close, it is hard to spot if you aren’t looking closely enough.
At the safehouse, climb on the first floor above the Bounty board and head into the kitchen to your left. The Burrito is on the counter and is only visible from the other side.
Burrito #2
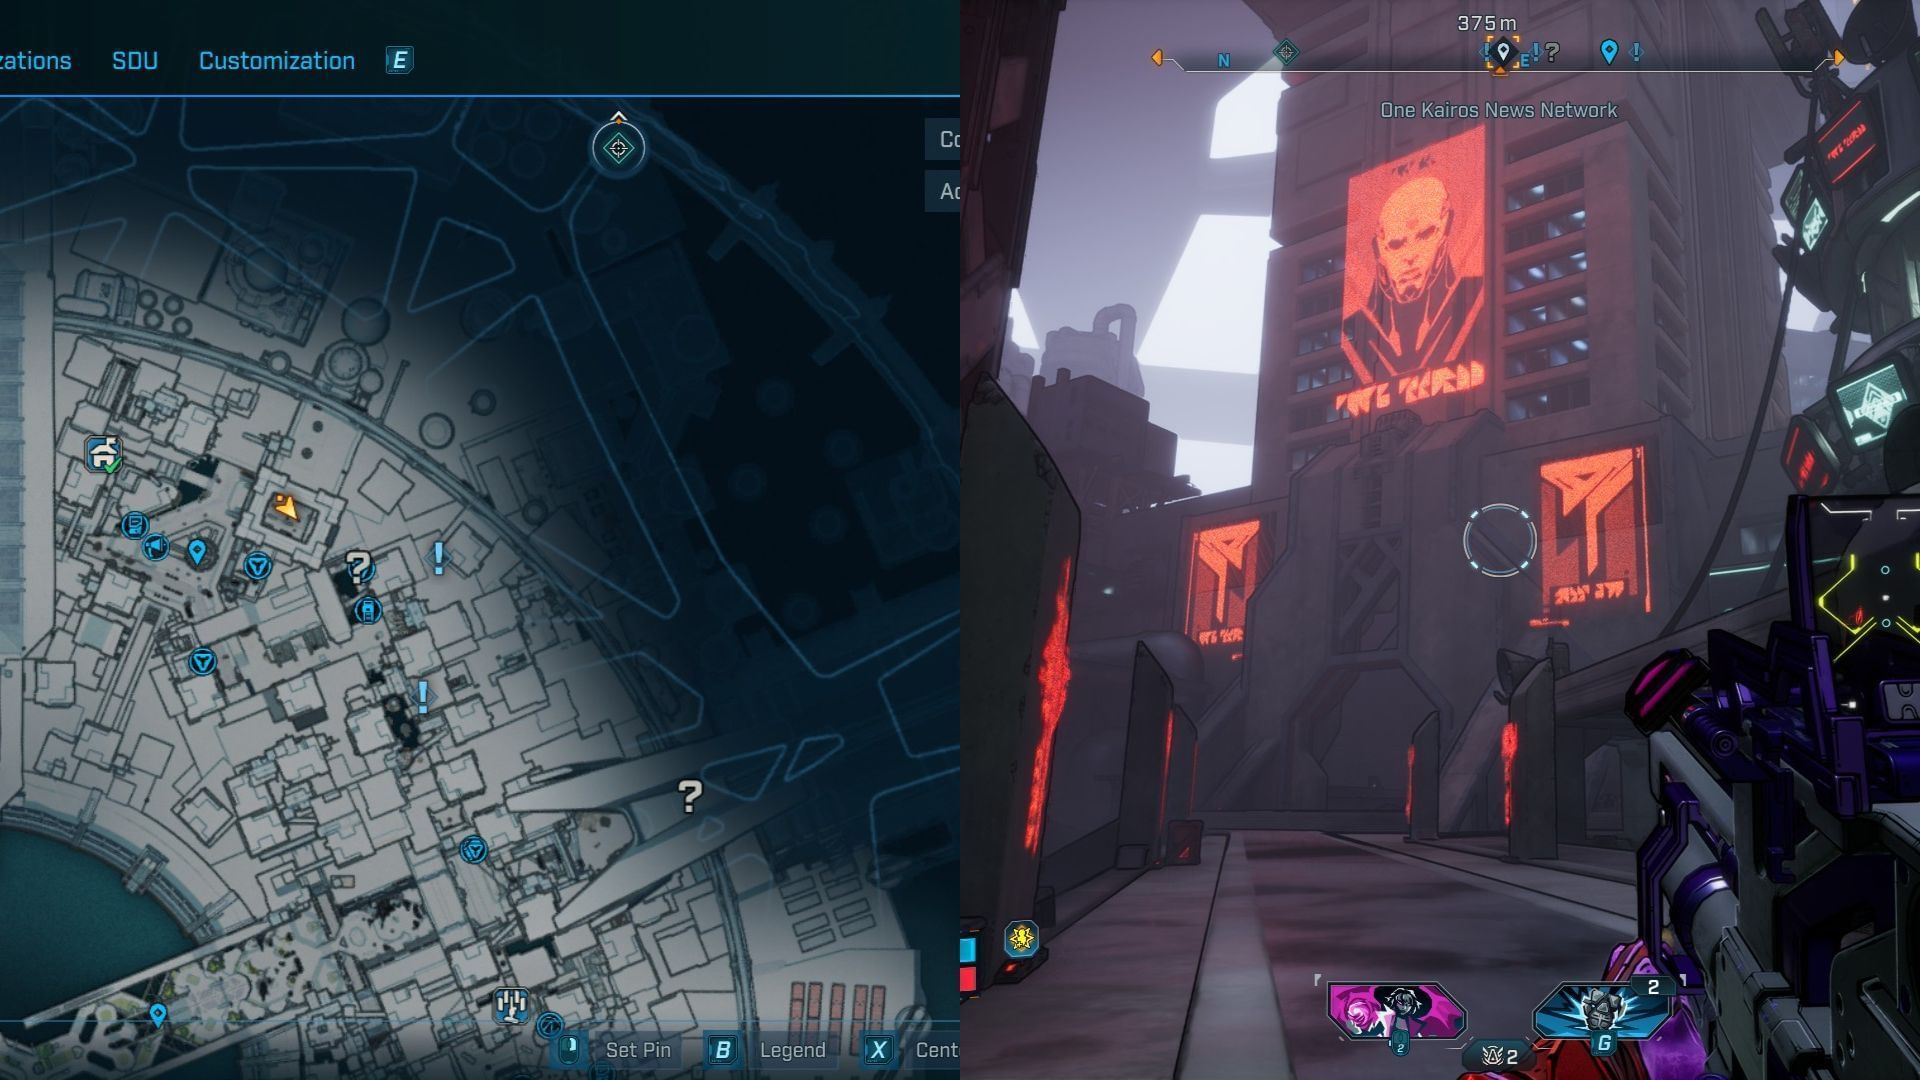
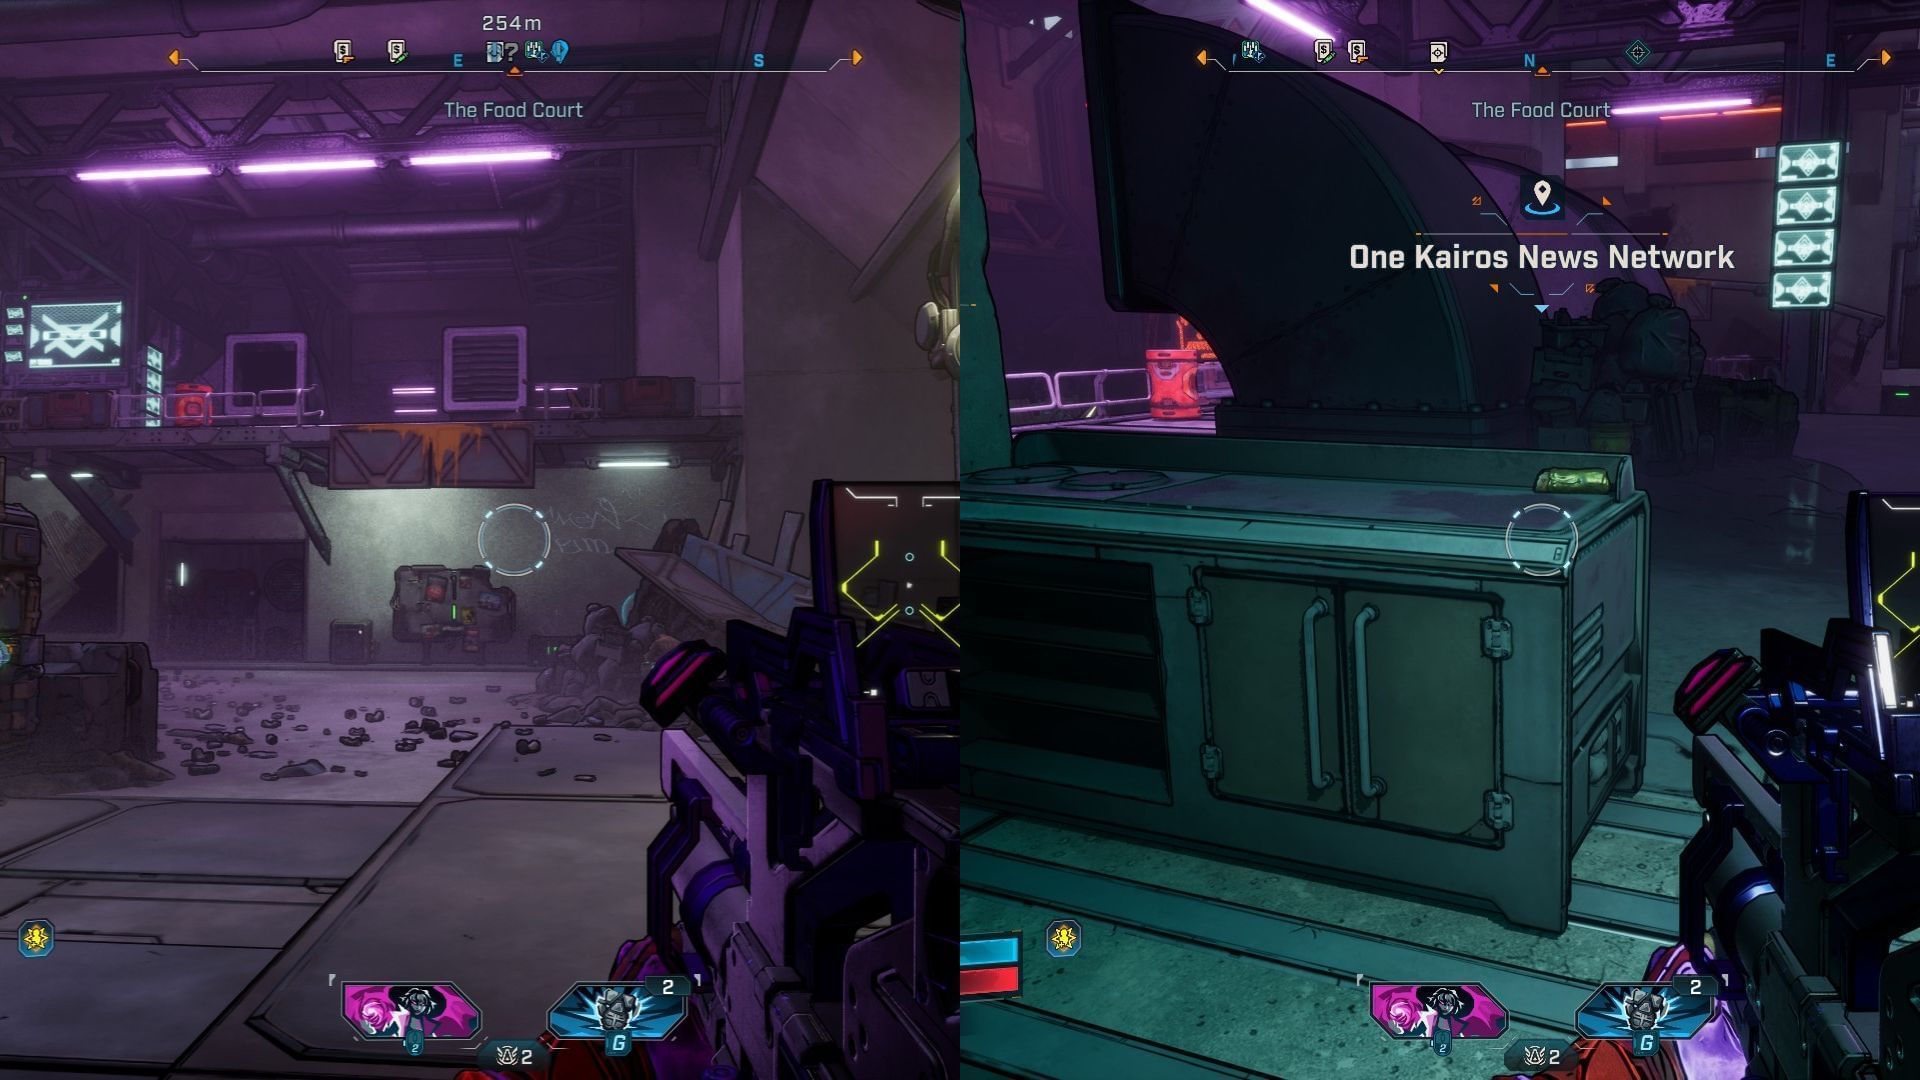
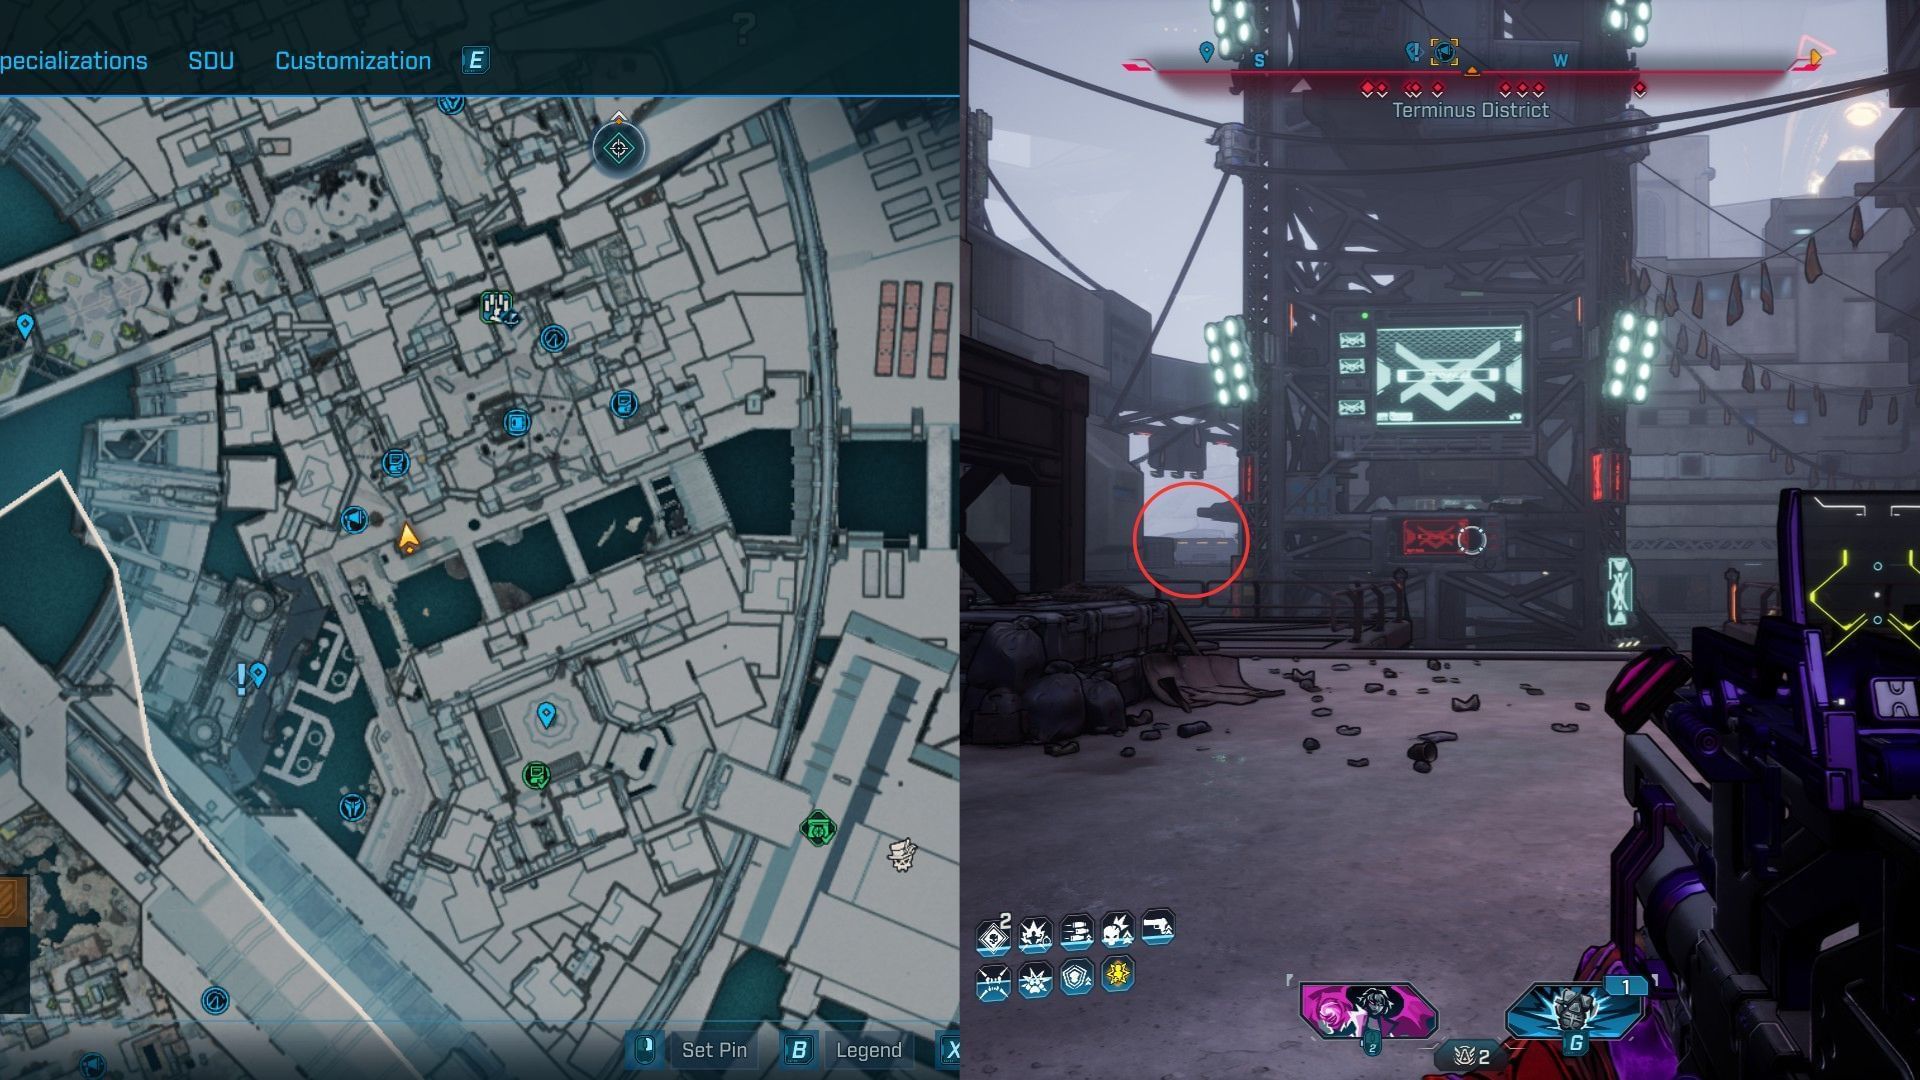
The area for this Burrito doesn’t have a name, but it’s close to the One Kairos News Network (OKNK). Take the left route to the road outside the safehouse until you reach the building near OKNN. It’s the one with Timekeeper’s face on it.
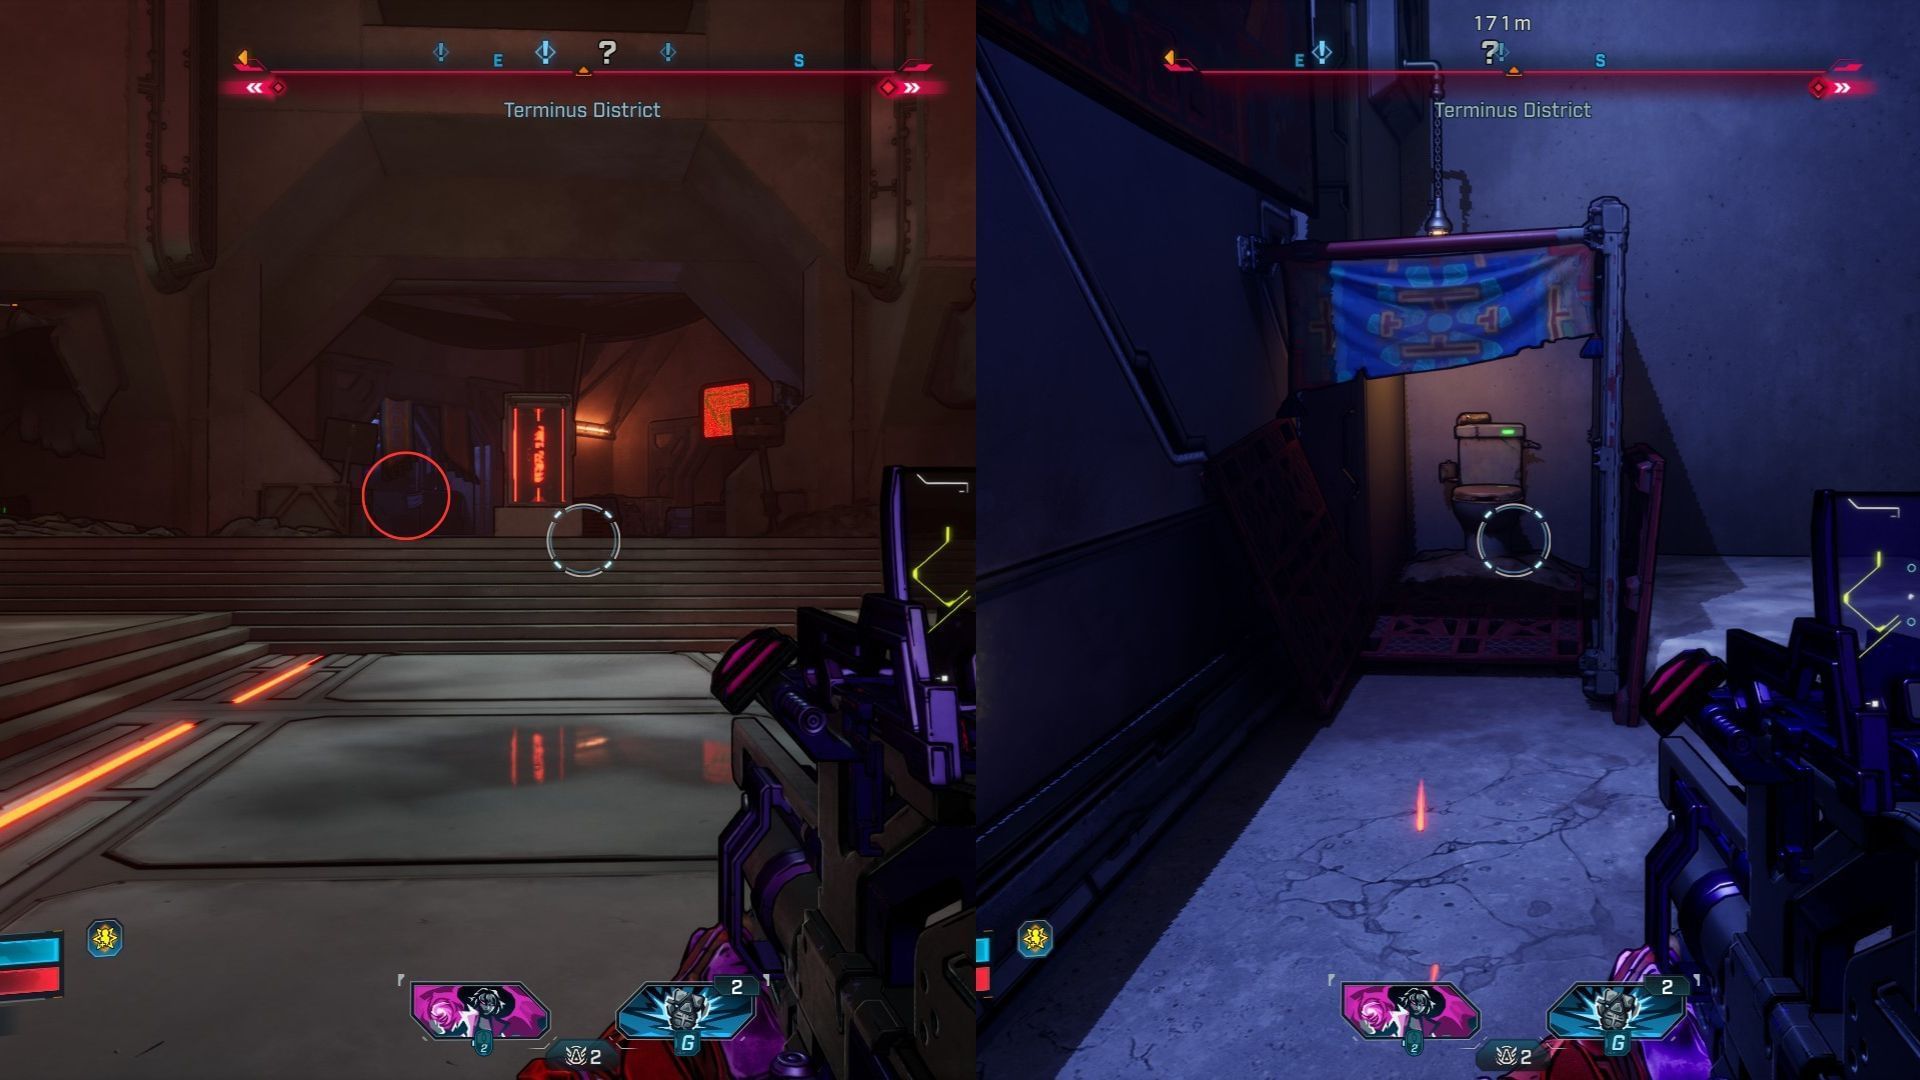
Head inside until you reach a spot with a ‘Keep Out’ warning and look inside the container to the left. You’ll find the Burrito on top of a toilet.
Burrito #3
This Burrito location also does not have a name, but it is right before the Tempered Manufactorium point of interest. Look for a ripper hideout called ‘Get The Funk Out’ to start your search.
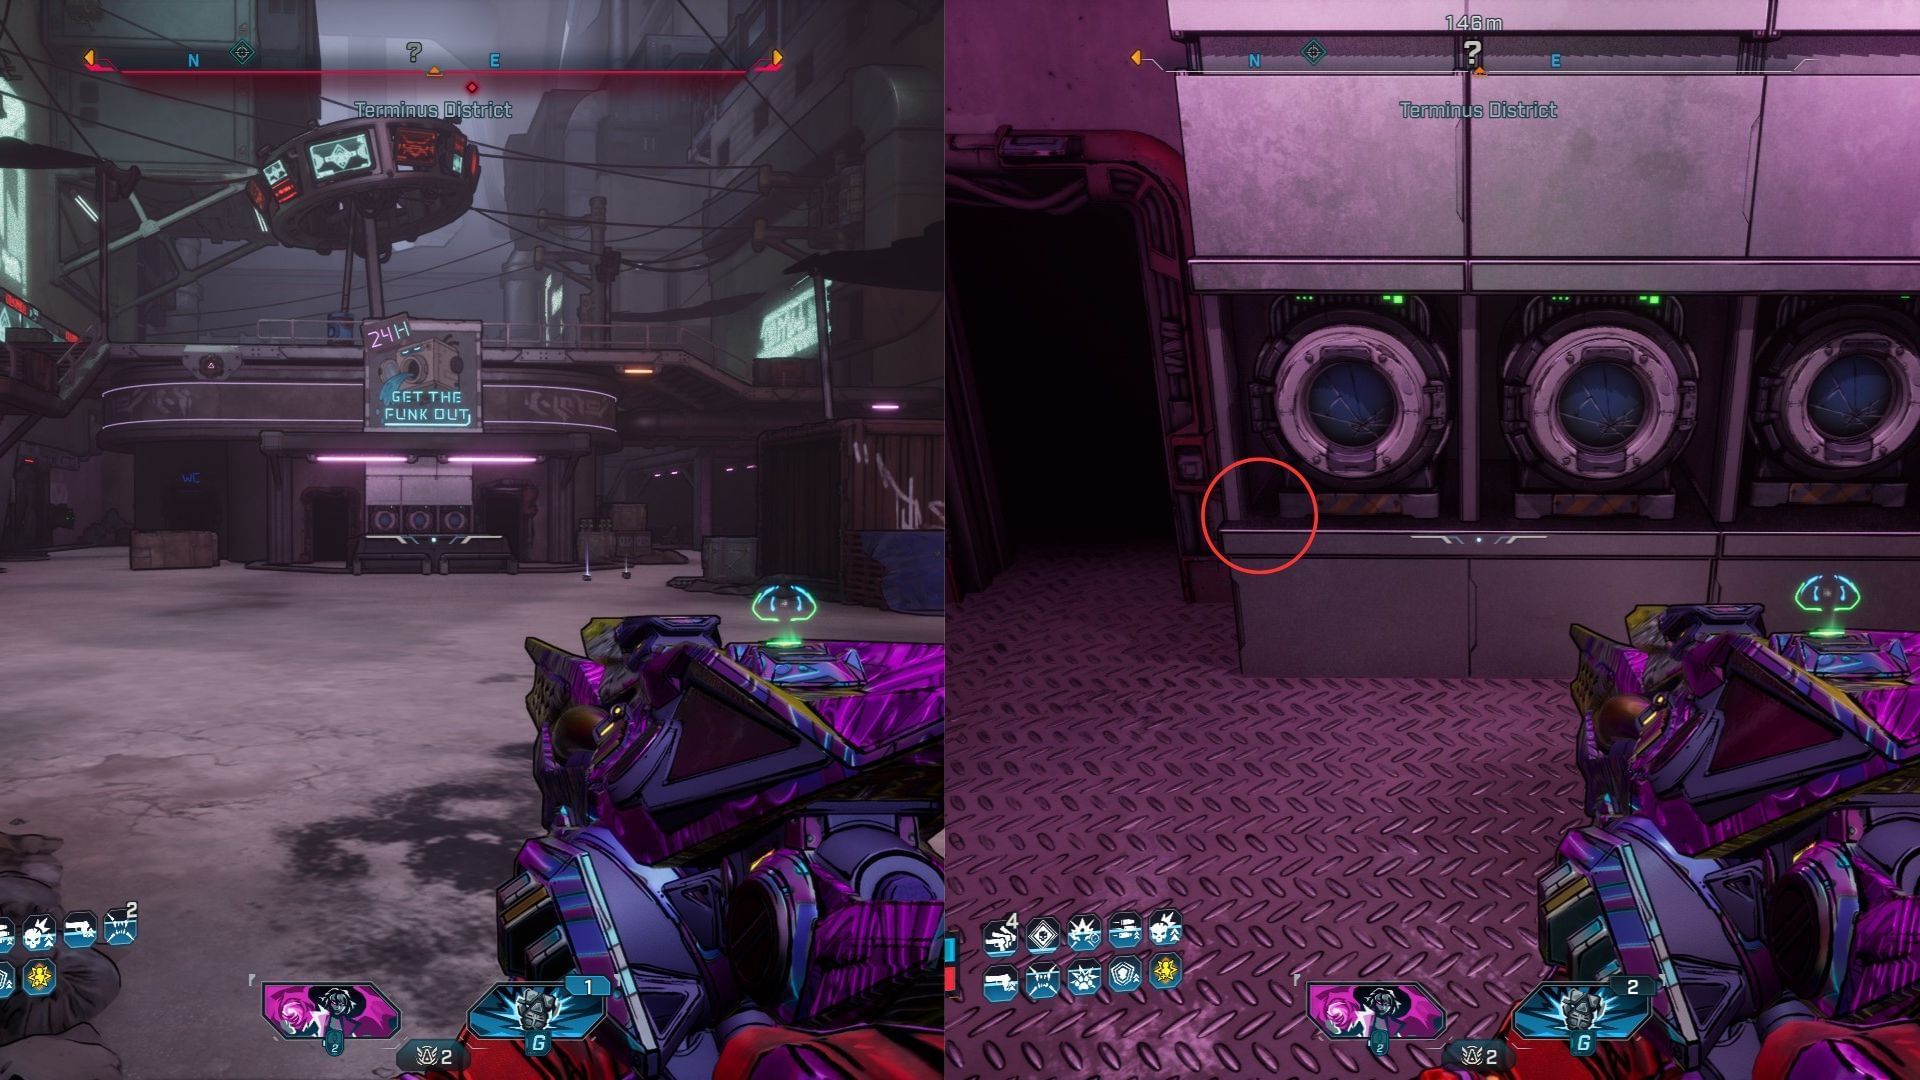
Walk up to the counter to find three loot caches. The Burrito will be on the left side. Note that it may get hit by a stray bullet if you decide to fight the rippers, so don’t panic if you can’t find one.
Burrito #4
This next Burrito is close to Burrito #3 and is inside a building at a fast-food stall. However, the path to this location requires a few turns, so follow the directions below.
Head back to the main road and cross the tunnel to your left while facing the checkpoint. Take the stairs on the left side leading to a building with a painting. Take the left from the wall painting to enter the building, and another left to find a dead end. On the right, you’ll find the food shop with the Burrito on top of the shelf next to soda cans.
Burrito #5
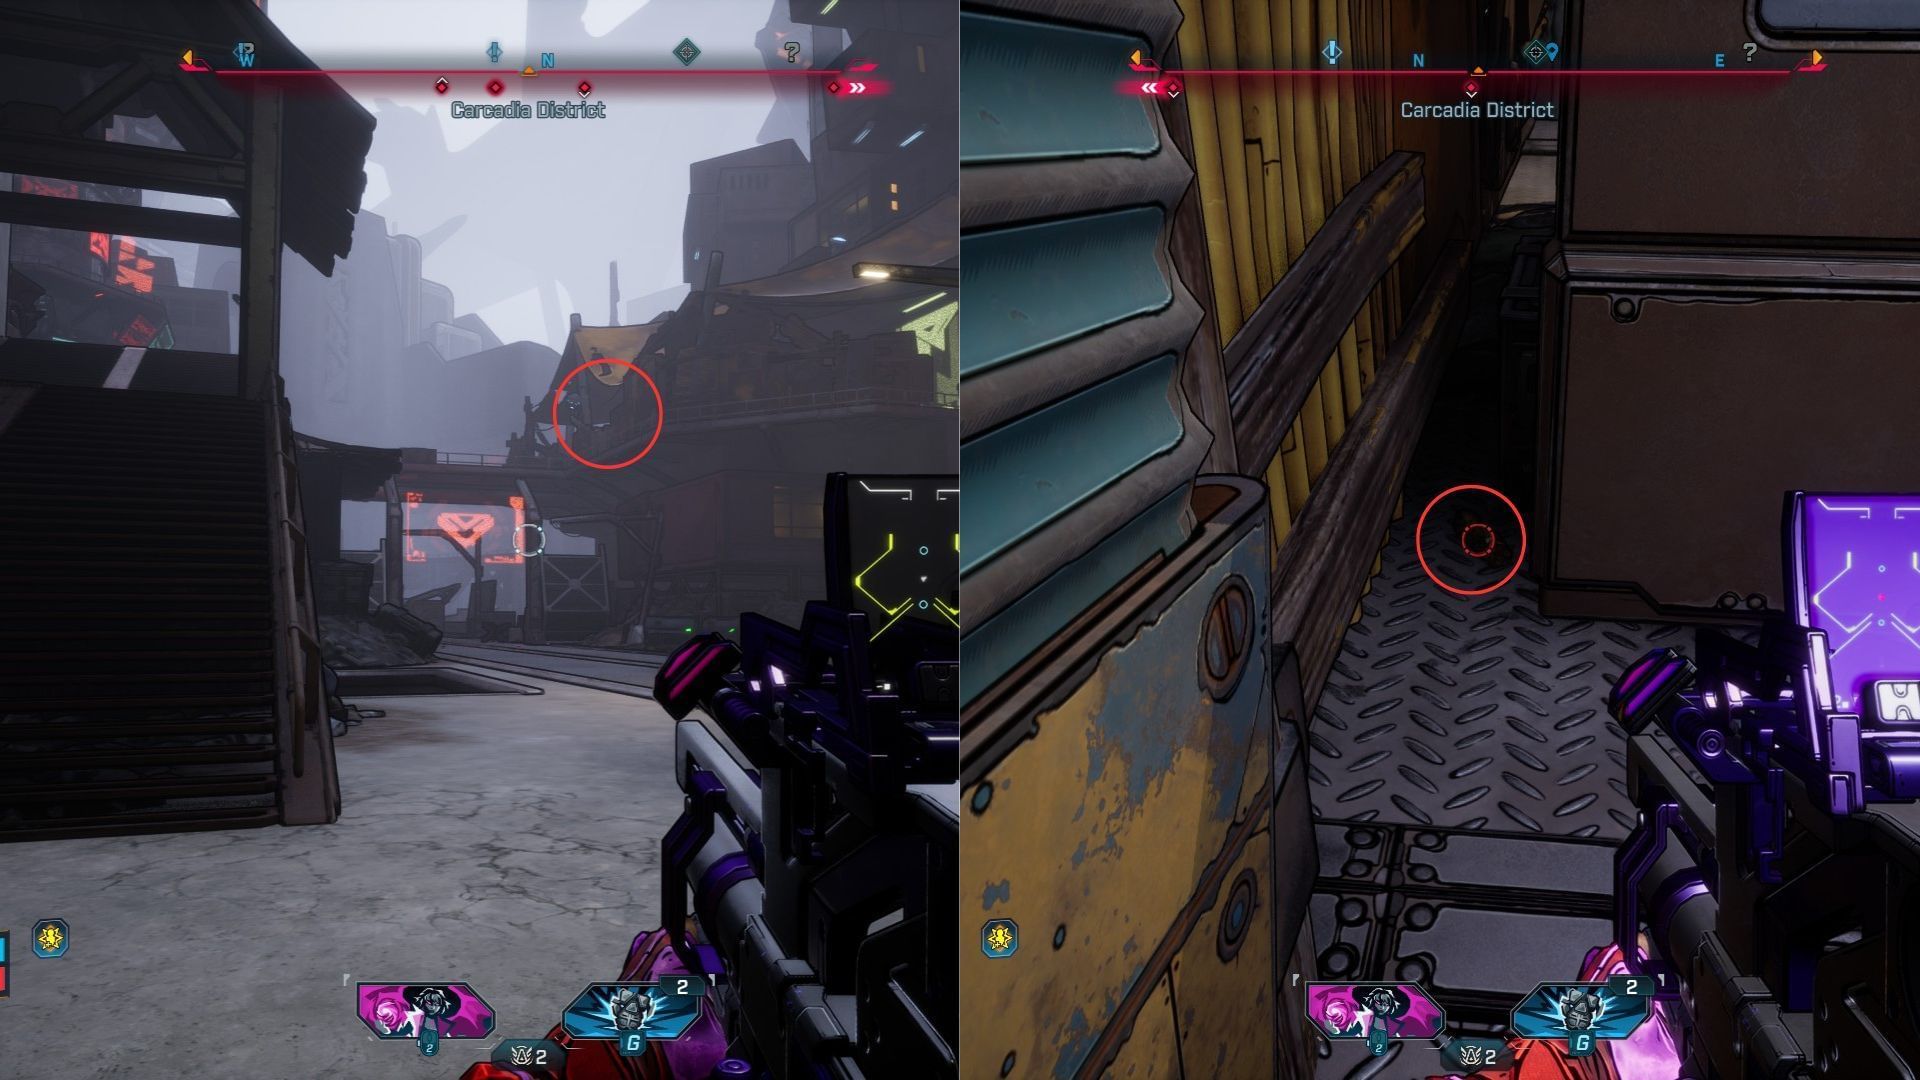
The final Burrito of the Terminus district is near a propaganda speaker. To reach the spot, head back outside the building with Burrito #4 and head left to the massive tower.
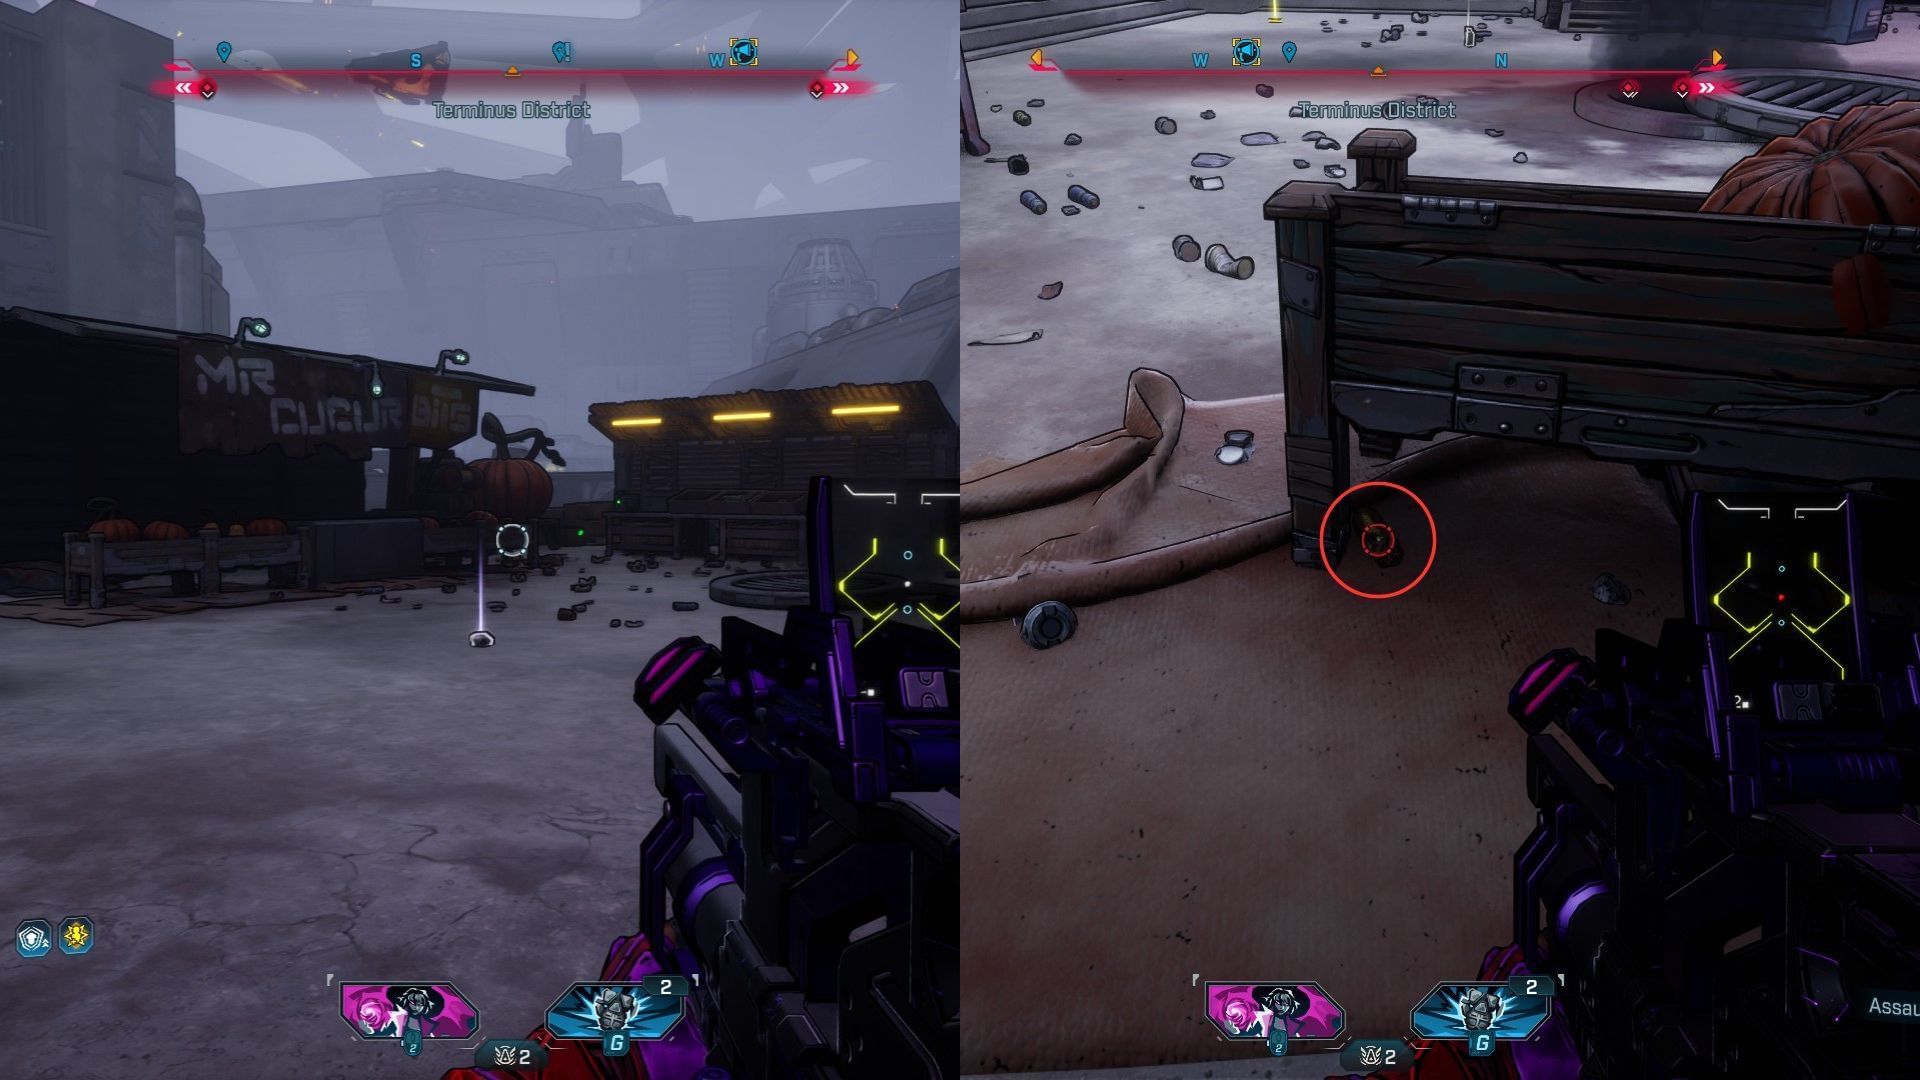
On crossing the area, you’ll come across a pumpkin shop that is sneaking something else in stock. Look under the right side of the table to find the Burrito.
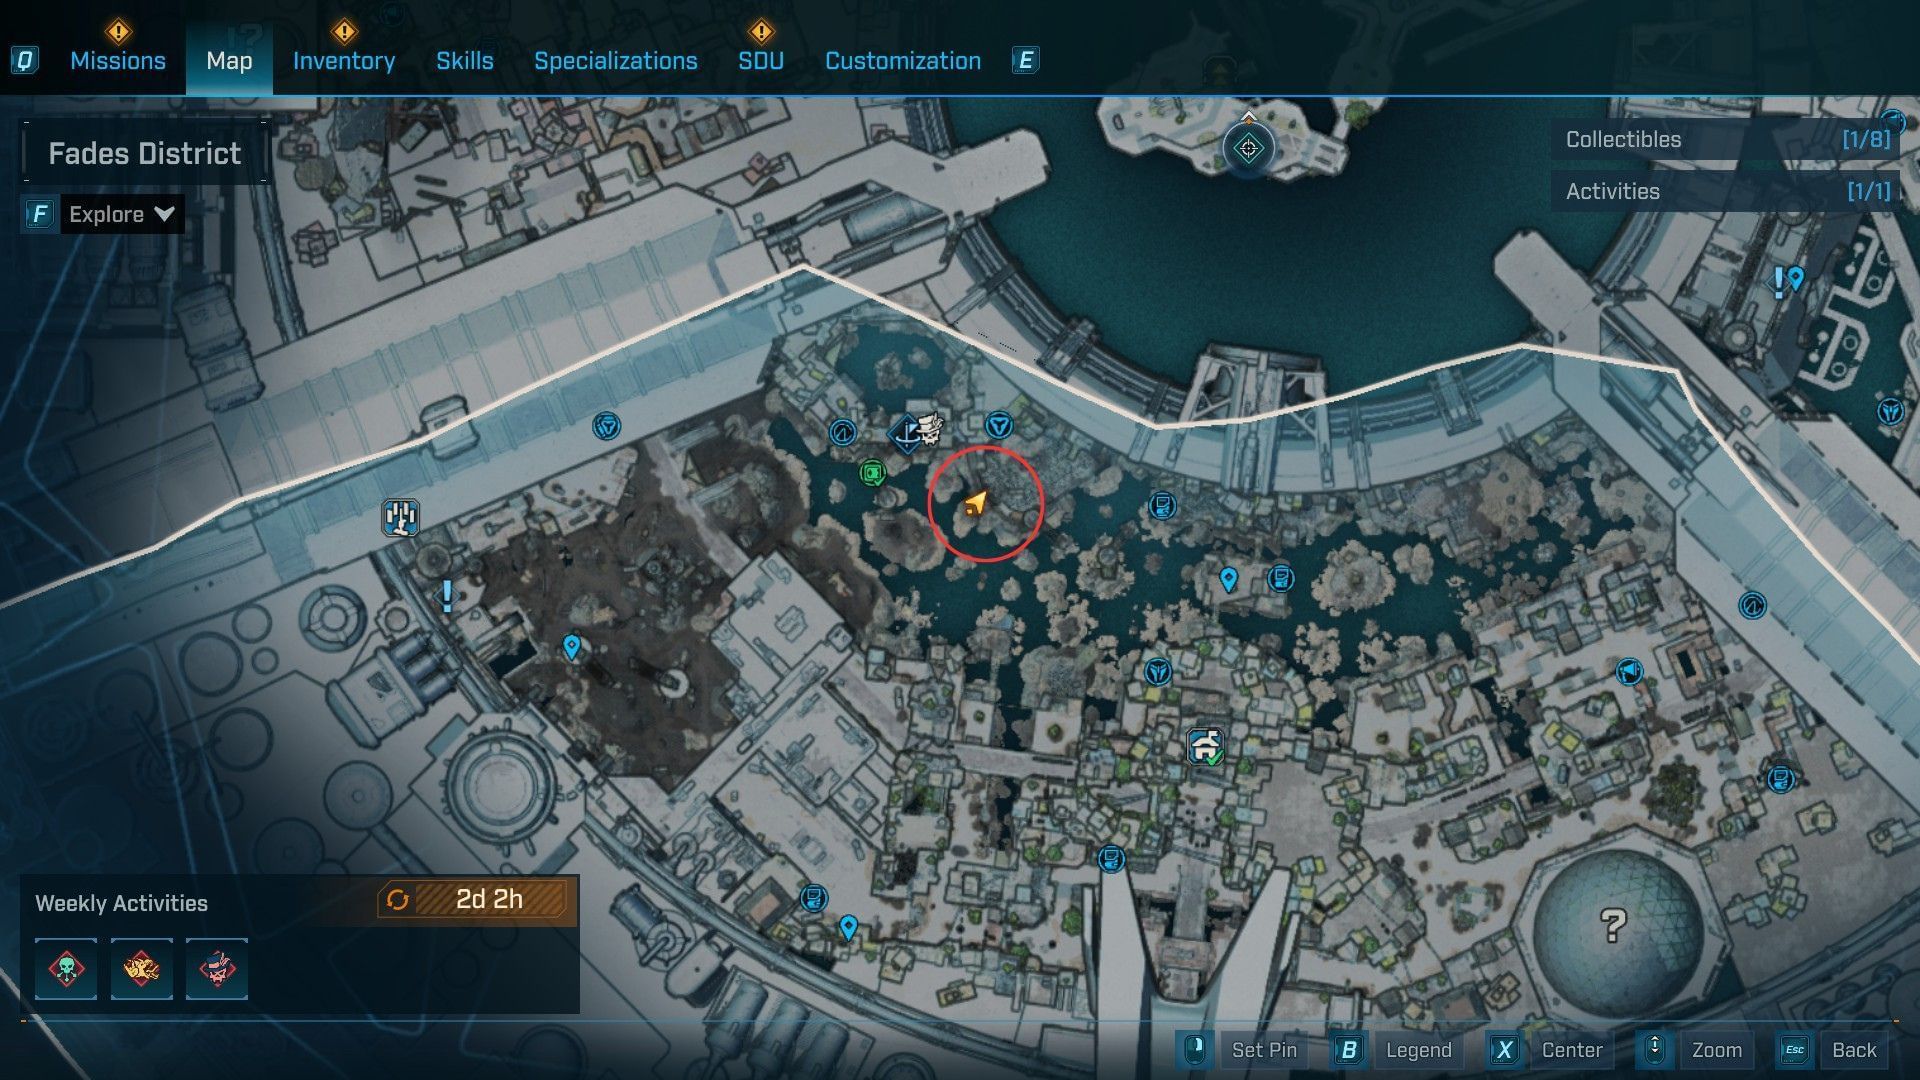
All Burritos within the Fades district in Borderlands 4
Here are all the Burritos in the Terminus district within Dominion
Burrito #1
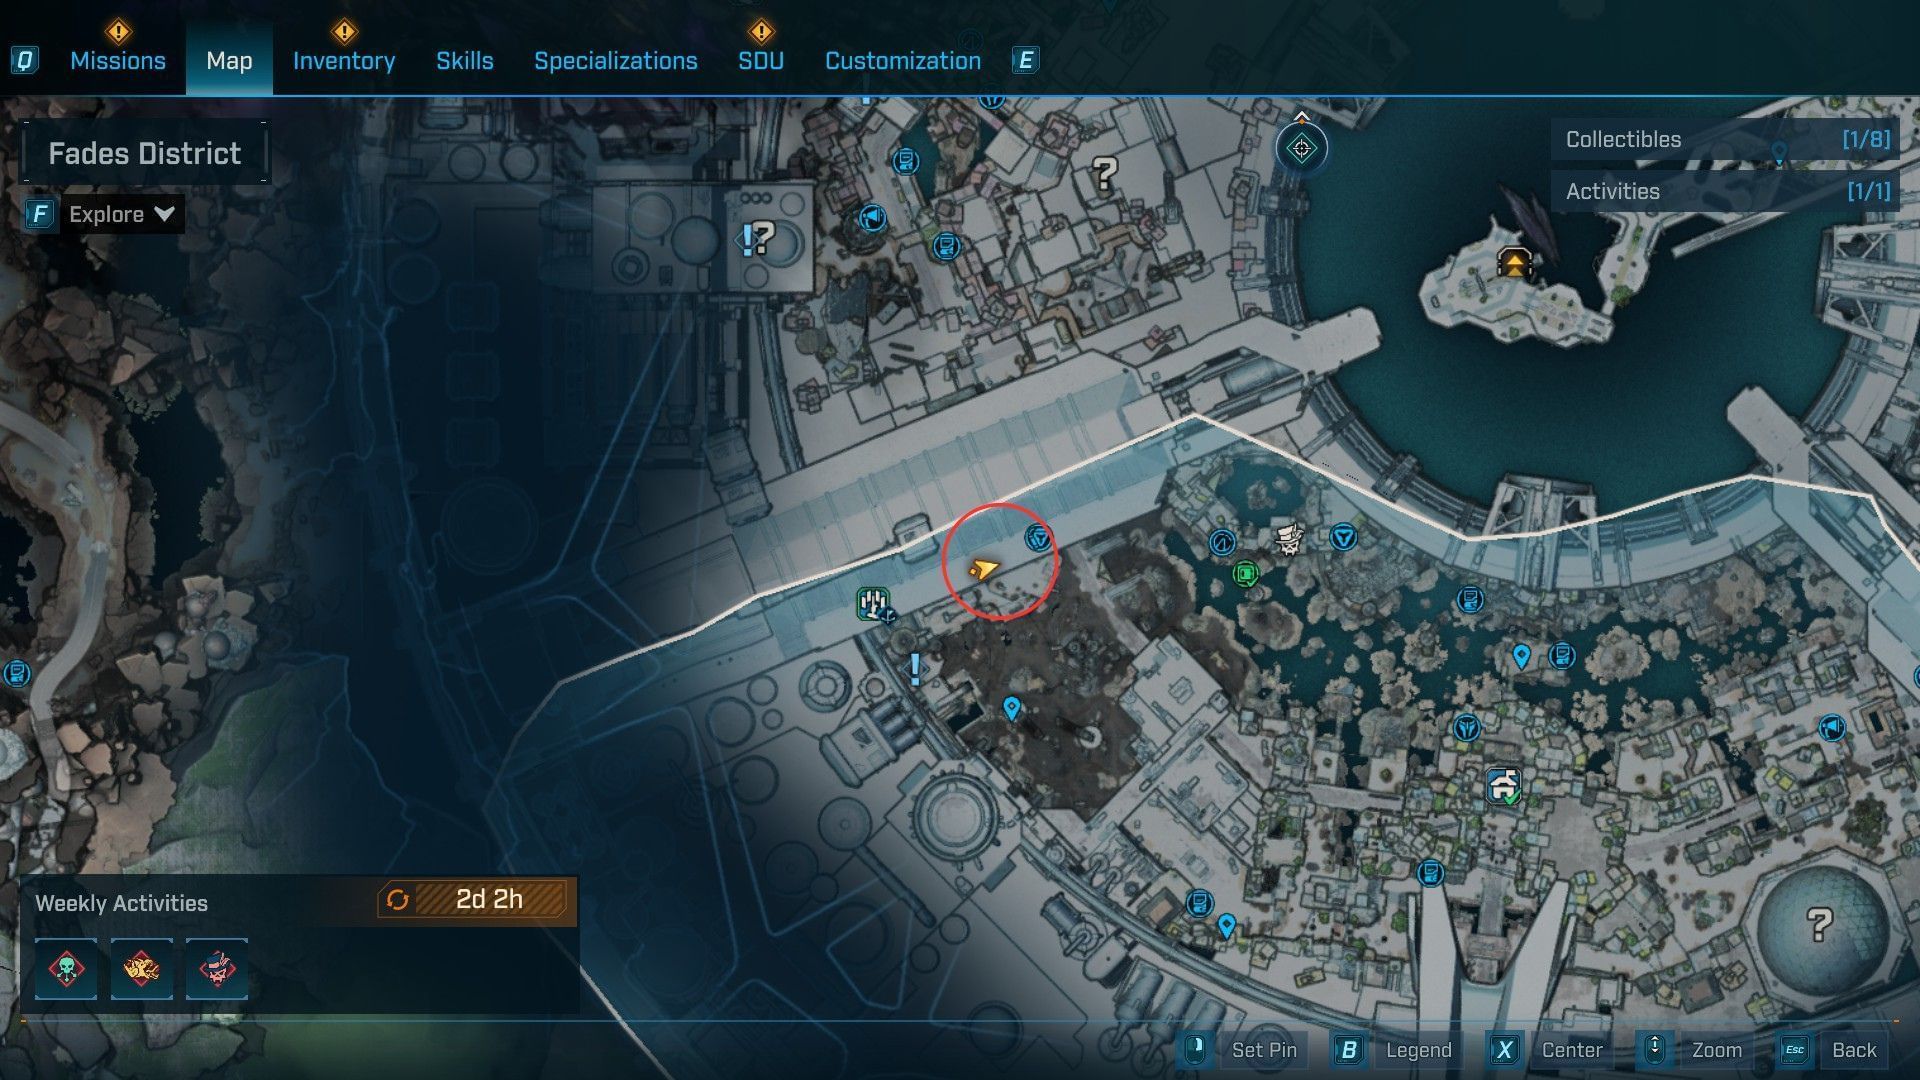
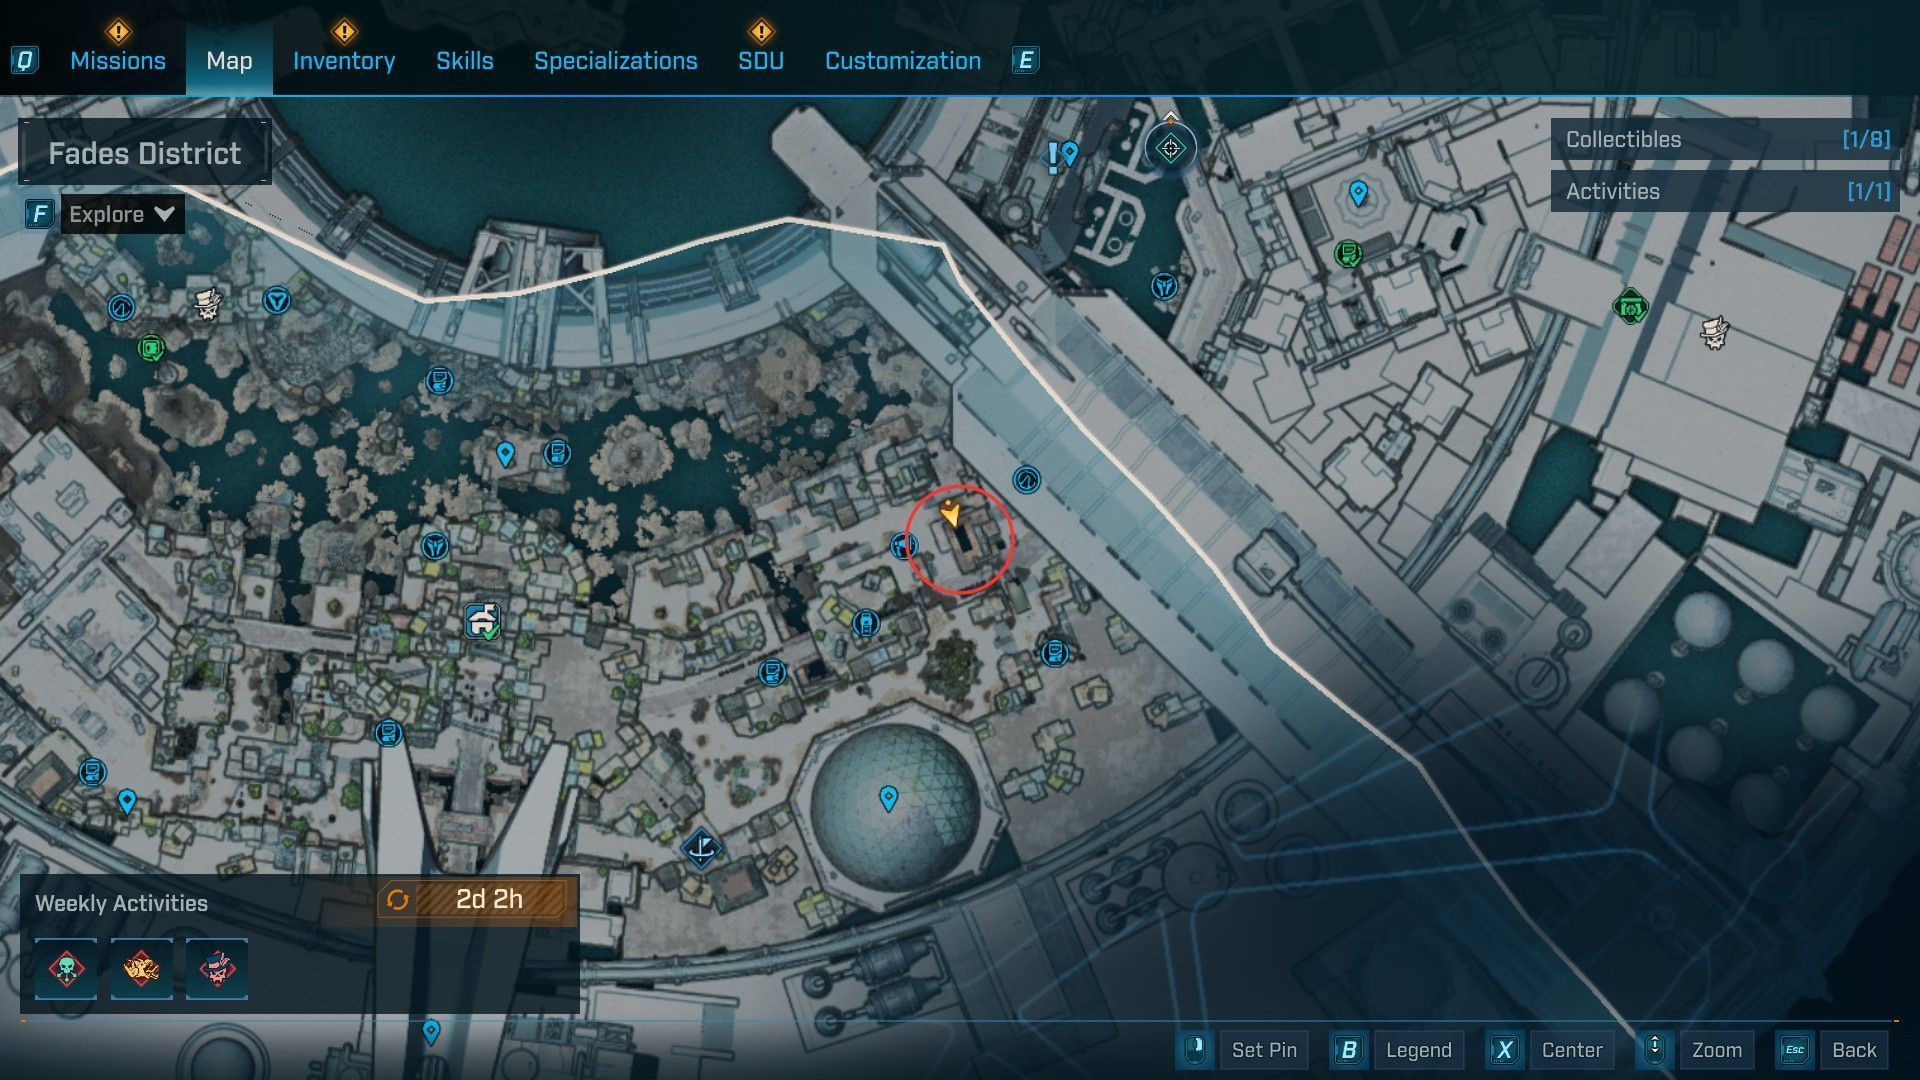
To find this Burrito, you’ll need to progress through the main story in Borderlands 4 to unlock Zadra’s Lab fast travel and get access to the Fades district. The Burrito is near one of the collectibles, Vault Hunter’s Guide to Kairos.
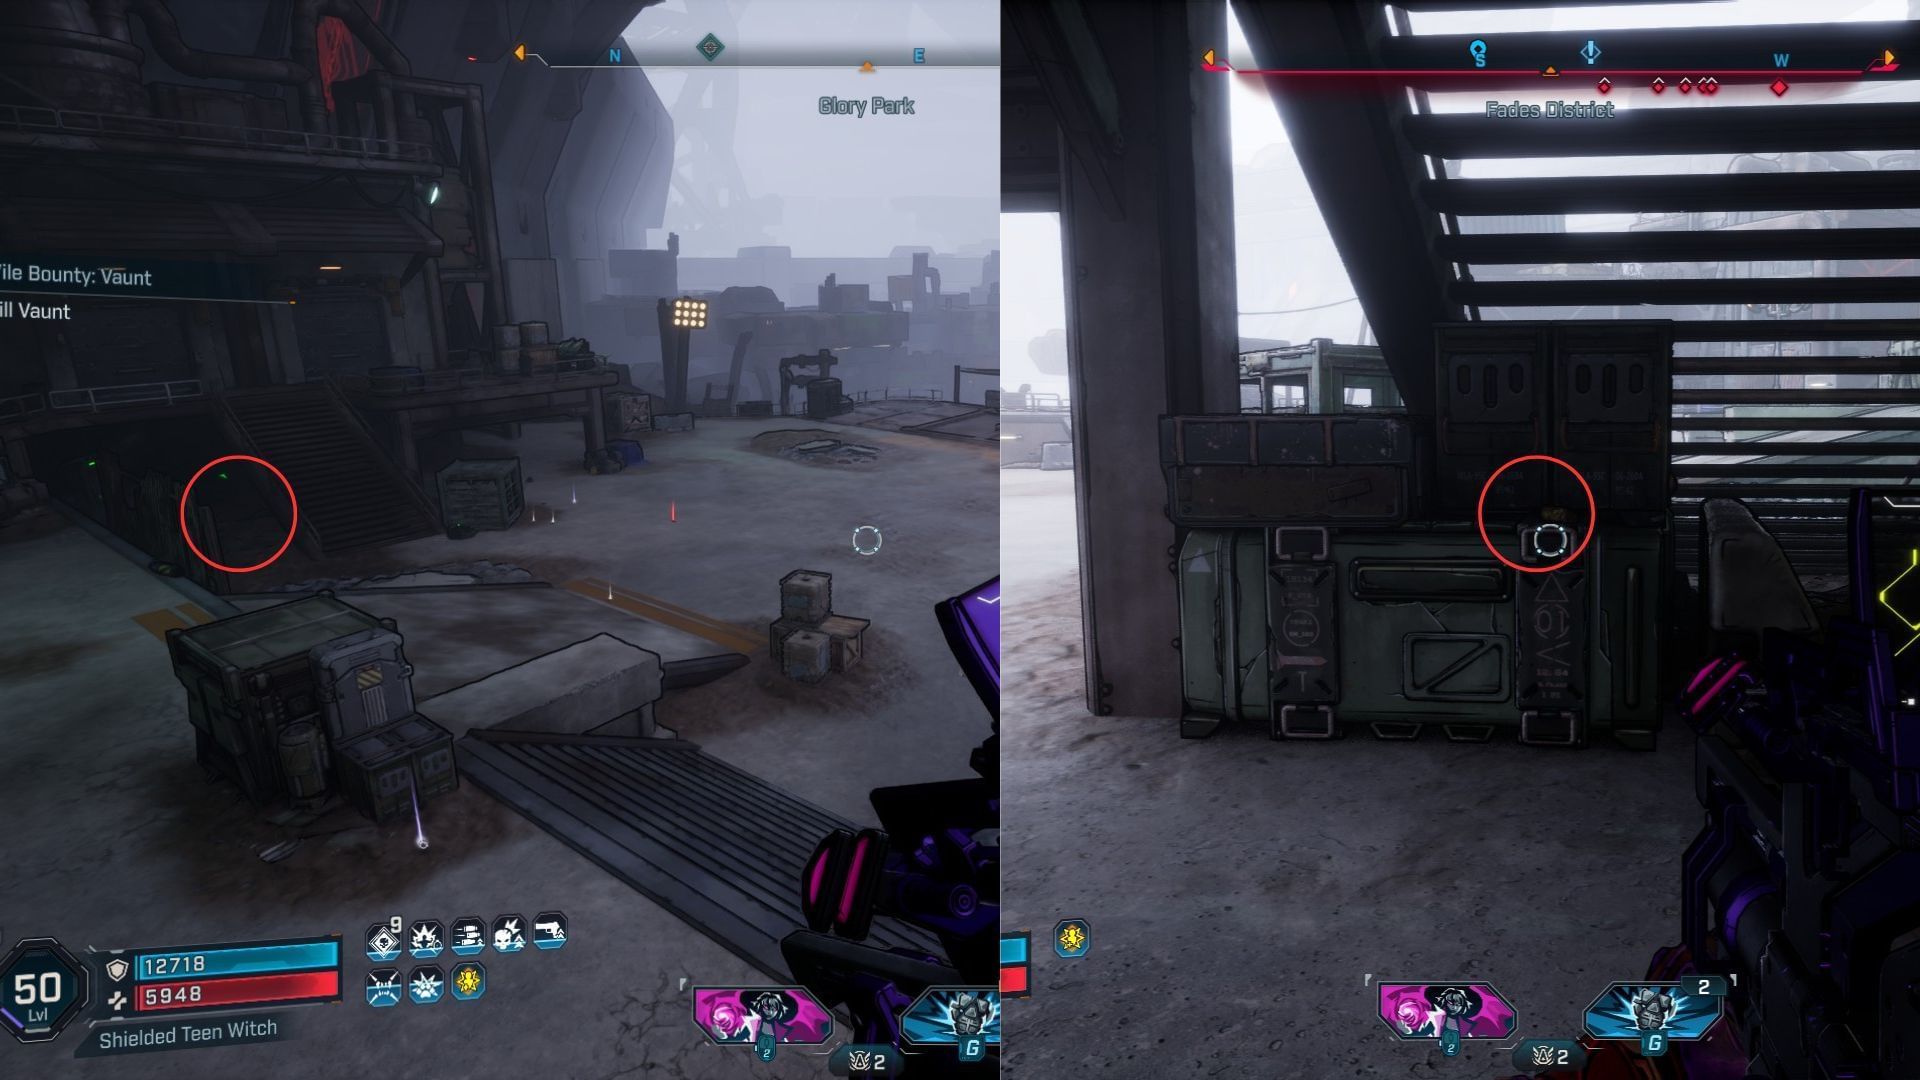
Head outside the fast-travel spot into the open area. Look for some containers behind the metal stairs on the left side. The Burrito is sitting on top of them.
Burrito #2
This Burrito is in a Ripper camp near the entrance to the Bio-Thresher Omega boss fight. The area is part of the ‘One Slimy Issue’ side quest in Borderlands 4, but even after completing it, you most likely missed your target.
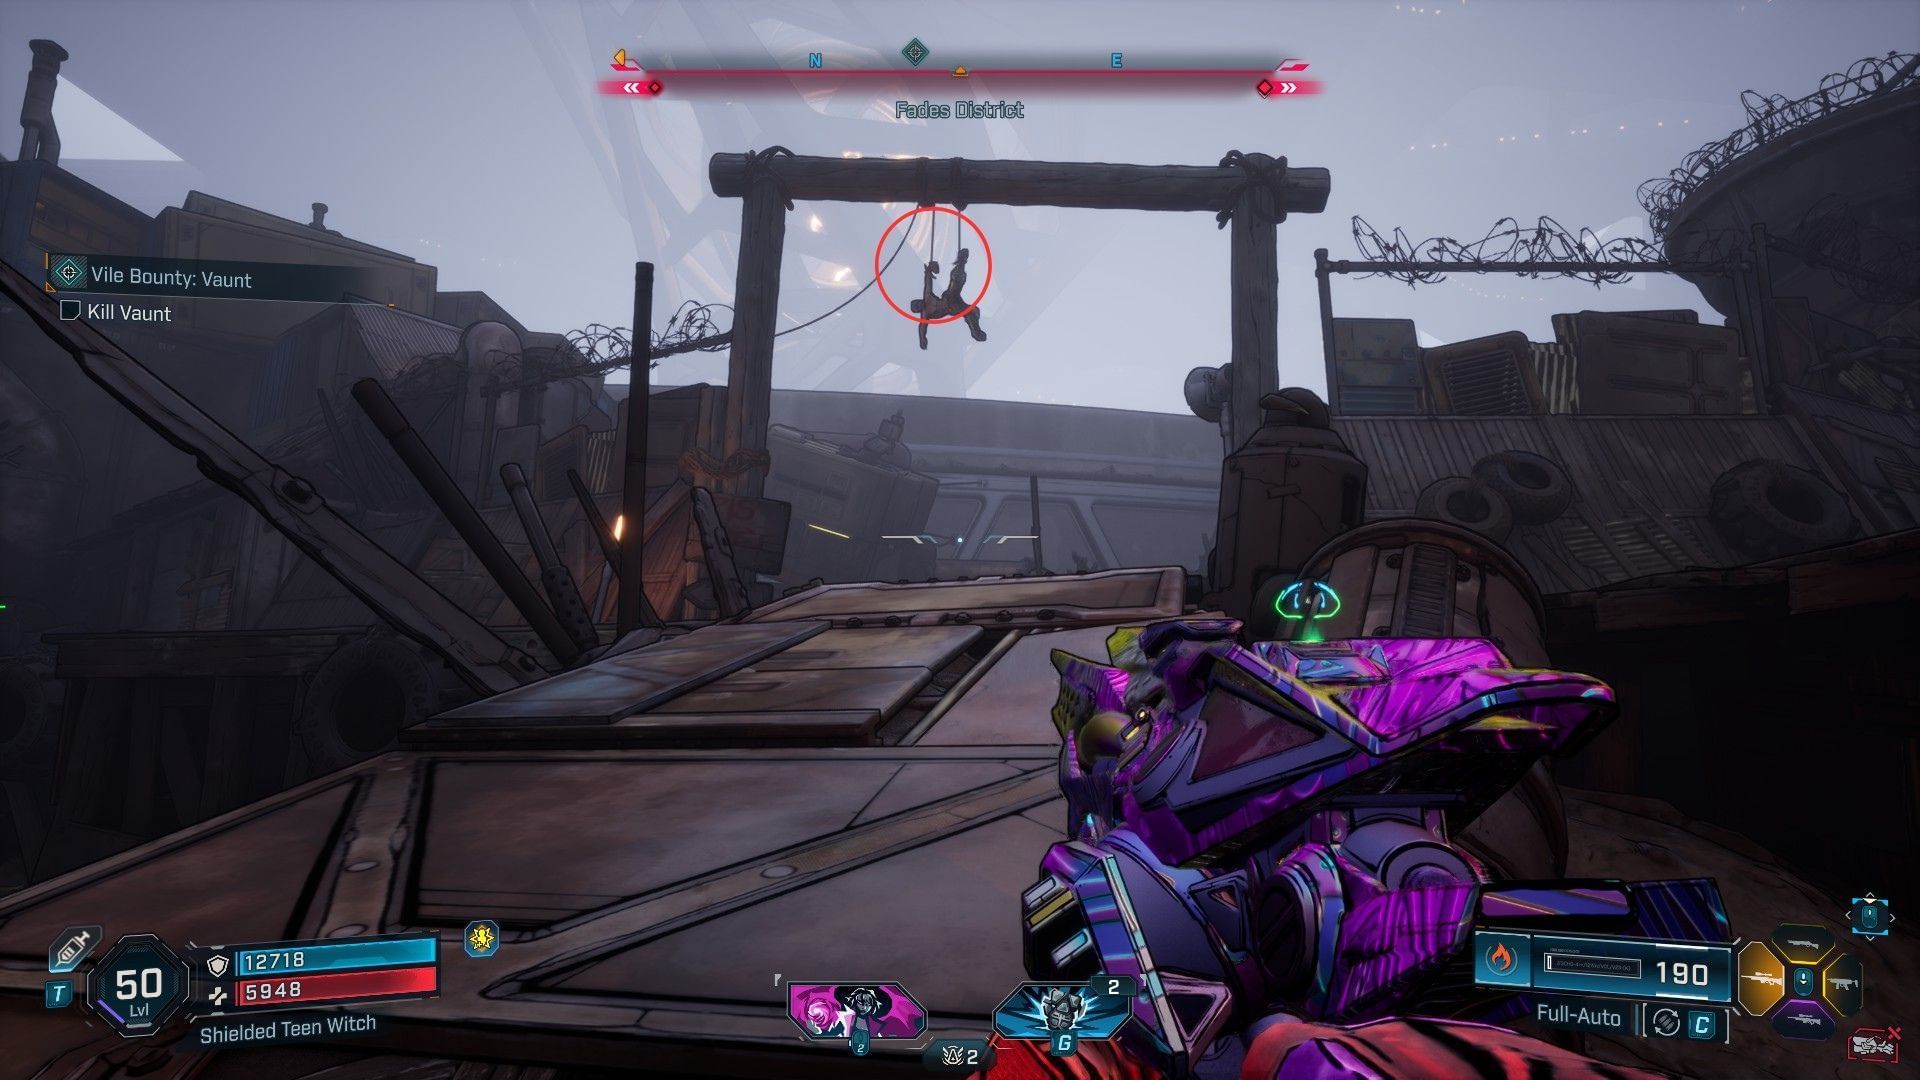
At the camp, you’ll find a body hanging in the middle of the entrance. Look closely to see the Burrito in its hands. You can use a Sniper Rifle to take it out from a distance and save some travel time.
Burrito #3
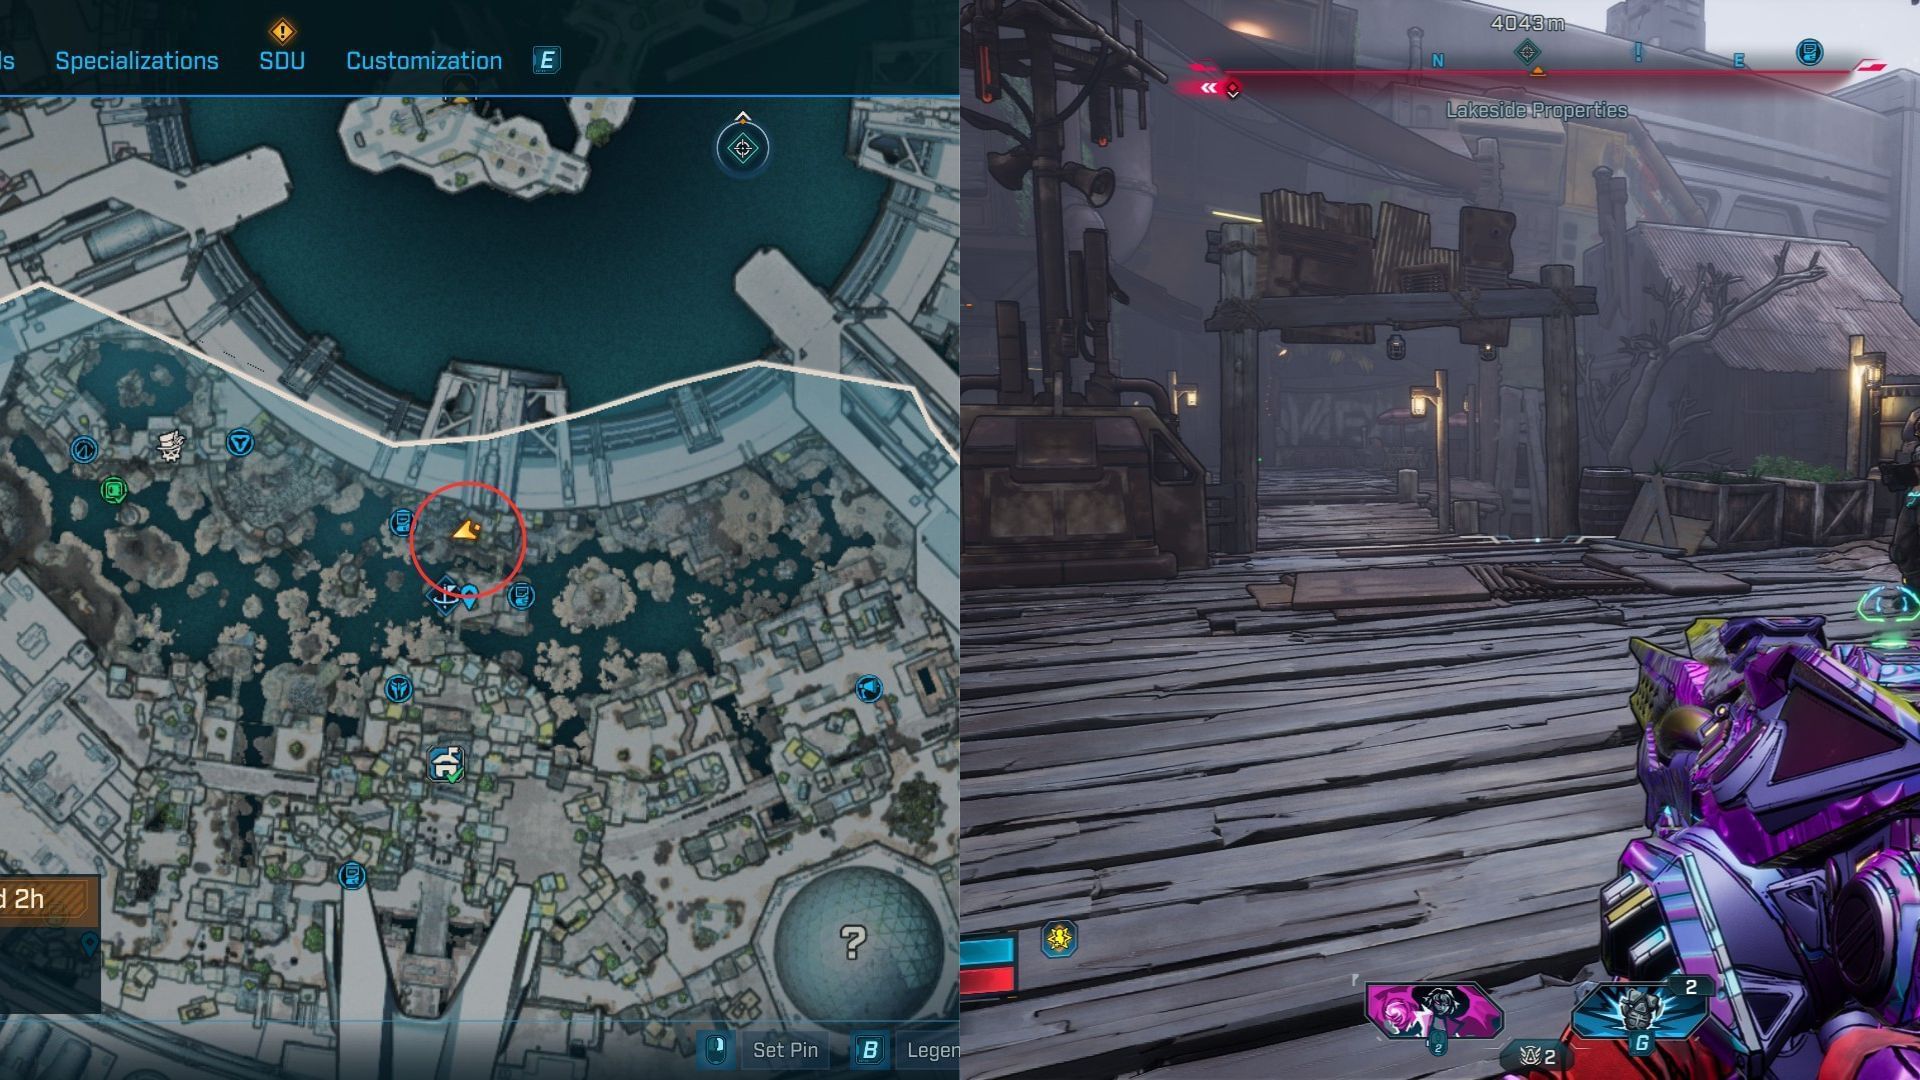
The third Burrito in the area is at the Lakeside Properties. Cross the bridge near Beth, the NPC who gives you the ‘One Slimy Issue’ side quest, to reach the other side of the area.
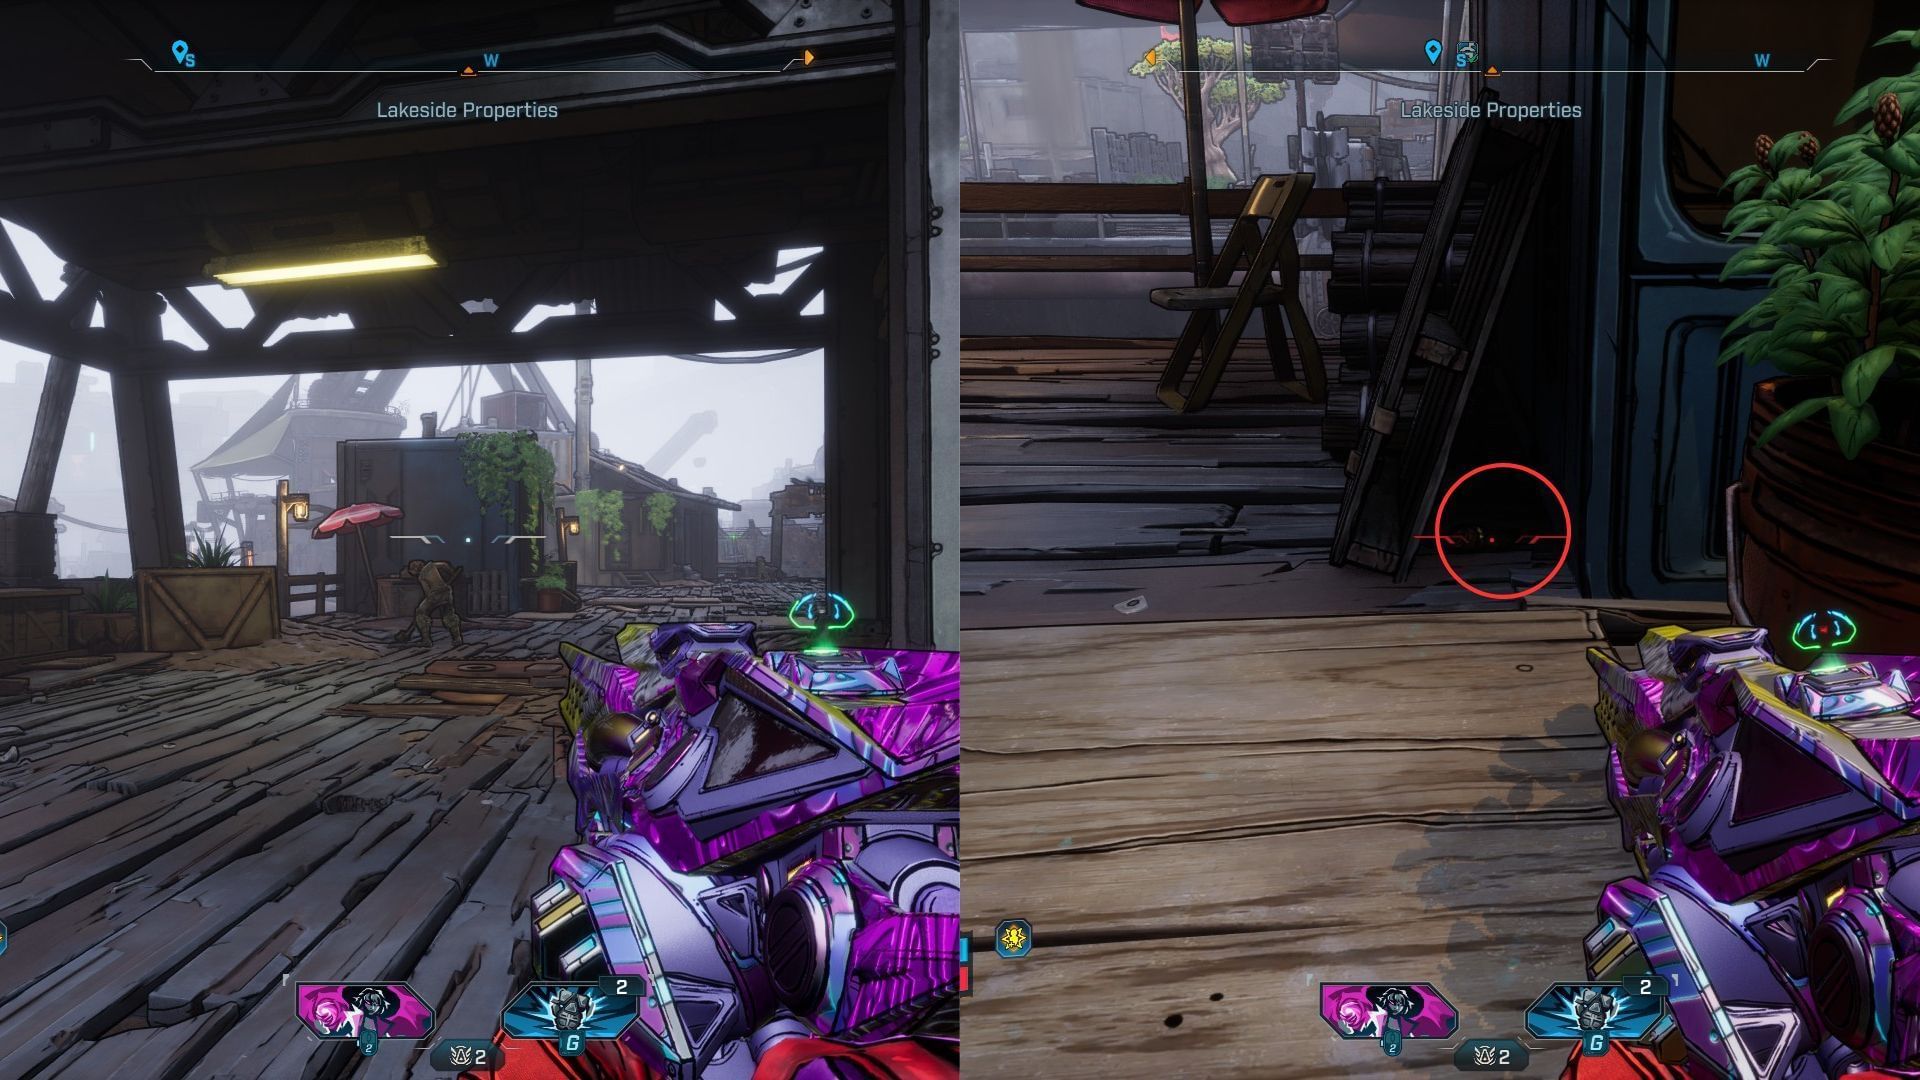
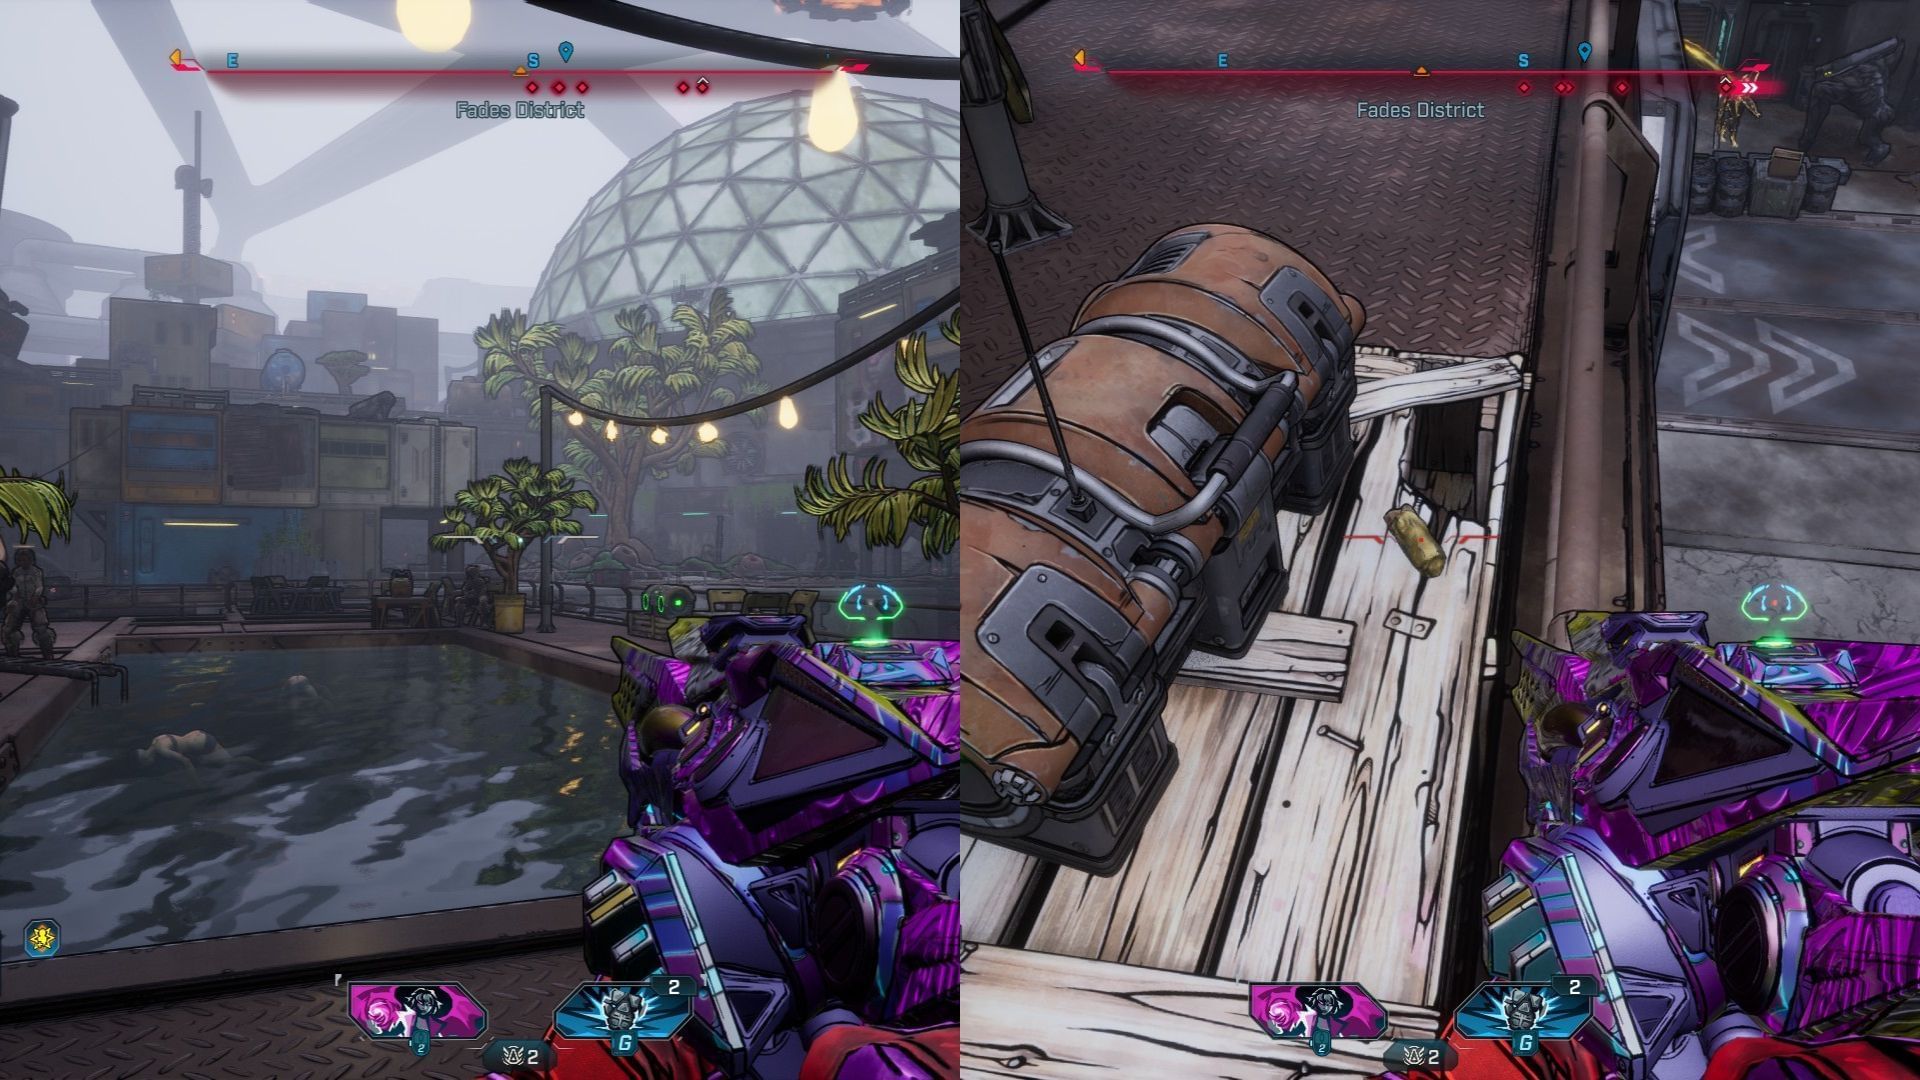
After crossing the bridge, turn left and head to the small blue shelter. The Burrito is hiding between the gap of the house and the wooden plank.
Burrito #4
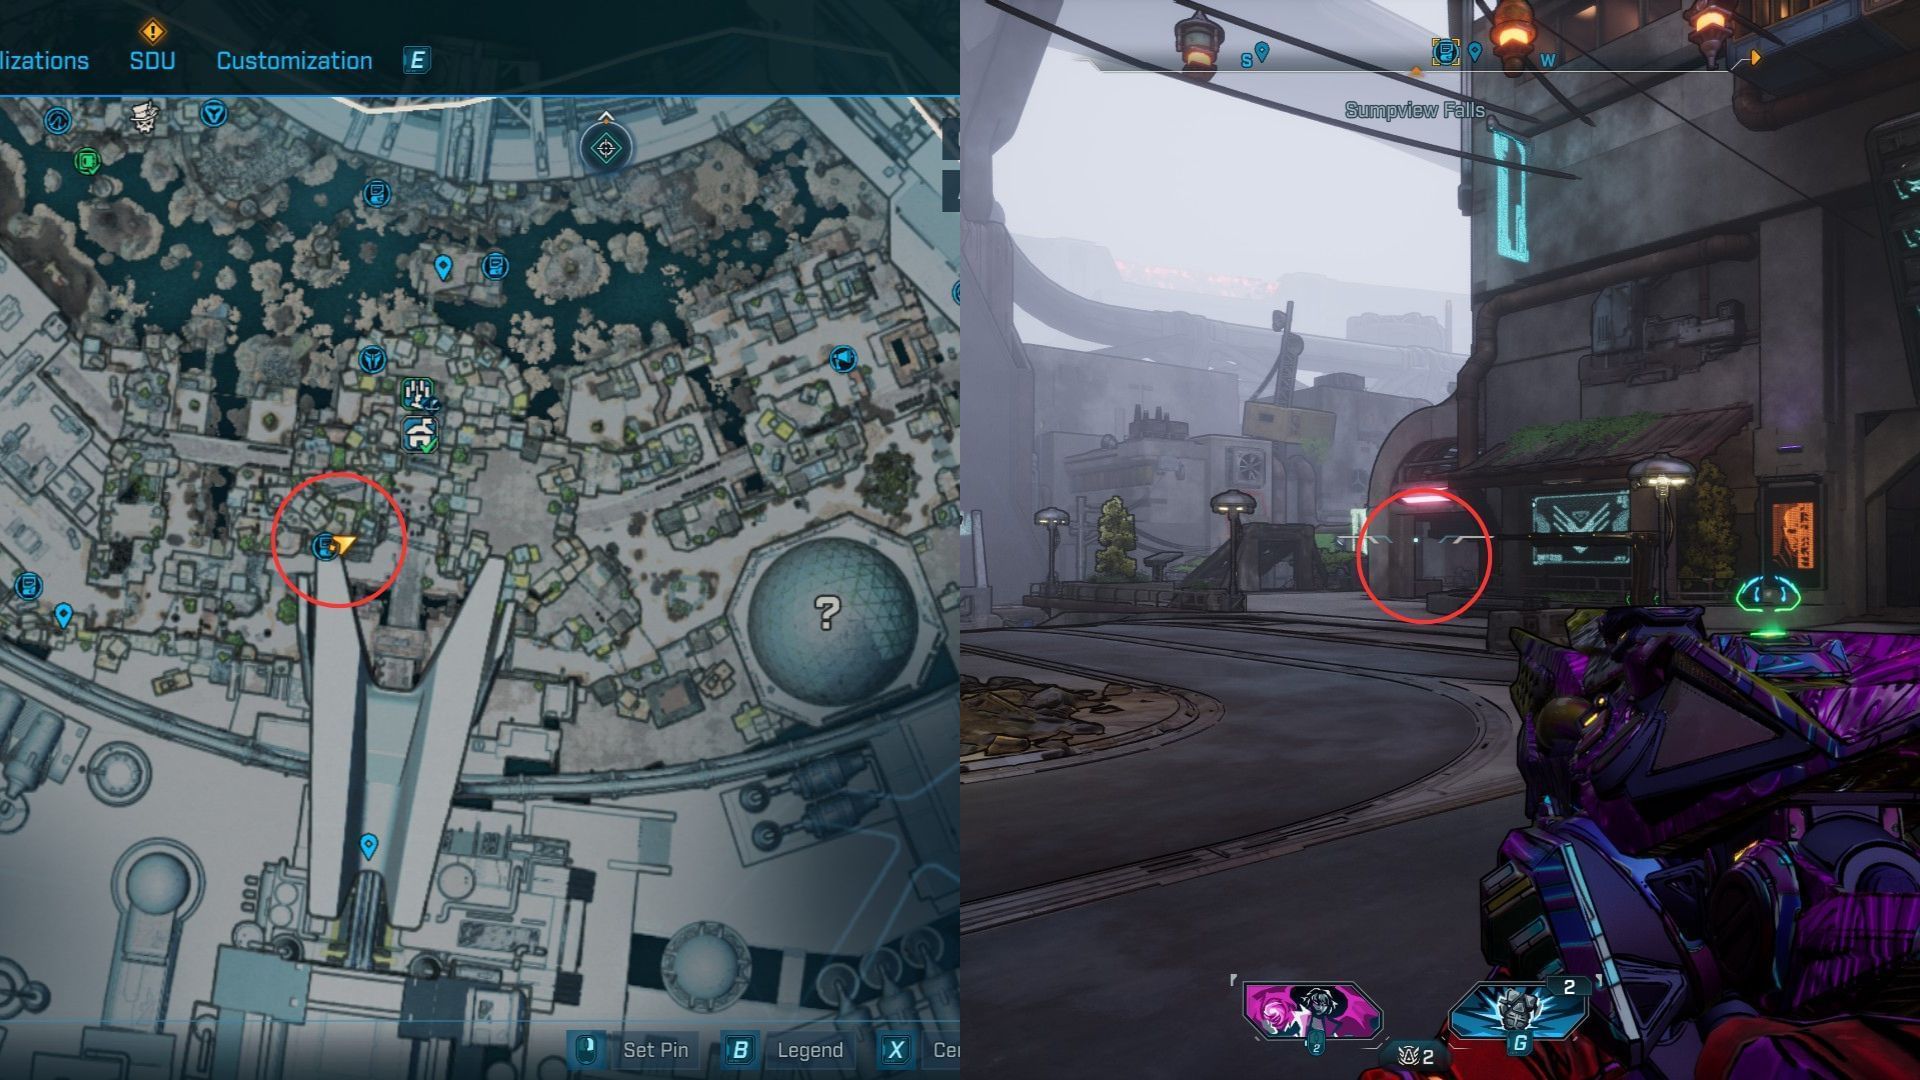
One of the final Burritos in our list is near the Sumpview Falls safehouse and in the direction of the Locus Production Facility. To find it, head up the stairs of the safehouse and head left into a shelter to your left in the shopping district.
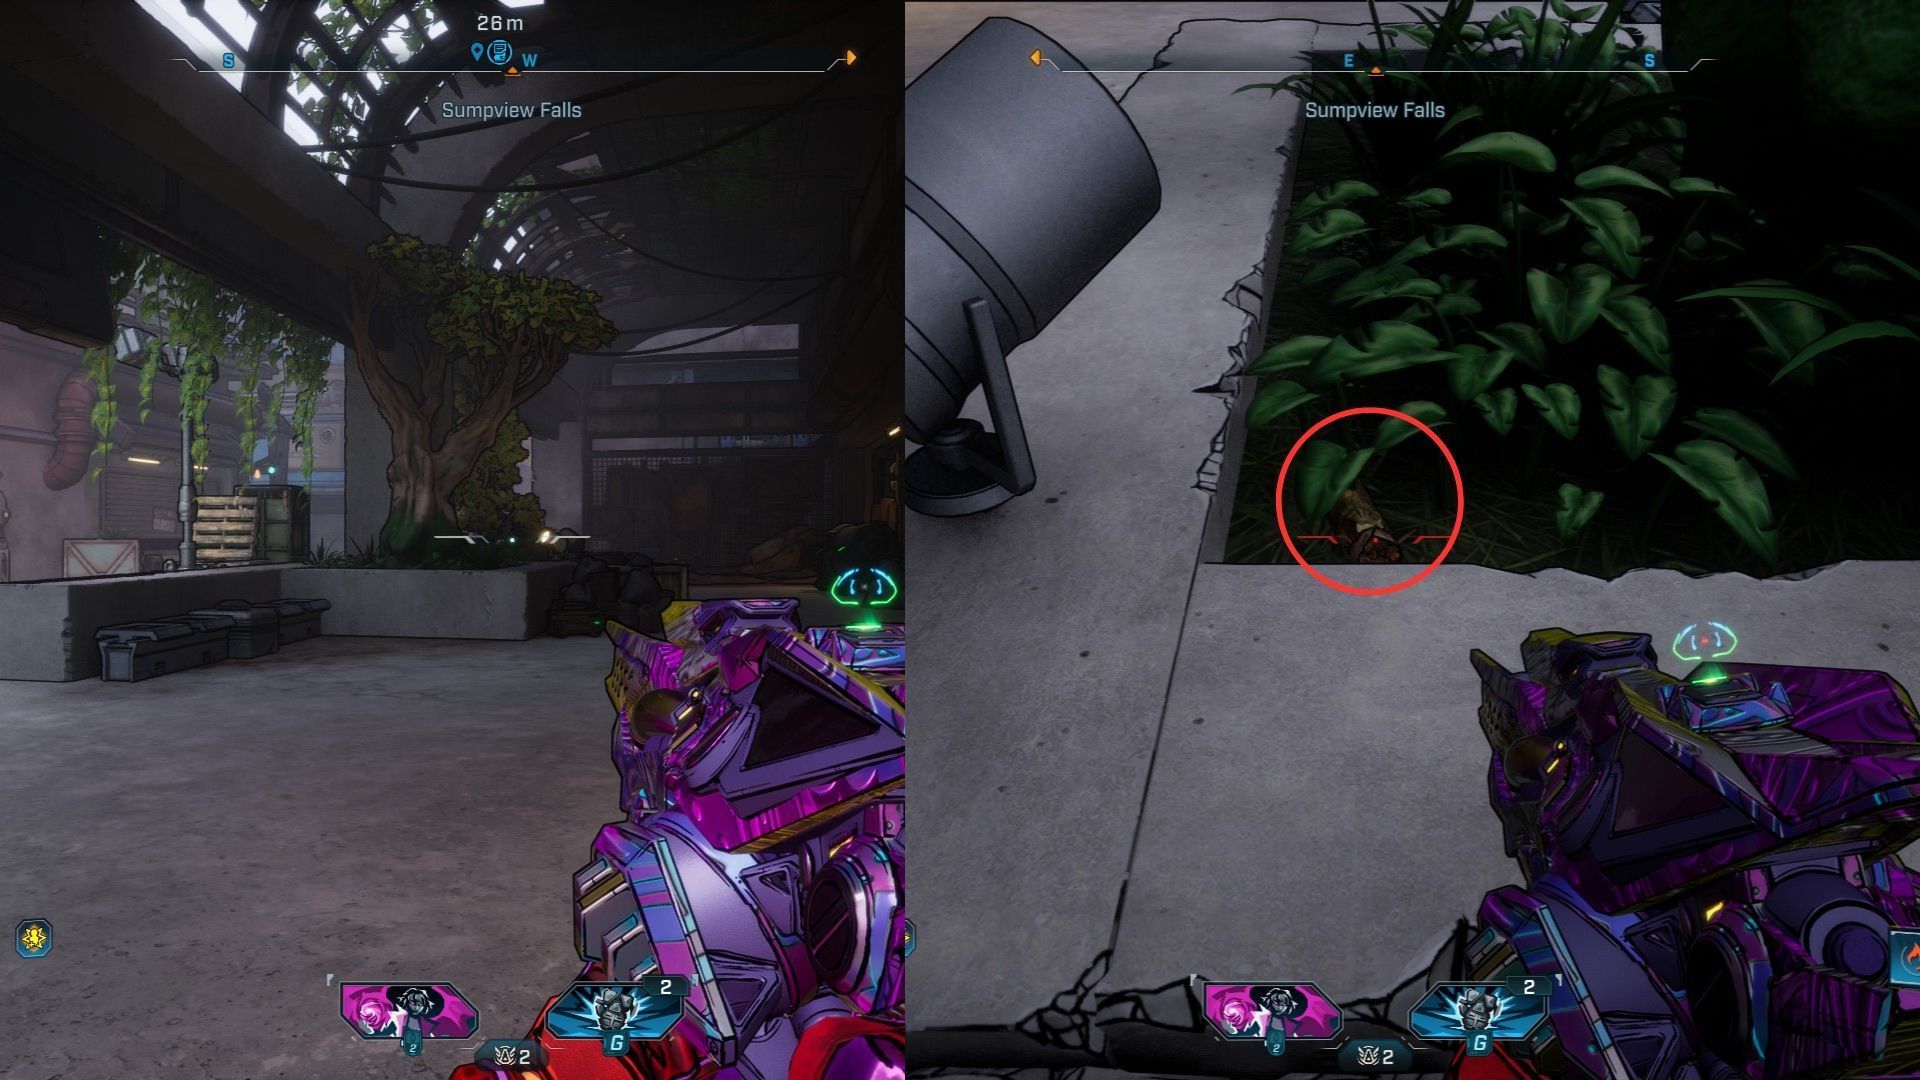
The Burrito is hiding in the grass near the tree and is hard to spot if you are even a little far away. Get close and look near the edge, where a spotlight is shining on the tree.
Burrito #5
The final Burrito is near a pool close to the propaganda speaker on the left side of the Fades district. Look for a building with a blue-colored water tank located to the east of the speaker.
As you approach the area, you’ll find two bodies in the pool and a group of people gathered to observe what has happened. Find the Burrito behind a loot chest in the area.
How to find Dave the Burrito in Borderlands 4
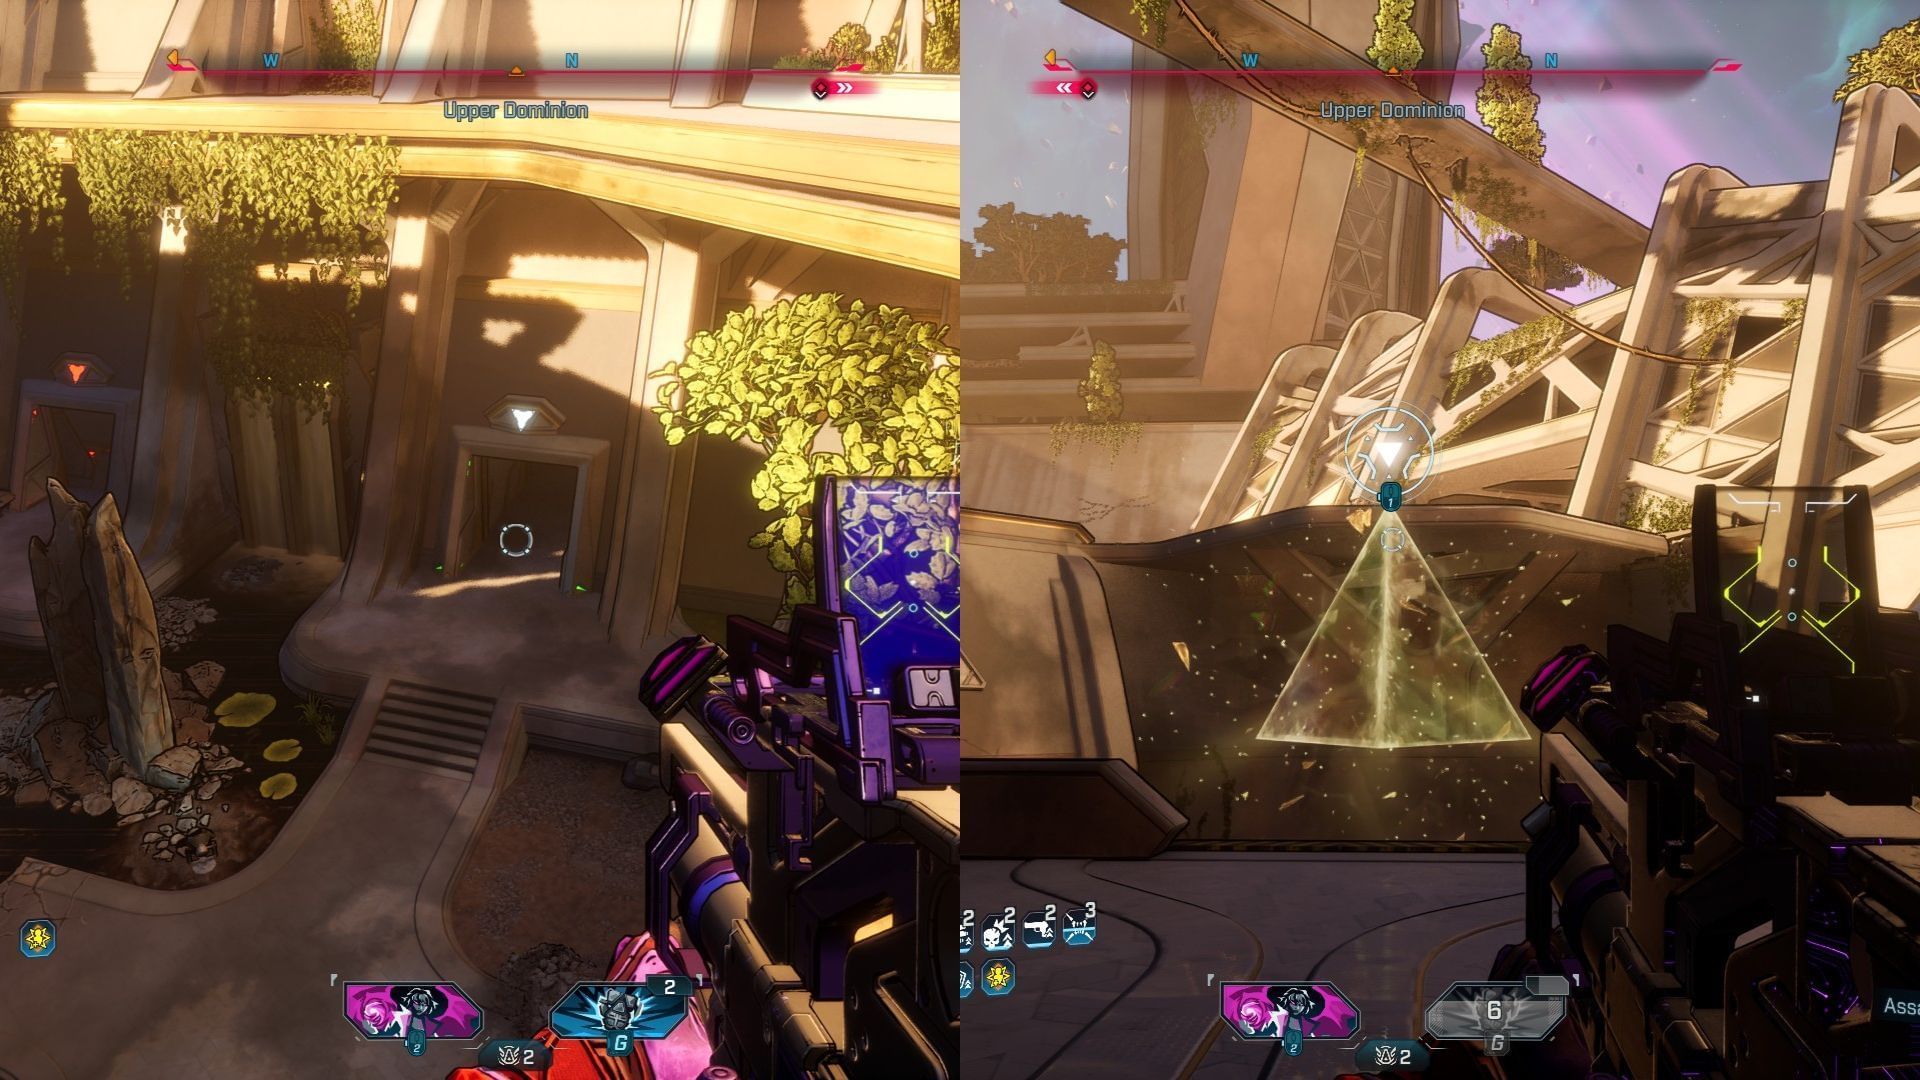
After shooting all the Burritos, make your way to the Upper Dominion, where the Timekeeper breaks the glass roof and forces you to take a different route. Make your way to the pyramid and enter the waterfall containing the Vault Symbol.
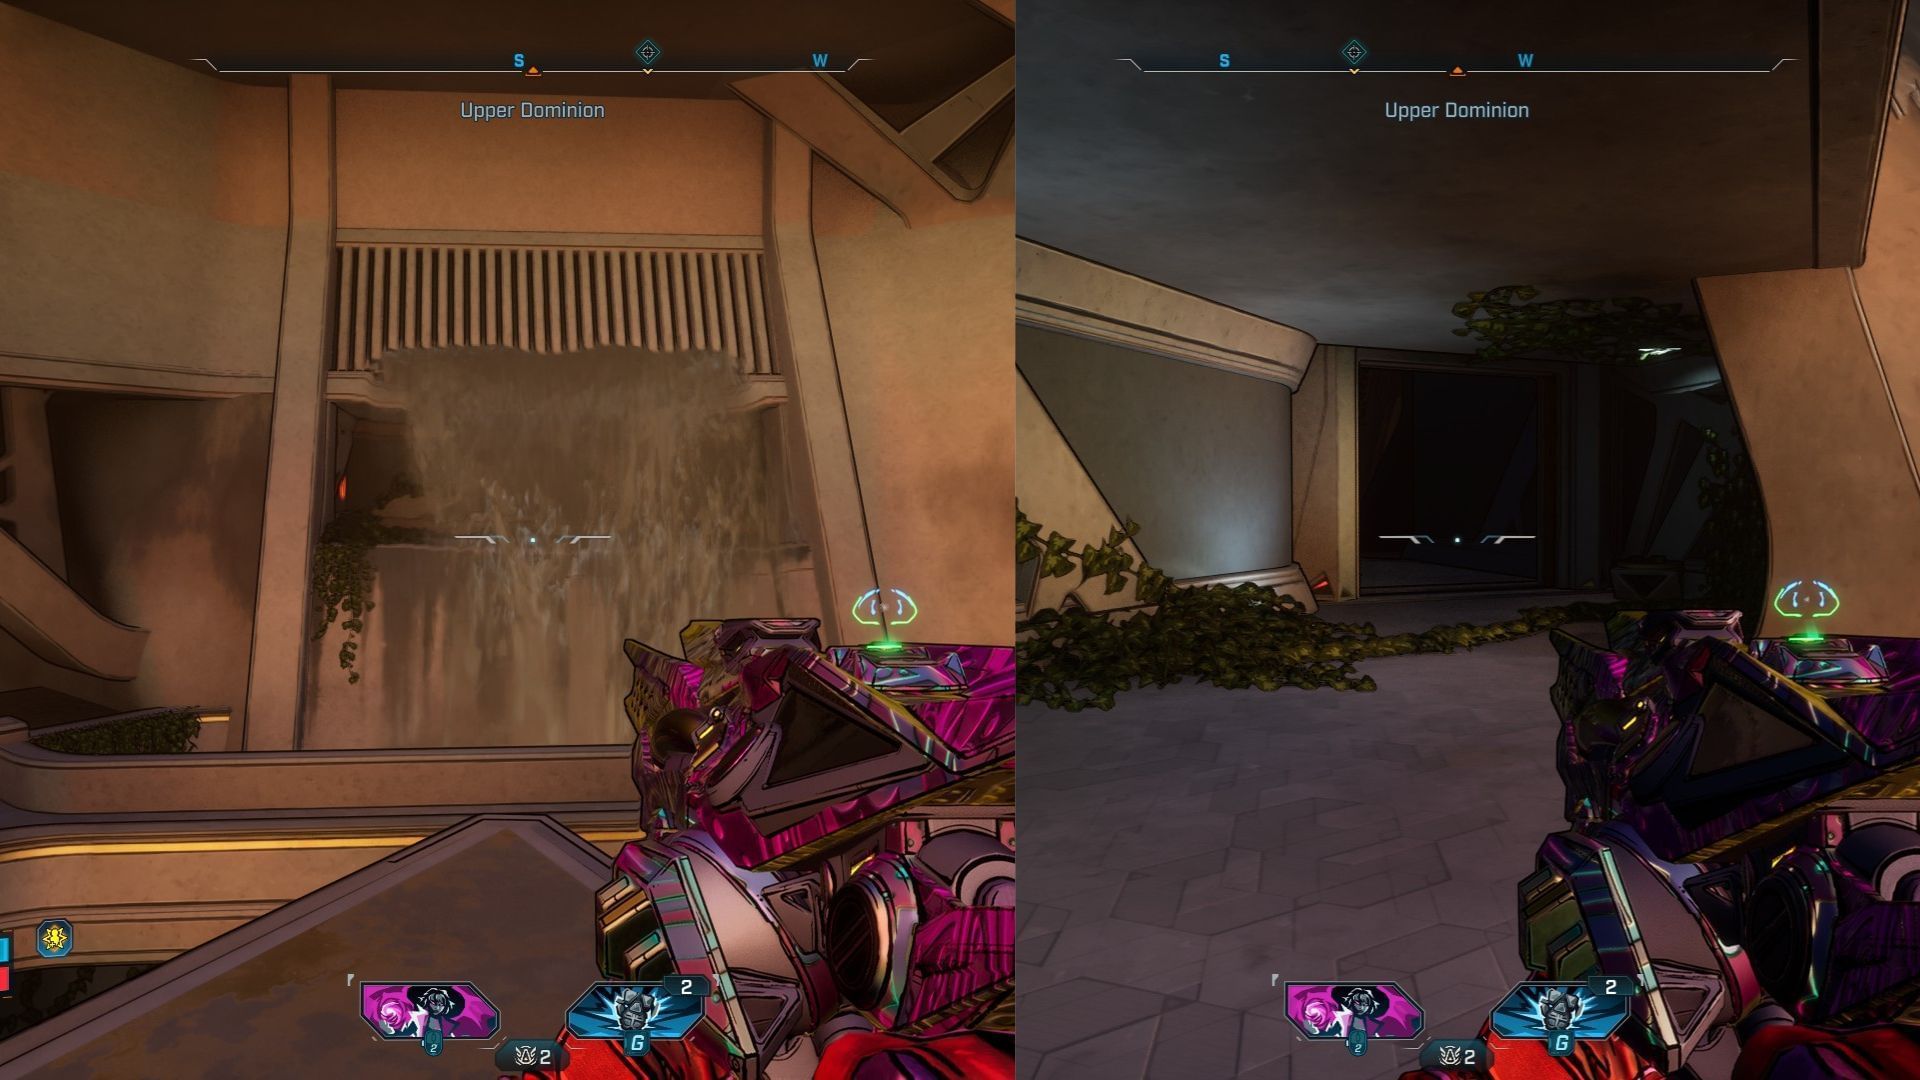
On the right side, the previously locked door will be open. Inside, you’ll find multiple loot chests along with Dave the Burrito floating in the middle. Get close to unlock the Guac is Extra trophy in Borderlands 4.
Check out other related Borderlands 4 guides and features:
- All Weapon Manufacturers in Borderlands 4
- What are Enhancements in Borderlands 4?
- Does Borderlands 4 have co-op and crossplay?
- Borderlands 4 Another Day, Another Universe walkthrough
- Borderlands 4 Rising Action walkthrough