
'%20x='0'%20y='0'%20height='100%25'%20width='100%25'%20%0A%20%20%20%20%20%20%20%20%20%20xlink%3Ahref='data:image/jpg;base64,/9j/4AAQSkZJRgABAQAAAQABAAD/2wCEAAMDAwMDAwQEBAQFBQUFBQcHBgYHBwsICQgJCAsRCwwLCwwLEQ8SDw4PEg8bFRMTFRsfGhkaHyYiIiYwLTA+PlQBAwMDAwMDBAQEBAUFBQUFBwcGBgcHCwgJCAkICxELDAsLDAsRDxIPDg8SDxsVExMVGx8aGRofJiIiJjAtMD4+VP/AABEIAAYACgMBIgACEQEDEQH/xABiAAEBAQAAAAAAAAAAAAAAAAAABAgQAAEDBAIDAAAAAAAAAAAAAAECAxIABAURBjEHEyEBAQEAAAAAAAAAAAAAAAAAAAQFEQACAwACAwAAAAAAAAAAAAABAgMEEQAFBjFh/9oADAMBAAIRAxEAPwDPKM1xDHY122c4tbupbsW/dJyQXFUtx0NqJAEuwmqLTHeO12rClcaZWS0glSpyPzs6WBulKgdnYnpVabQSMhkUlzu6d+8F5DangbI2C5MQMUesHP/Z'%3E%3C/image%3E%3C/svg%3E)
Roblox is popular for the variety of games it has to offer. Every game on the platform is made by its users.
In addition to games, players can also create outfits on Roblox and showcase their creations to the world. The platform allows users to design clothes and sell them to others for a price.
You need a Roblox account and some Robux to make a piece of clothing on the platform
This article will cover how you can make a shirt on Roblox. The process of making other pieces of clothing is largely the same. The only major difference is you have to choose between shirts, T-shirts, or pants in the "Clothing" section of the platform
How to begin creating a shirt in Roblox
Before designing a shirt, you need to have a Roblox account and some Robux, the in-game currency used by players to buy accessories, clothes, and skins from the avatar shop.
You should have a minimum of 10 Robux to upload servers. After creating a Roblox account, log in to the platform, and click on the “Avatar” option on the left side of the screen. An Avatar Editor page will appear. You can now create your avatar.
Click on the “Clothing” option on the top-right corner of the screen and then on “Shirts” to get the template. Press the “Create” button on the right side of the screen, and a new page will open up with the “Create a Shirt” option at the top. Click on it.
How to choose a shirt and download a template
On the “Create a Shirt” page, players will see a “Do you see the template? If not, download it here” message in the middle of the screen.
Click on the “Download it here” option, and a template will appear on the screen. The template will initially seem a little confusing, as shown in the image below.
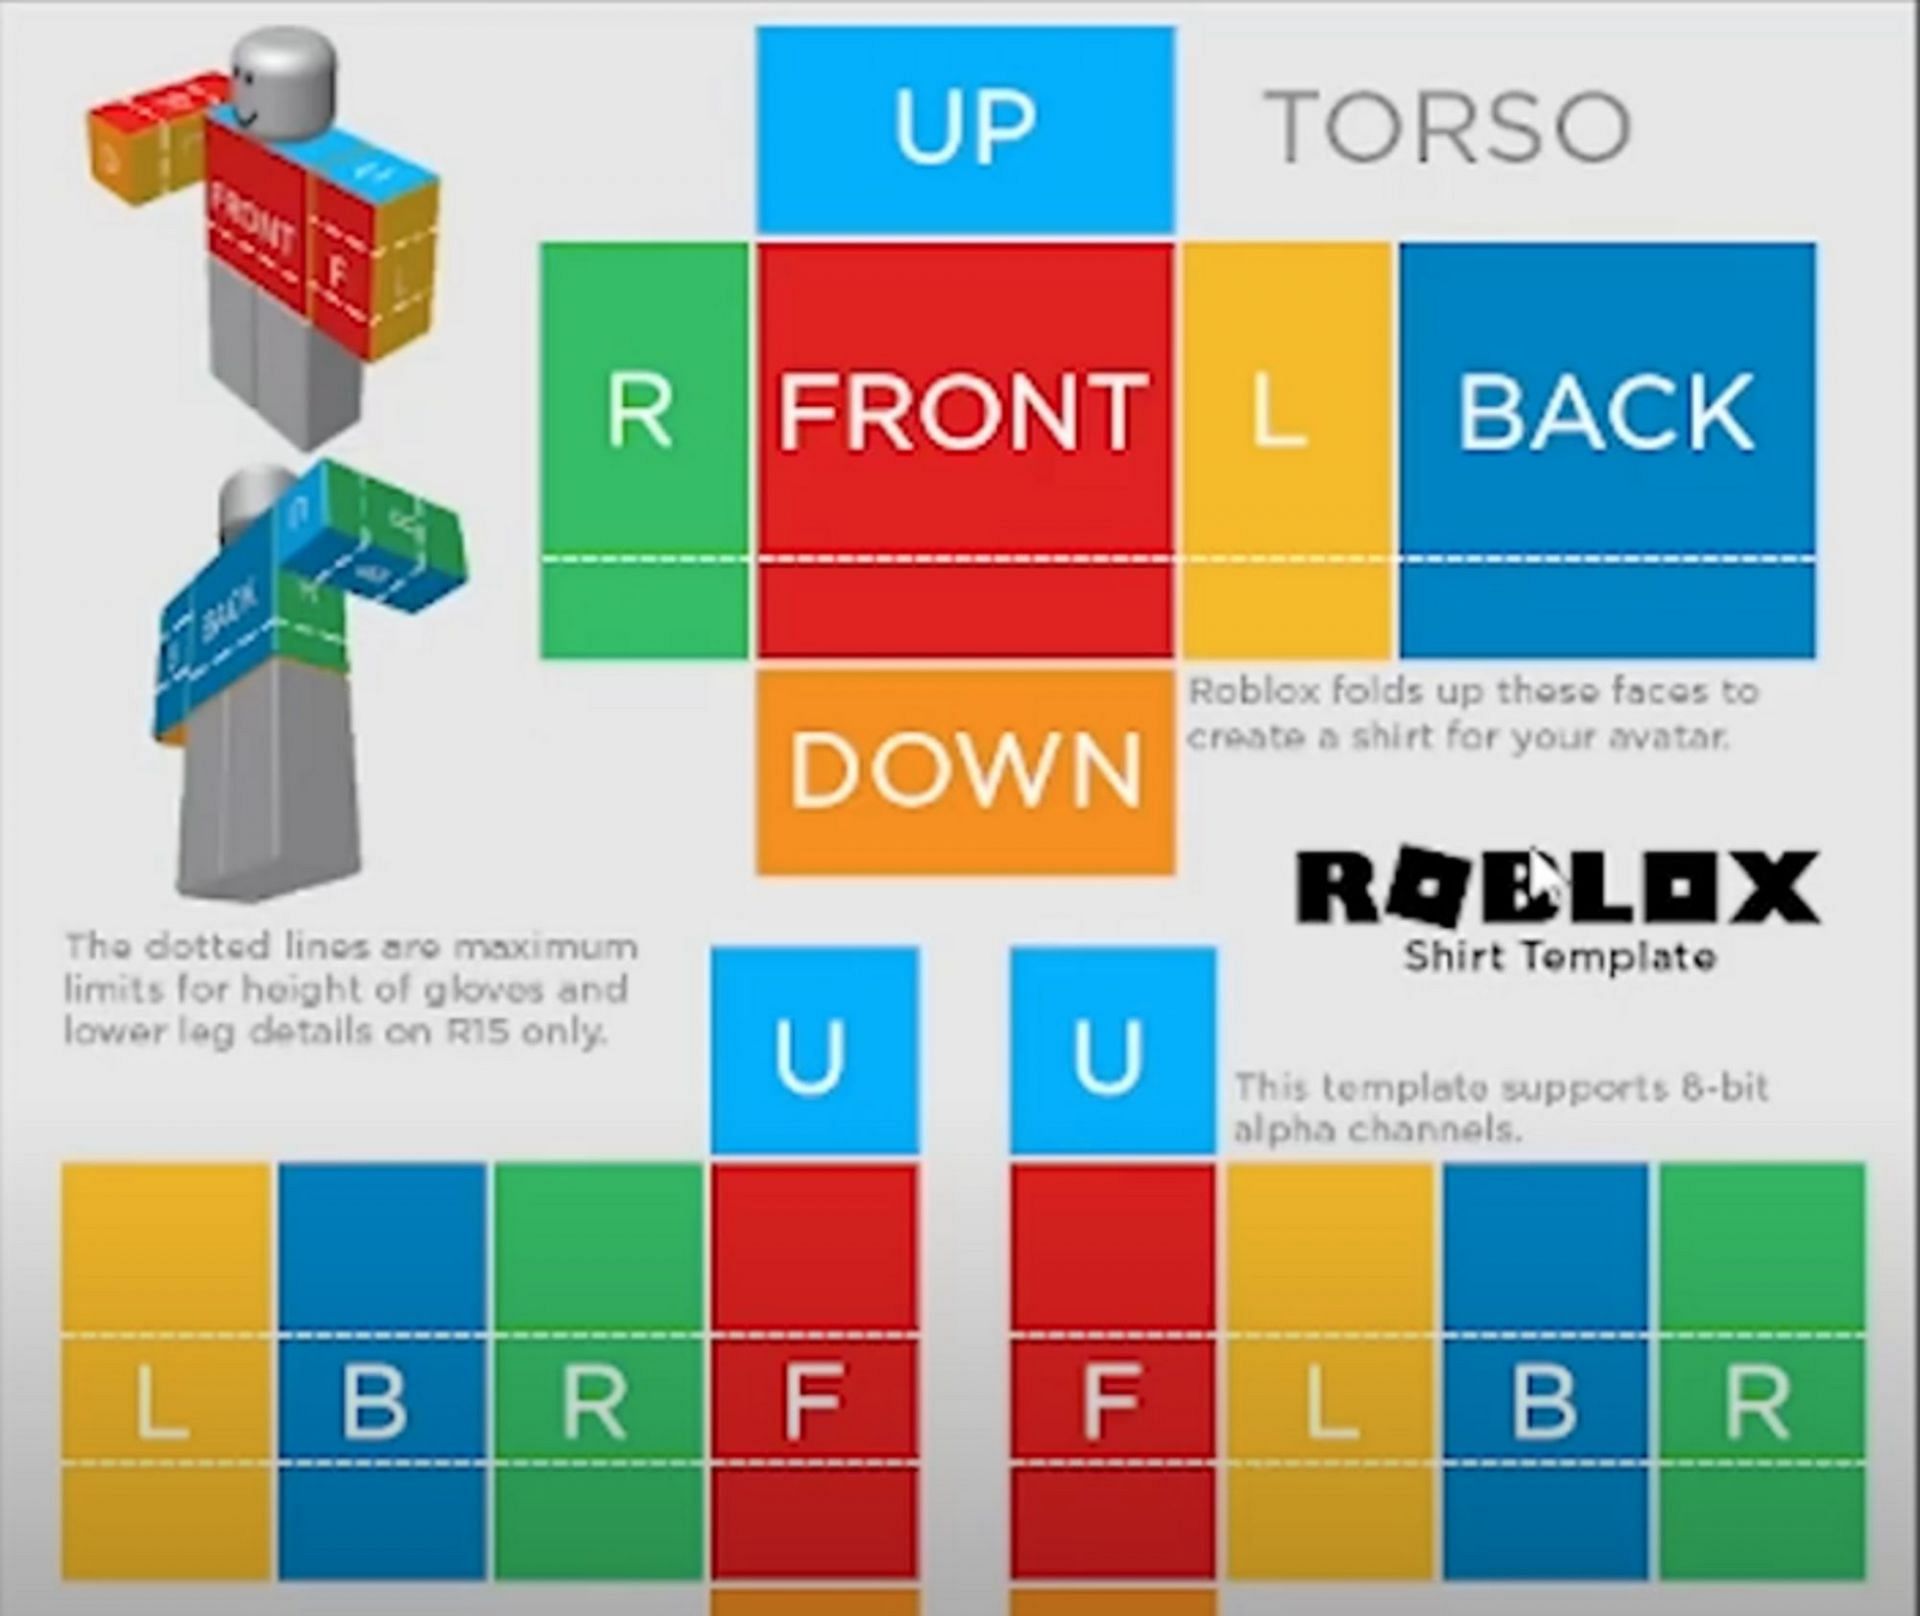
To download the template, right-click on the image and select the “Save image as” option to save it.
You can use any third-party app to design the image. After designing it, save it by clicking on the “File” option and then “Save.”
How to upload and sell the shirt
After updating the template, it’s time to upload it. To do this, you will have to go back to the Roblox page, where you will see a green-colored button that says “Upload for 10 Robux.” Click on the “Choose File” option and open the file that has the template.
The “Shirt Name” option will be visible below it. You can name the shirt anything that you like or wish. After you've named it, click on the “Upload” button. A confirmation pop-up will appear on the screen. It reads, “Would you like to upload your shirt for 10 Robux?”.
Once finished, the shirt's name and an icon will appear under the "Shirts" title. The shirt's image will initially only have a piece of paper with a dotted outline. This indicates that Roblox is reviewing the shirt to ensure that it is appropriate for release. This can take a few hours.
Once you've received approval, find the created shirt and click the down arrow next to the gear icon. Choose "Configure" from the list of options instead of "Advertise." You will be taken to the "General" tab, where you can confirm that the clothing you want to sell is the one you're dealing with.
When you click on the "Sales" option in the "General" tab, the "Configure shirt" page will appear with a toggle button to the right of the "Items for sale" line.
Upon clicking on the toggle bar, it will turn green, and a pricing screen will appear. You can now enter the price you want your clothing to have. Don’t make the price too high, or else only a few people will buy it. Don’t make it too cheap, either.
After deciding on the price, click on the “Save” option. If everything goes well, a green bar that says, “Successfully Updated,” will appear. That’s it. Your shirt has now been made. It is ready to be purchased and downloaded by other Roblox users.

Check out this A-Z list of all of our Roblox Codes 2025