'%20x='0'%20y='0'%20height='100%25'%20width='100%25'%20%0A%20%20%20%20%20%20%20%20%20%20xlink%3Ahref='data:image/jpg;base64,/9j/2wBDAAYEBQYFBAYGBQYHBwYIChAKCgkJChQODwwQFxQYGBcUFhYaHSUfGhsjHBYWICwgIyYnKSopGR8tMC0oMCUoKSj/2wBDAQcHBwoIChMKChMoGhYaKCgoKCgoKCgoKCgoKCgoKCgoKCgoKCgoKCgoKCgoKCgoKCgoKCgoKCgoKCgoKCgoKCj/wgARCAAGAAoDASIAAhEBAxEB/8QAFQABAQAAAAAAAAAAAAAAAAAAAAX/xAAUAQEAAAAAAAAAAAAAAAAAAAAE/9oADAMBAAIQAxAAAACPXDB//8QAHxAAAgEEAgMAAAAAAAAAAAAAAQIDAAQFERUkUmJx/9oACAEBAAE/AOdvY8zjY1k6zQPN7EJrYP0Gnv5y7EO+ifKv/8QAGBEAAgMAAAAAAAAAAAAAAAAAAAECBBL/2gAIAQIBAT8Auyej/8QAFxEBAAMAAAAAAAAAAAAAAAAAAQACEv/aAAgBAwEBPwCgZJ//2Q=='%3E%3C/image%3E%3C/svg%3E)
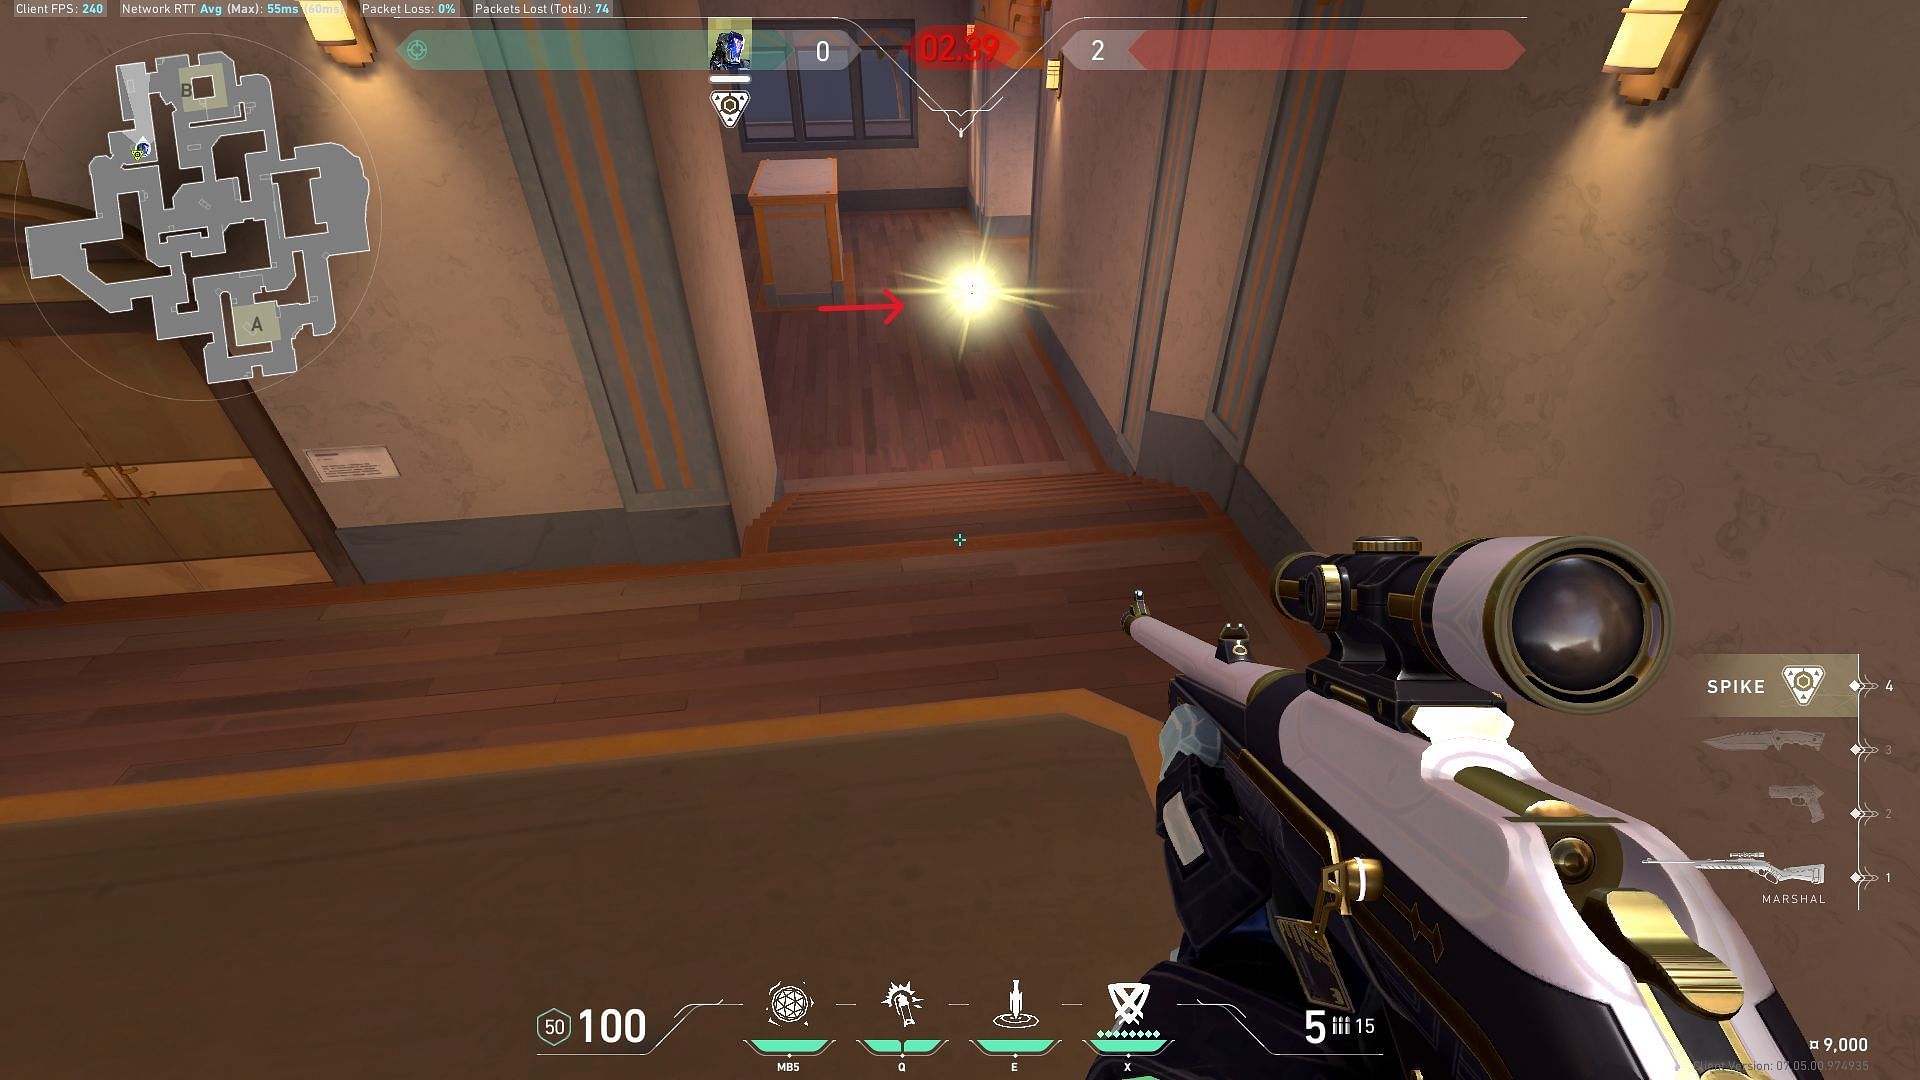
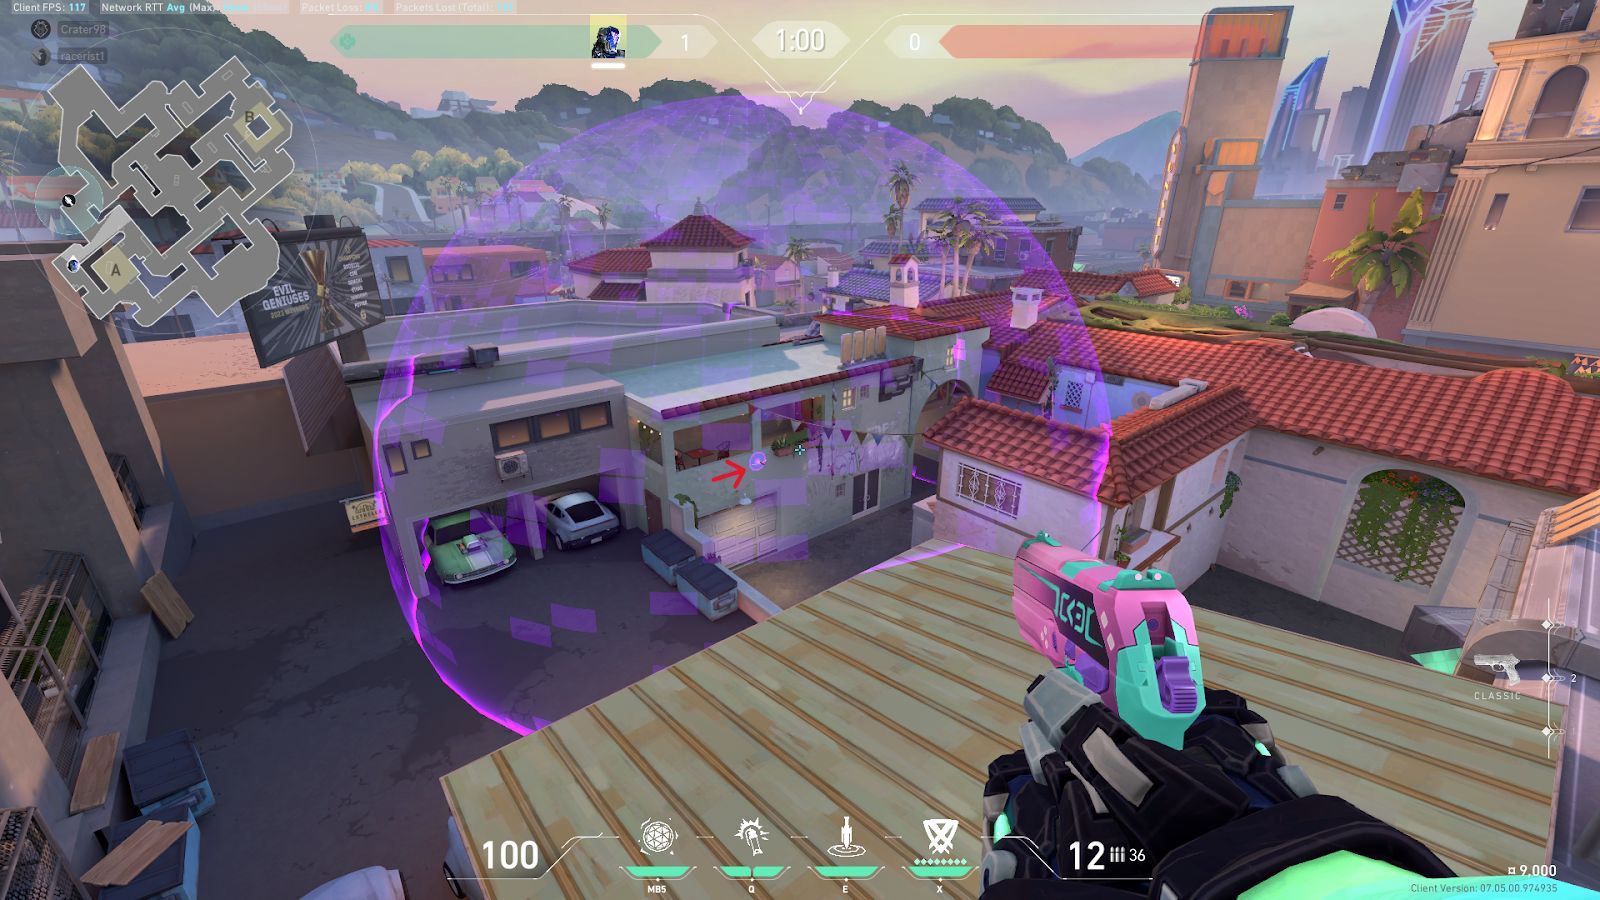
Valorant just released Episode 7 Act 2, which brought significant changes to the abilities of a few Agents and debuted the new Sunset map. Based on the city of Los Angeles, Sunset has a simple layout with two spike plant sites and a three-lane structure toward Mid. Due to its tight corners and small entryways, the map strongly favors Initiators.
In the world of Valorant, information is key. And when it comes to gathering crucial intel, KAY/O is one of the best choices suited for this job. The Sunset map offers ample opportunities for KAY/O enthusiasts to experiment with various strategies, deploying lineups to suppress and outwit their enemies, ultimately turning the fight in their favor.

Valorant KAY/O’s complete abilities in the Sunset map
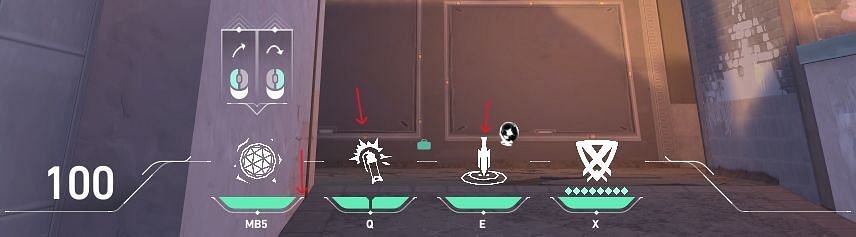
KAY/O is one of the top choices for Initiators in Valorant. His kit contains a variety of abilities that allow his team to win combats on the map. These abilities include
- FRAG/ment: Equip an explosive fragment. Explodes and inflicts damage on landing.
- FLASH/drive: Equip a flashbang grenade. Blind enemies on popping.
- ZERO/point: Equip a suppressor blade. Neutralizes enemy abilities when affected.
- NULL/cmd: Ultimate ability. It covers a large area where enemies' ability gets canceled.
This article digs deep into the proper utilization of KAY/O’s abilities in Valorant's new map, Sunset.
Attacking:
A) ZERO/point blade lineups in the Sunset map
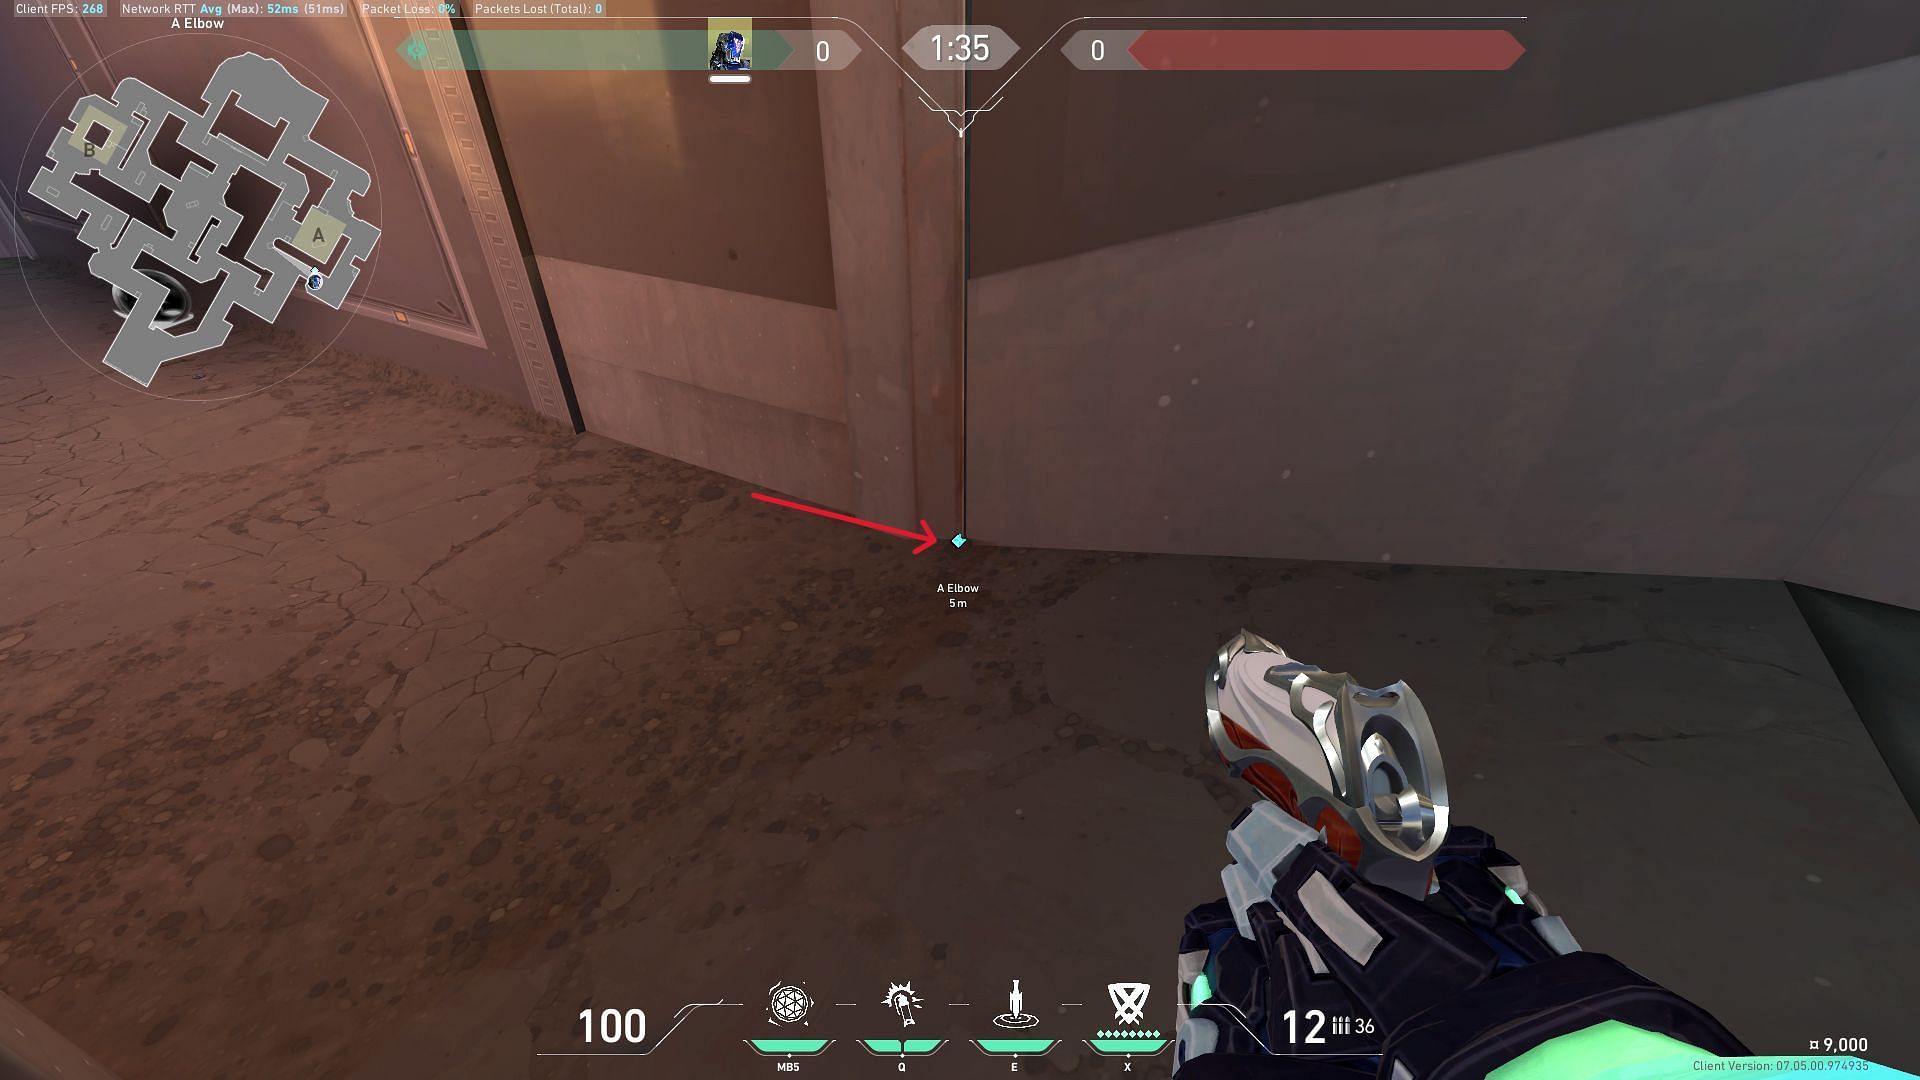
1) A-site ZERO/point blade lineup
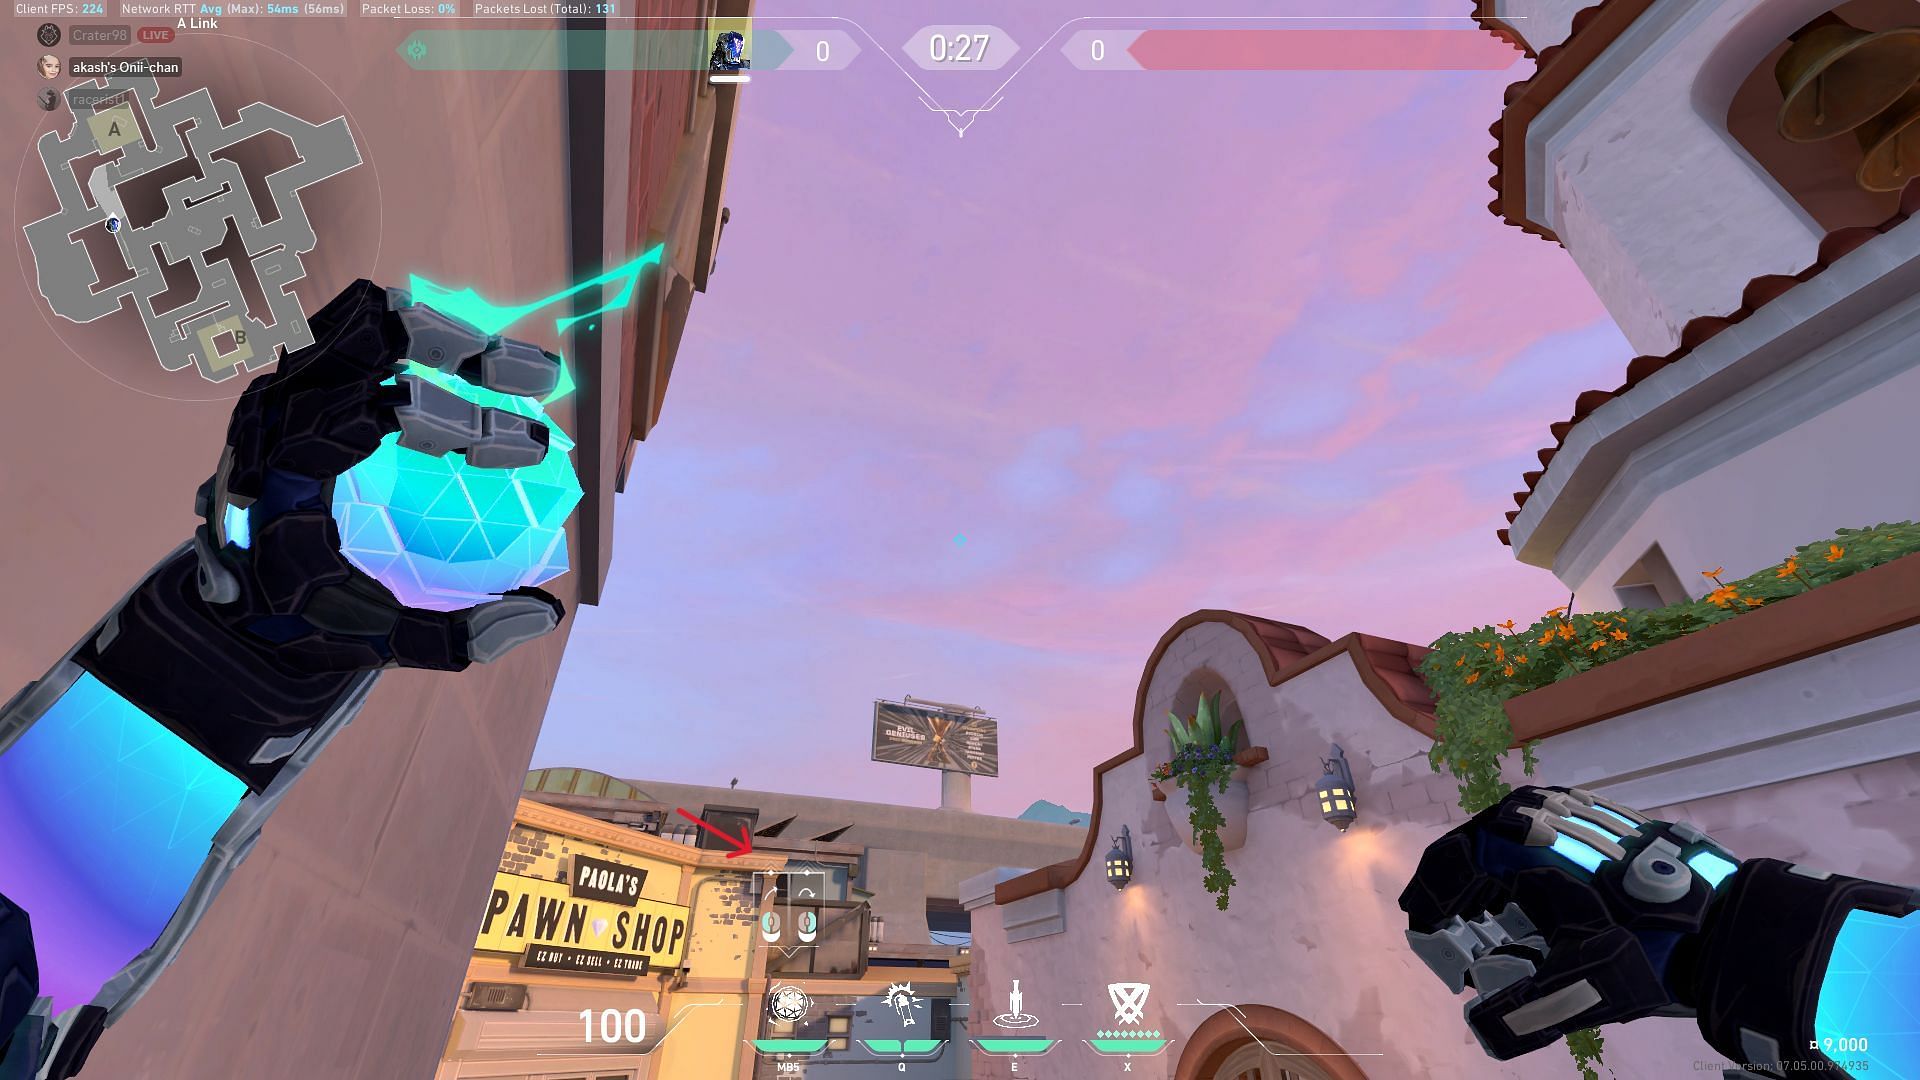
This ZERO/point lineup can be used at the start of the round while attacking in Valorant's Sunset map to gather intel and prevent the enemy from flashing your team on A-main.
For this lineup, you must position yourself on the wall on your right at A-lobby. Equip KAY/O's suppressor blade and place your crosshair as marked in the above images. Left-click to fire, and the blade will land at the corner of the A-elbow, exposing and suppressing the enemies peeking from A-main.
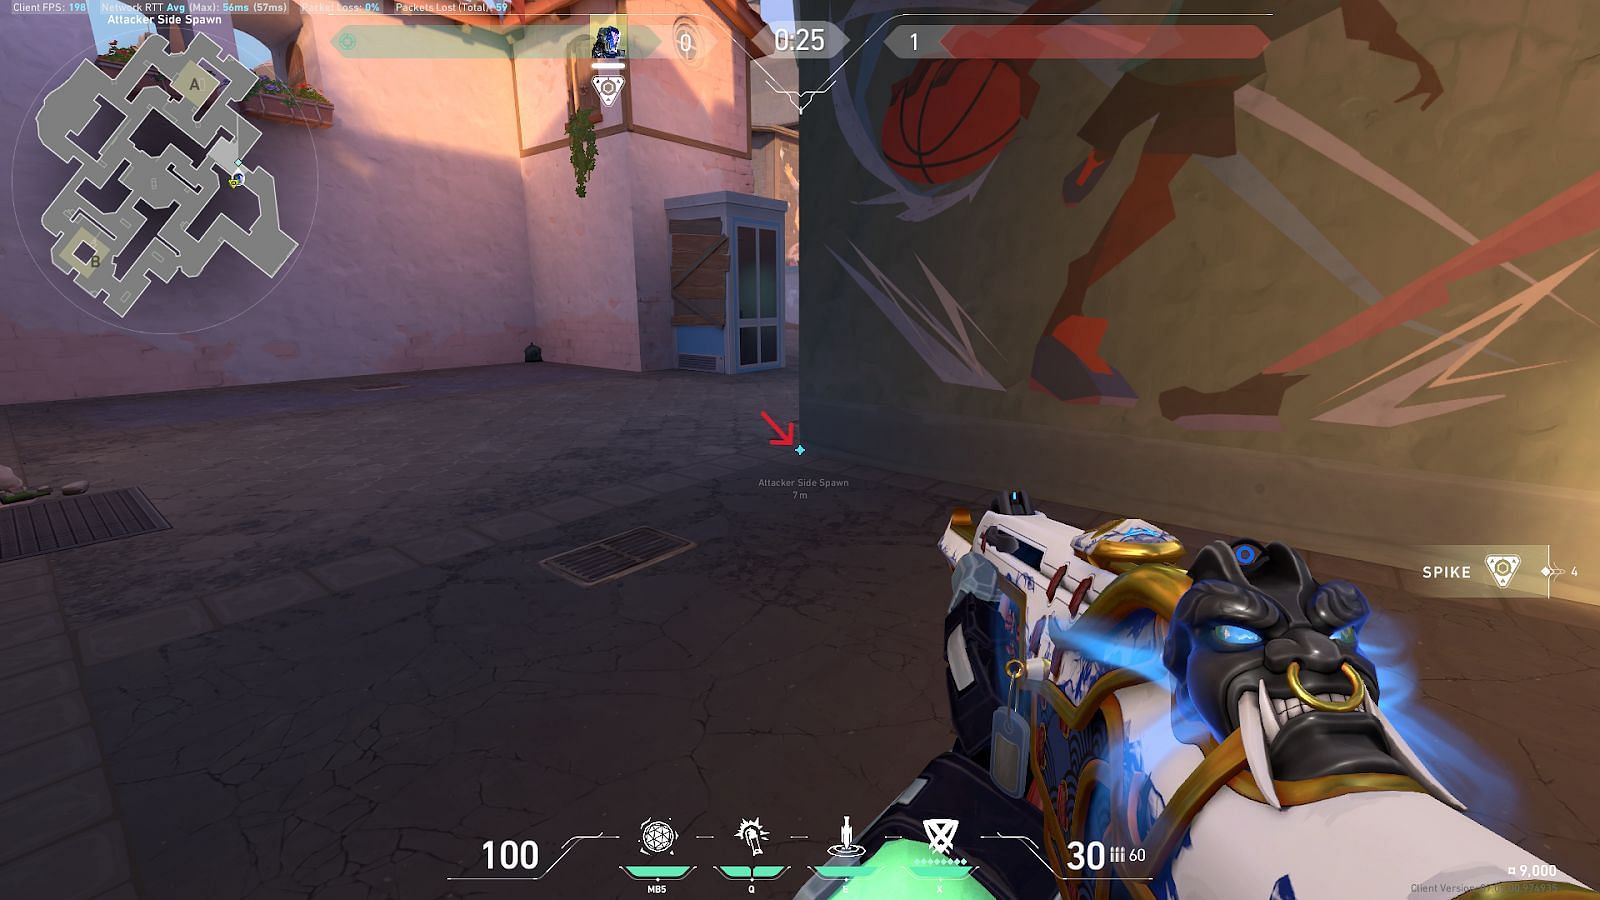
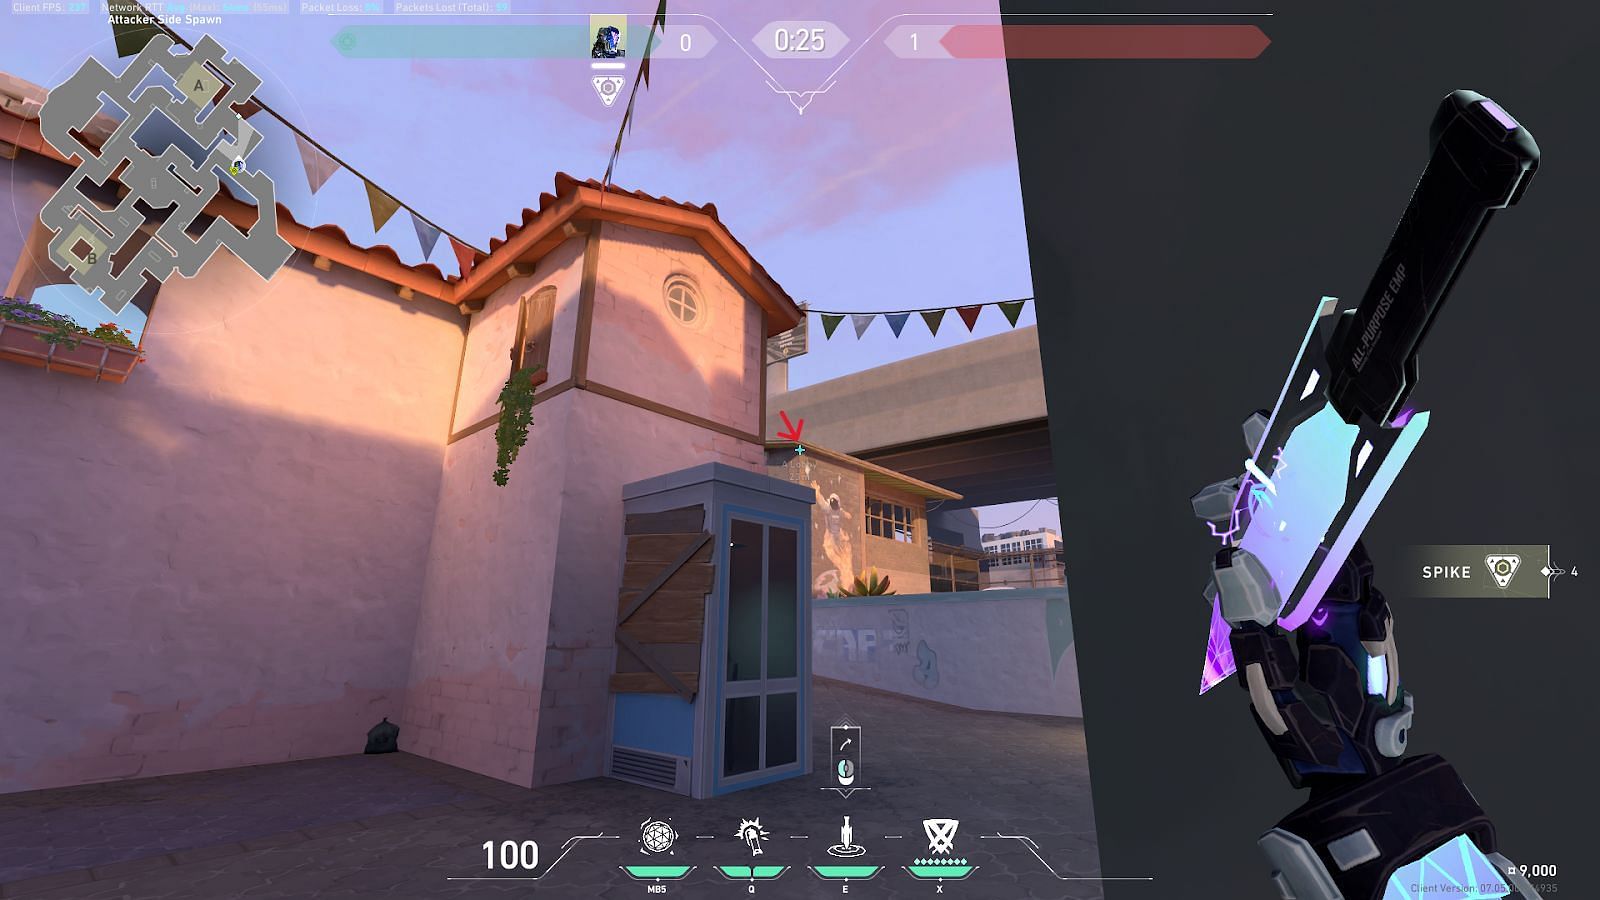
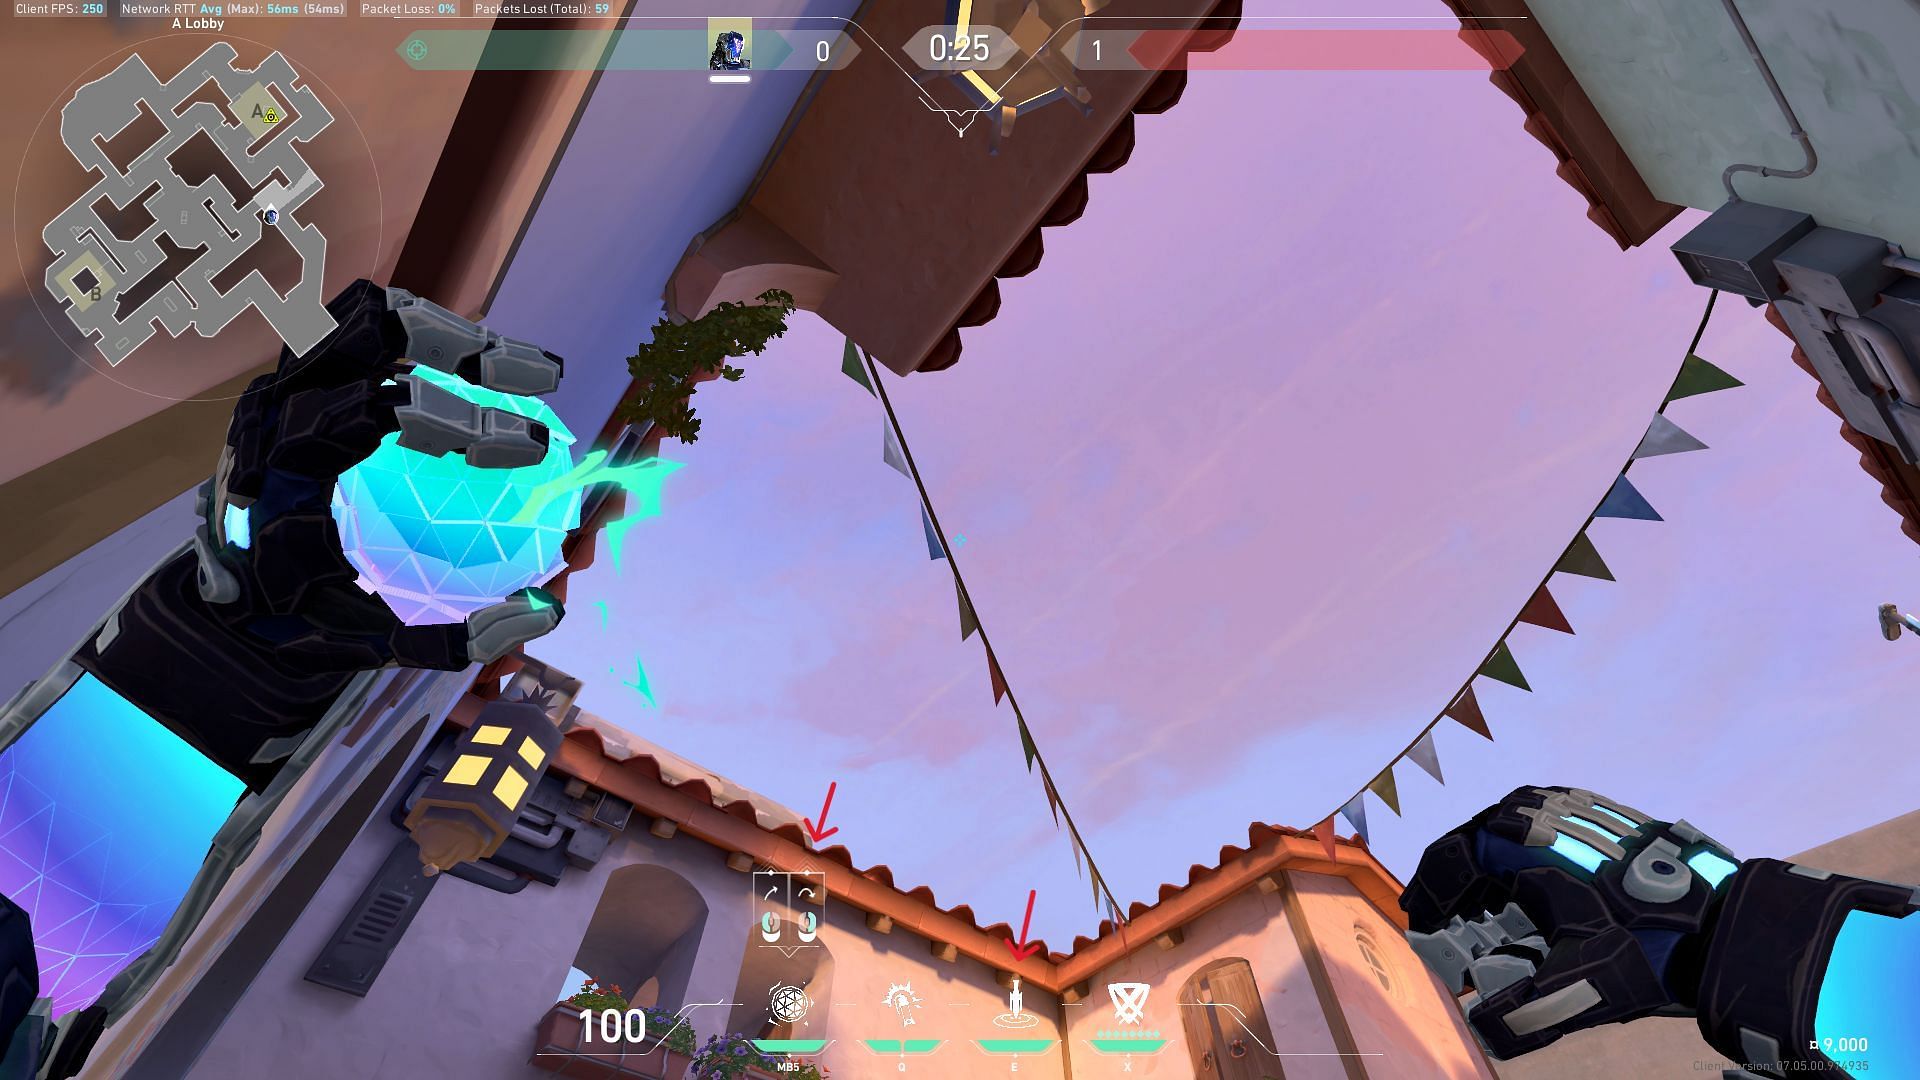
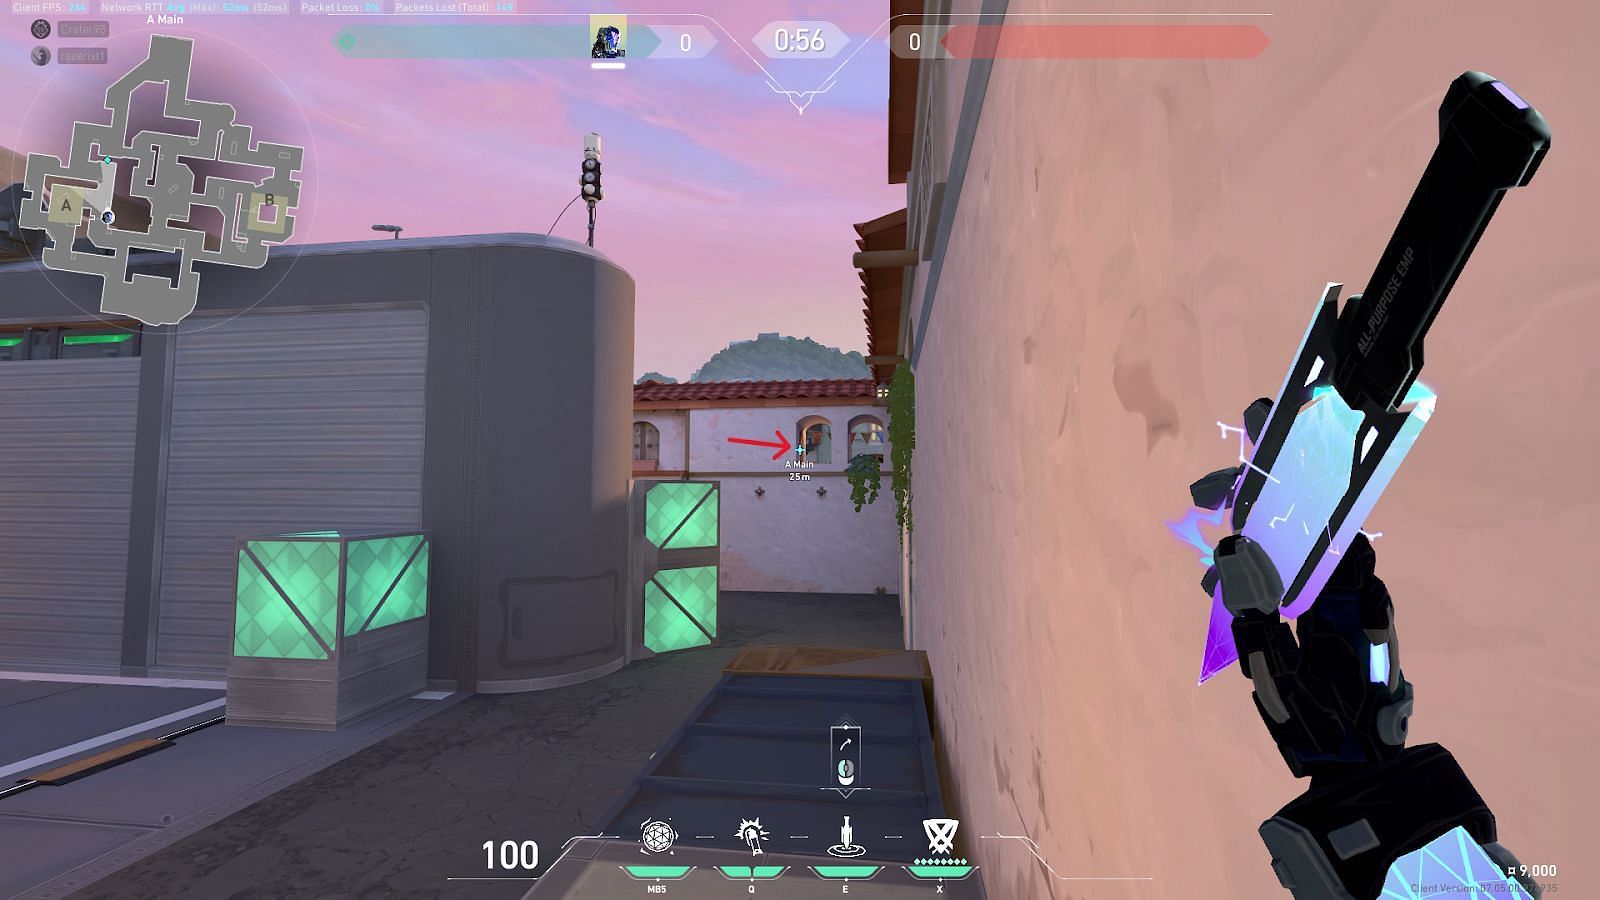
2) A-site ZERO/point blade second lineup
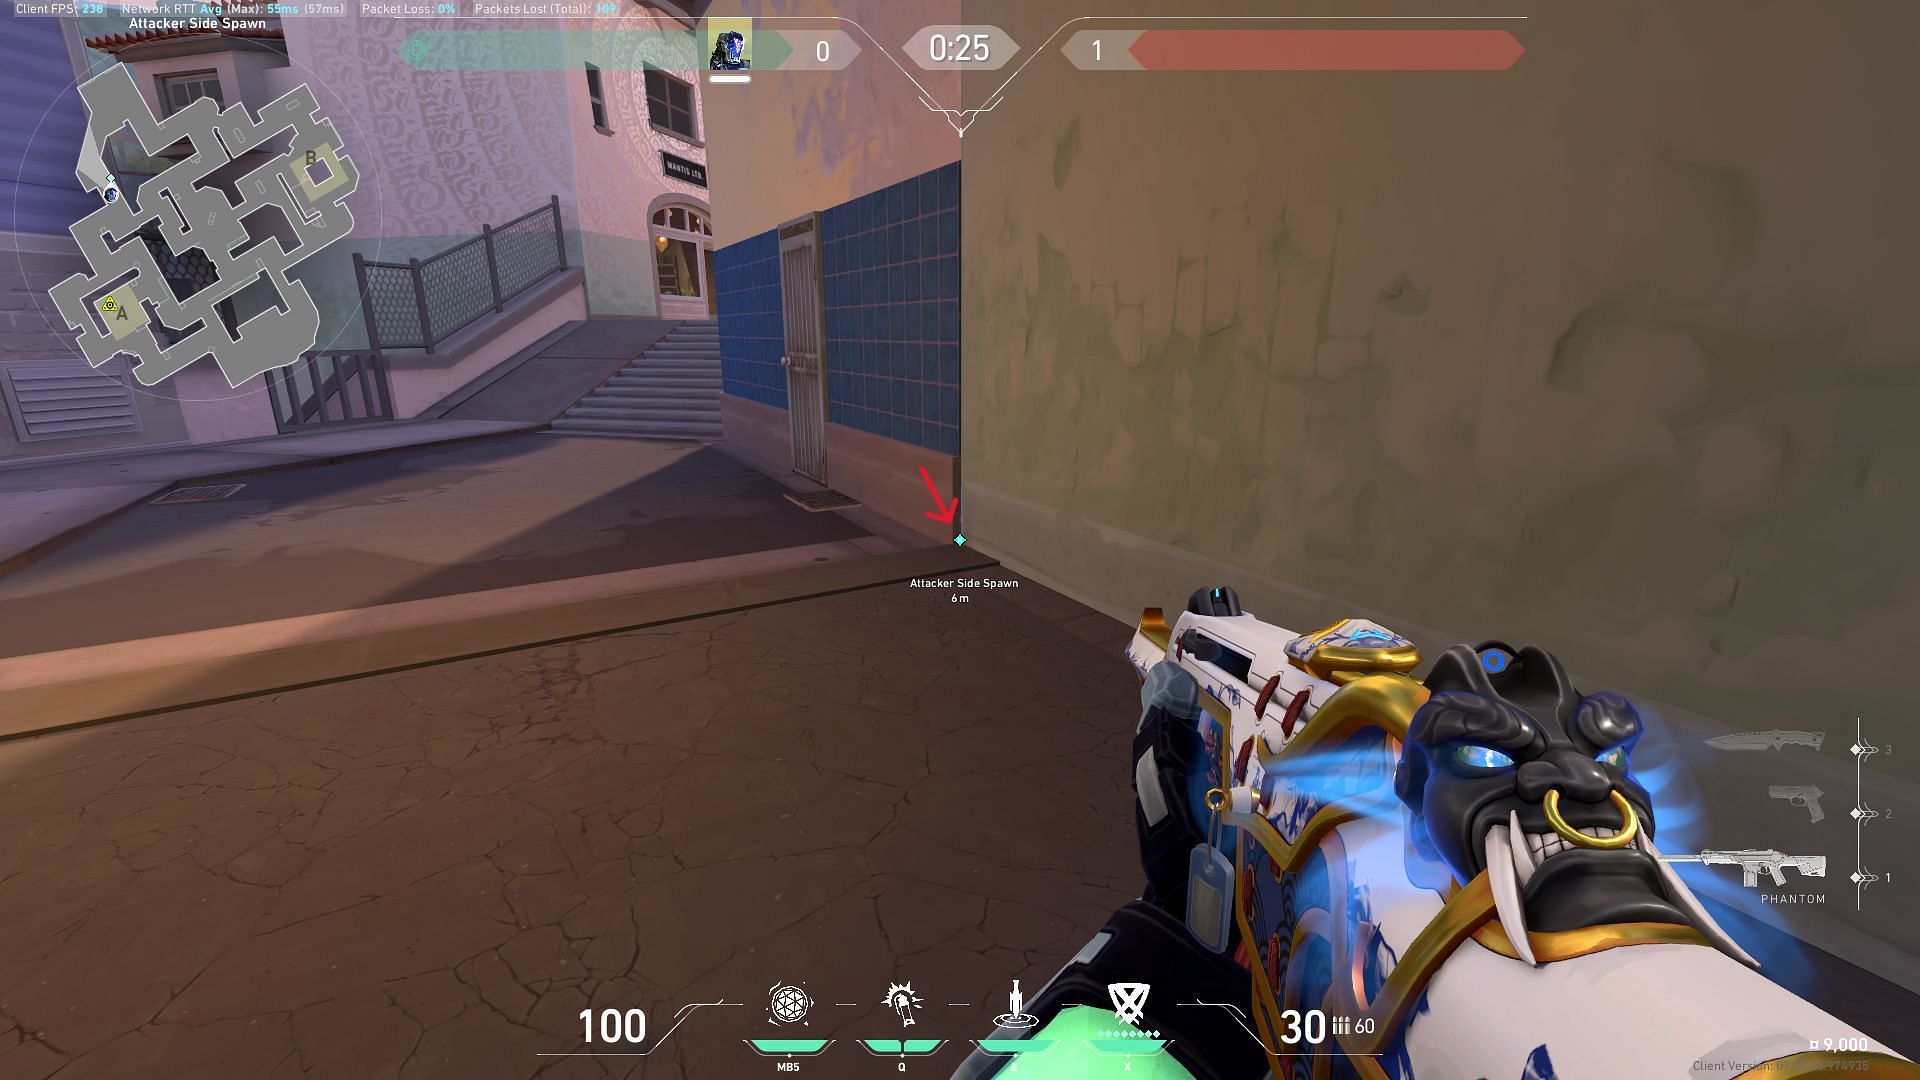

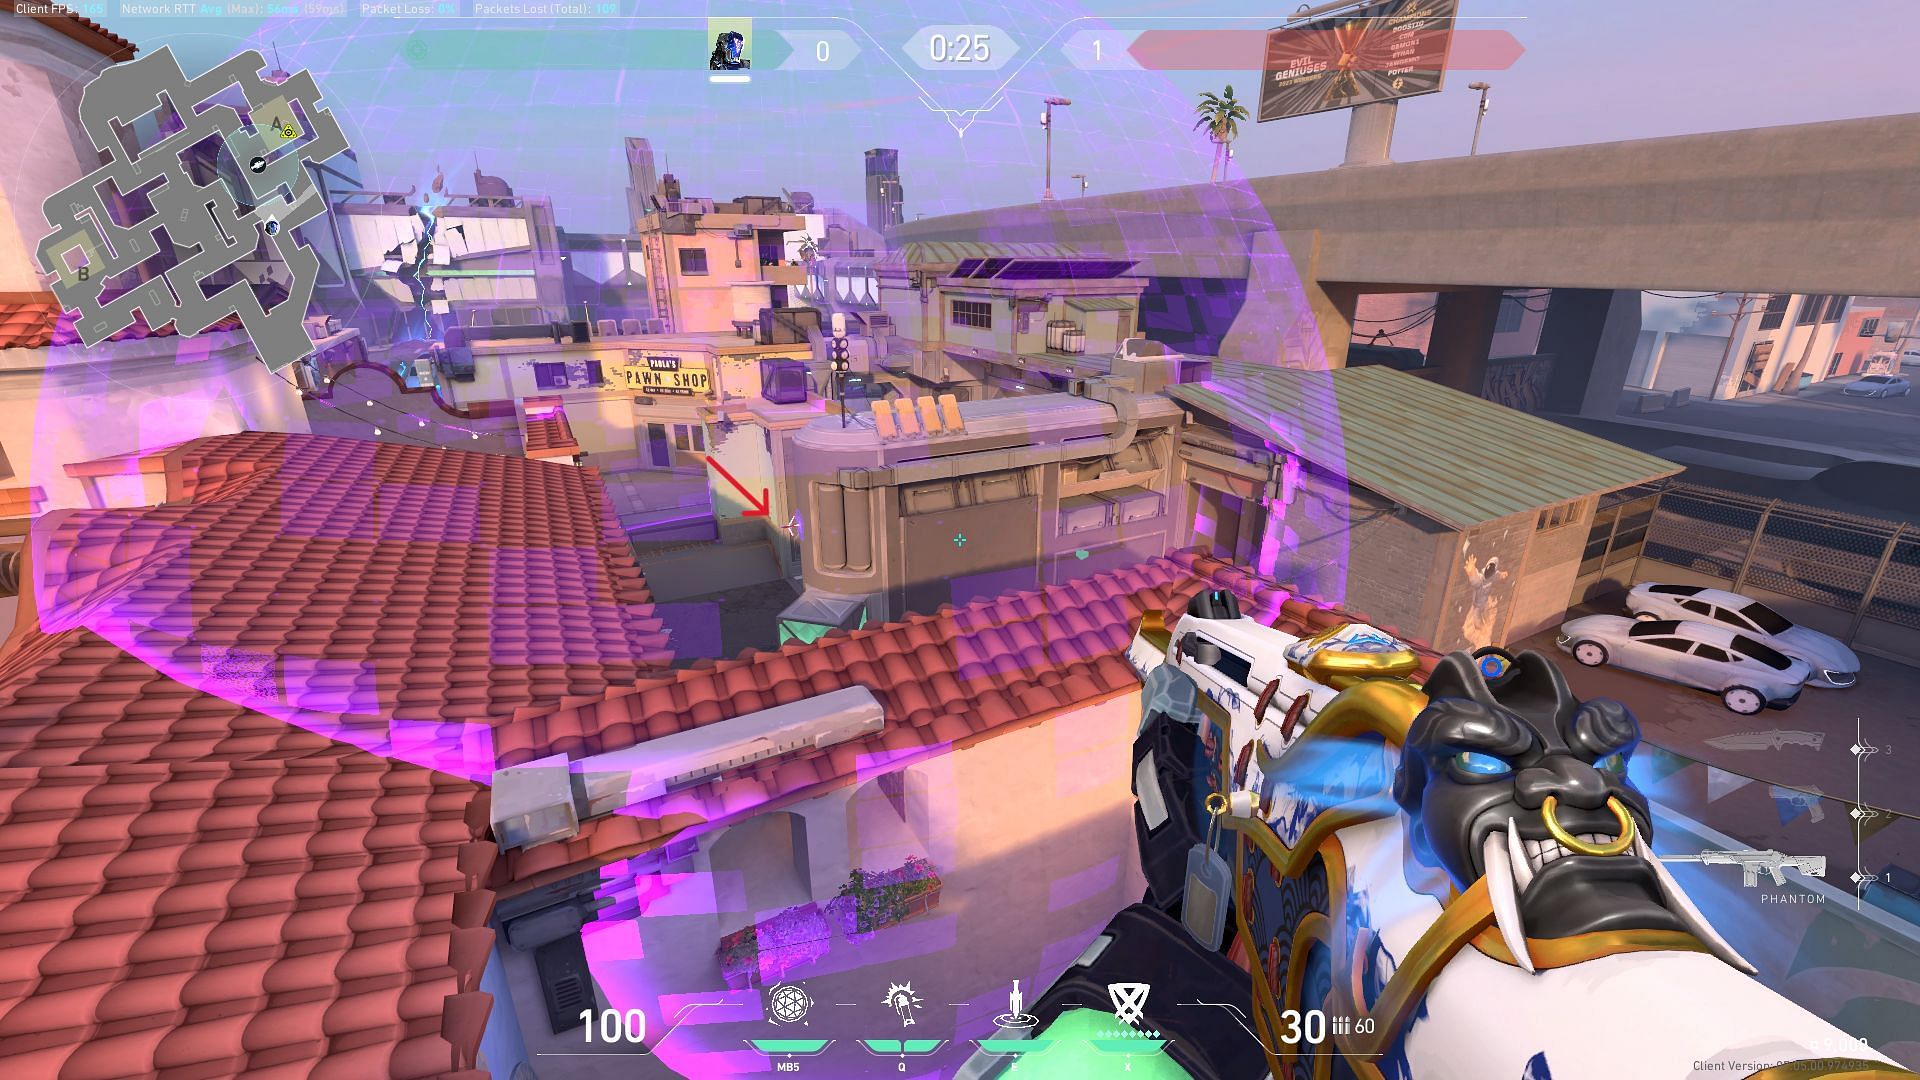
This is another ZERO/point lineup to suppress enemies peeking from A-main Valorant's new map, Sunset. For this lineup to work, you must position yourself on the wall on your left at the end of the Attacker’s Spawn, as indicated in the above image.
Equip the ZERO/point blade and place the crosshair as marked in the image. Make sure to position it accurately, as it will affect the projectile of the blade. Left-click to fire so it will prevent the enemies within the affected area from flashing abilities at A-main.
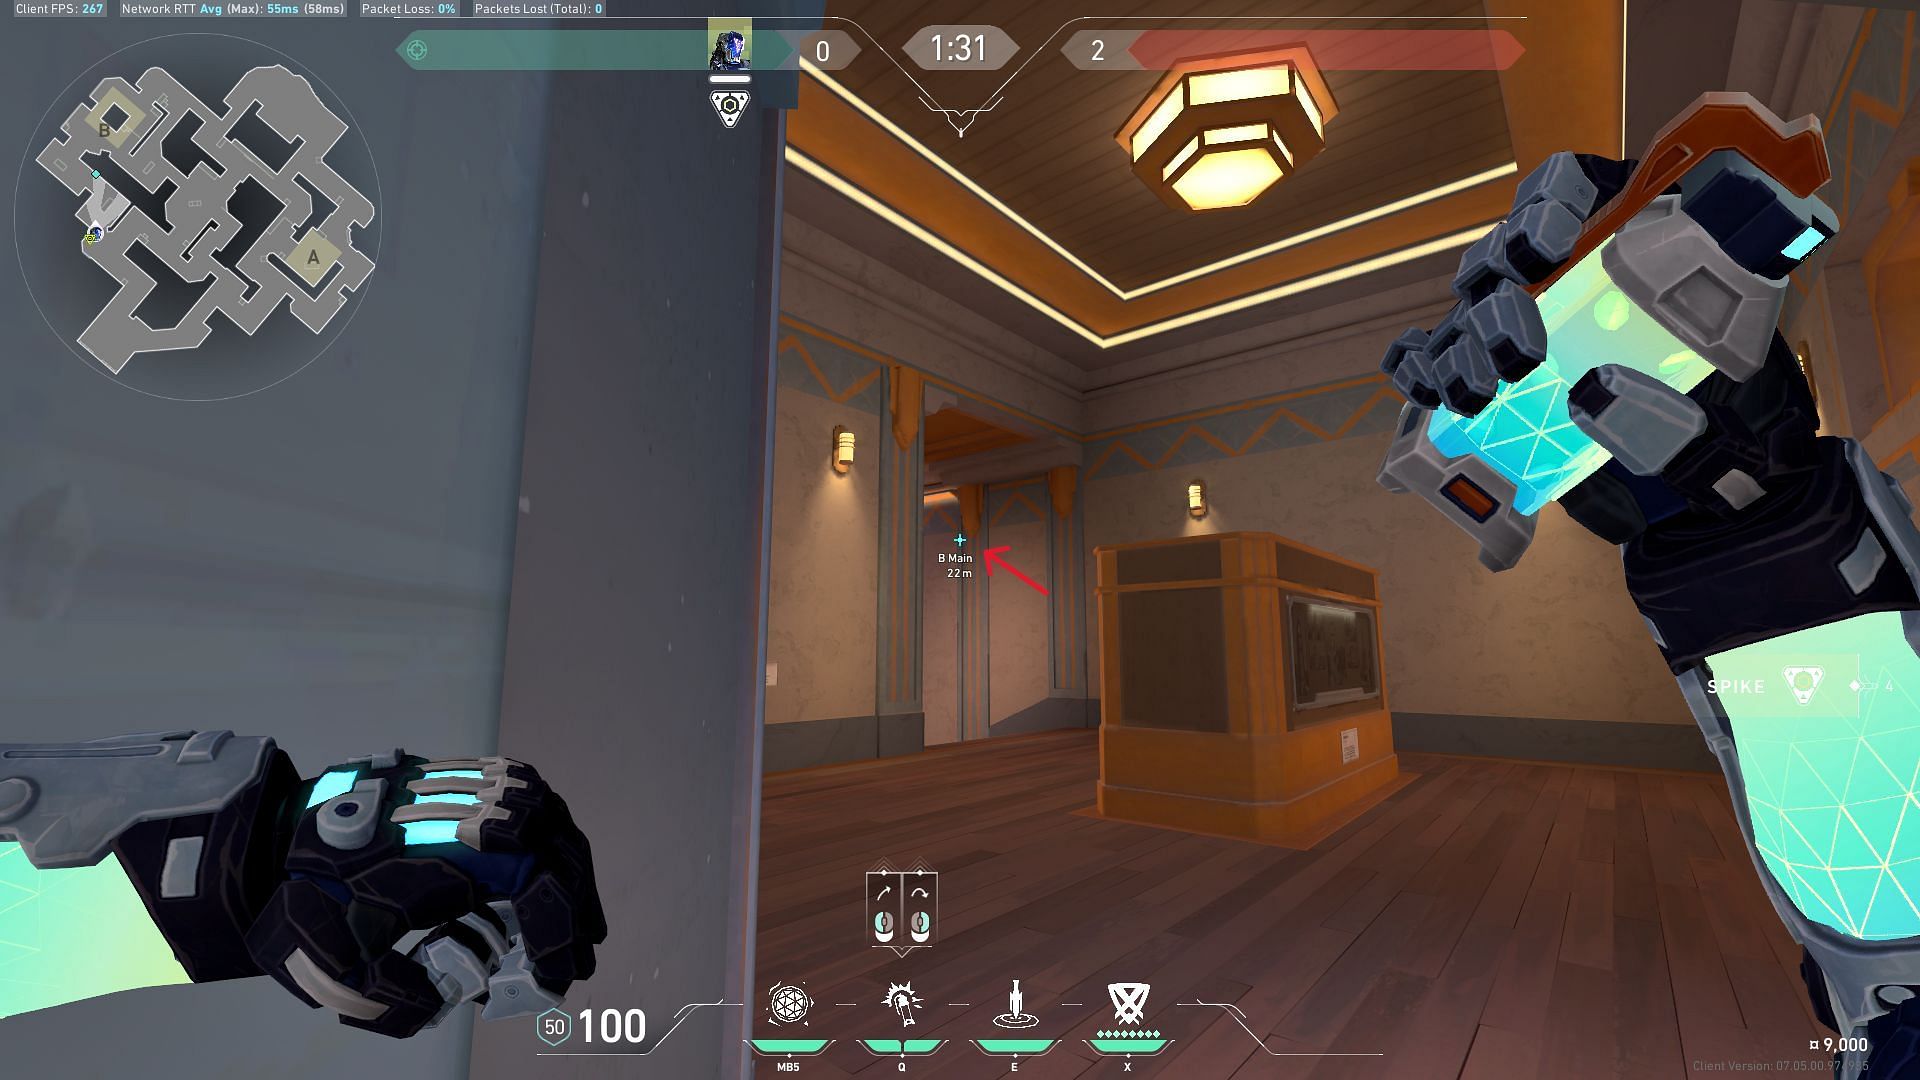
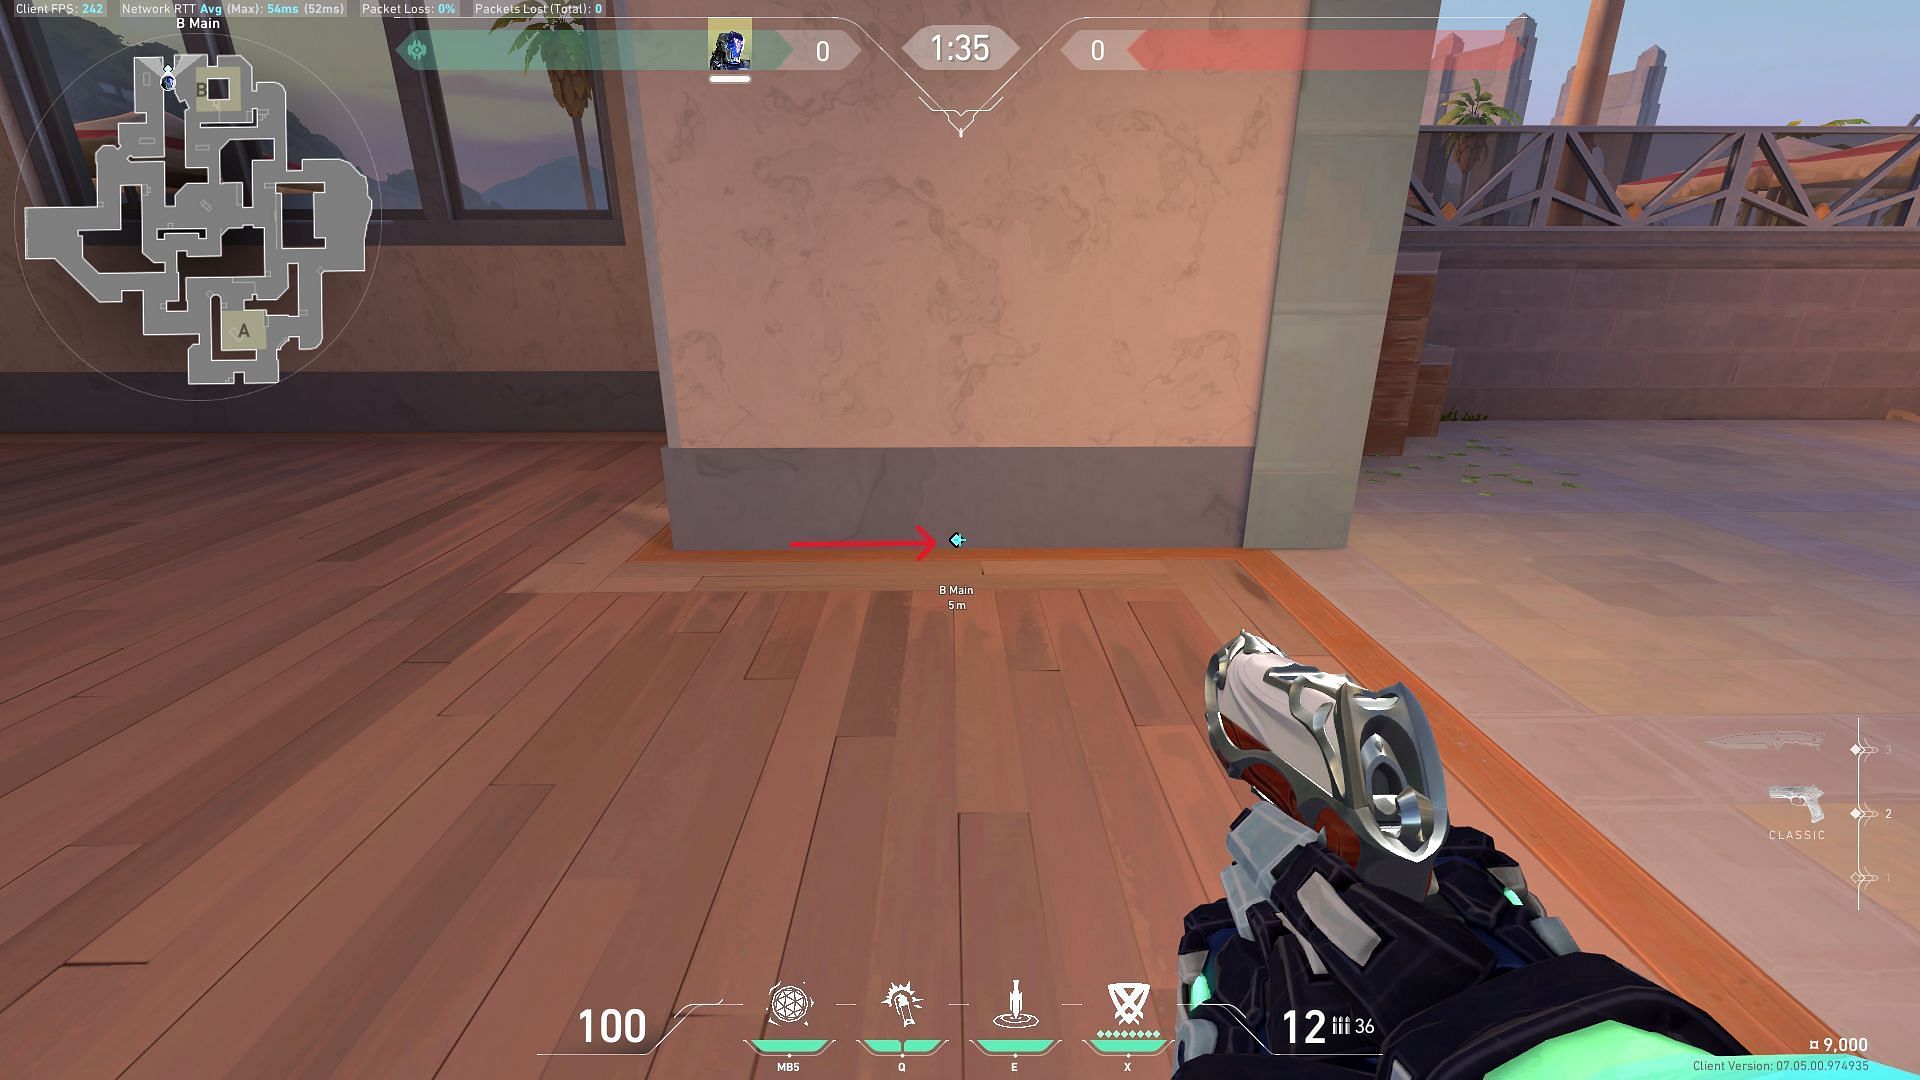
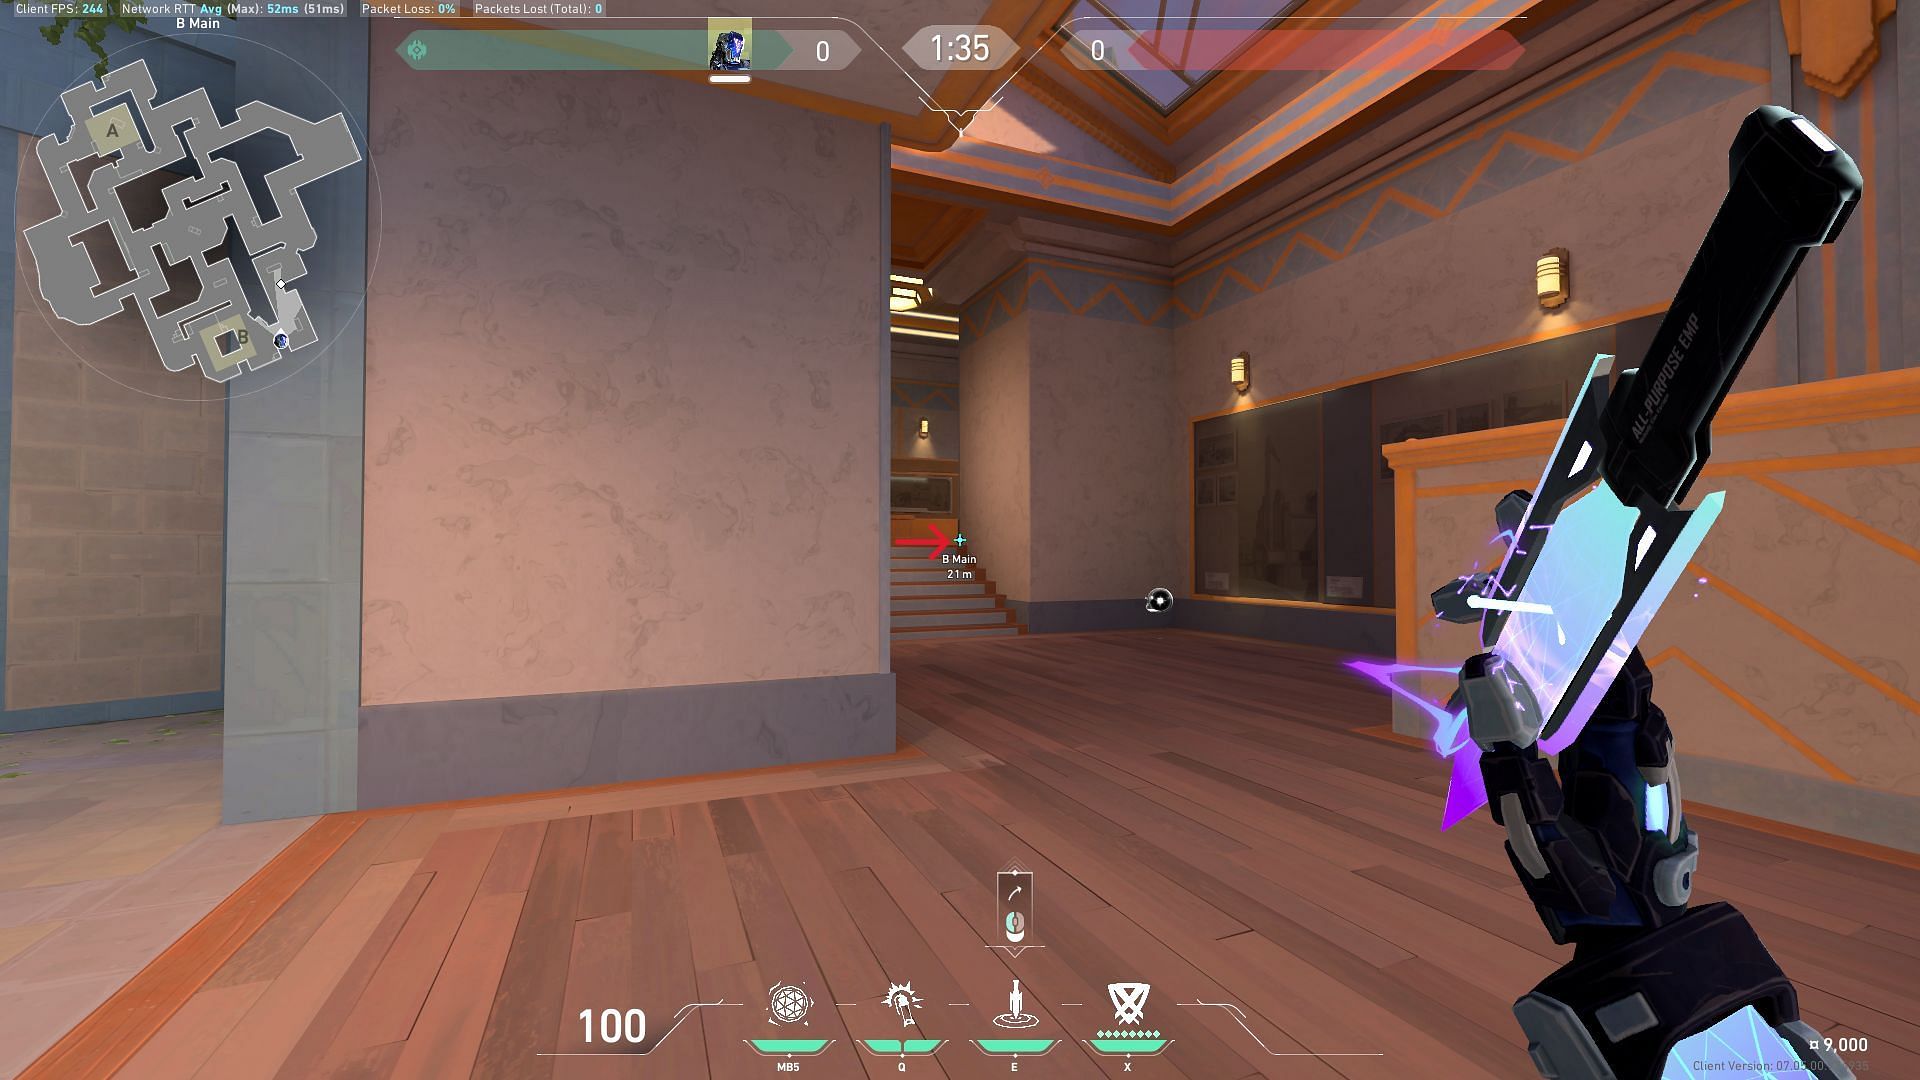
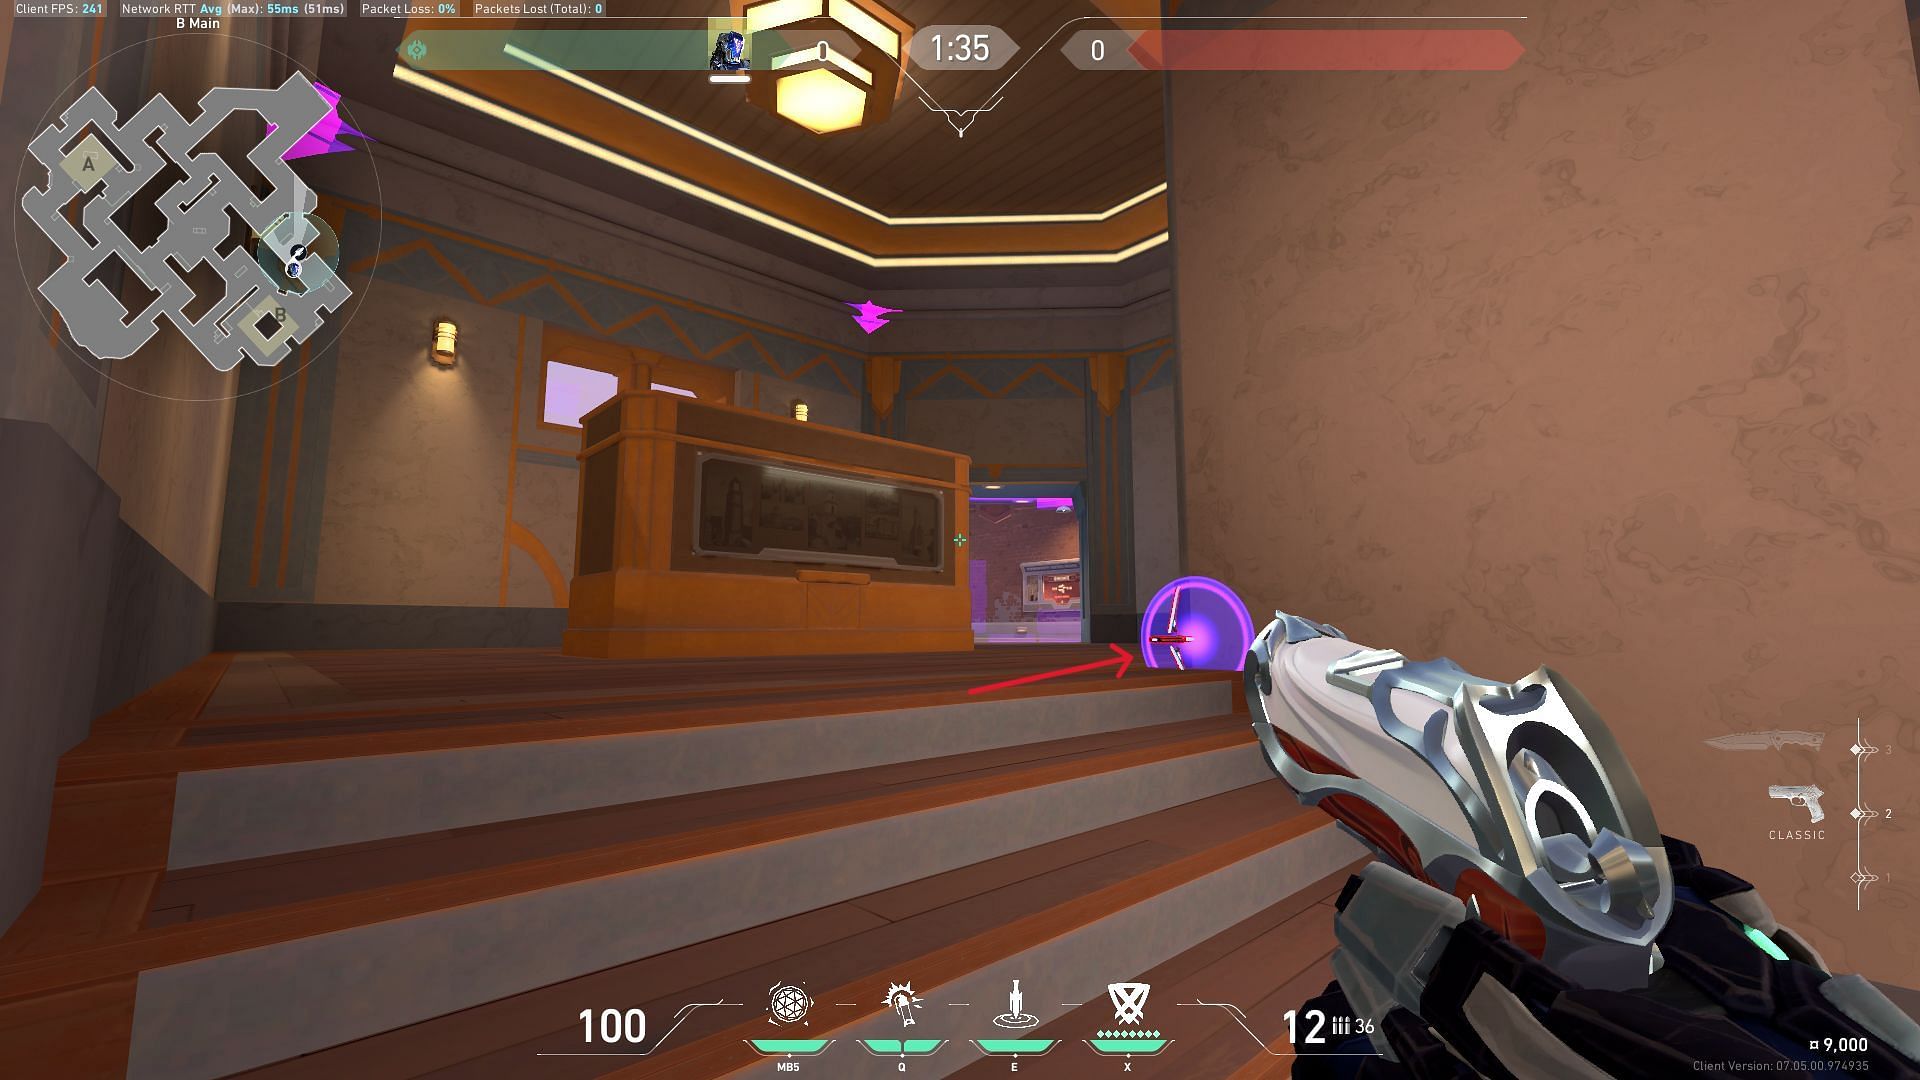
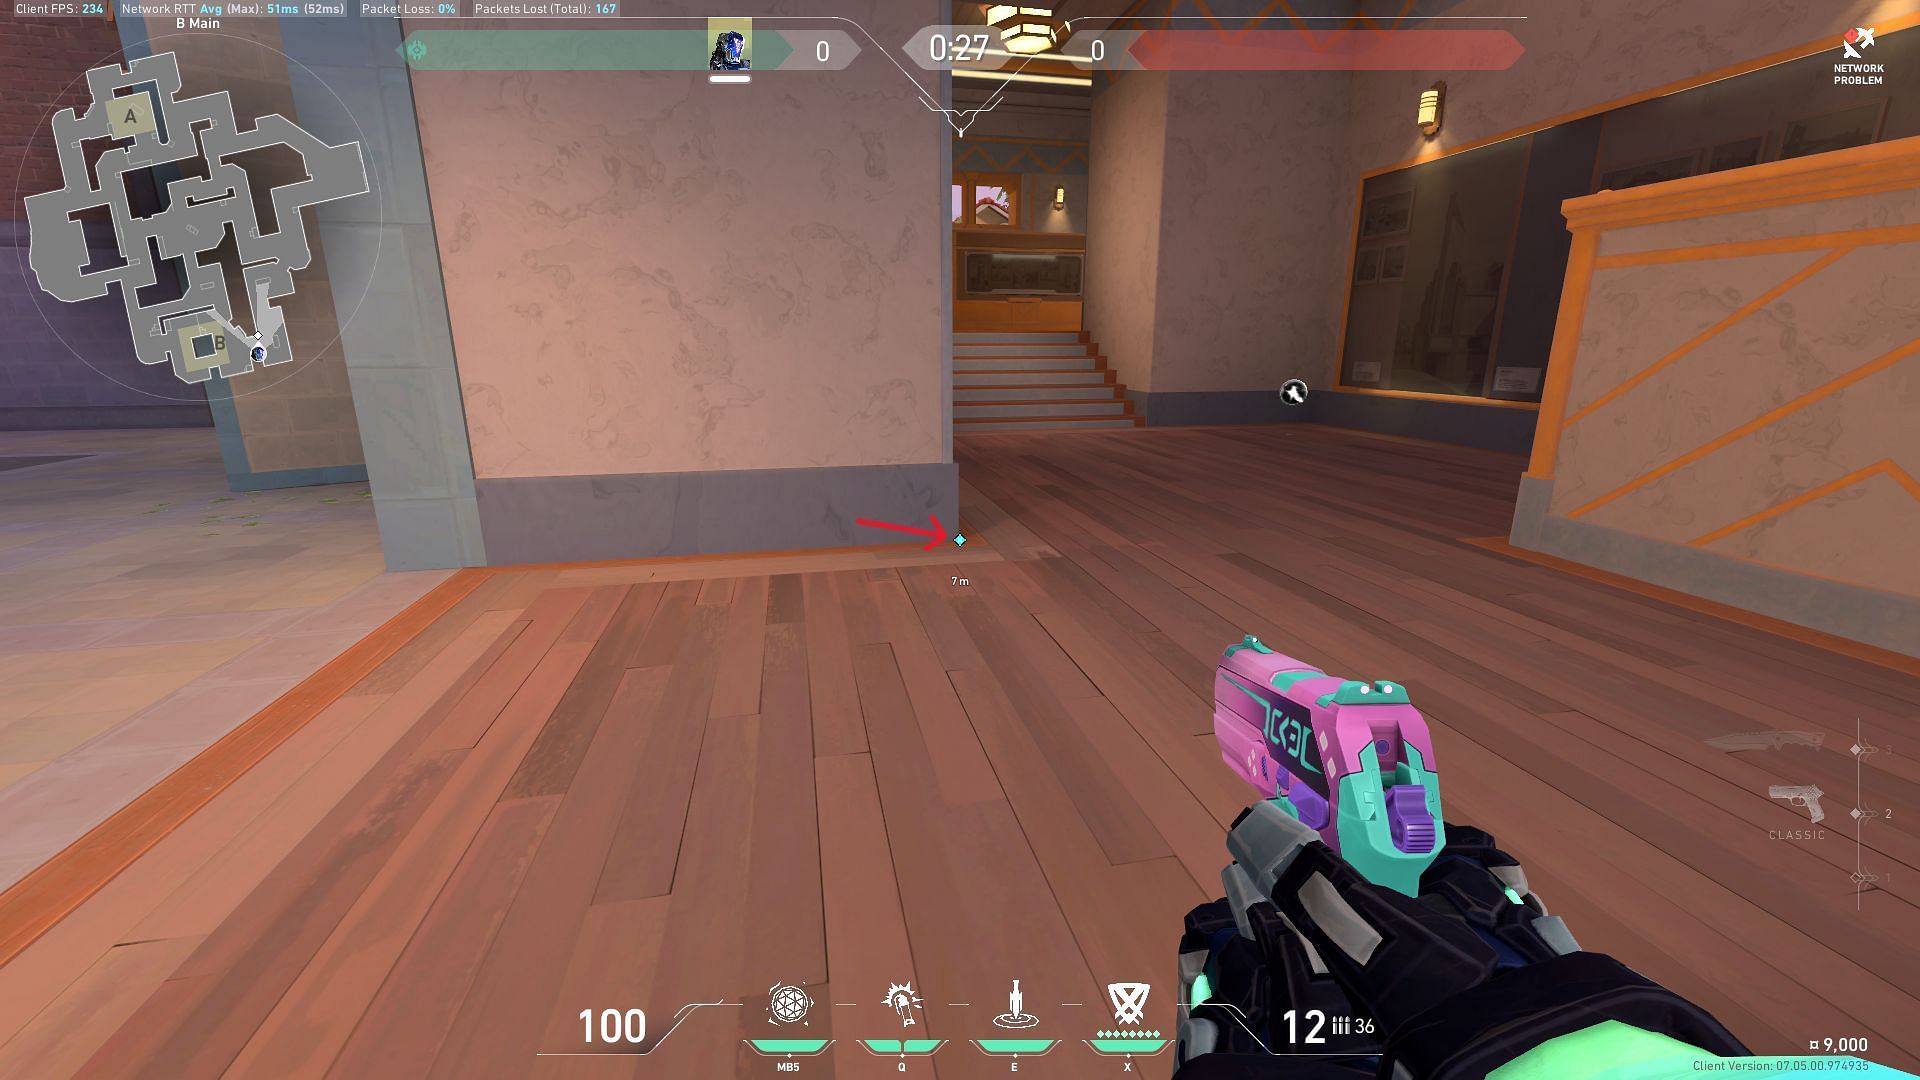
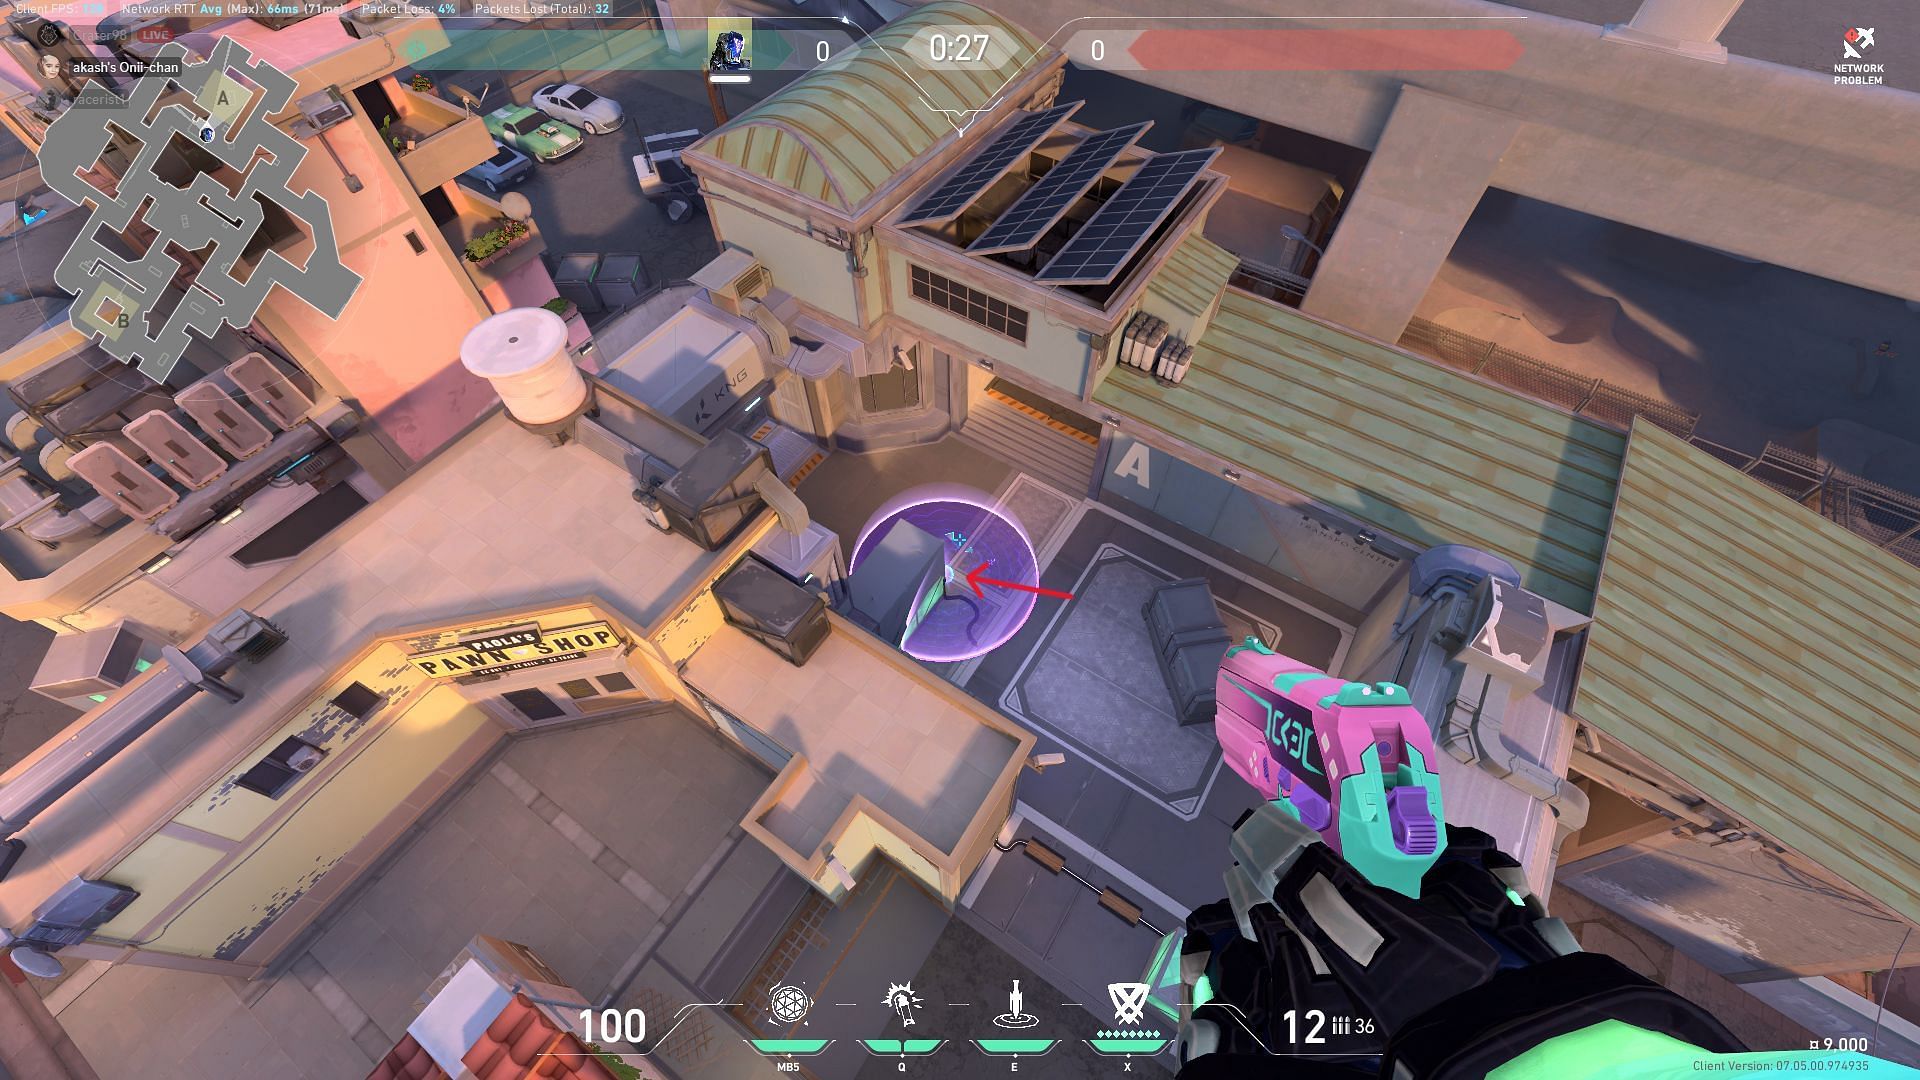
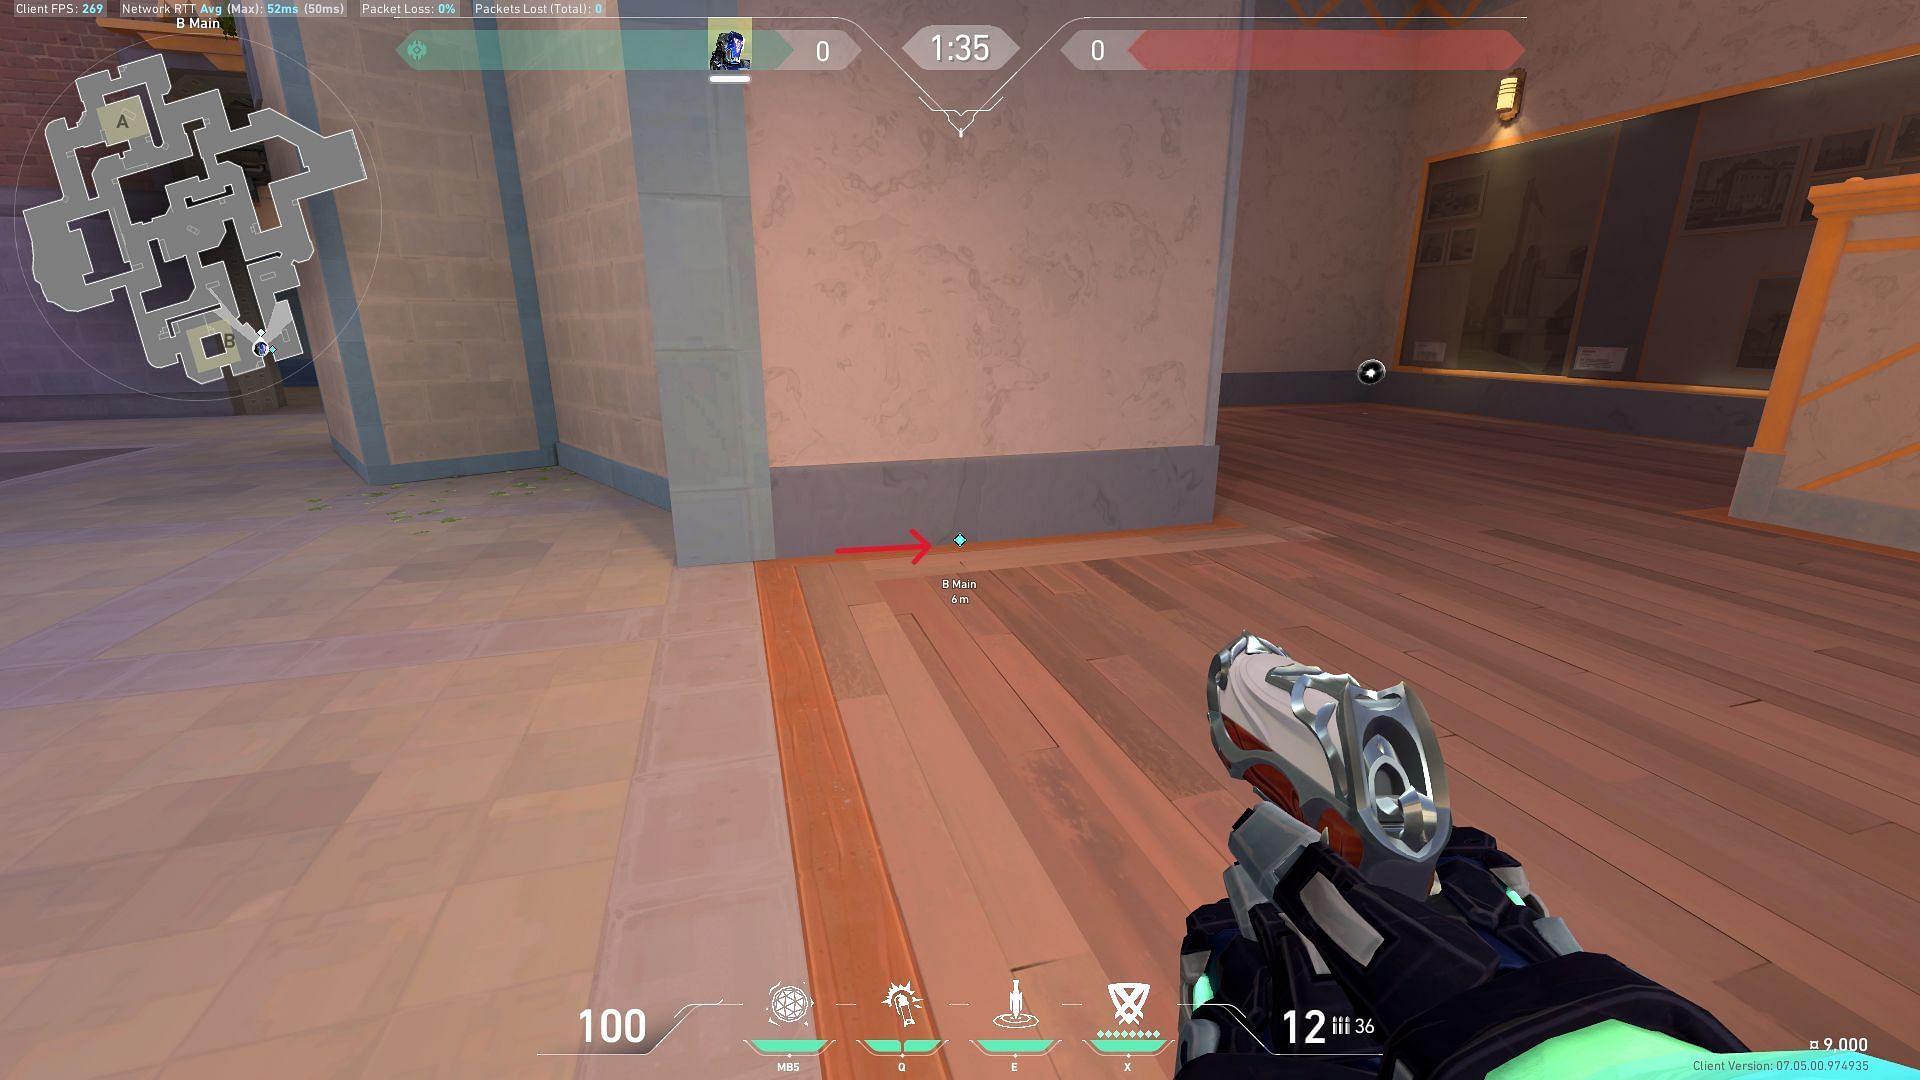
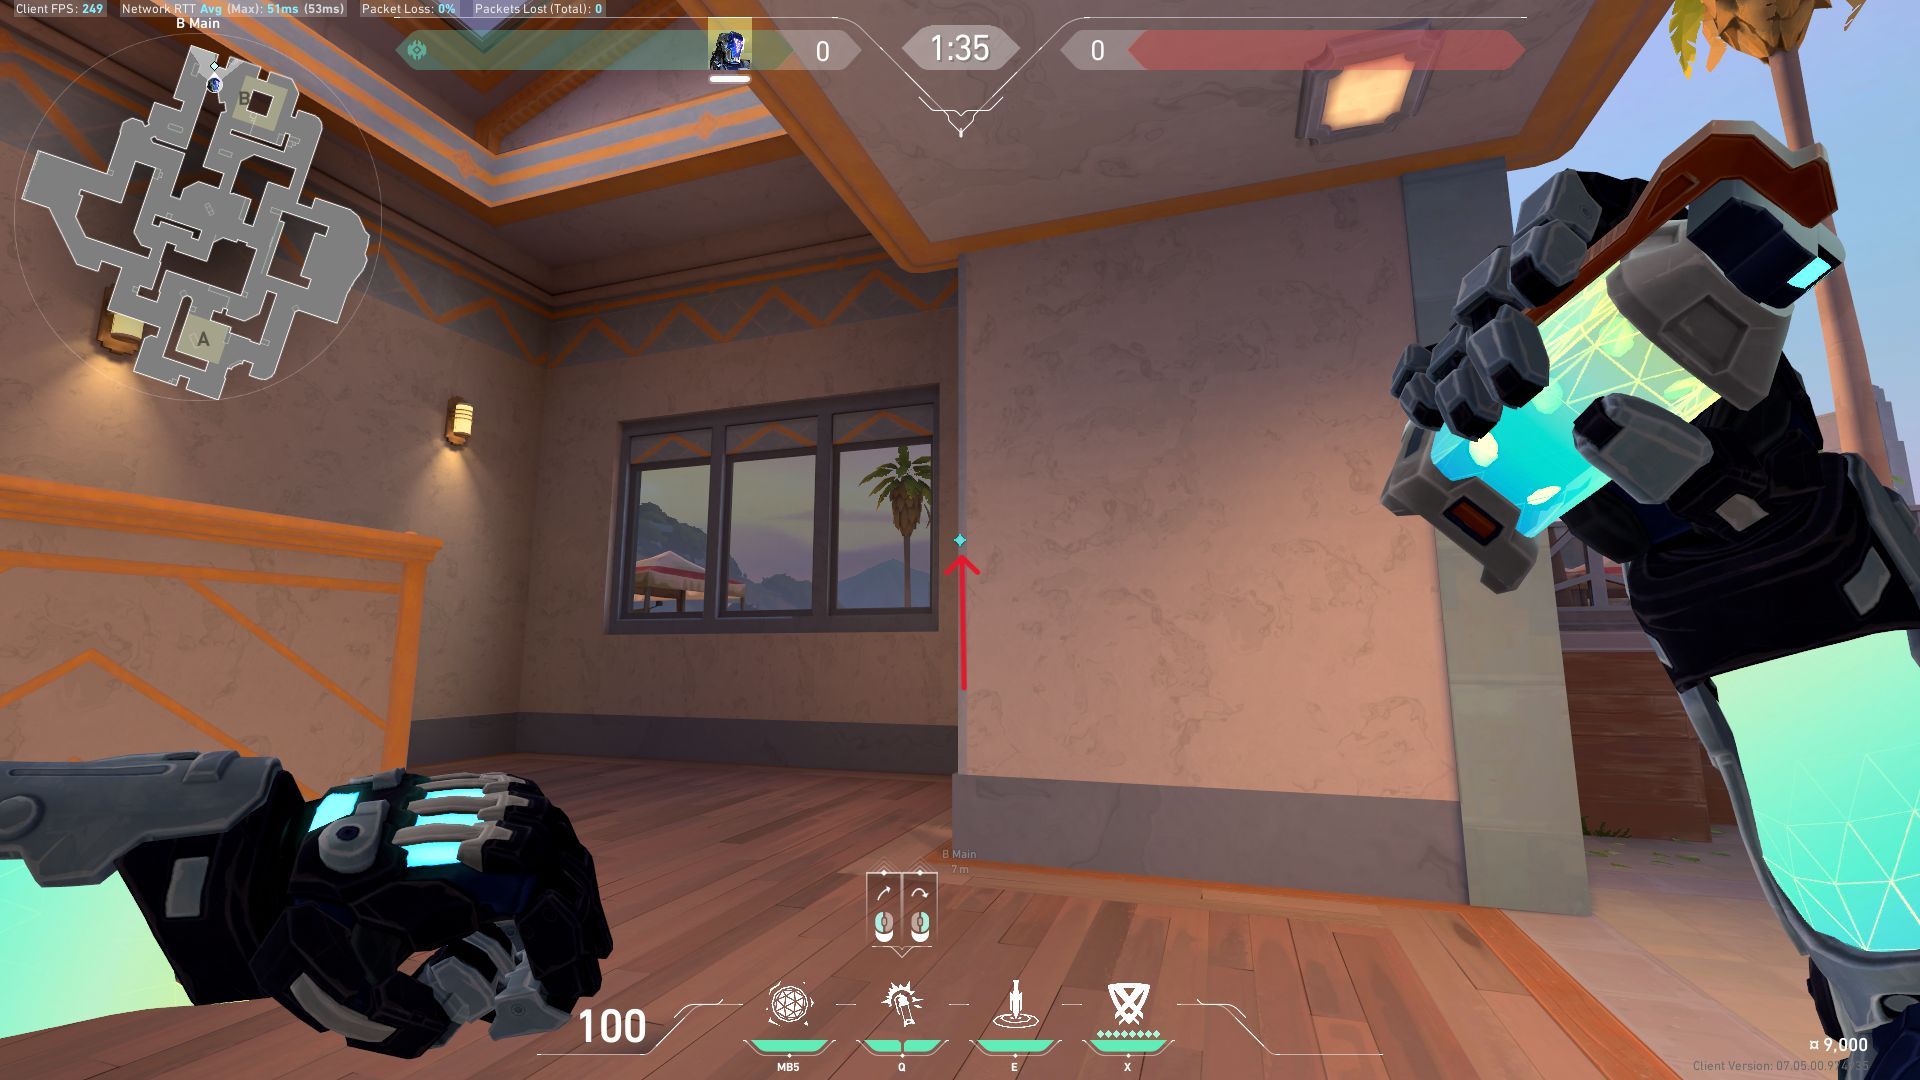
3) B-site ZERO/point blade lineup
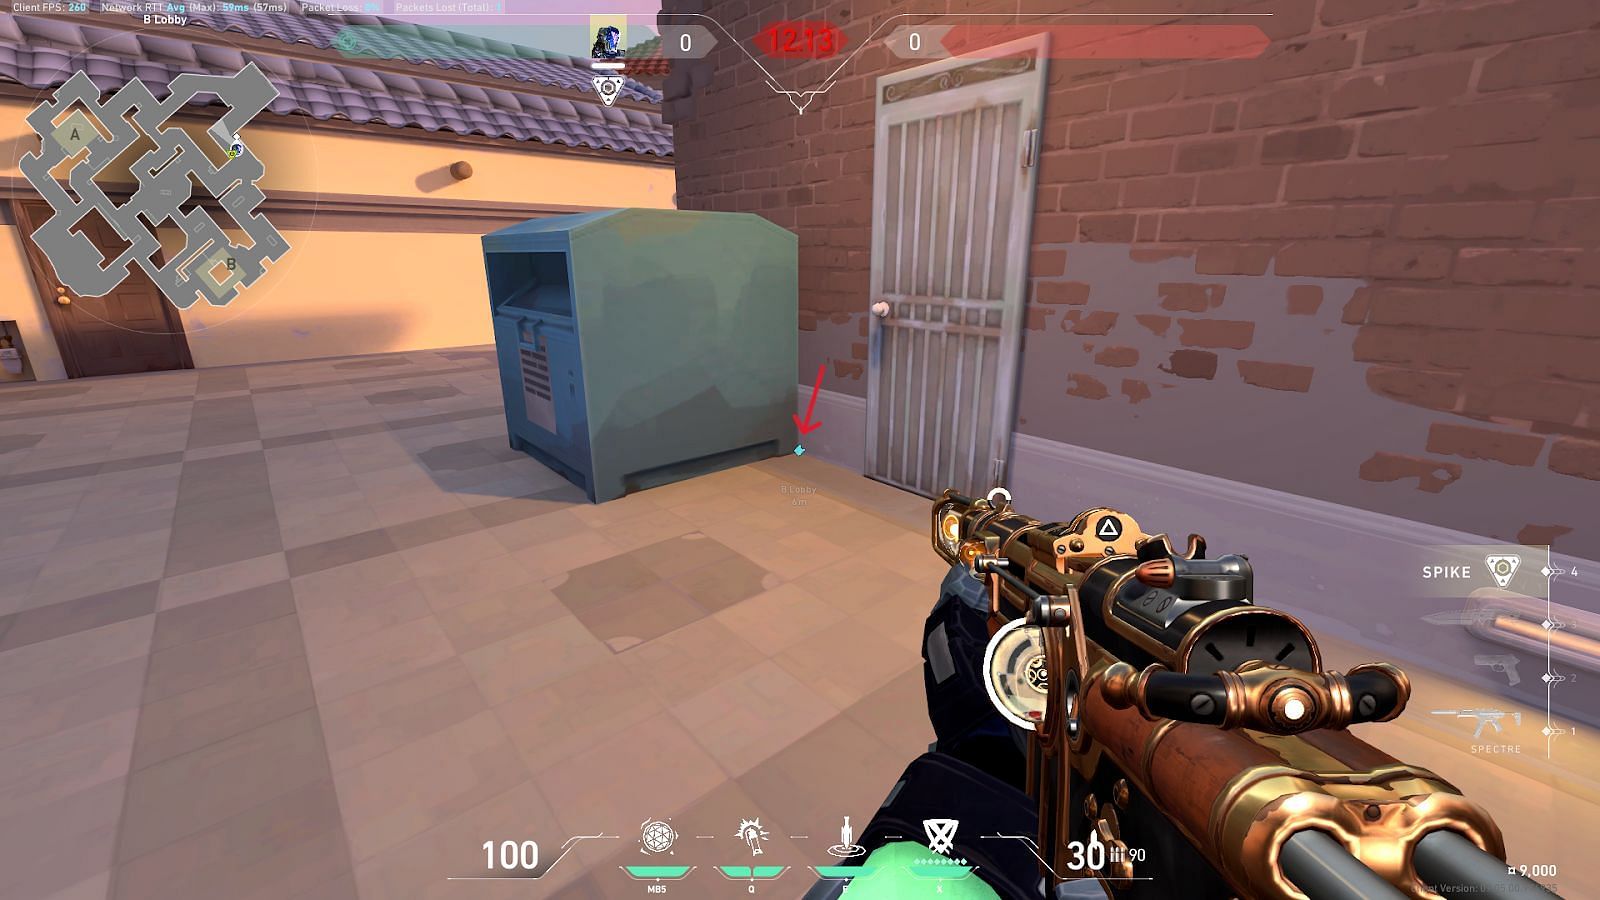
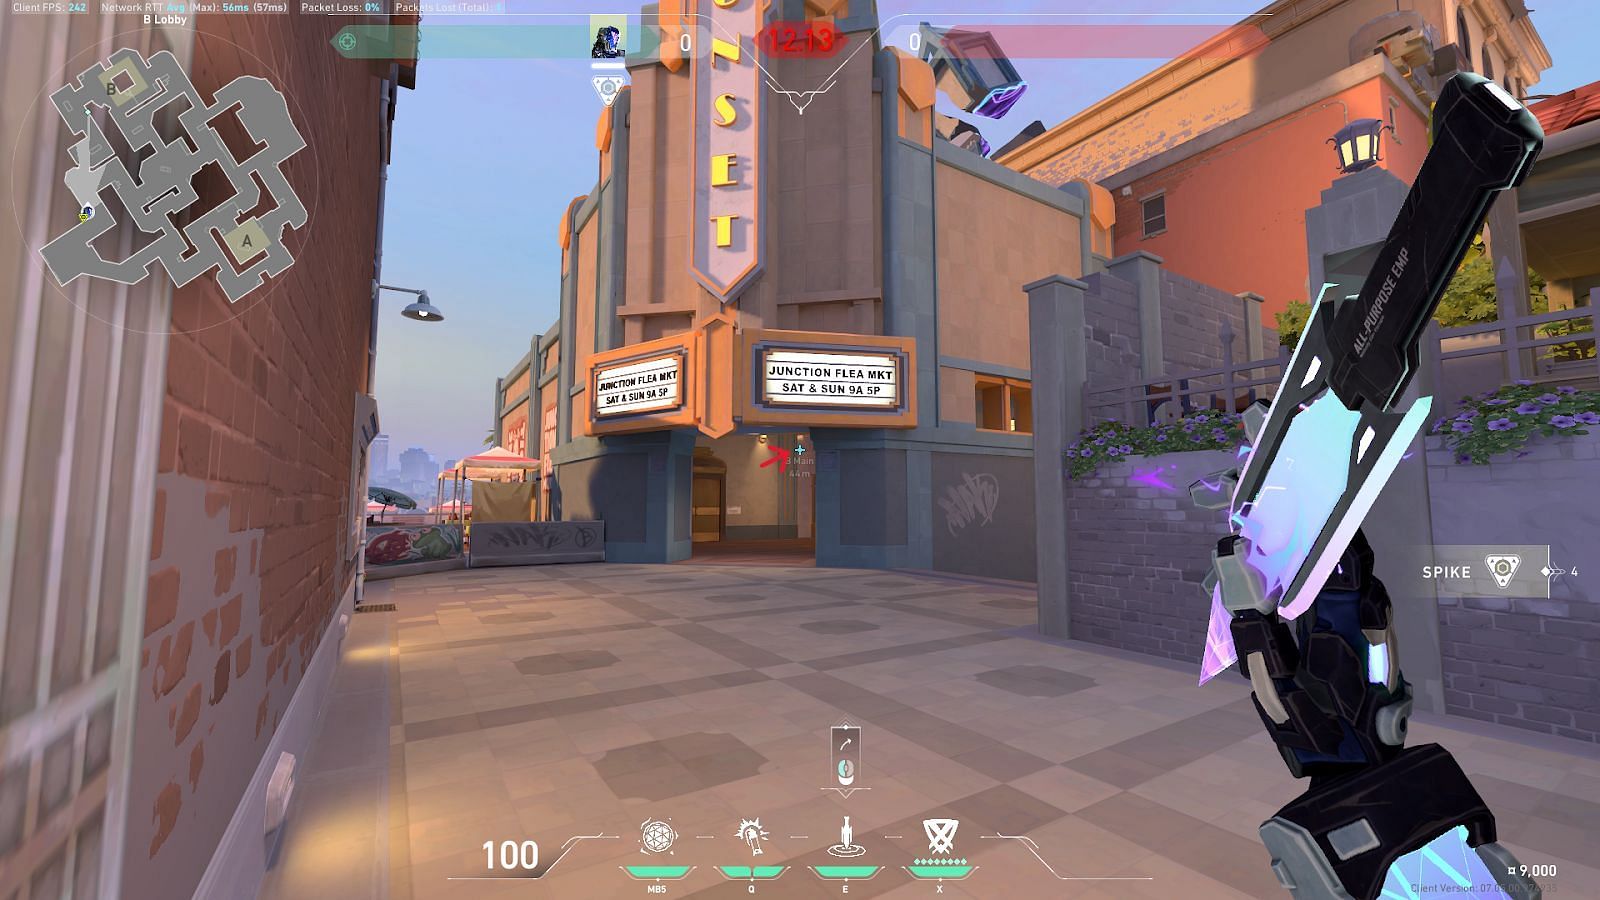

This lineup in the new map, Sunset, is useful for detecting any potential peekers at B-main. For this, first position yourself at the corner of the blue box. Equip KAY/O’s ZERO/point blade and place your crosshair as marked in the image above. After proper placement, left-click to fire the blade, which will land on the B-main wall. This move will prevent enemies from using their flashing abilities in Valorant.
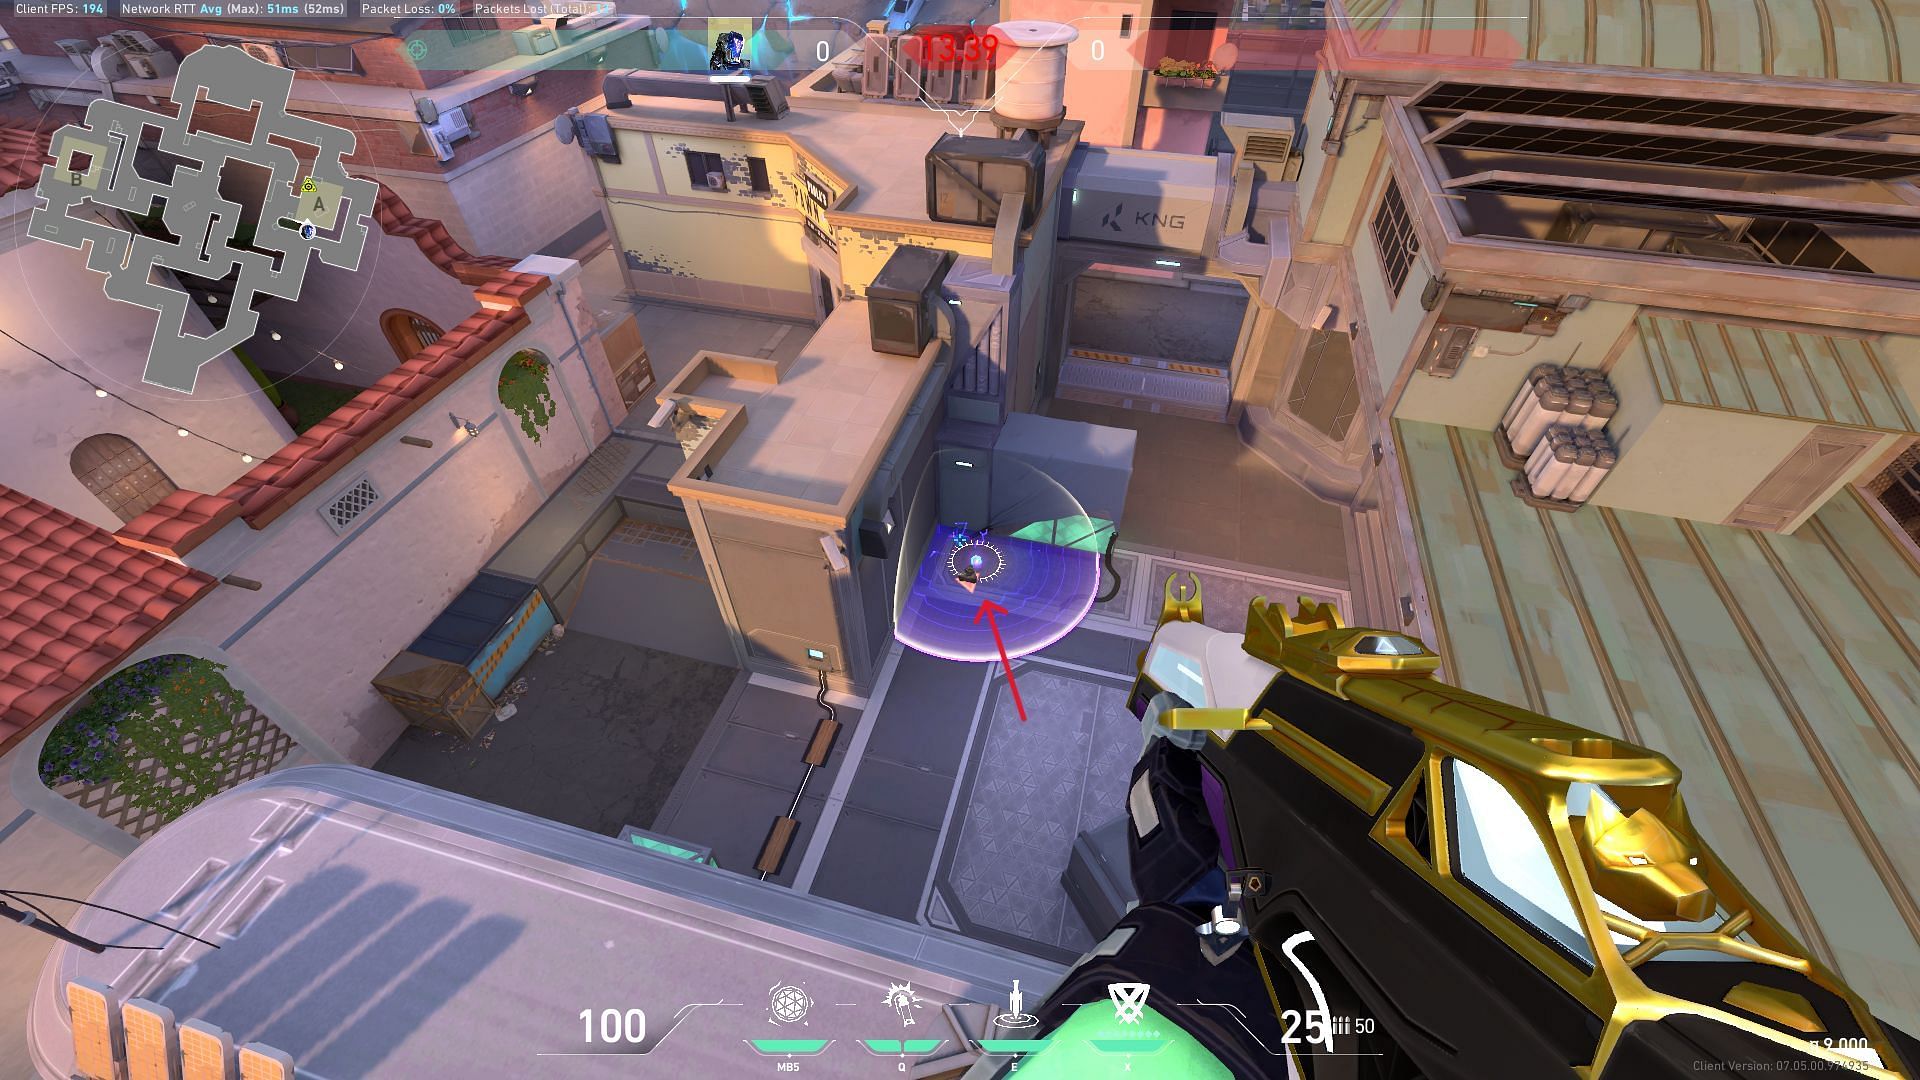
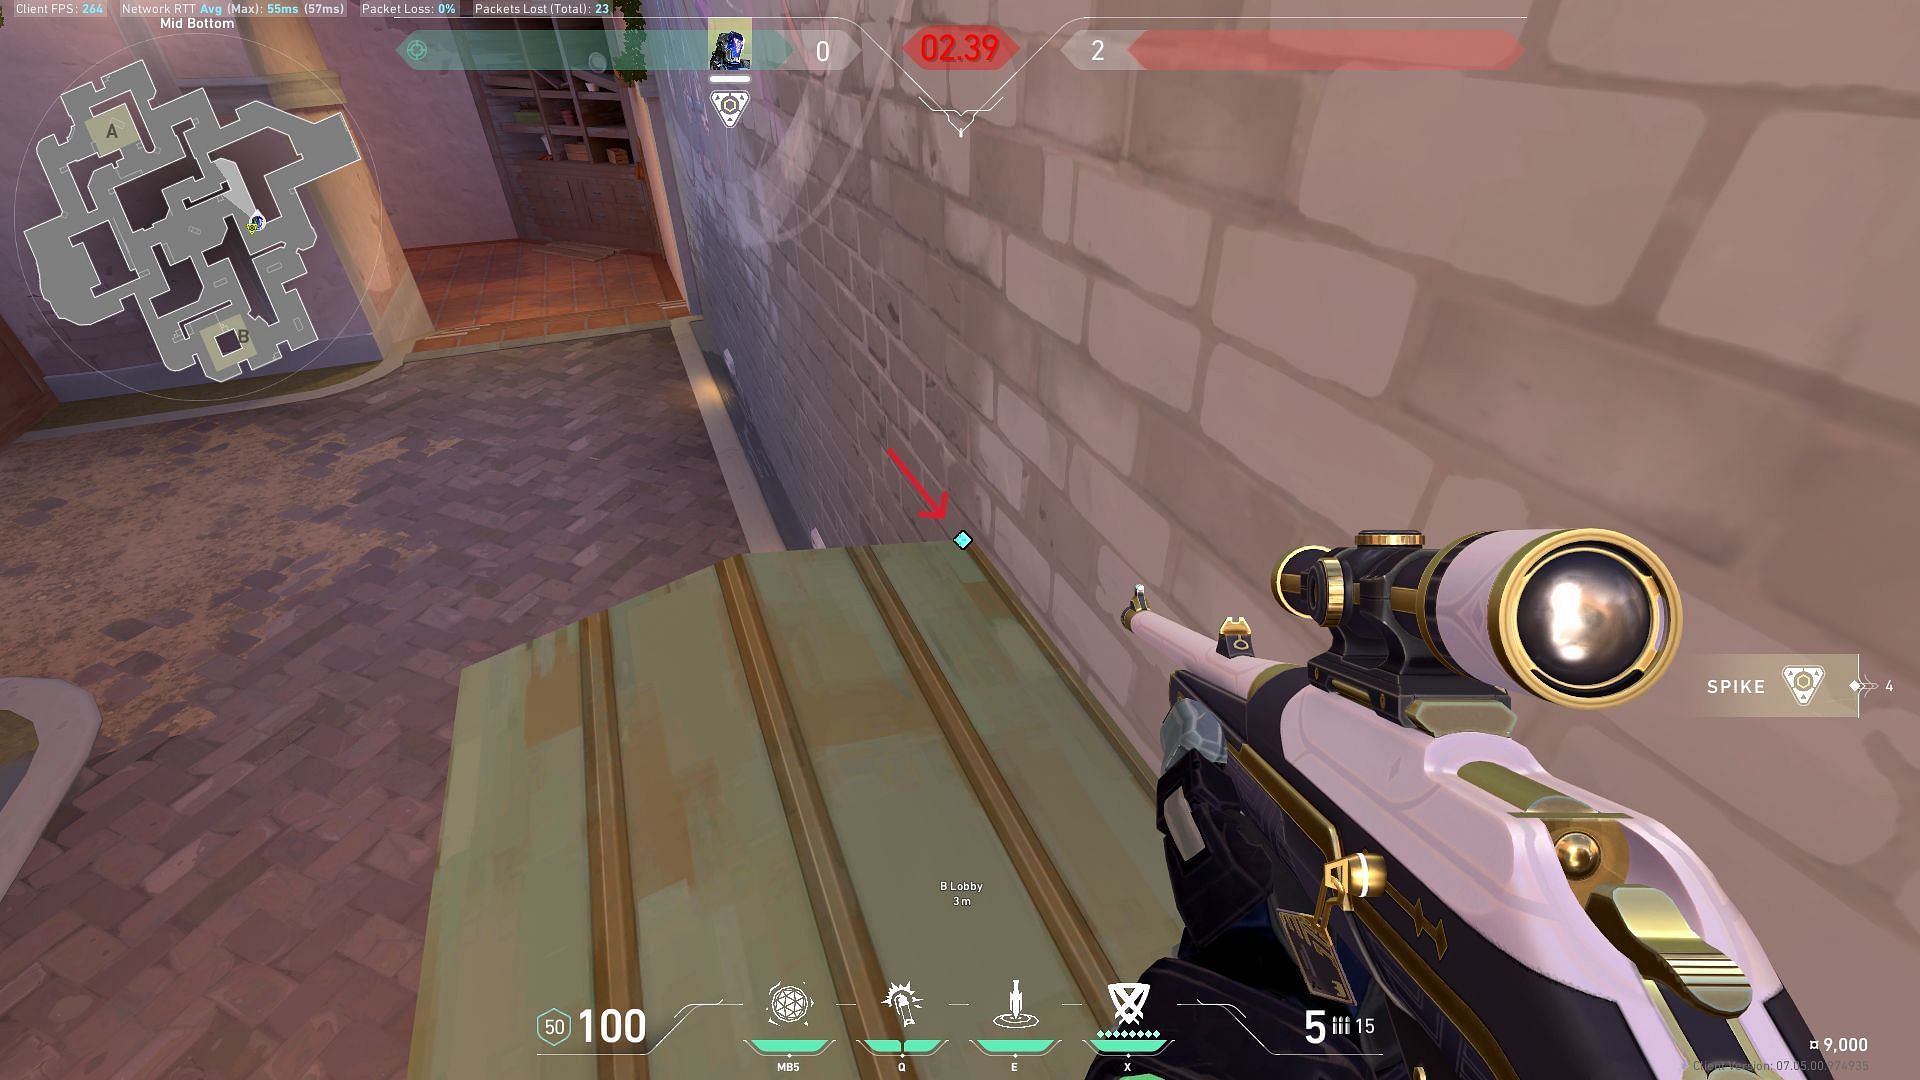
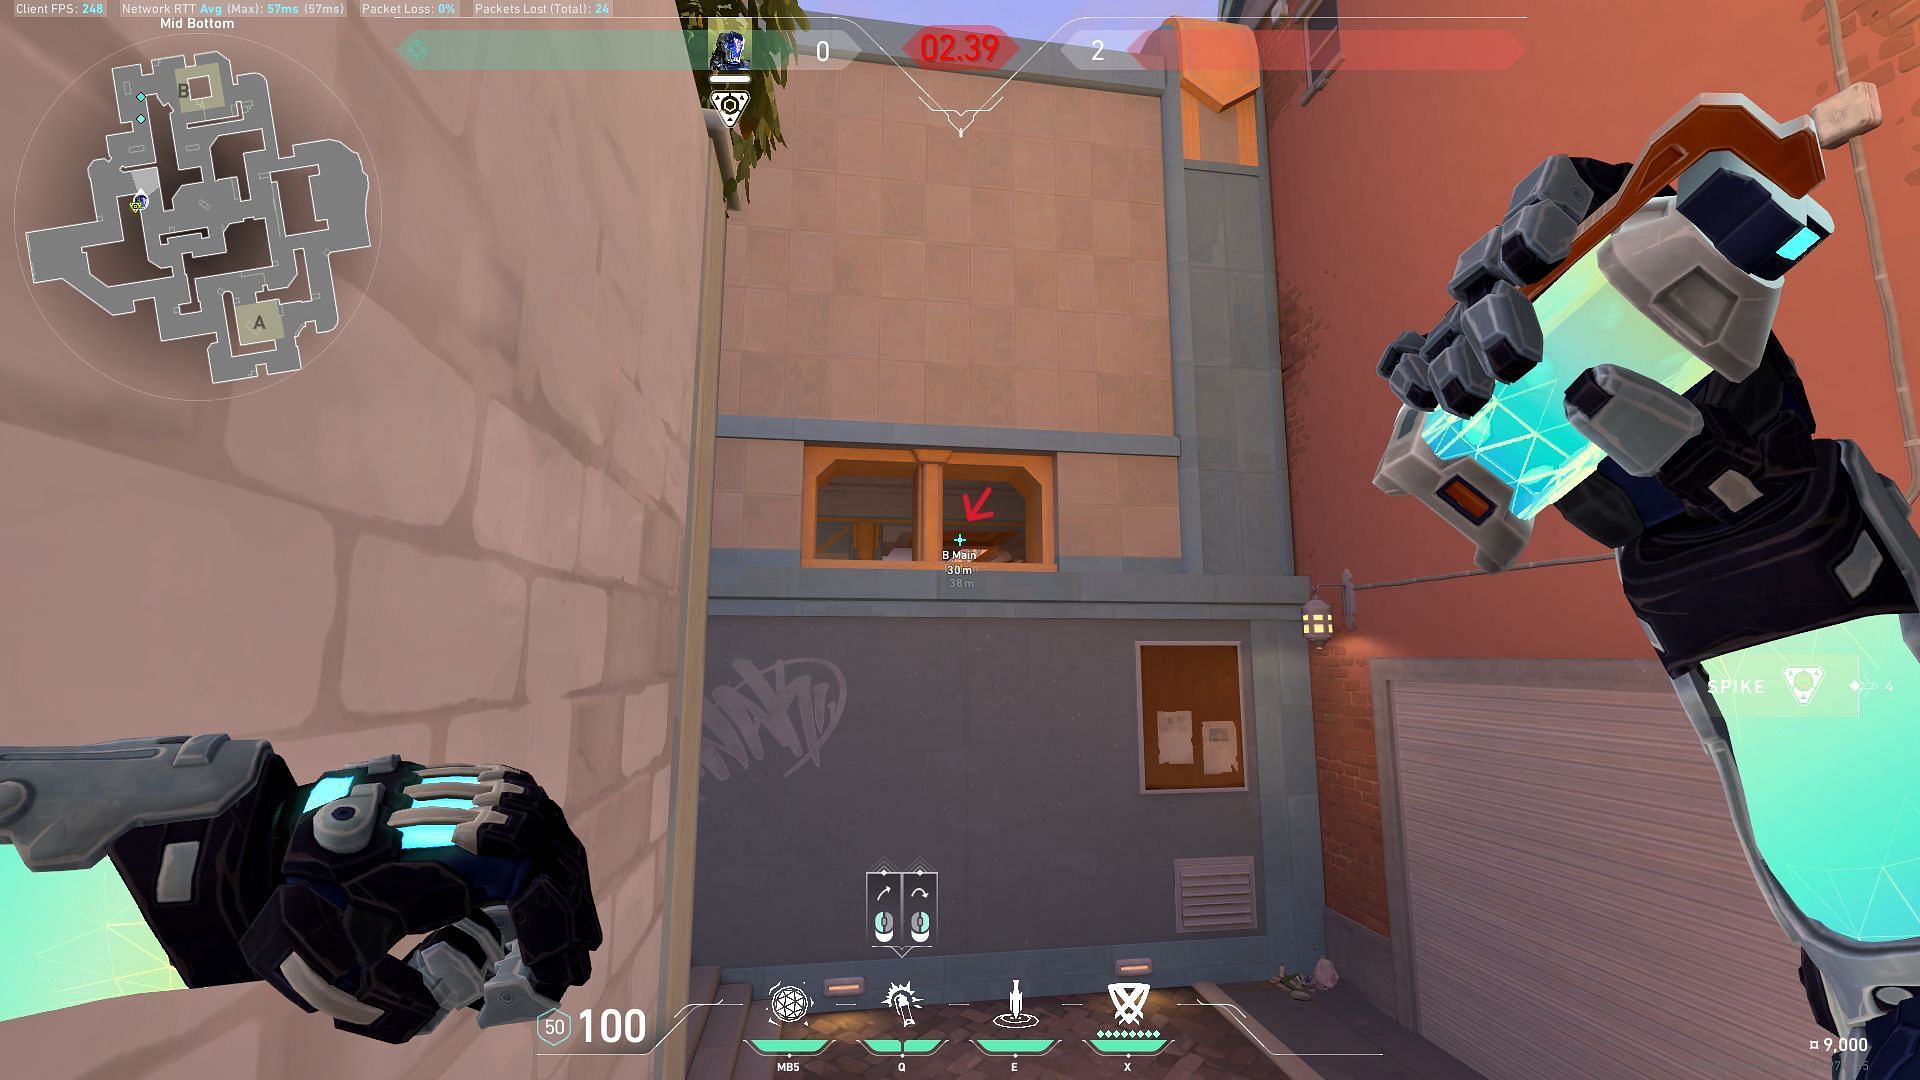
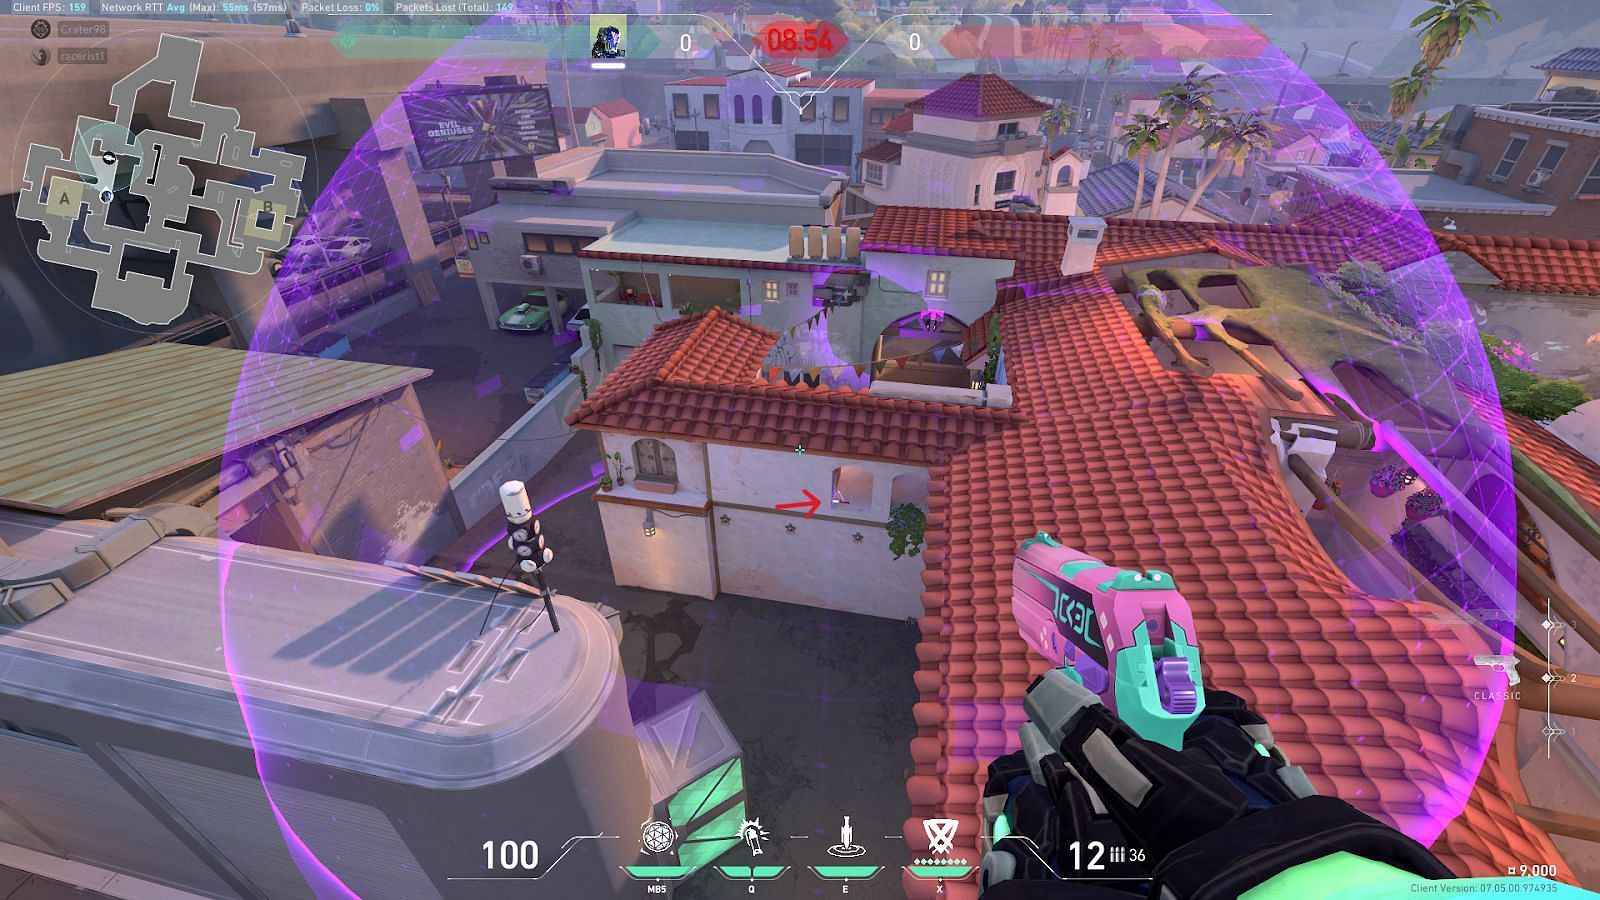
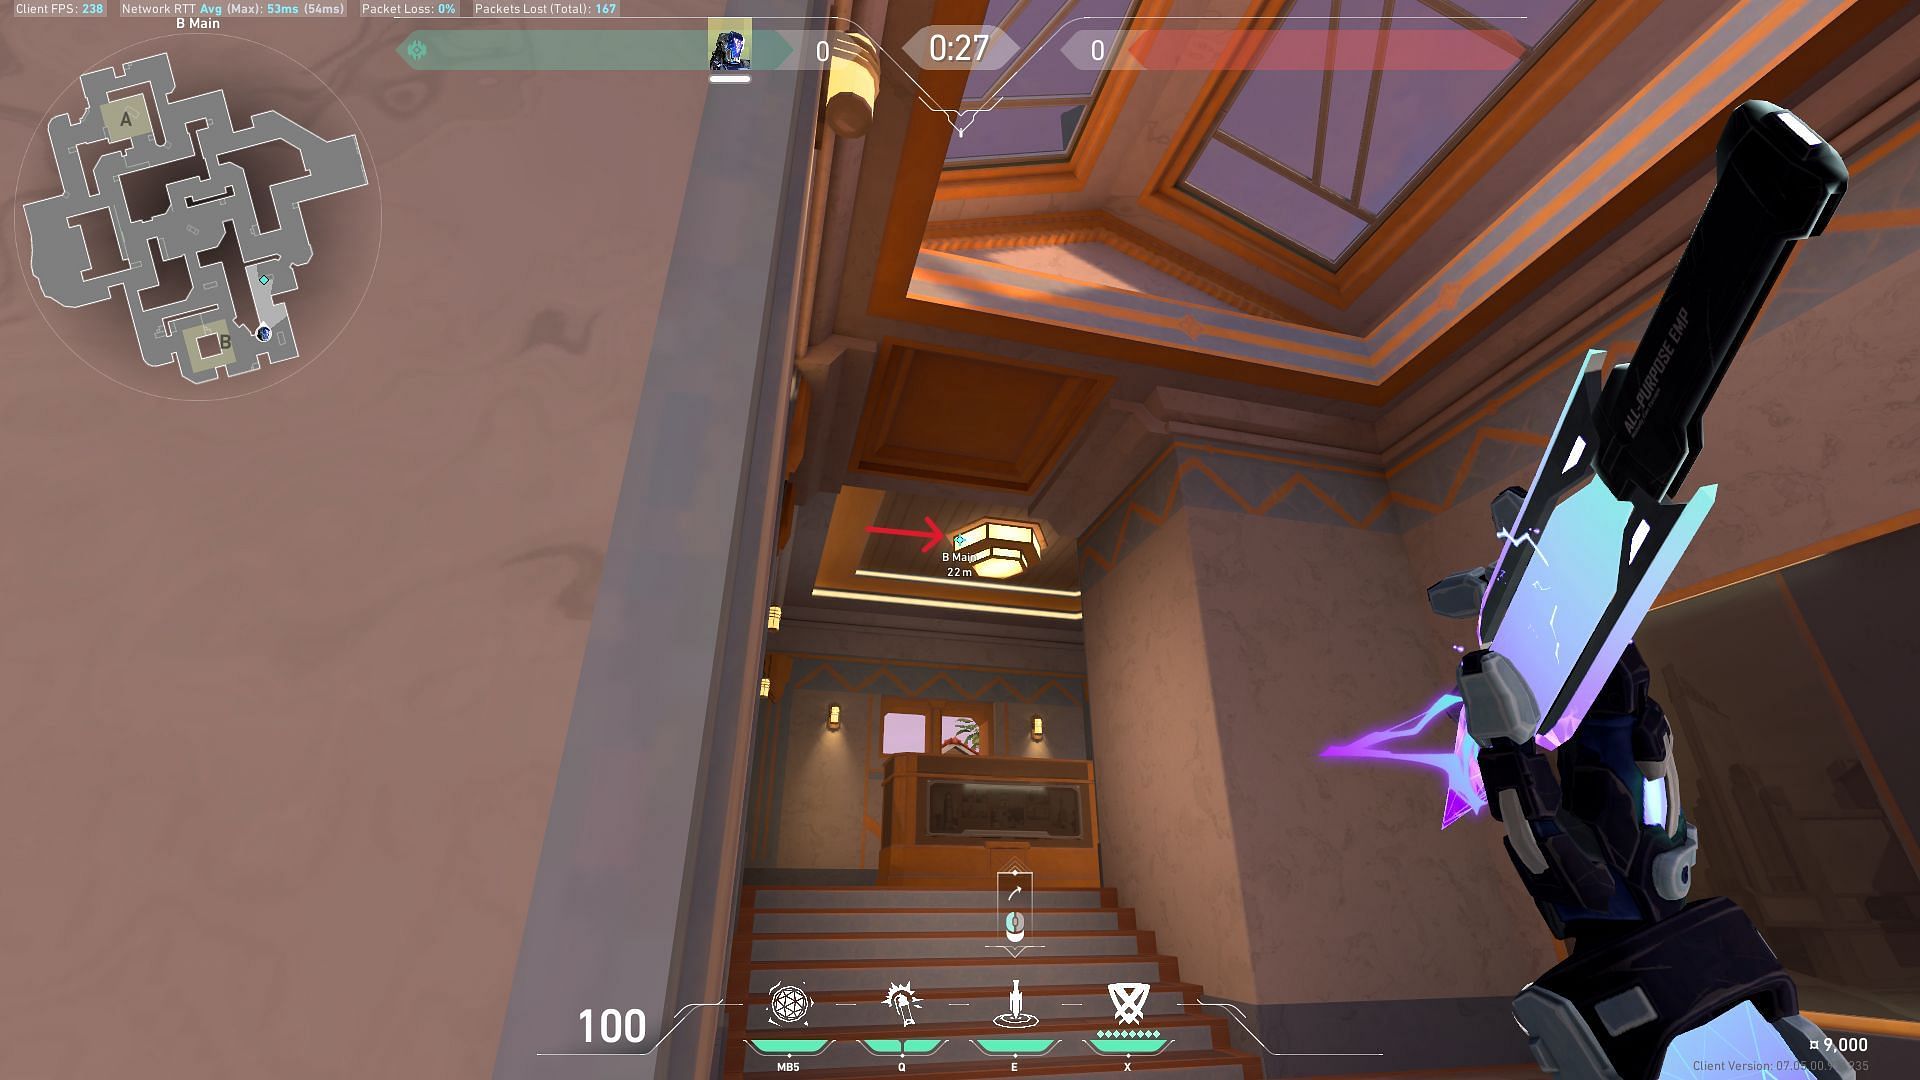
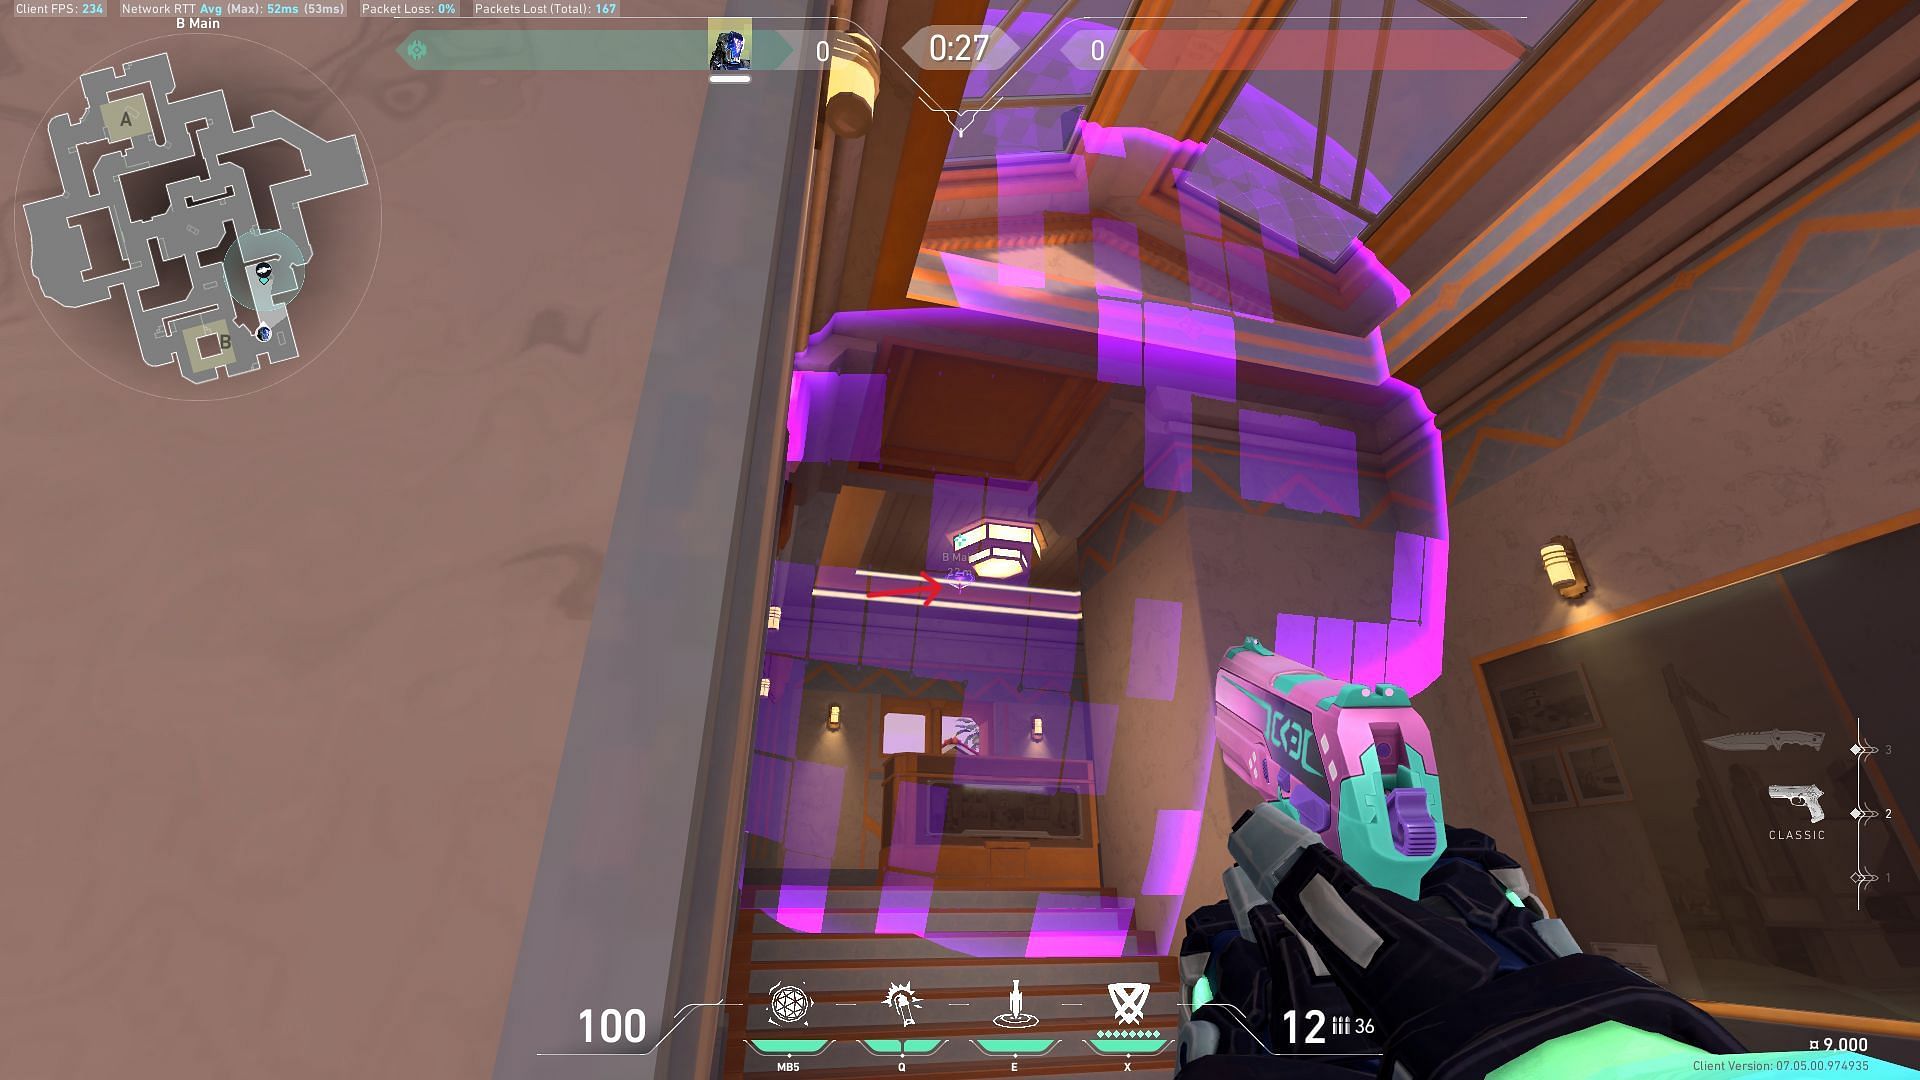
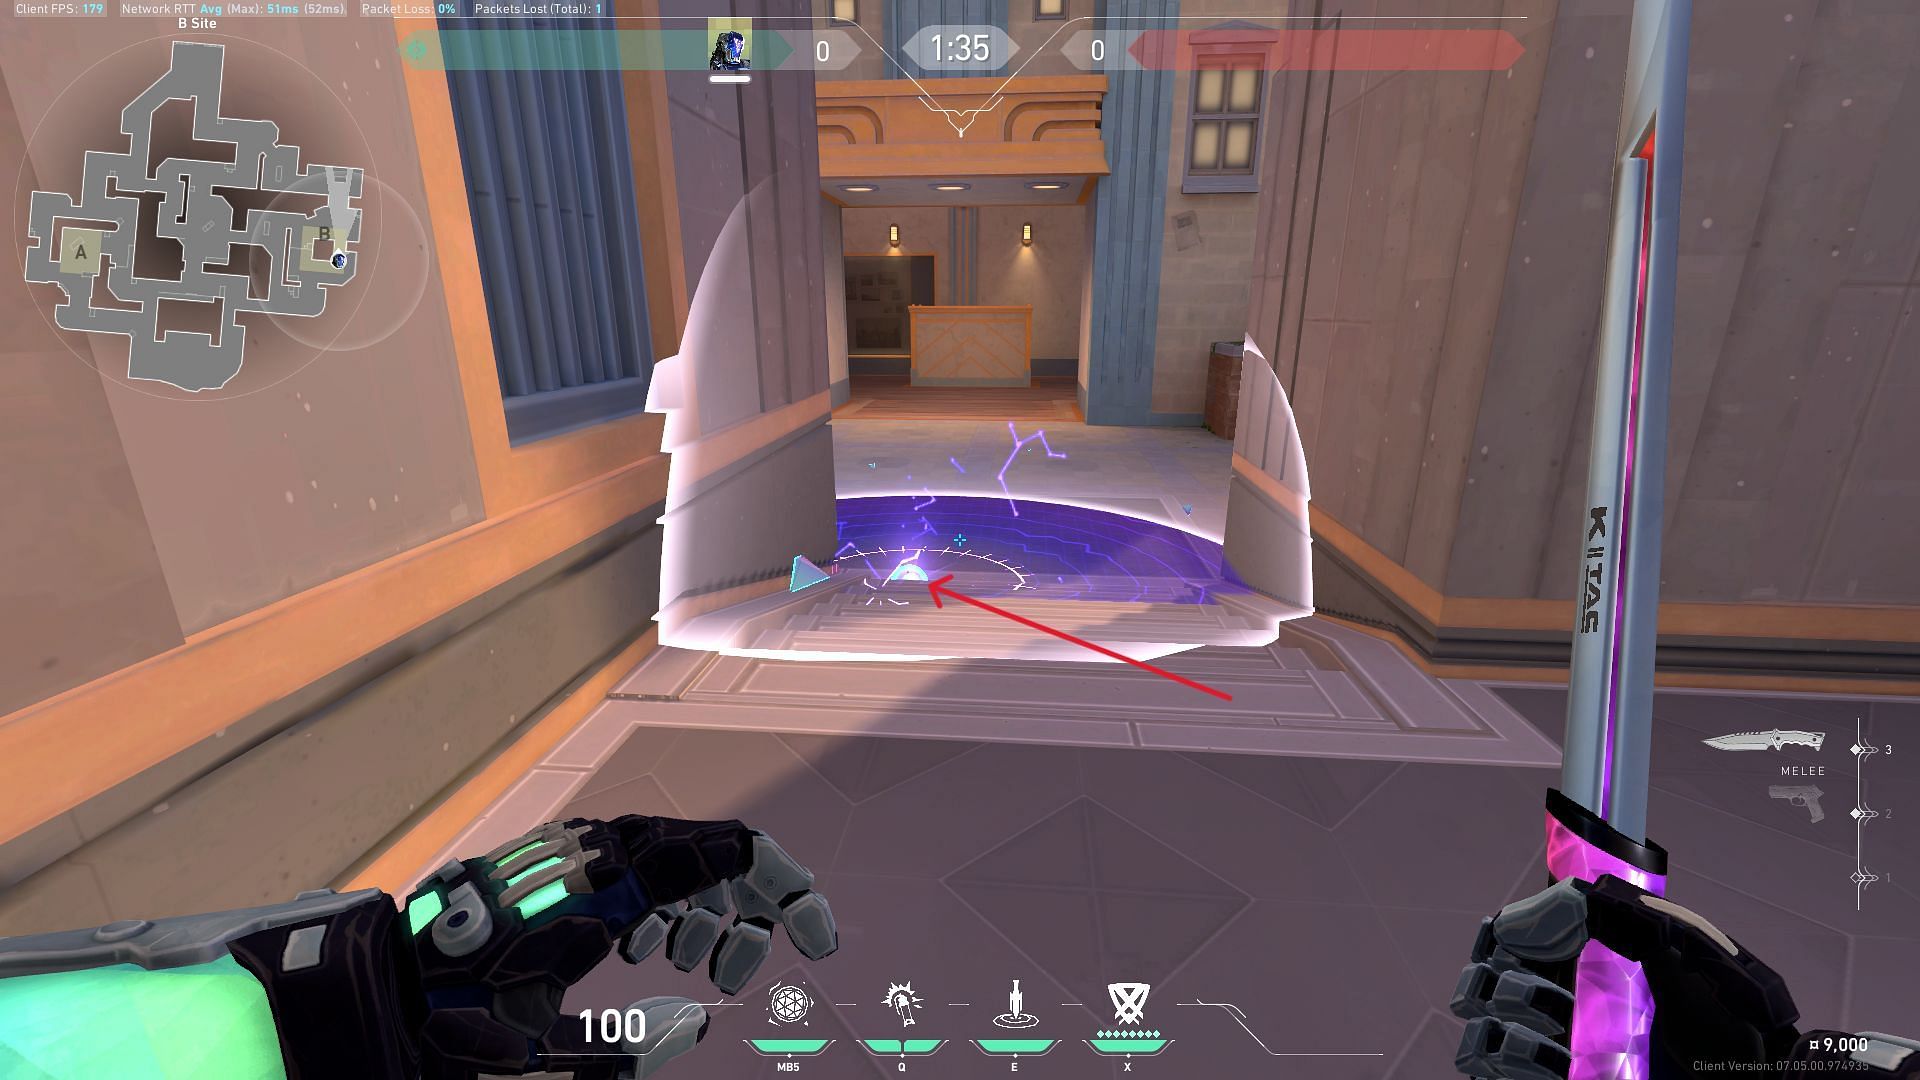
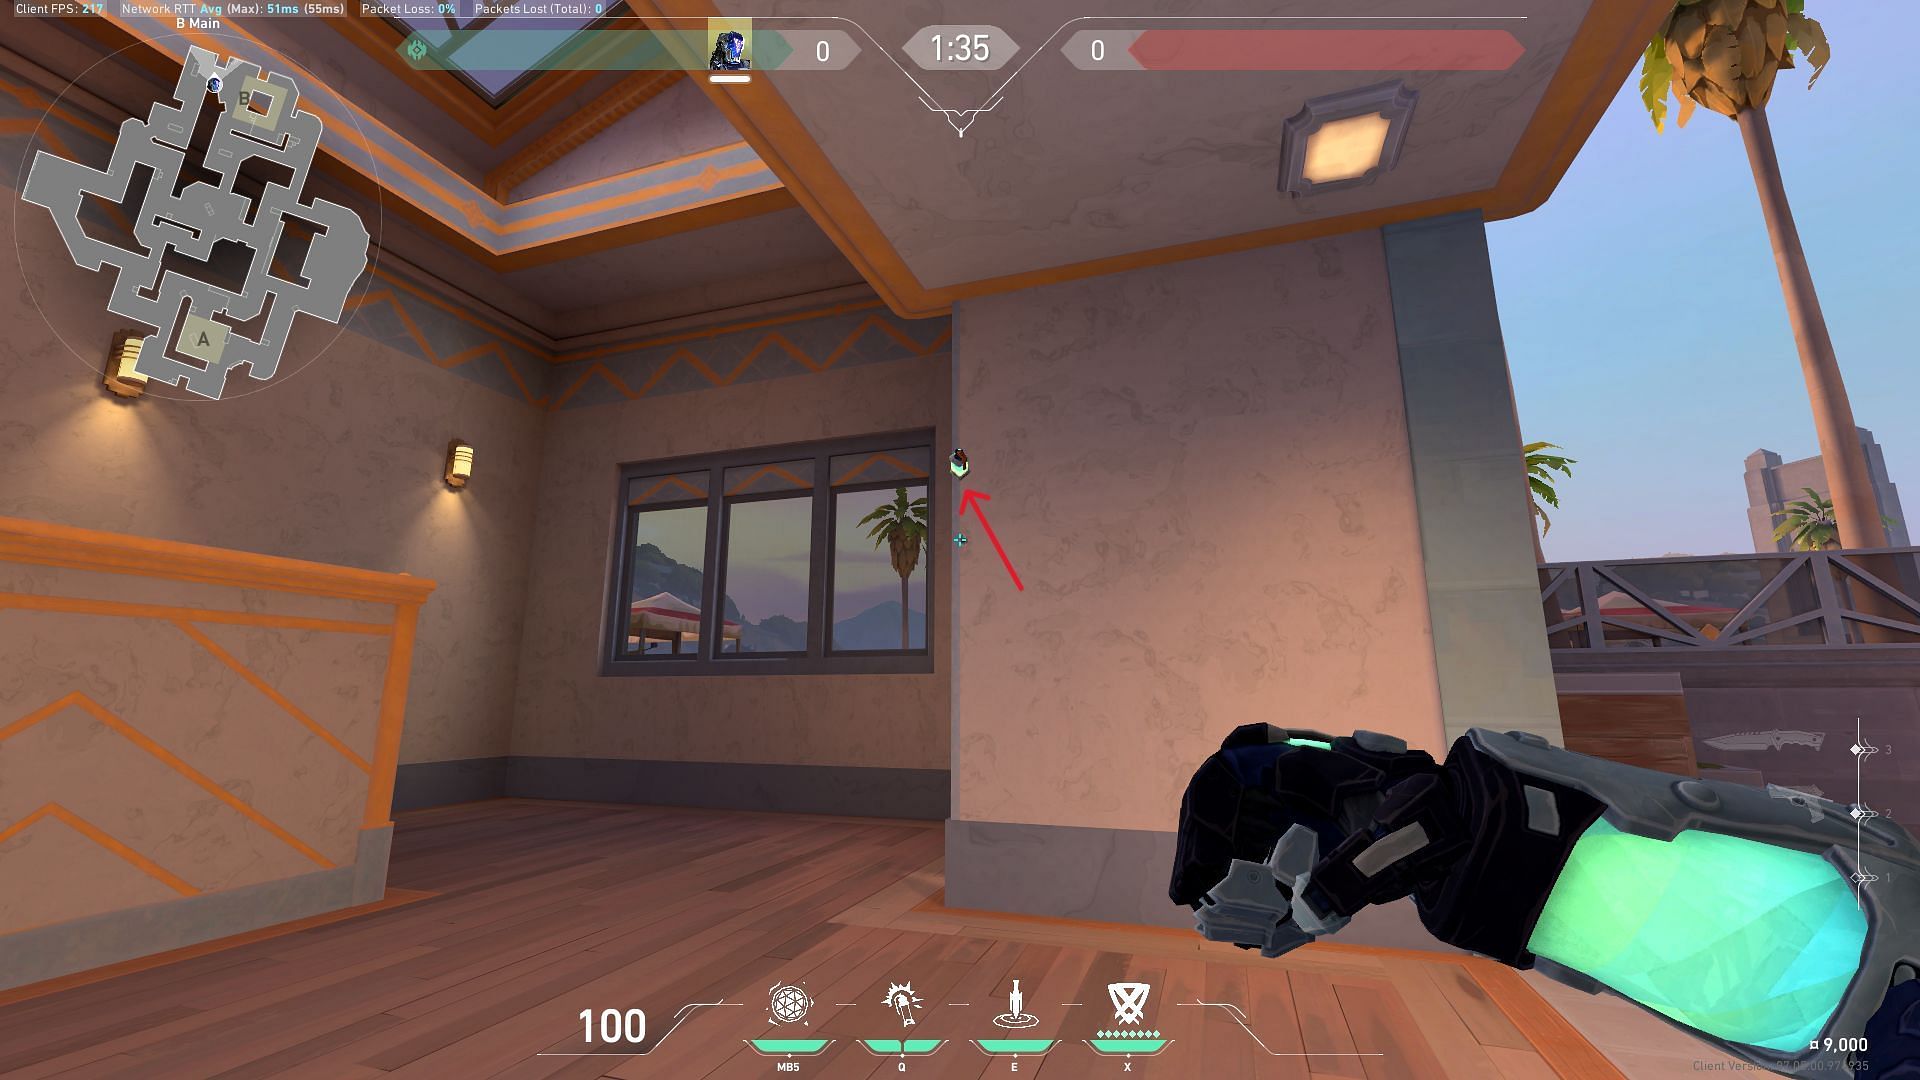
4) B-site ZERO/point second lineup
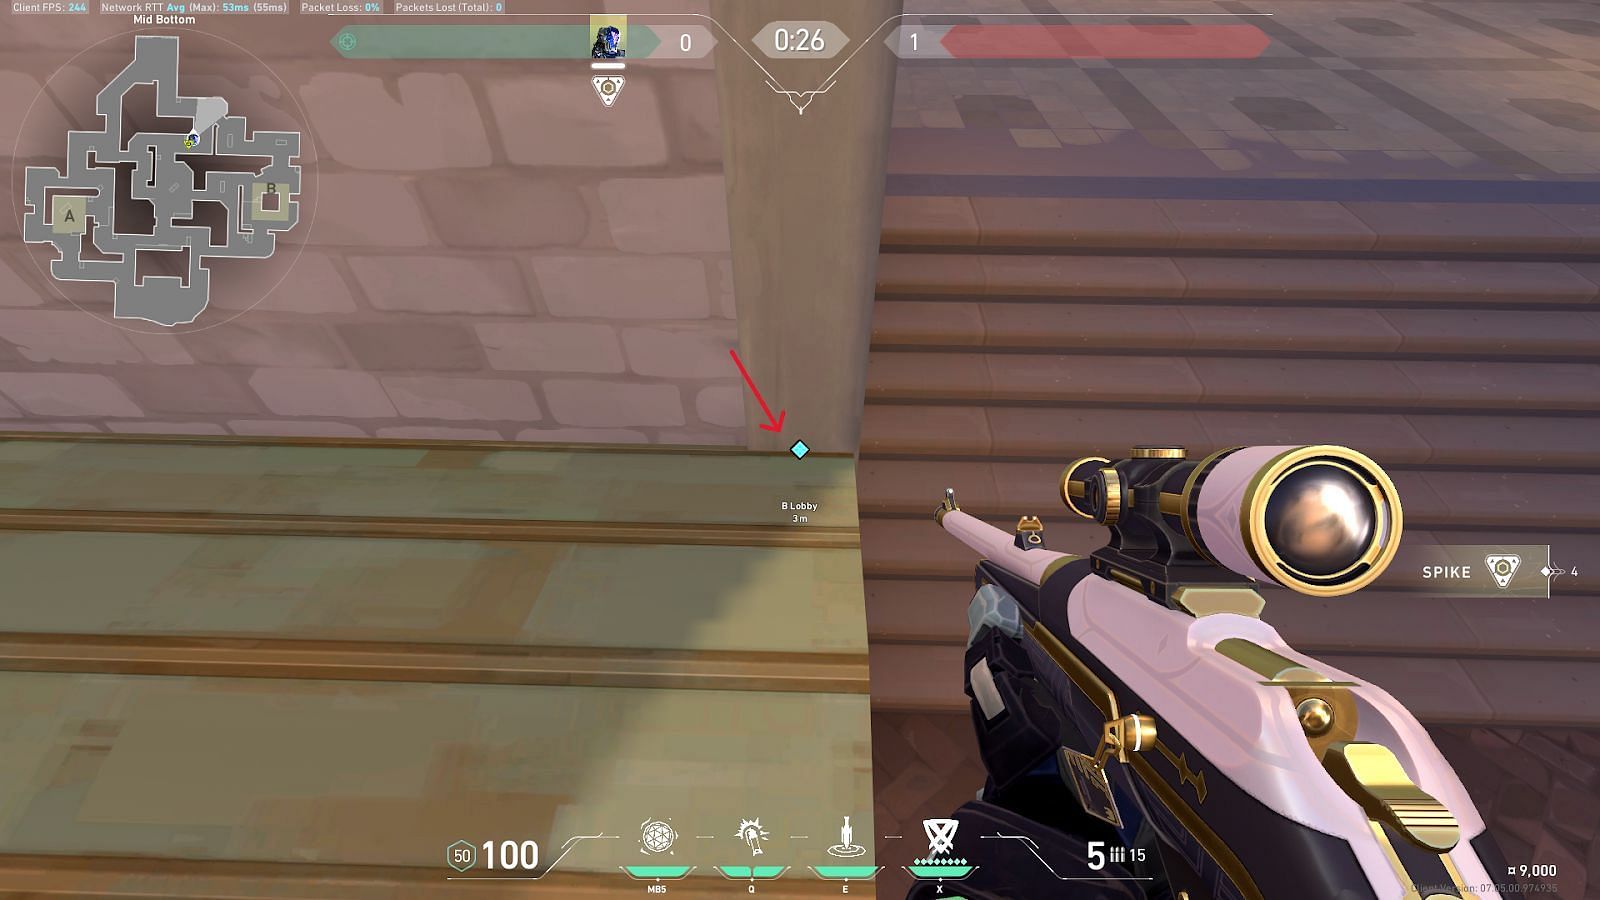
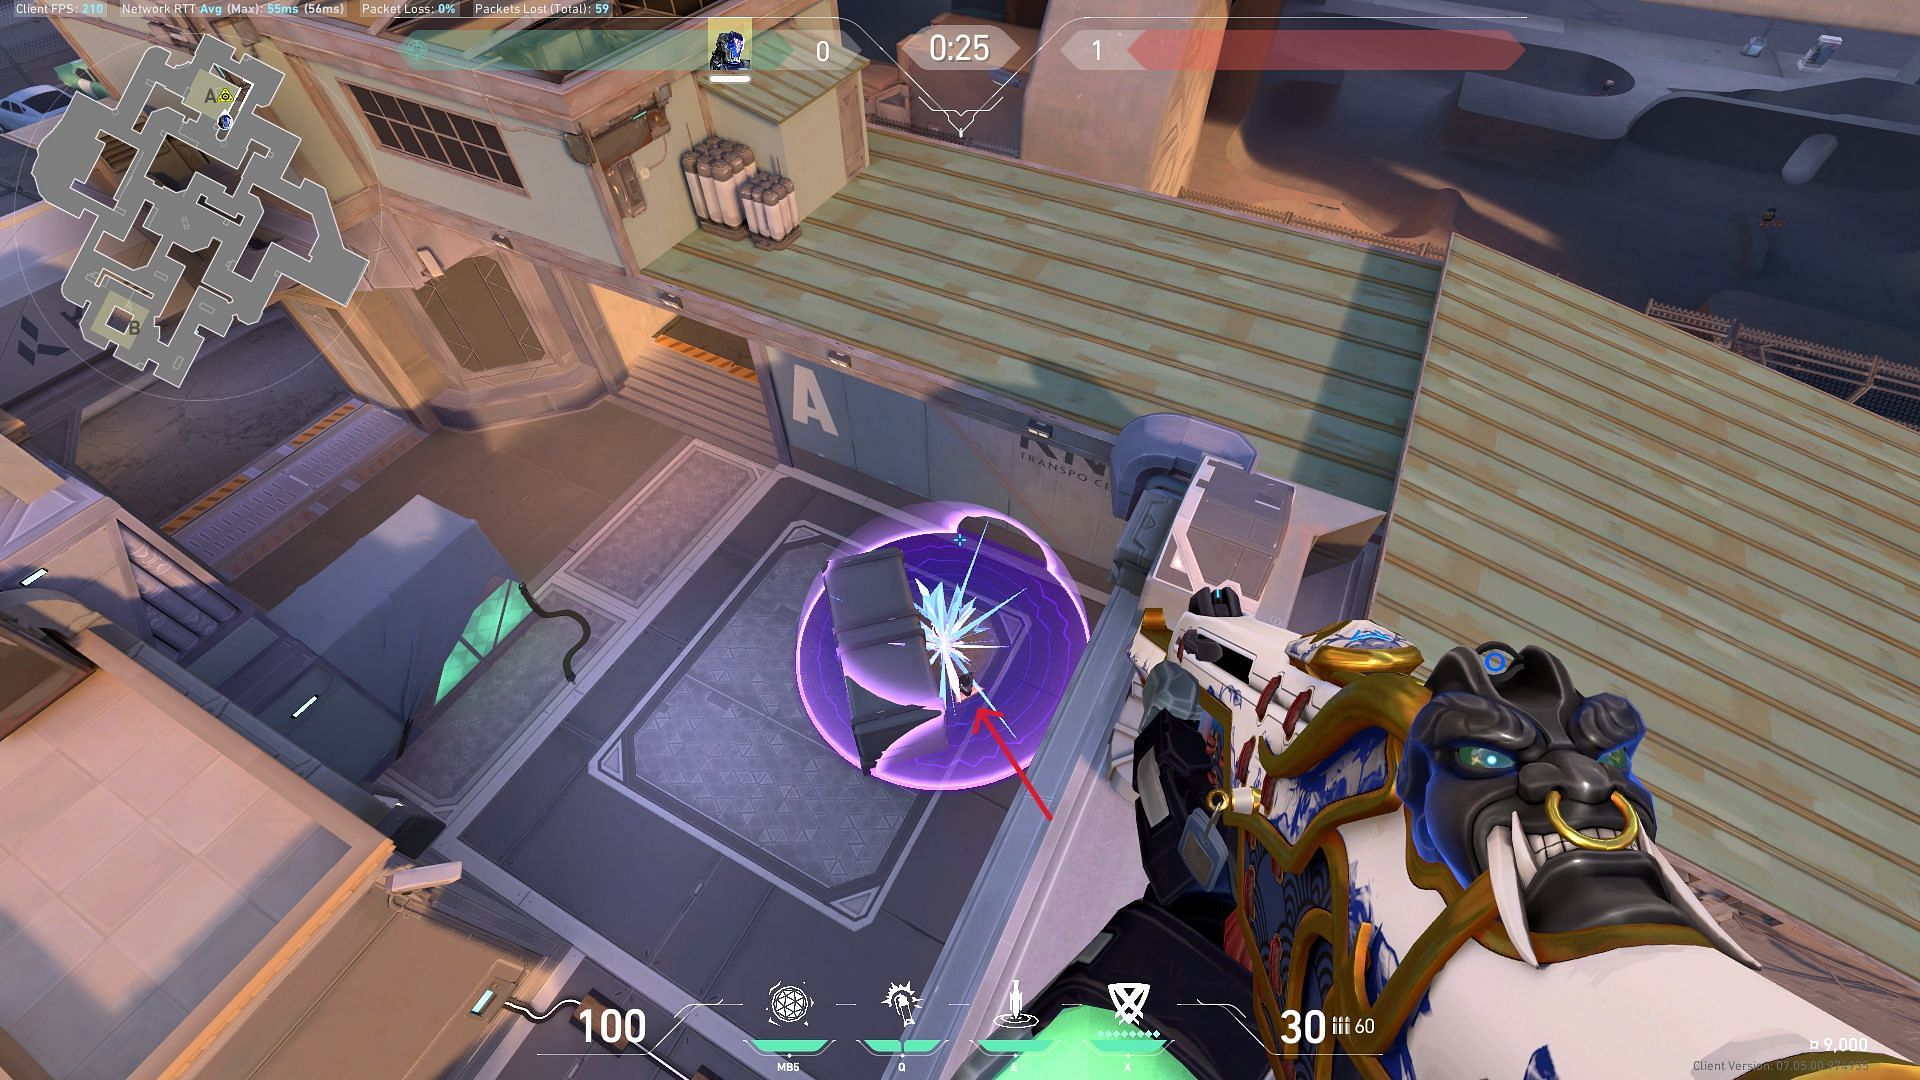
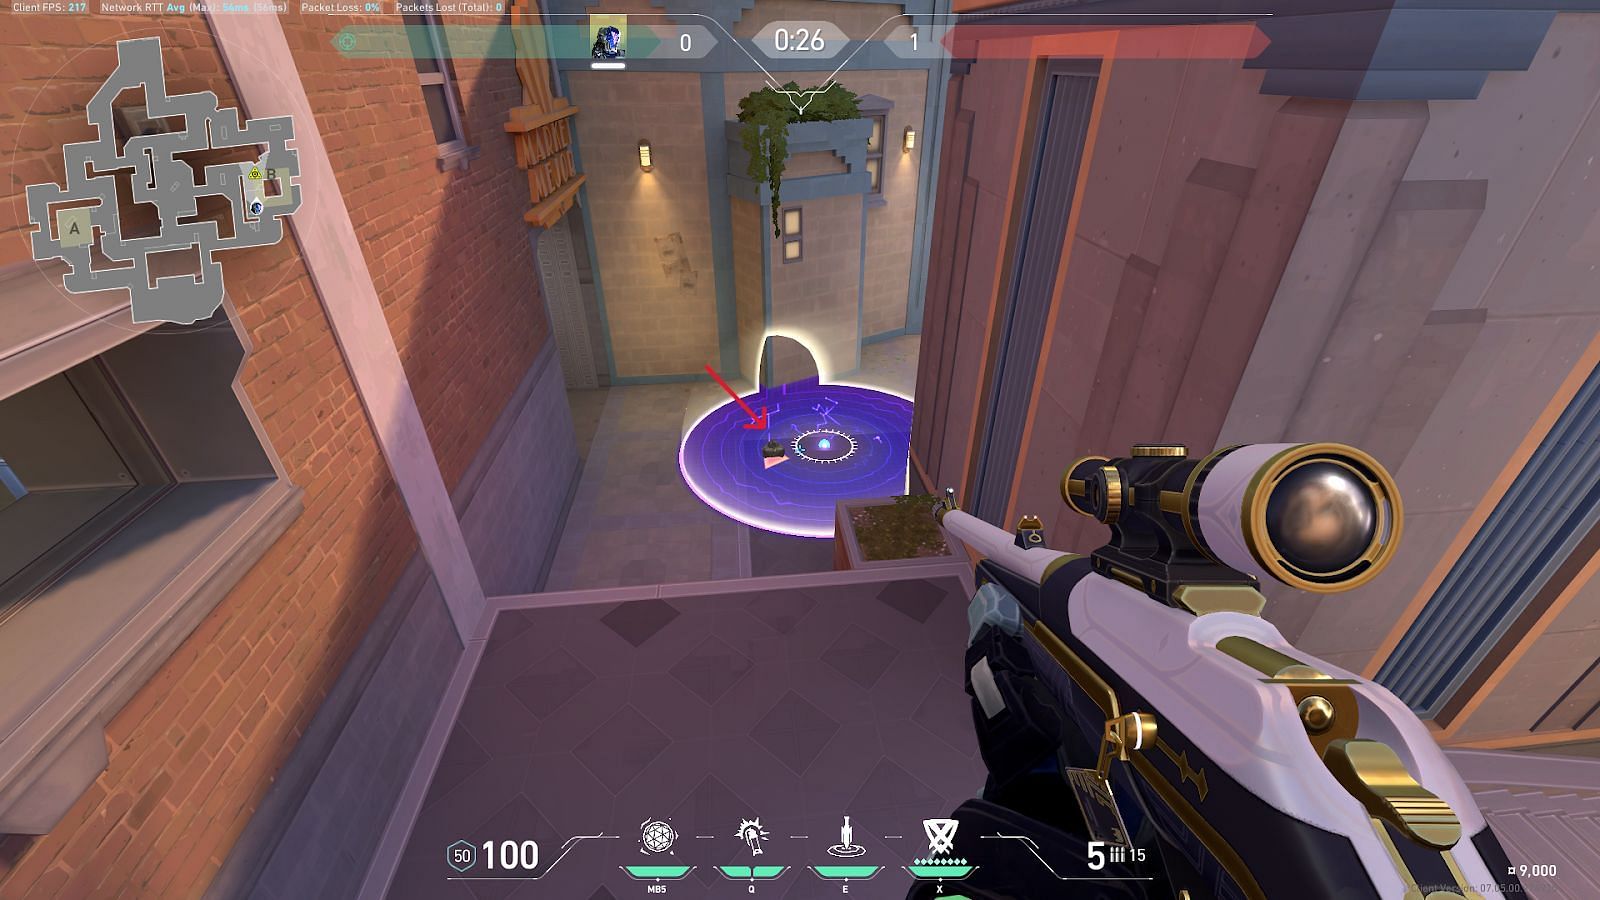
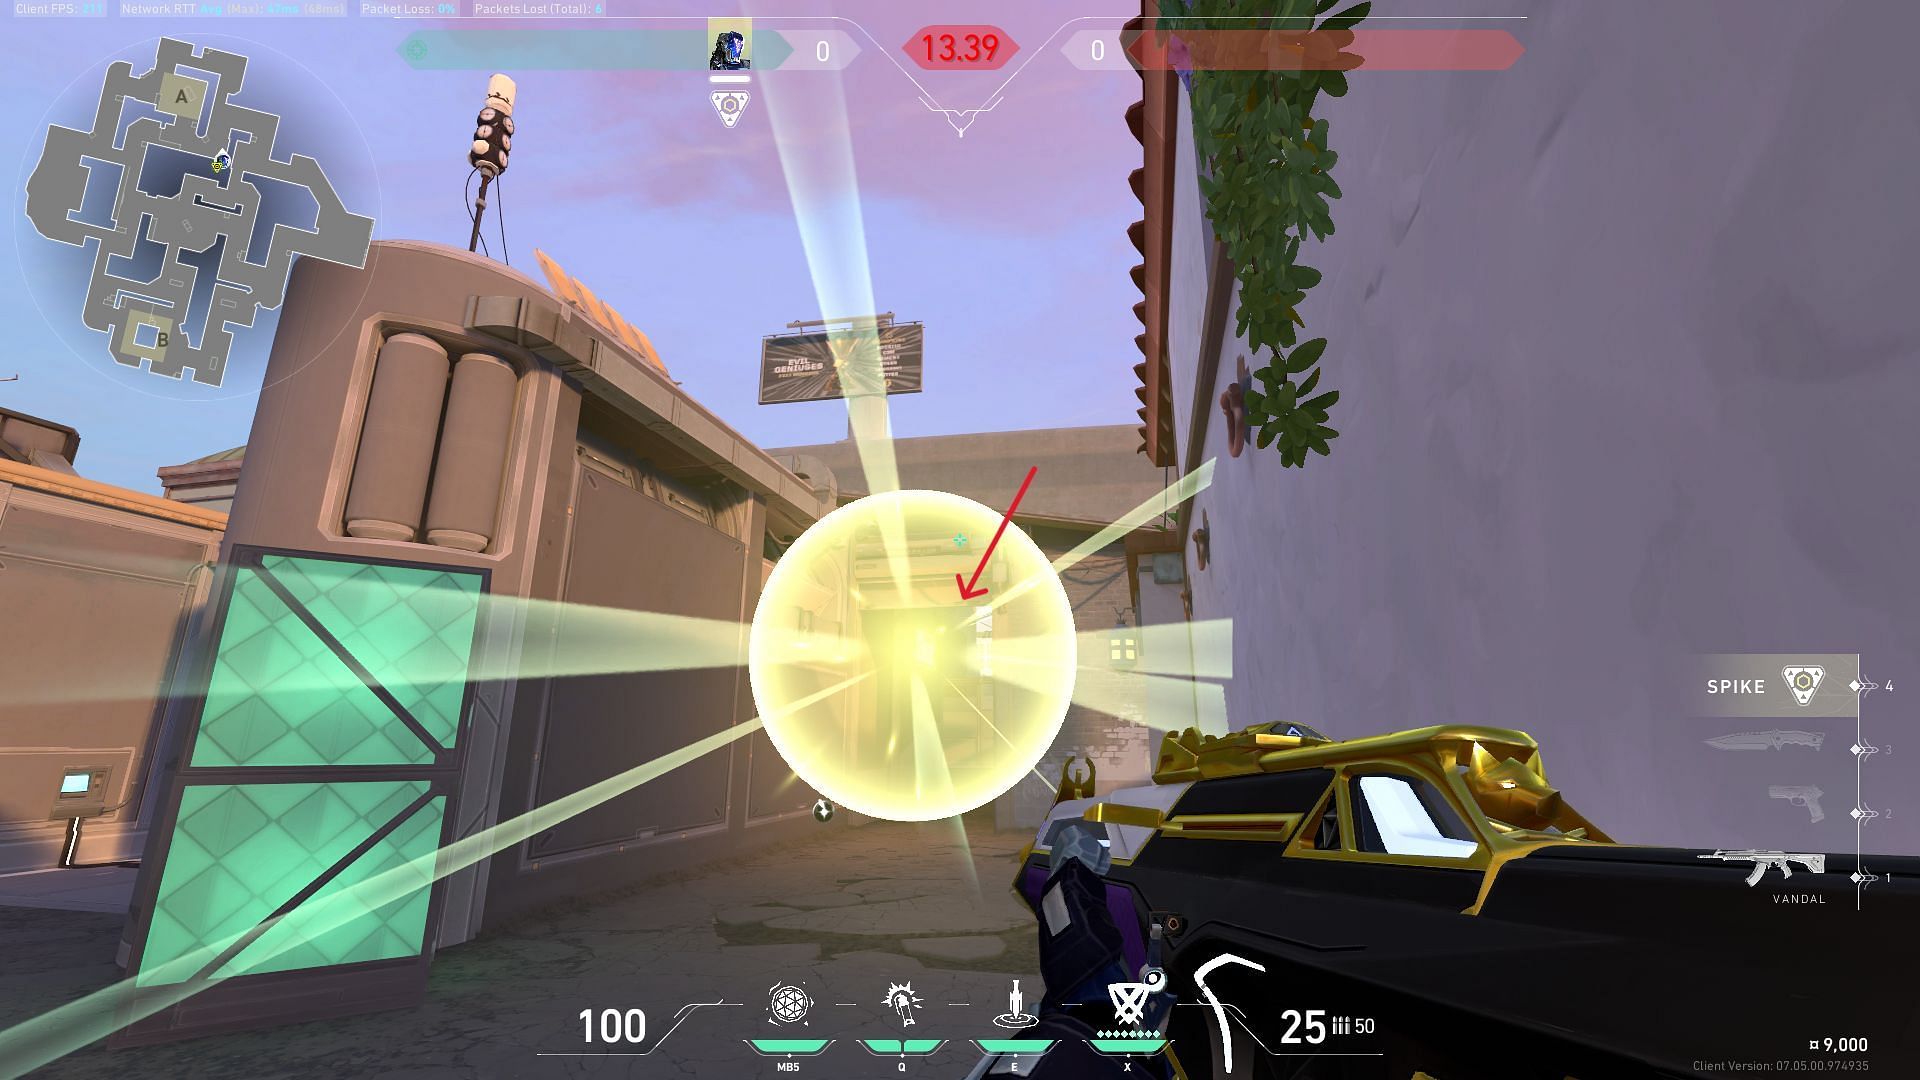
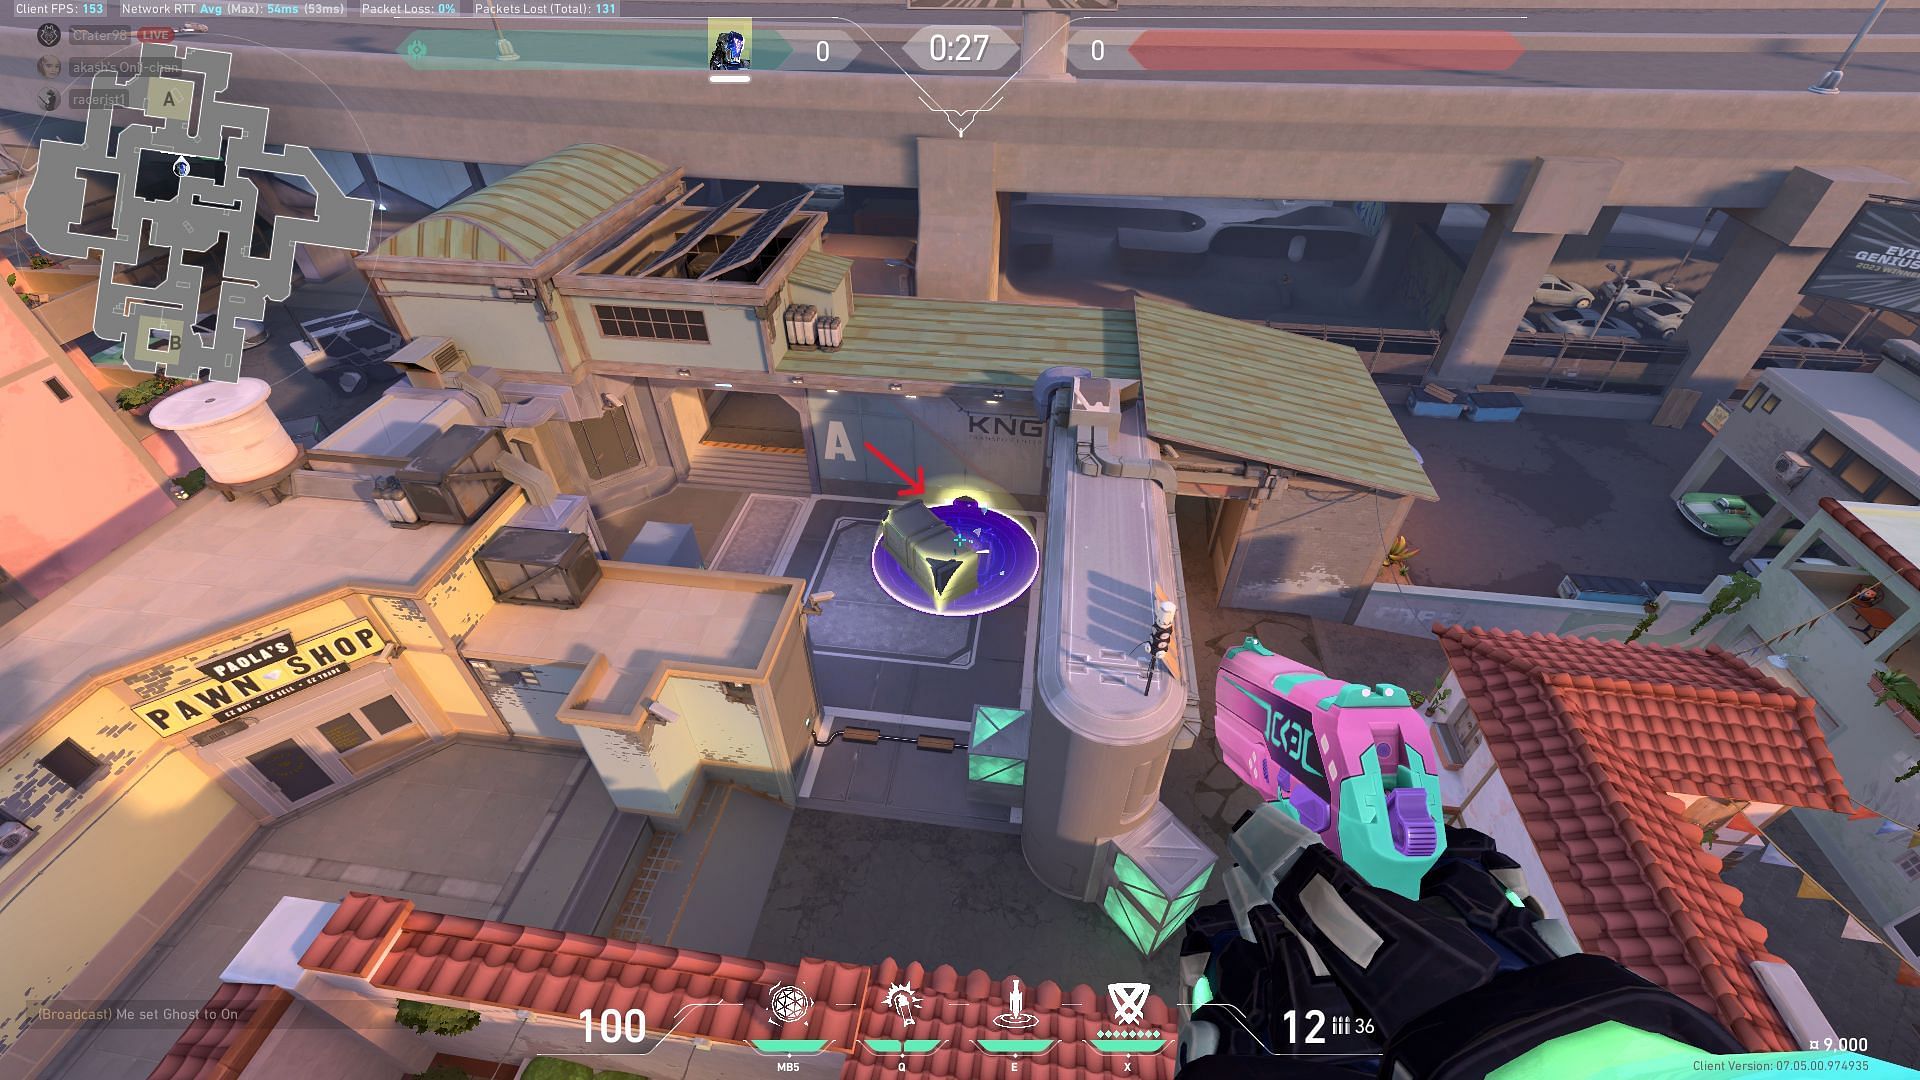
This lineup in Valorant's new map, Sunset, helps suppress enemies holding some major angles of the B-site. Get on top of the green box at Mid-Bottom. Stand on the exact spot as marked on the second image. Equip KAY/O's ZERO/point blade and move your crosshair upward. Match the HUD icons with the building pillar, as shown in the image. Left-click to fire, and it will eventually land in the middle of the B-plant site.
B) FRAG/ment lineups for post-plant
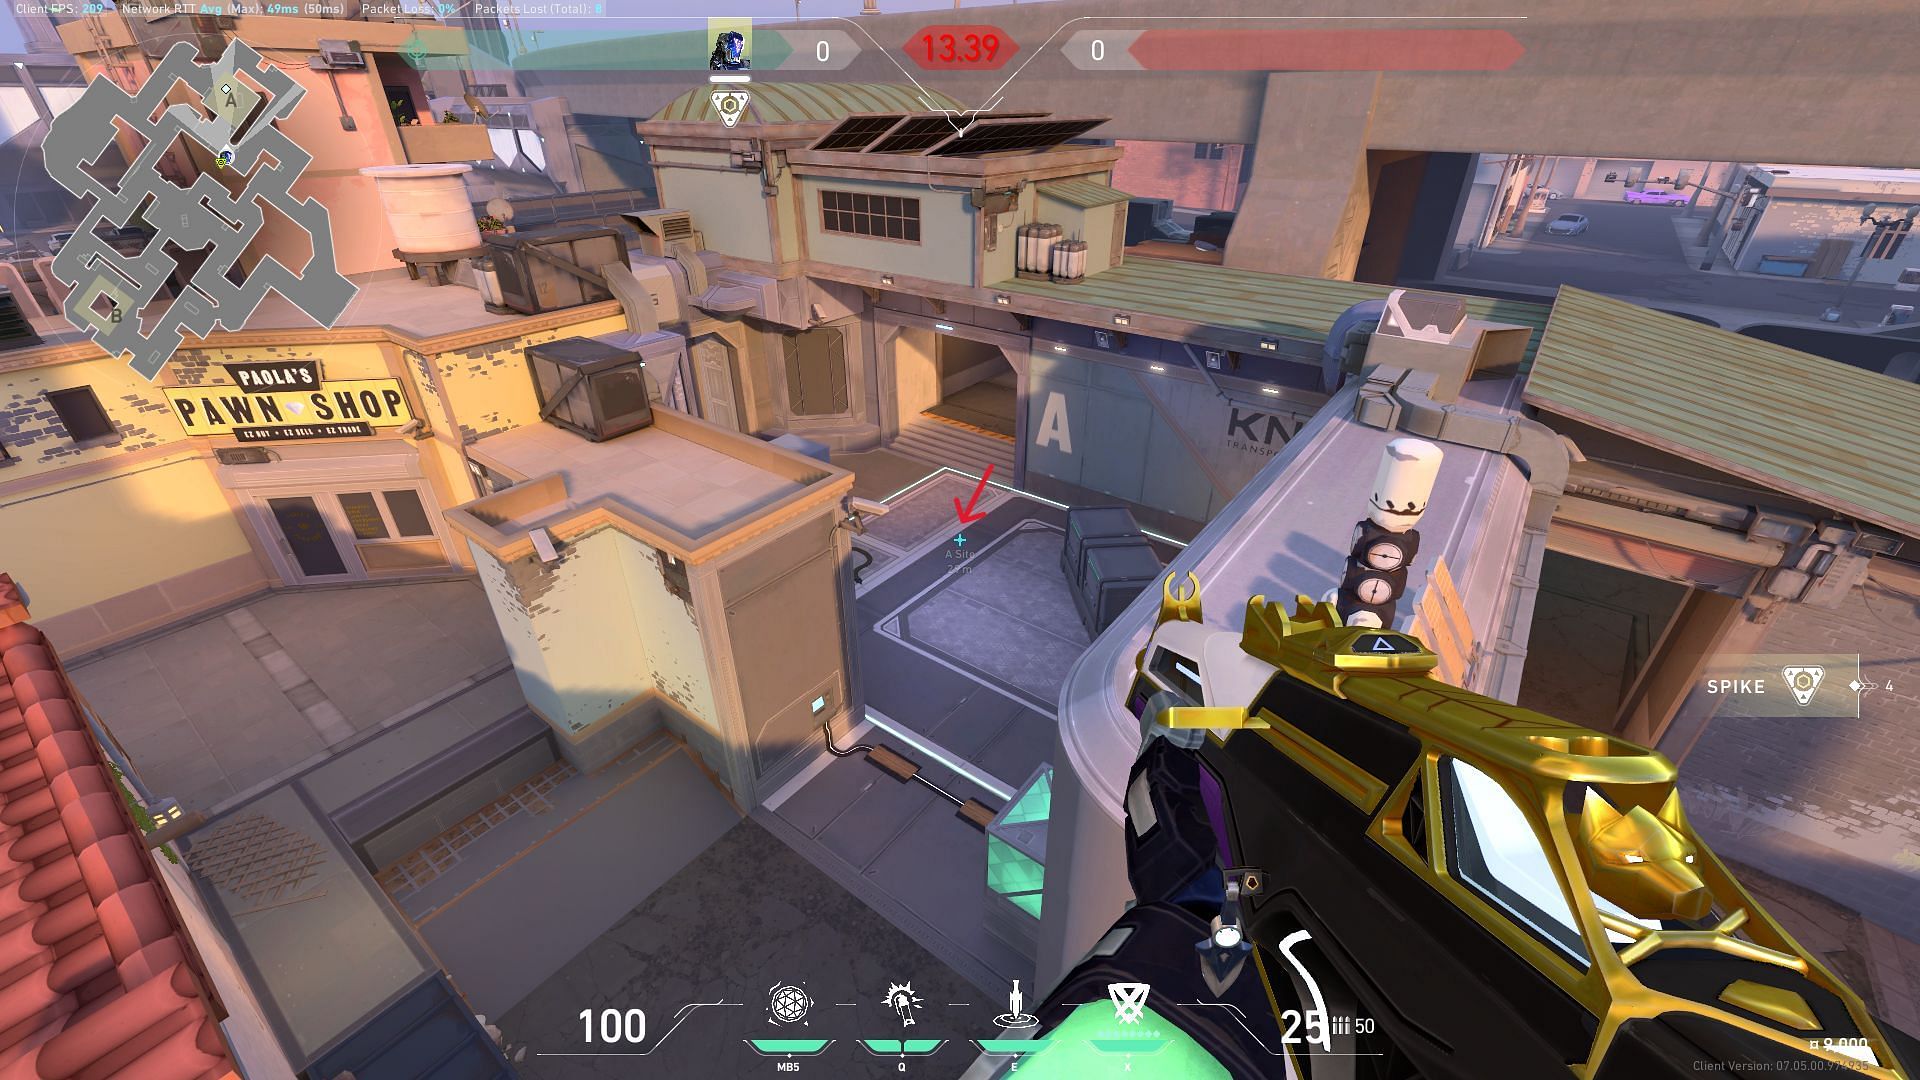
1) A-site FRAG/ment lineup
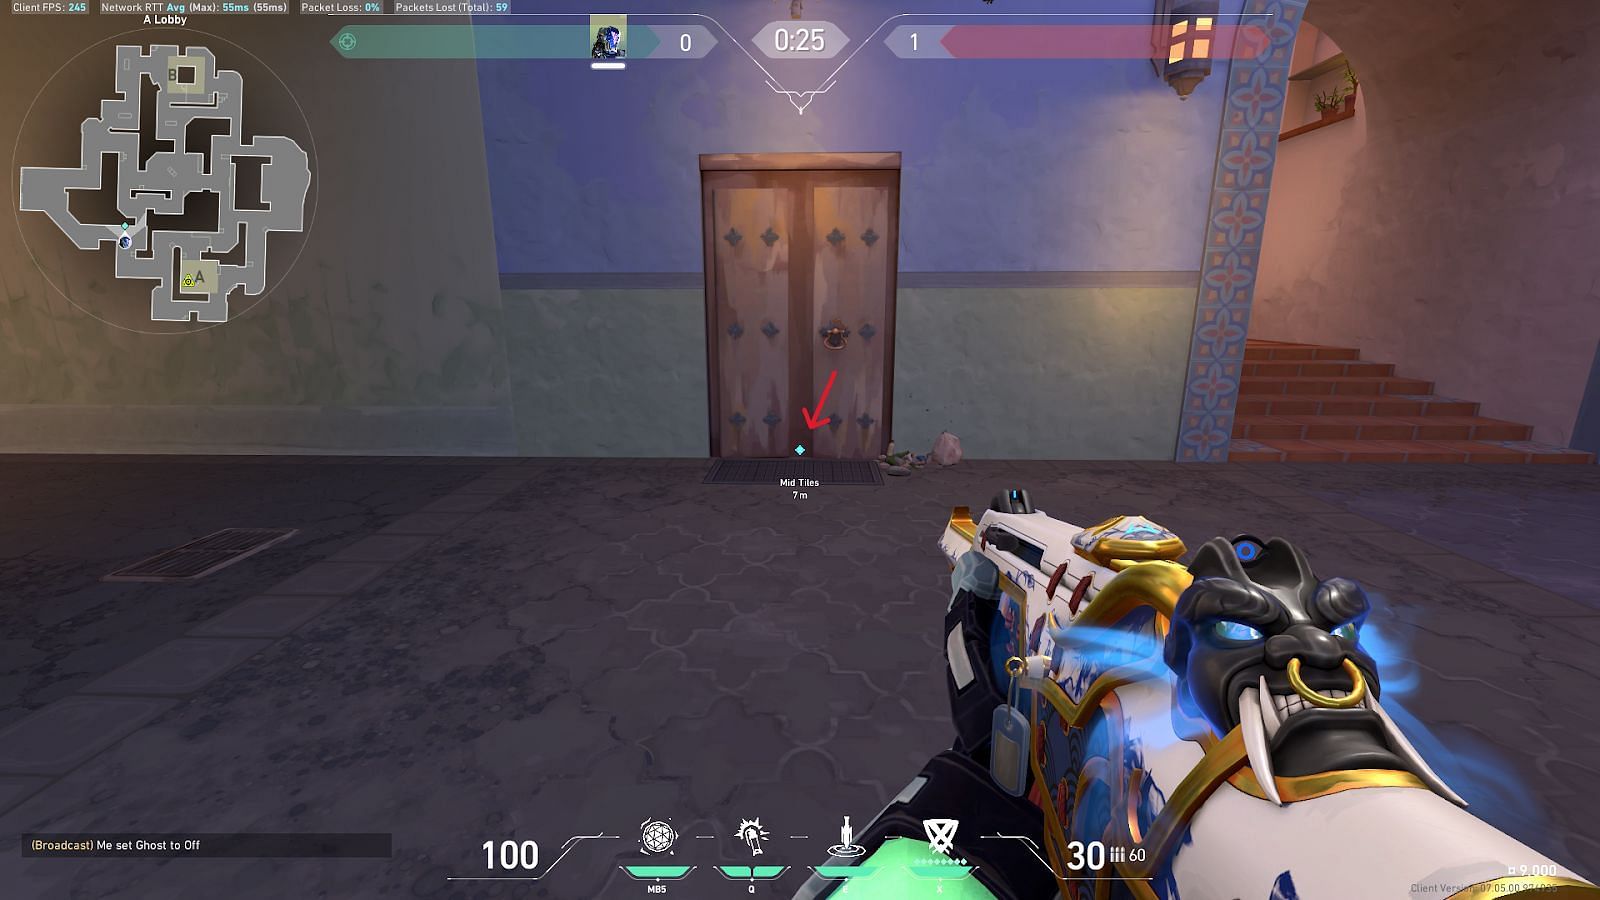
This lineup in the Sunset map in Valorant is useful for post-plant situations. You must stand beside the wooden door at A-lobby, as marked in the image above. Position yourself and place the crosshair upward, matching the tip of the ZERO/point (E) icon, and match other HUD elements with the surroundings as marked in red arrows in the image. Press JUMP and left-click simultaneously to make the FRAG/ment grenade land at the back of the solid black box at A-site.
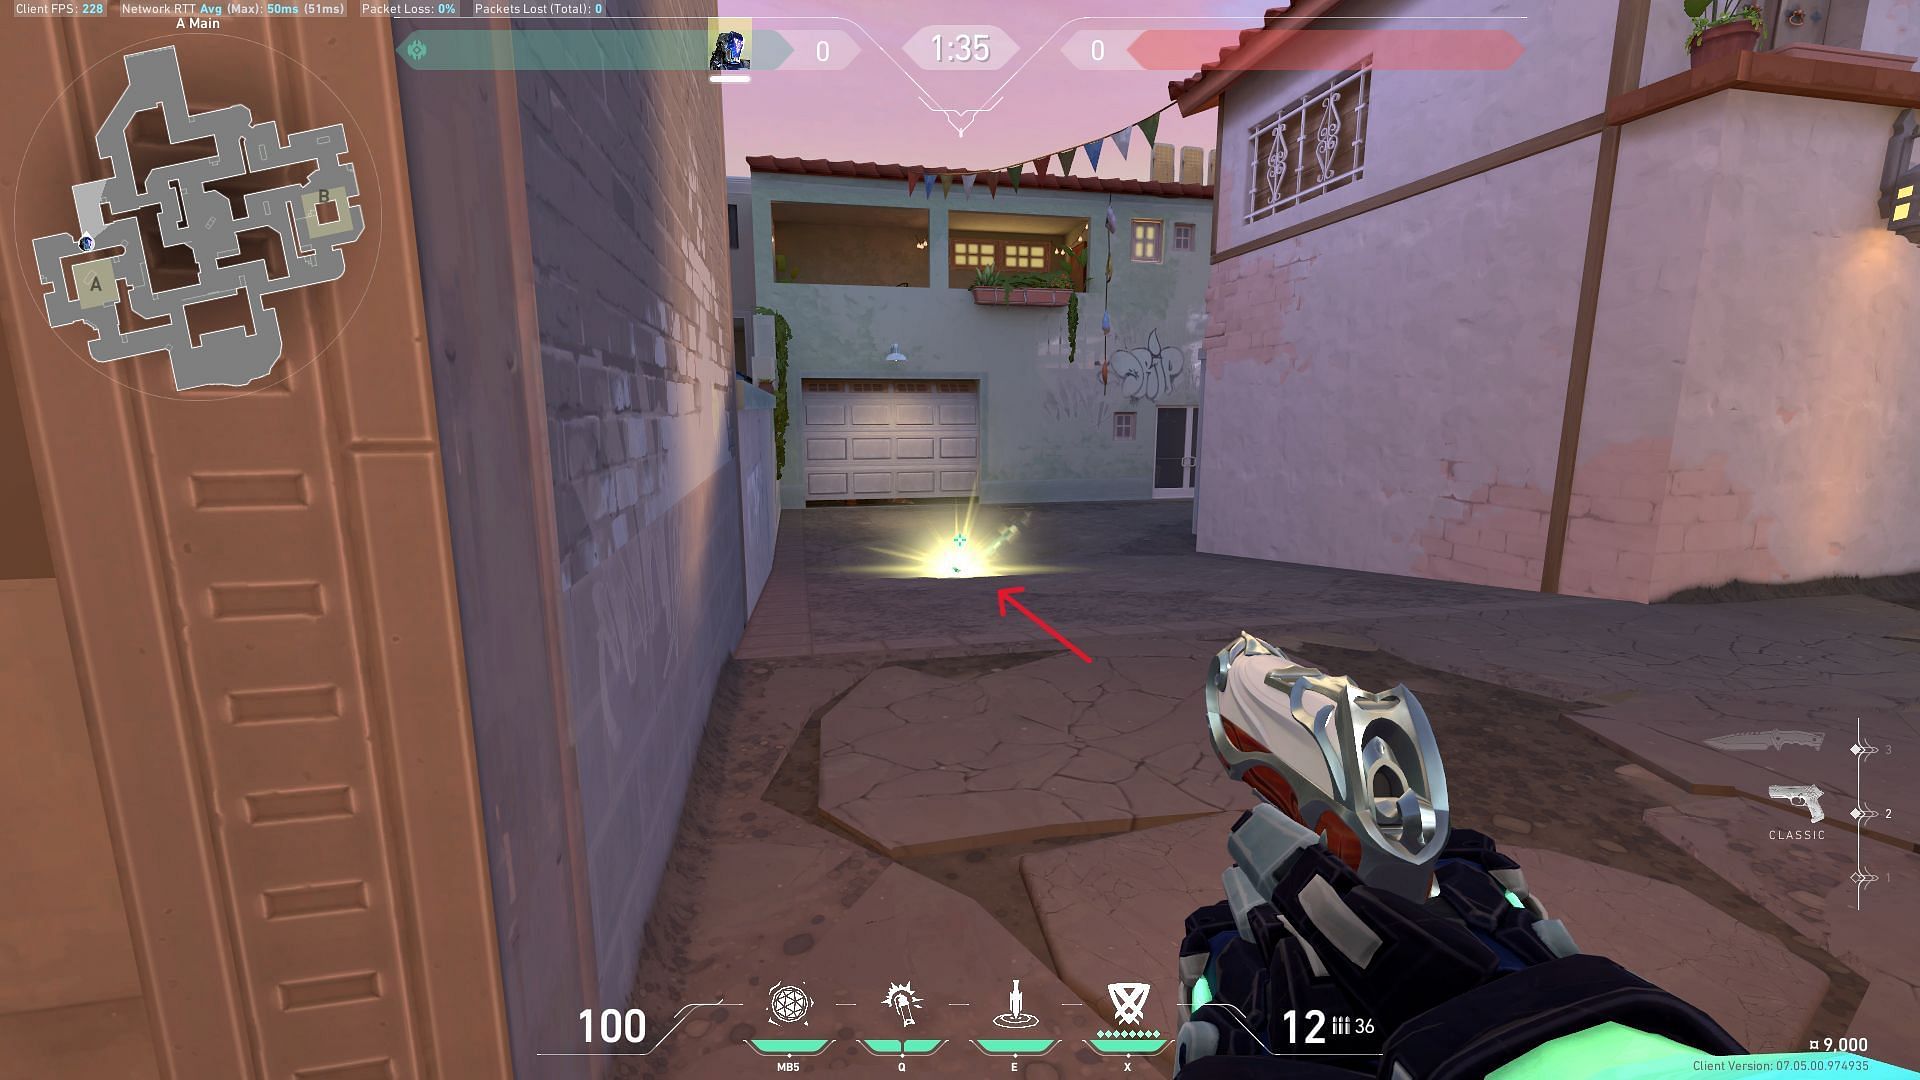
2) A-site FRAG/ment second lineup

This is another lineup for FRAG/ment grenades that can be used for post-plant scenarios in Valorant's Sunset map. Position yourself at the corner of the A-lobby, as marked in the above images. Place your crosshair upward while matching the HUD elements with the floor and small tower on your left. Make sure to match the HUD elements as accurately as possible by referring to the images above. This move will highly impact the landing of the FRAG/ment grenade.
Jump and left-click at the same time to fire the grenade upward. The grenade will land exactly near the Green boxes at the A site. You can also throw a flash grenade to stall the spike defusion and catch enemies off guard in Valorant's new map, Sunset.
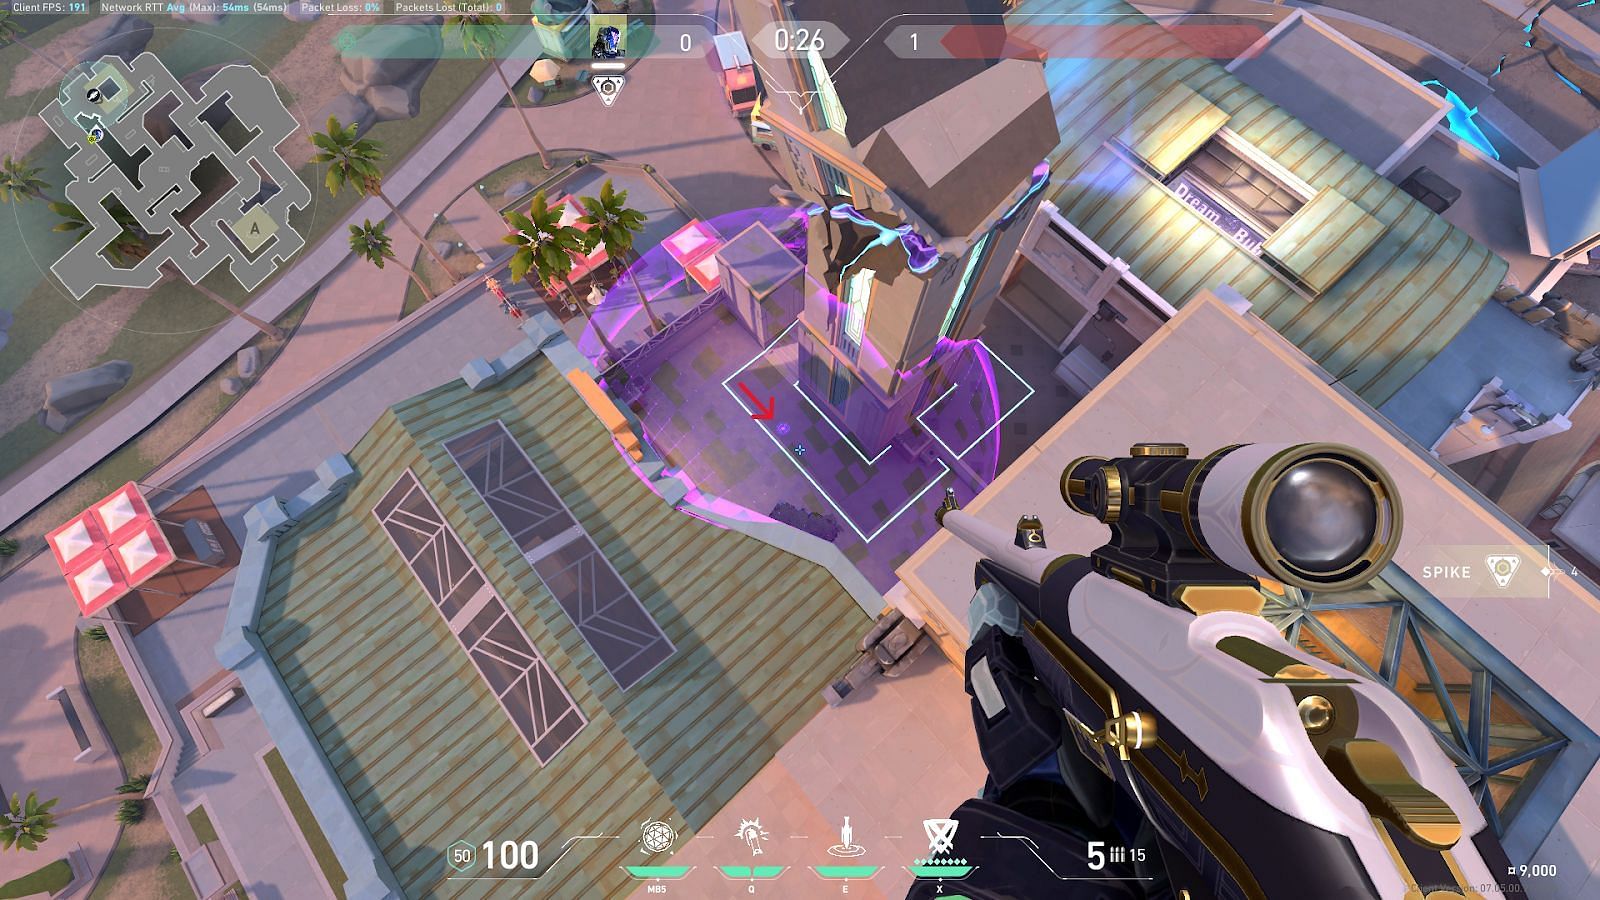
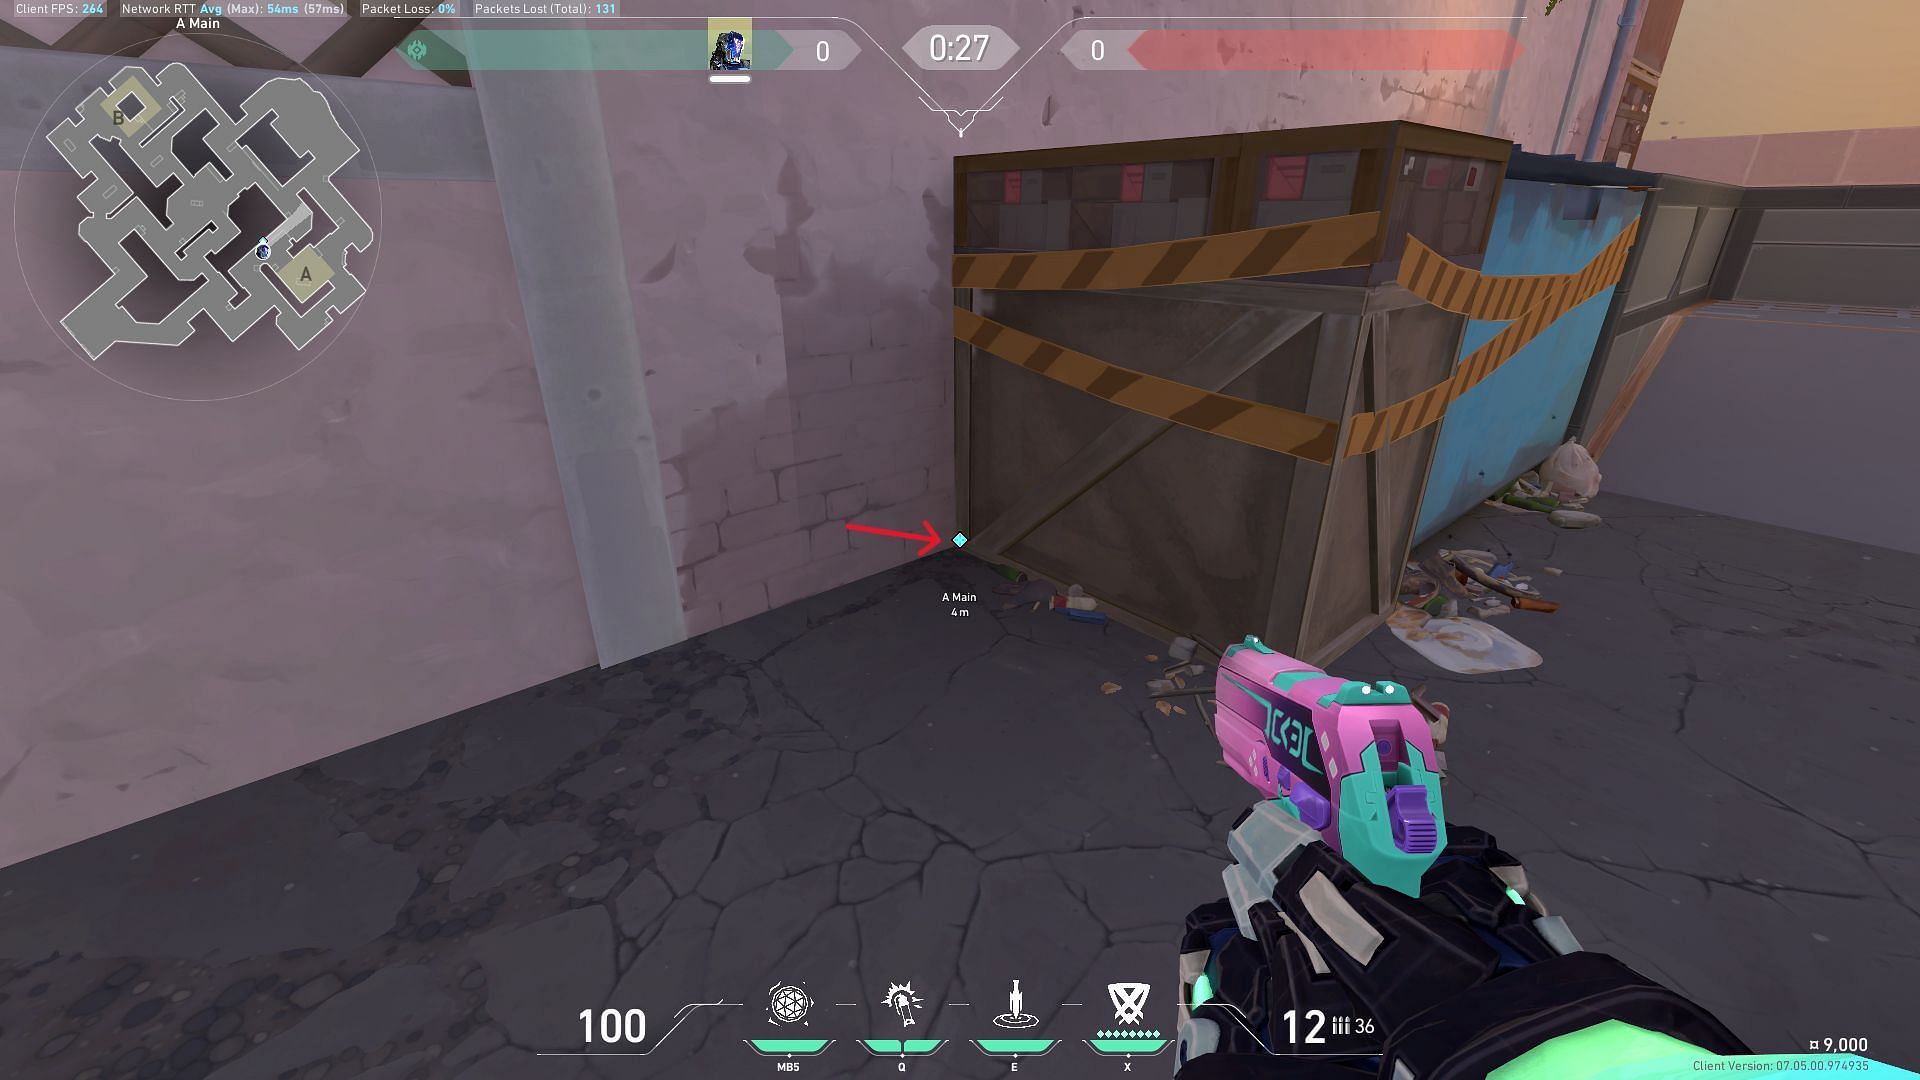
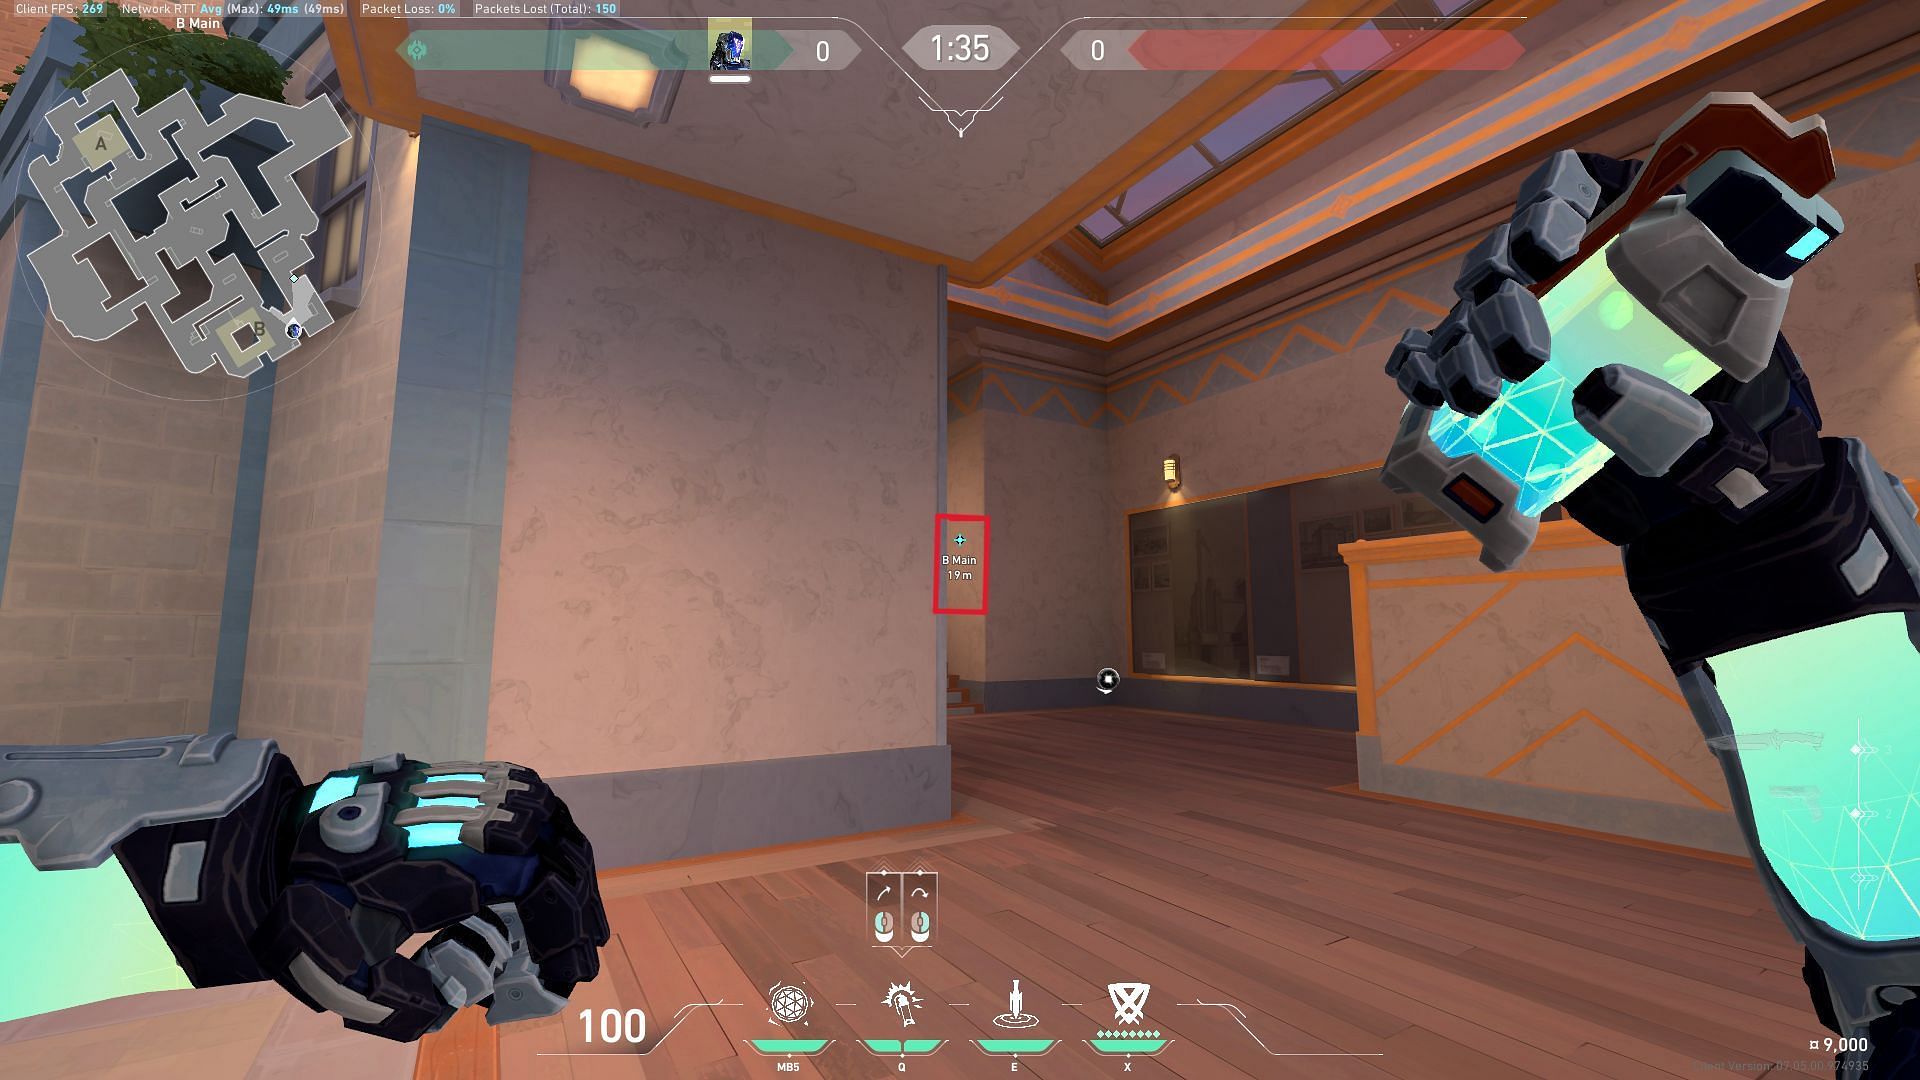
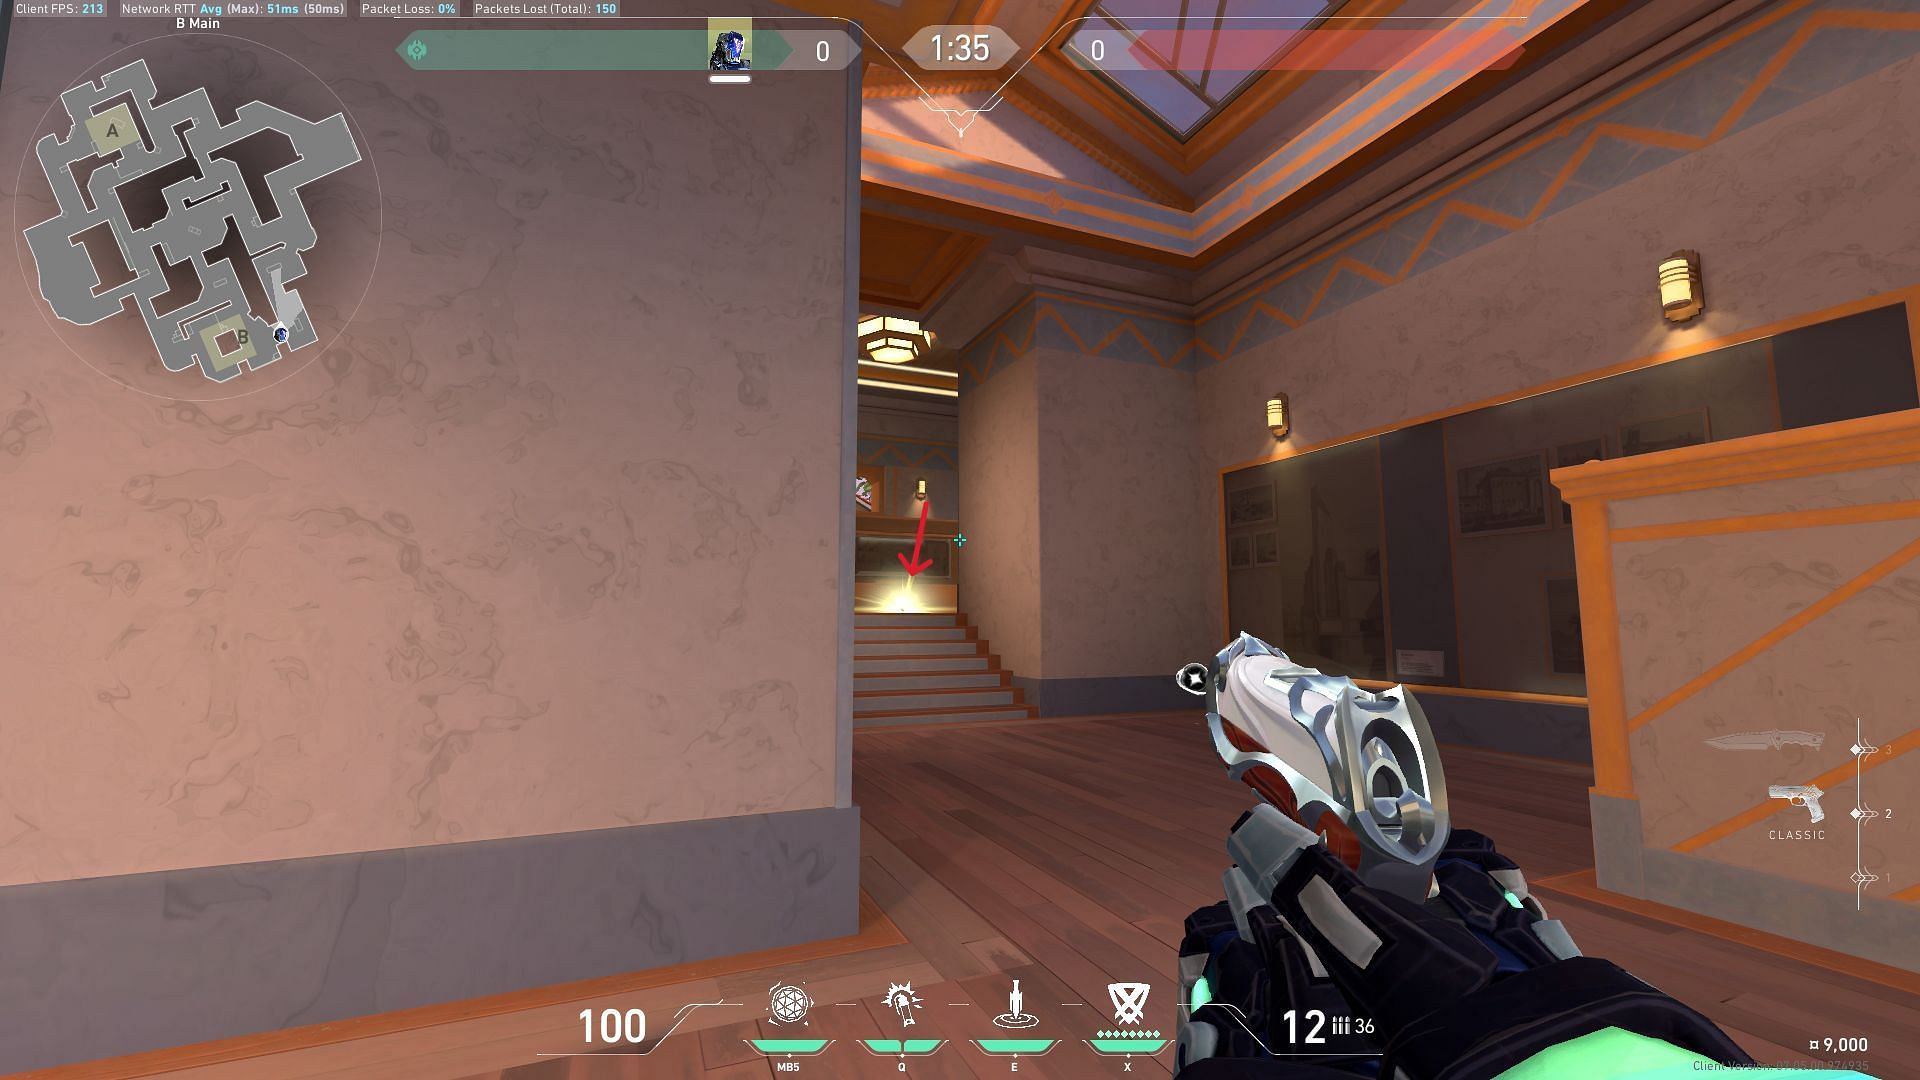
3) B-site FRAG/ment lineup
For the lineup to work out, you must stand in front of the Grey pillar of the dark-colored wall at the B-lobby. Equip KAY/O's FRAG/ment nade and place your crosshair upward, exactly like the one marked in the image above. Left-click to fire the nade up in the air so it lands at the edge of the B spike planting site of the Sunset map by Valorant, as shown above.
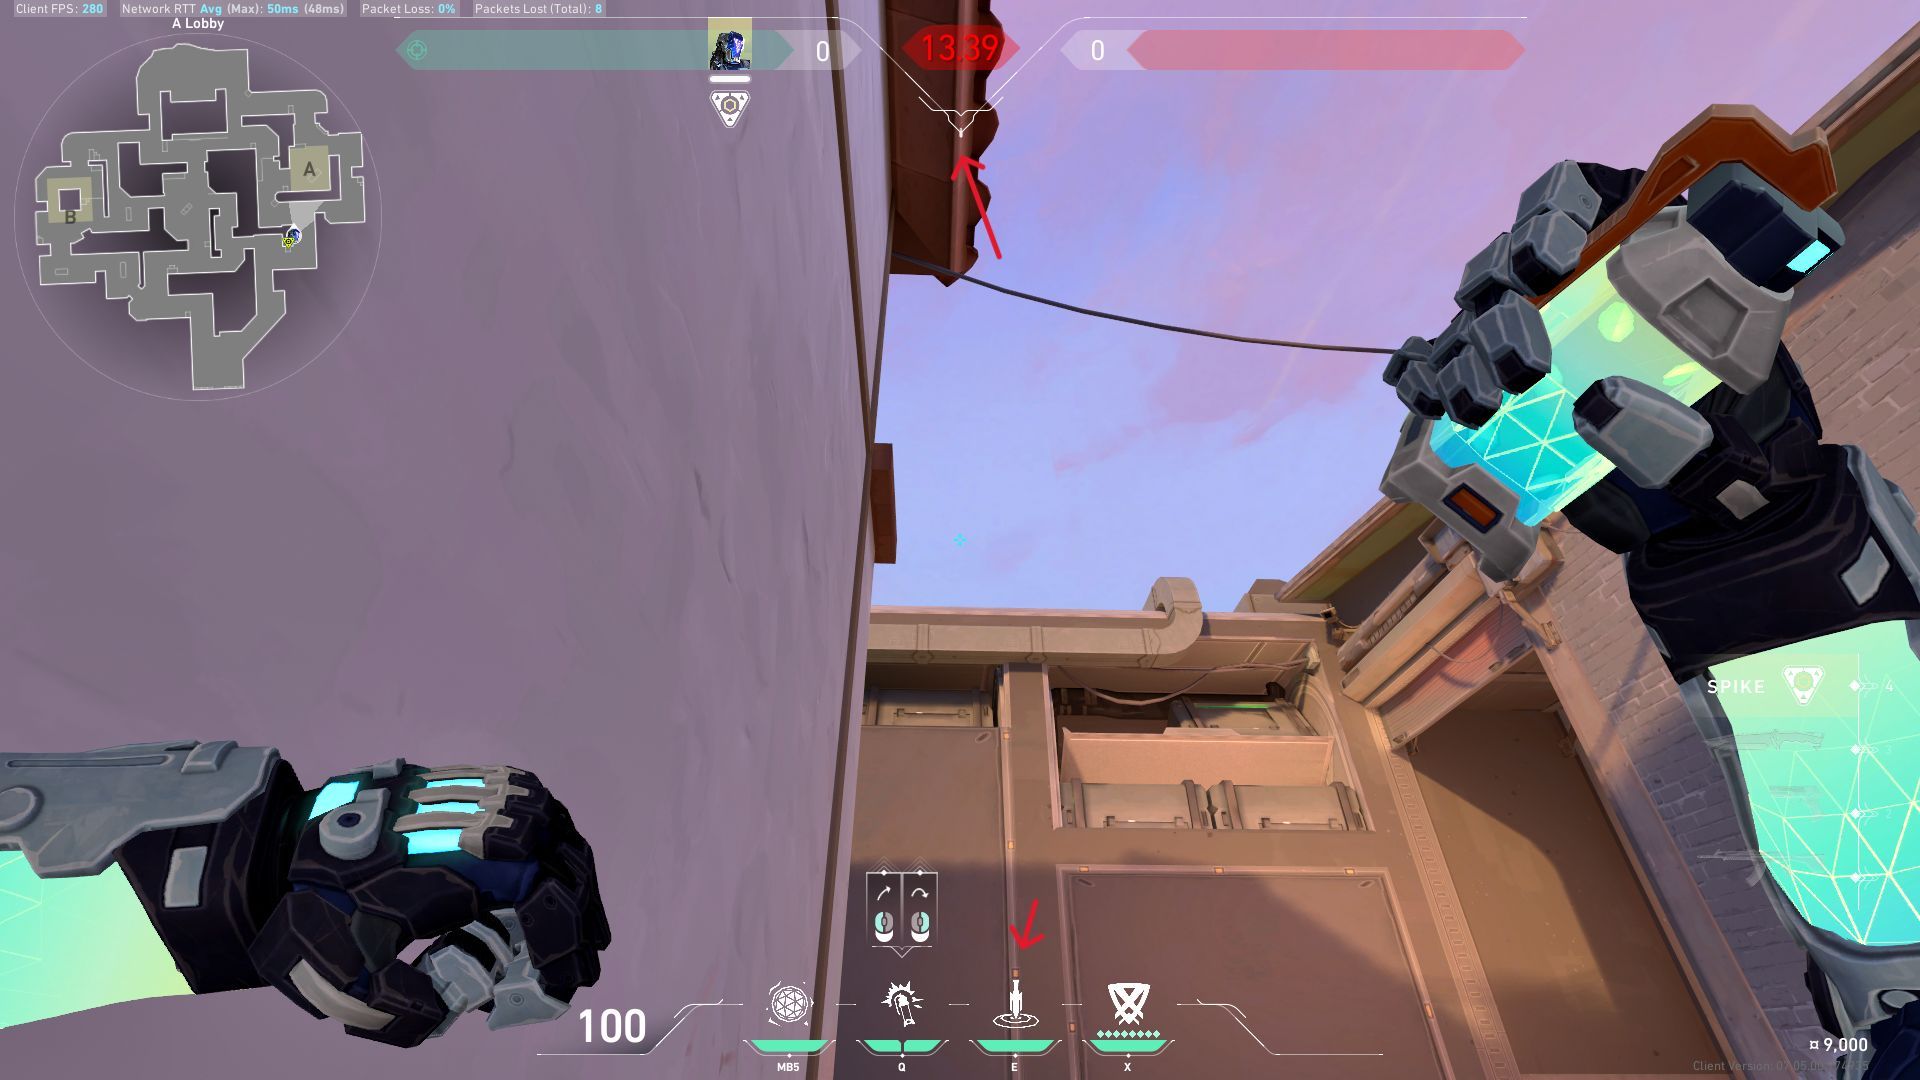
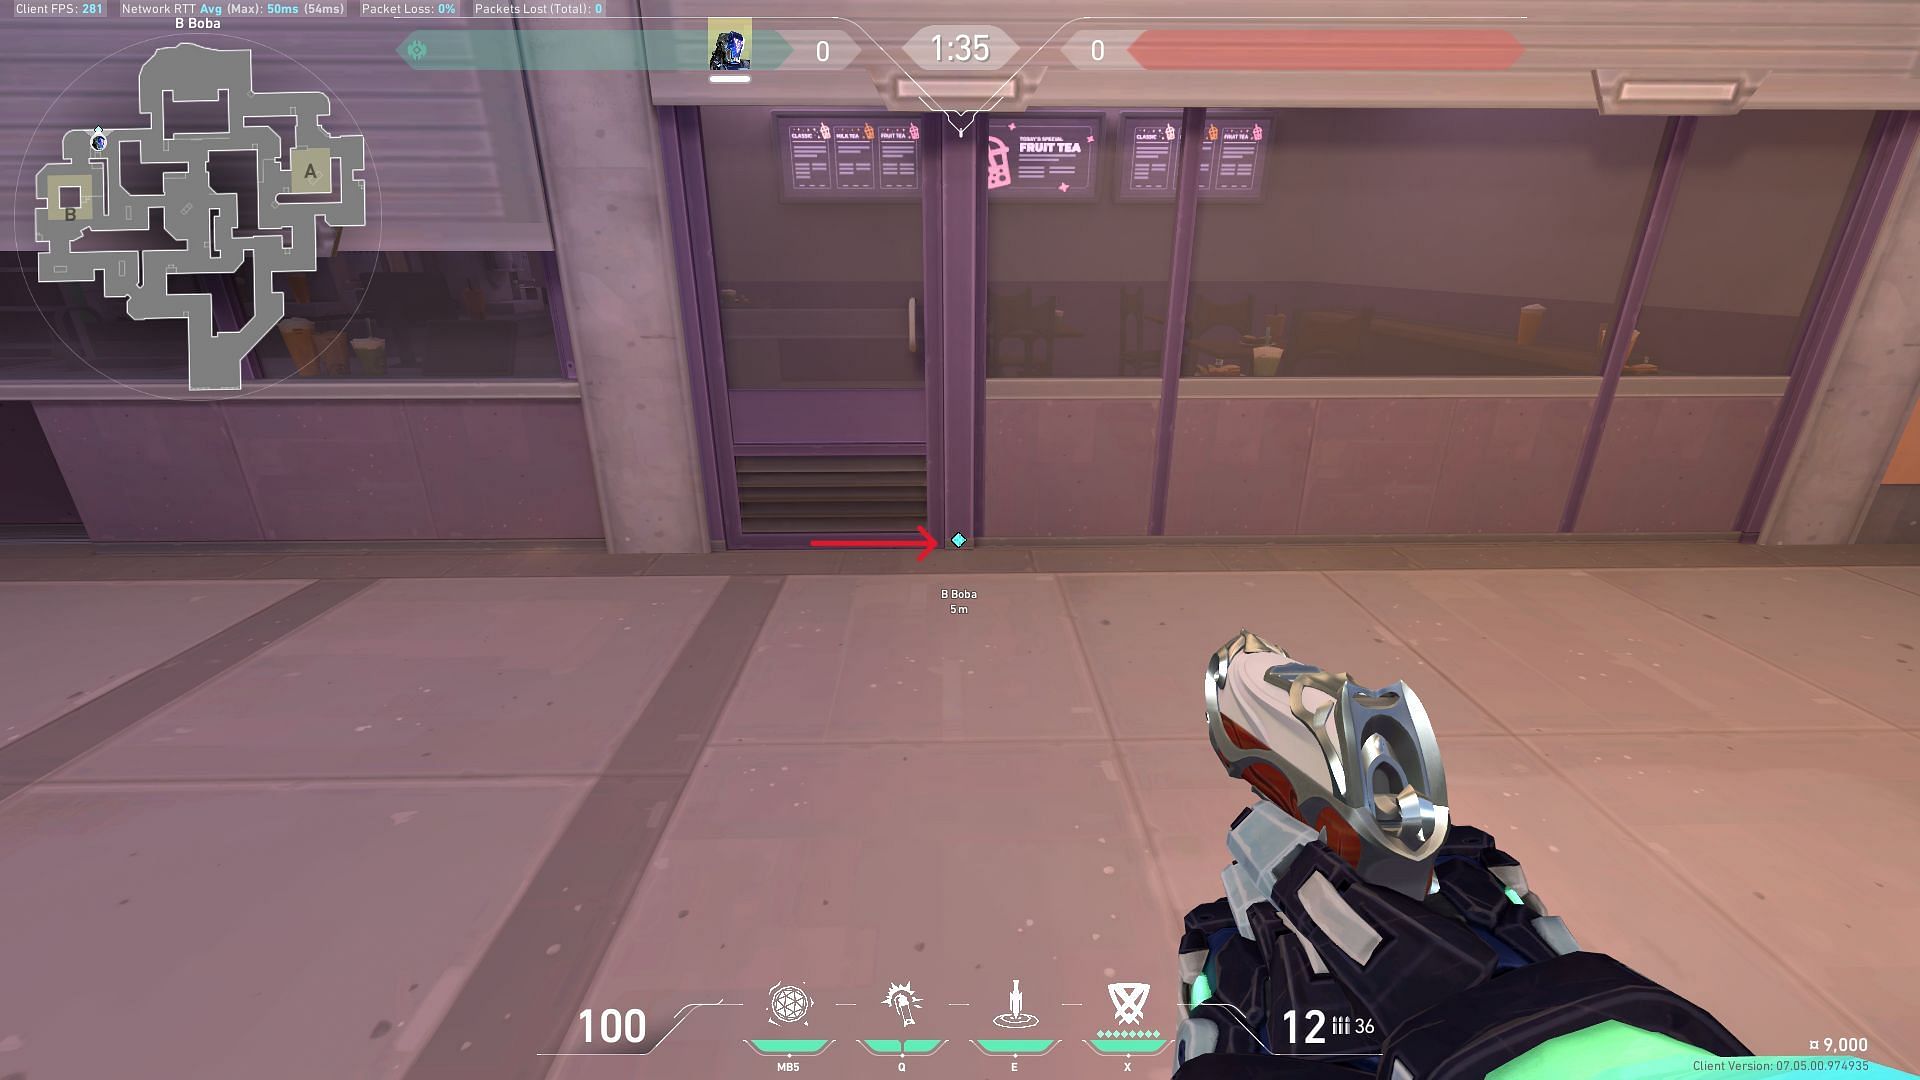
4) B-site FRAG/ment post-plant second lineup
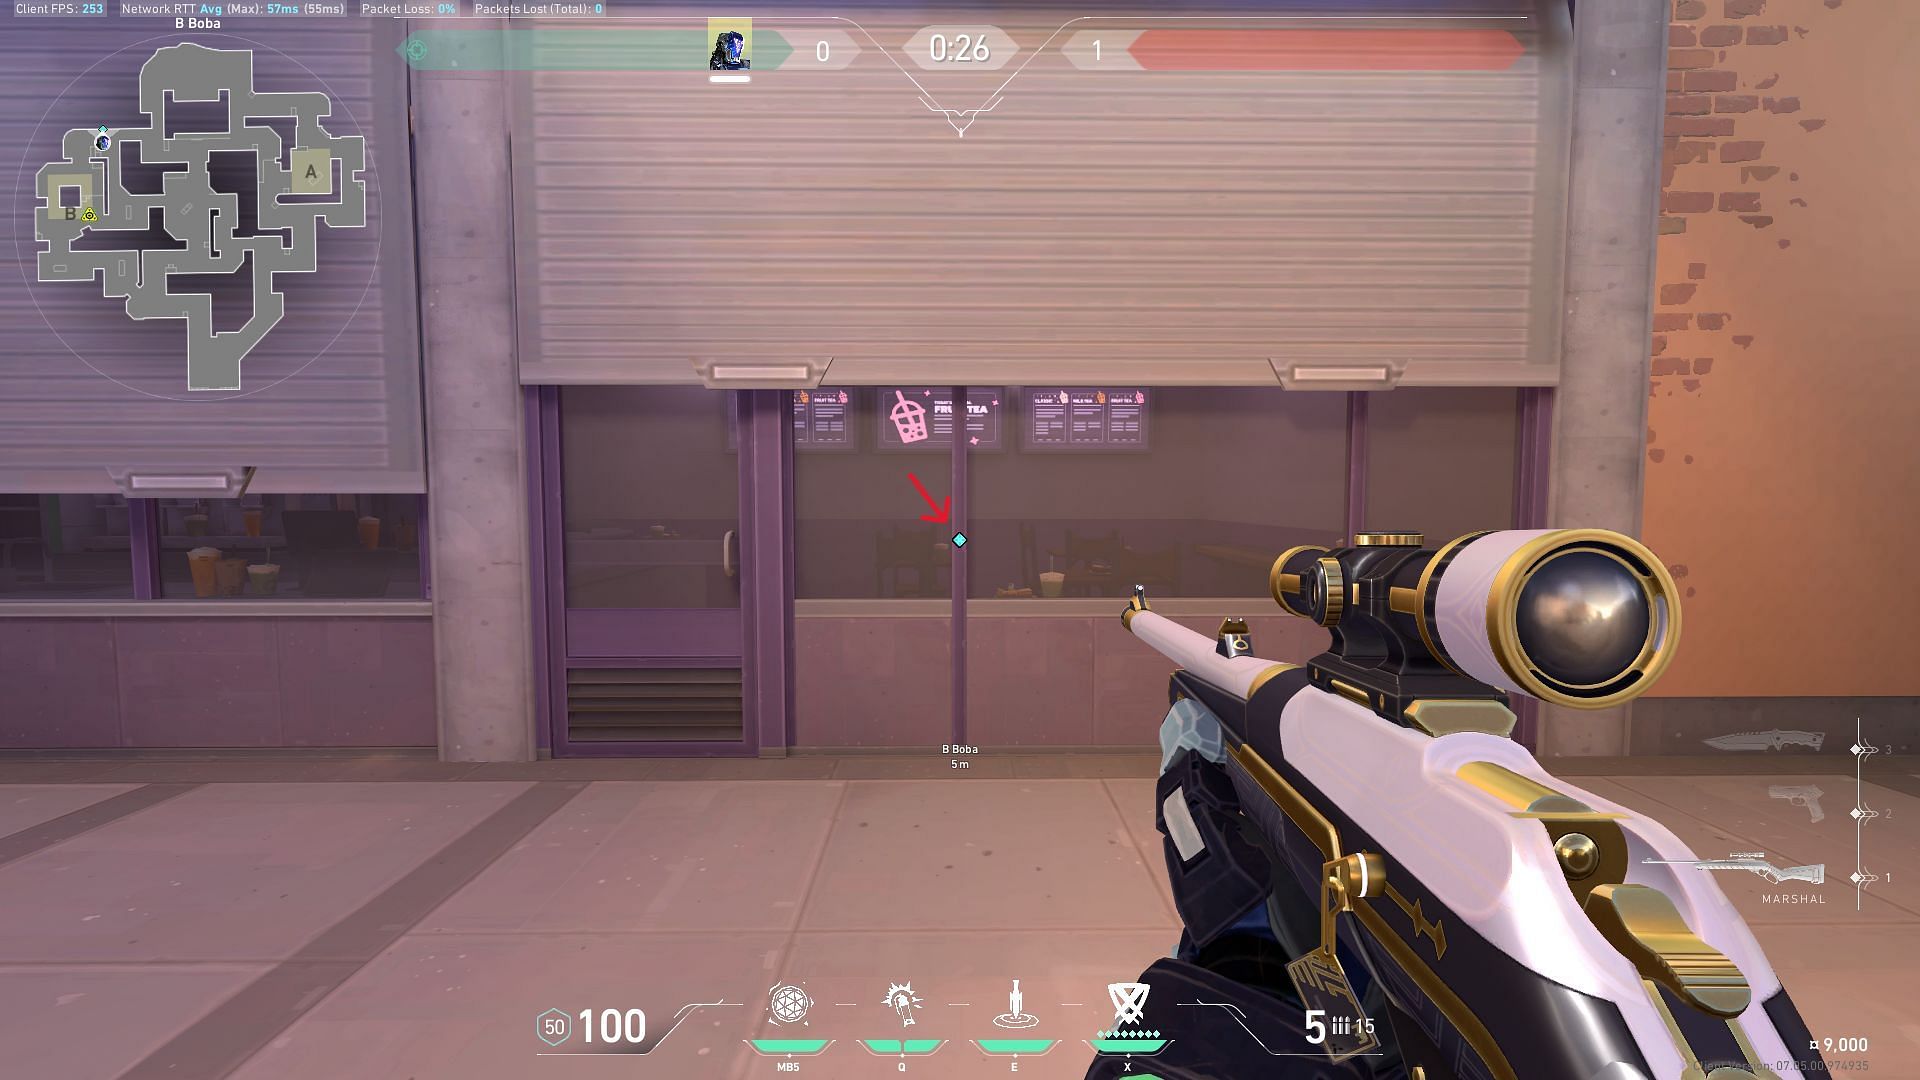

For this lineup, you need to get to the back of the B site of the Sunset map. Head to B-boba and place yourself in the middle of the purple line. Look upward, place your crosshair a little bit above the tower tip, and match the HUD icons as shown in the image. Jump and left-click to throw the nade upward so that it lands on the exact spot on the B plant site of the Sunset map in Valorant.
C) FLASH/drive lineups
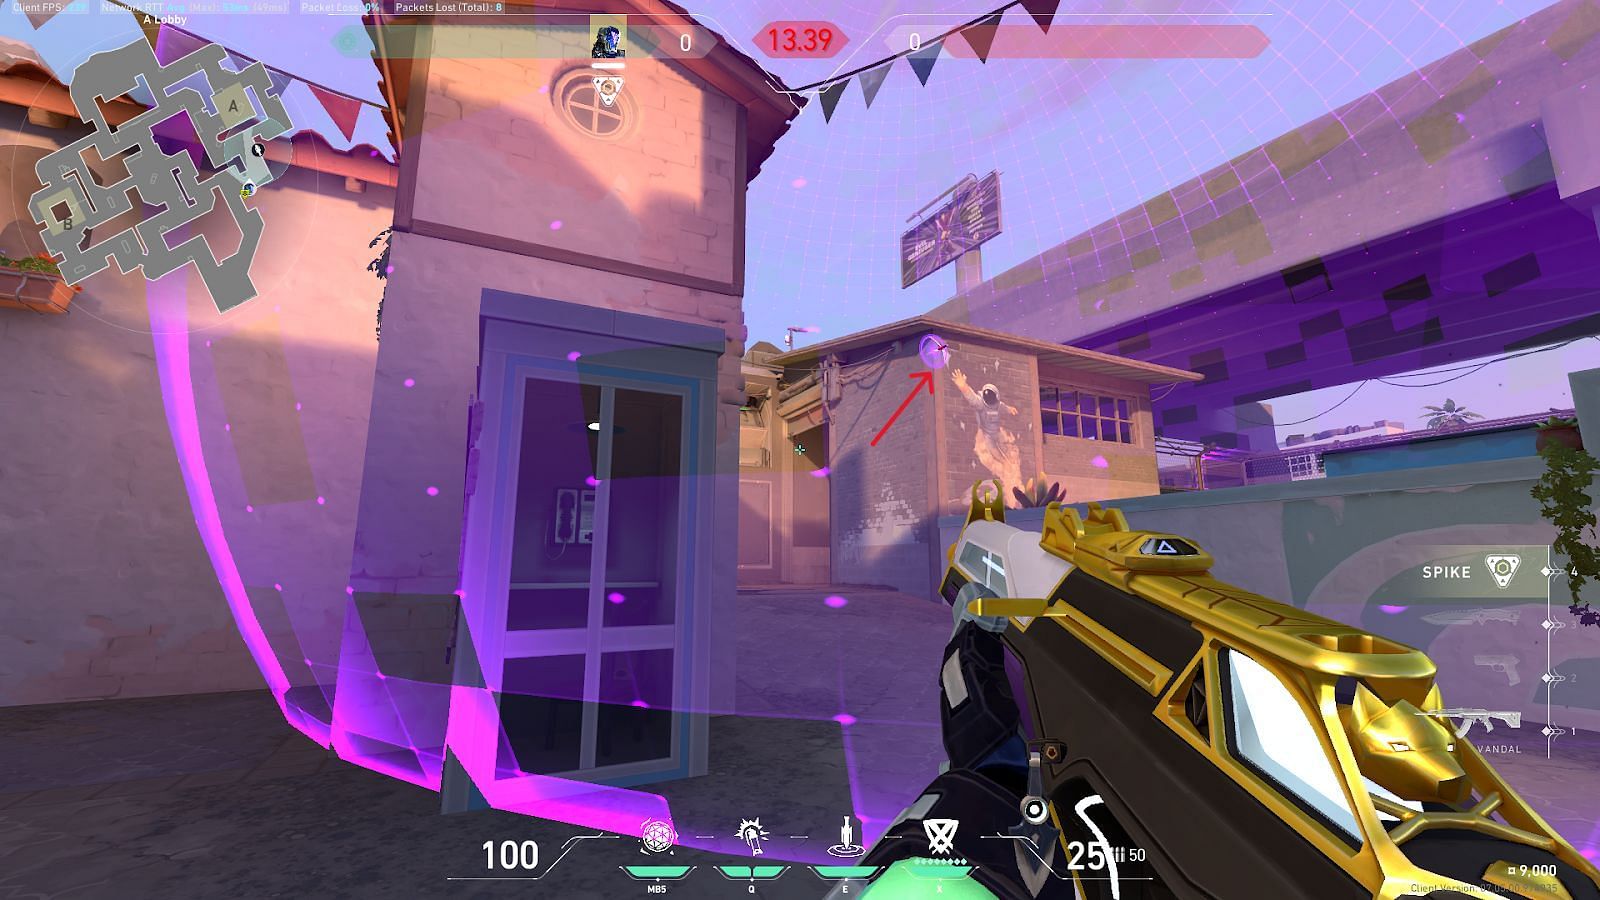
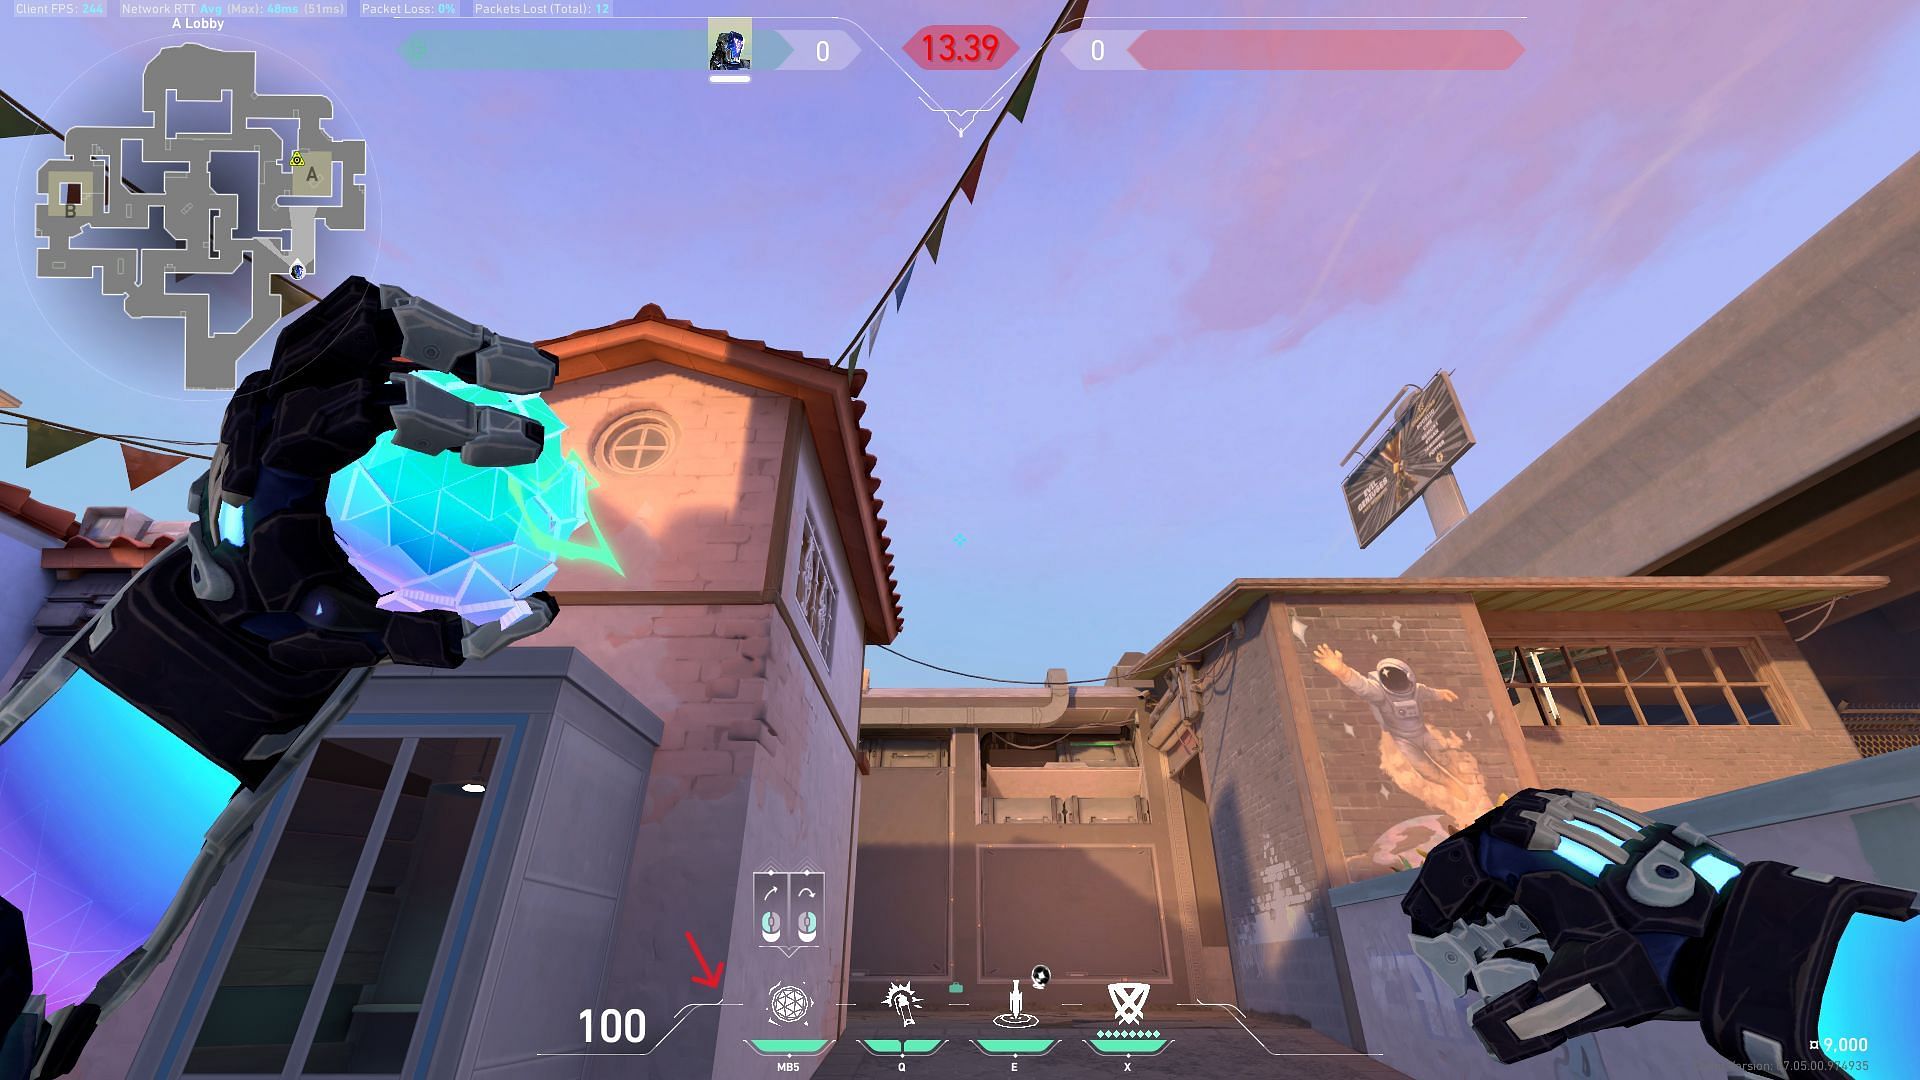
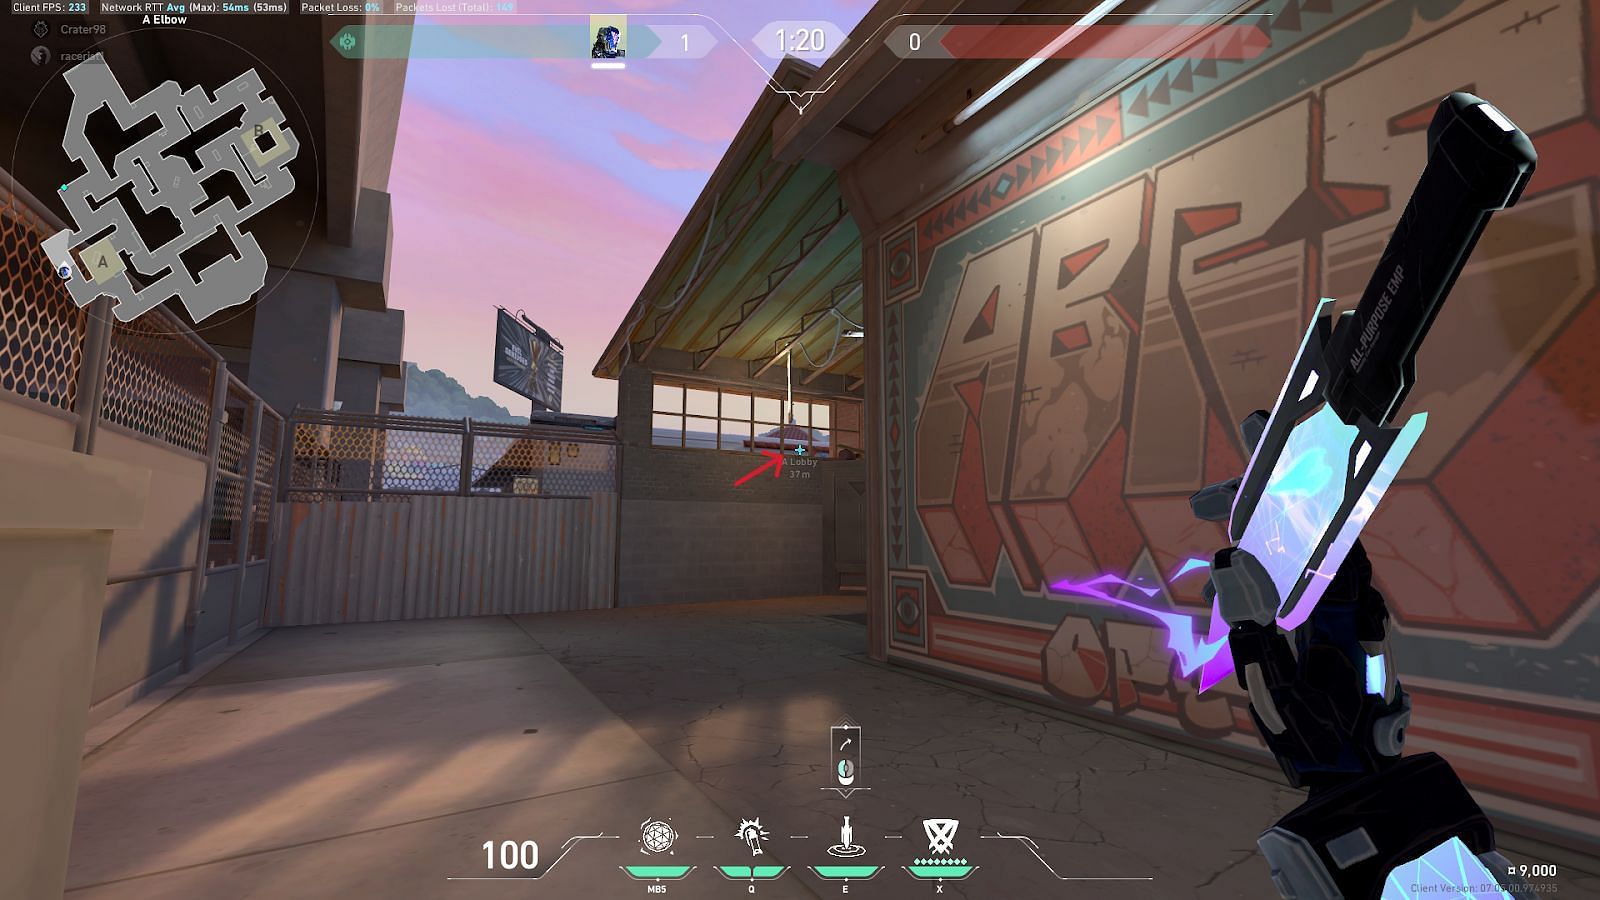
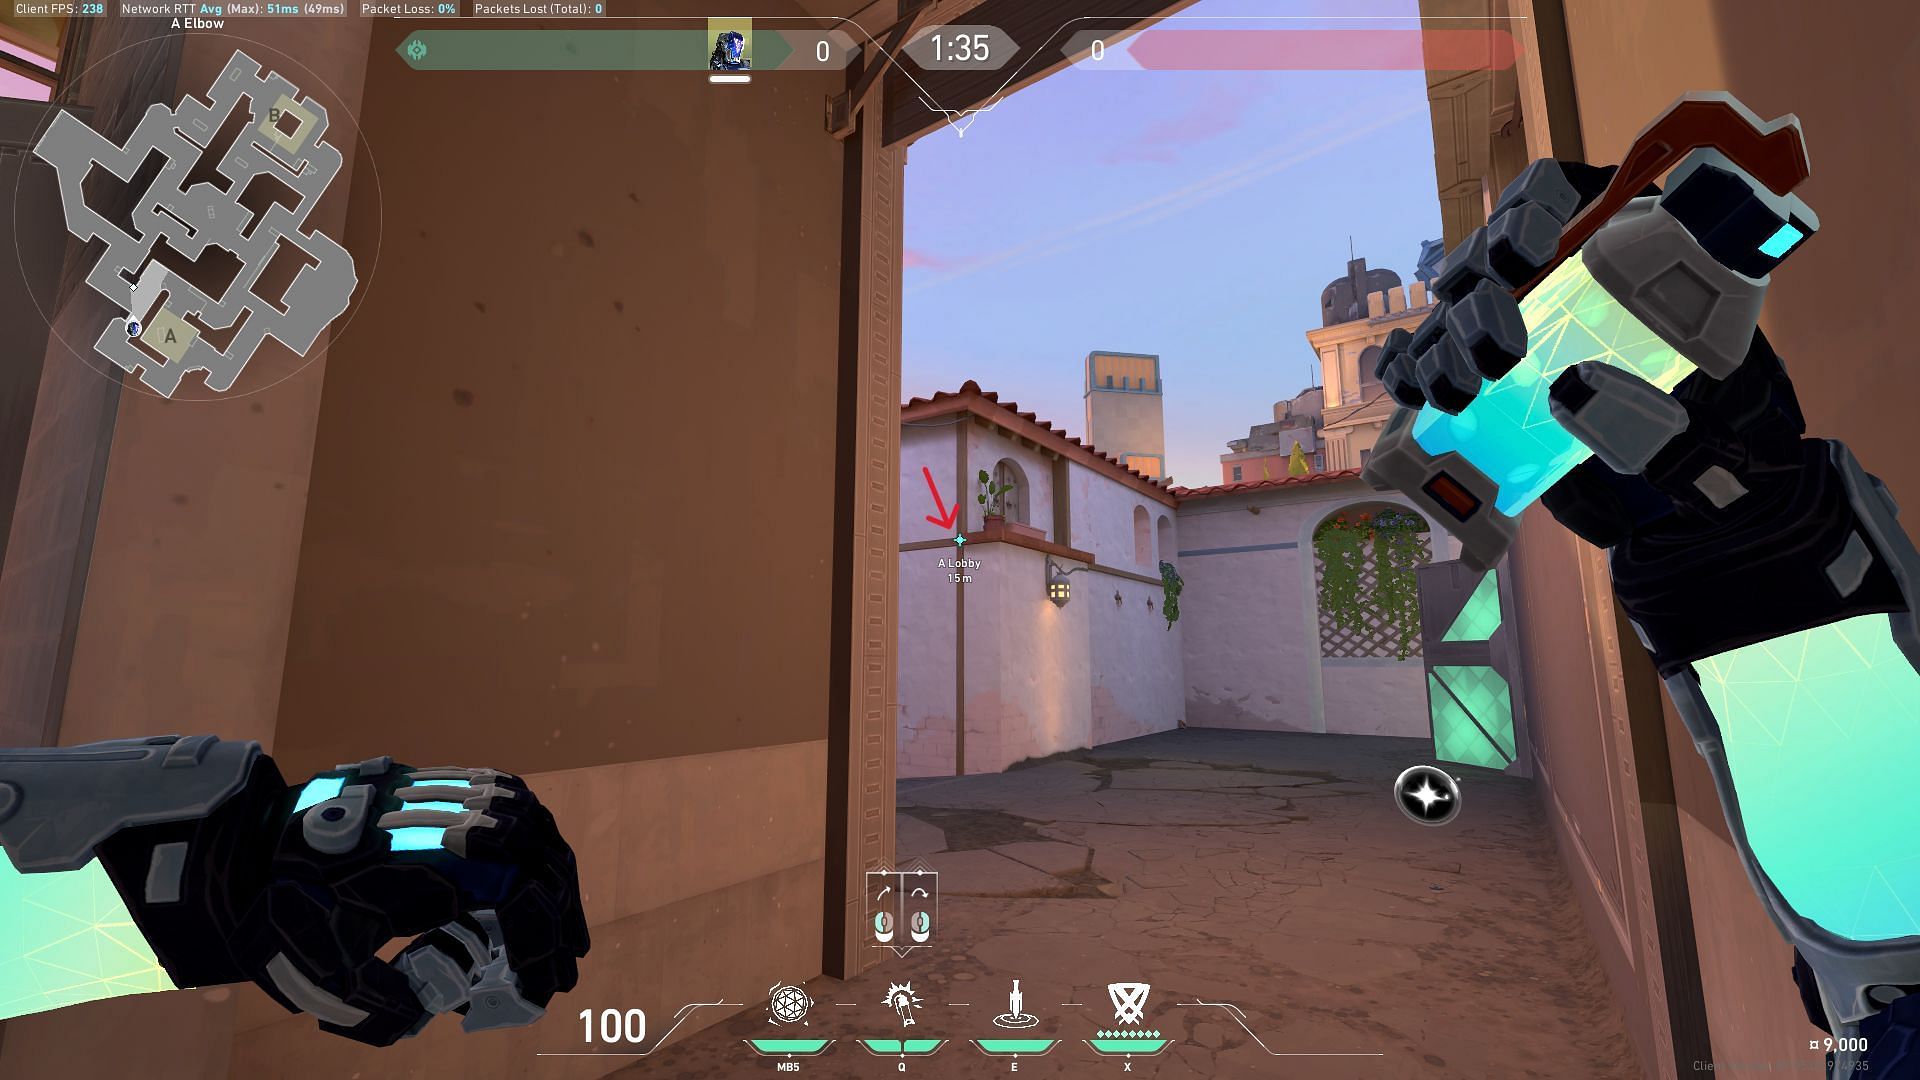
1)A-site FLASH/drive second lineup
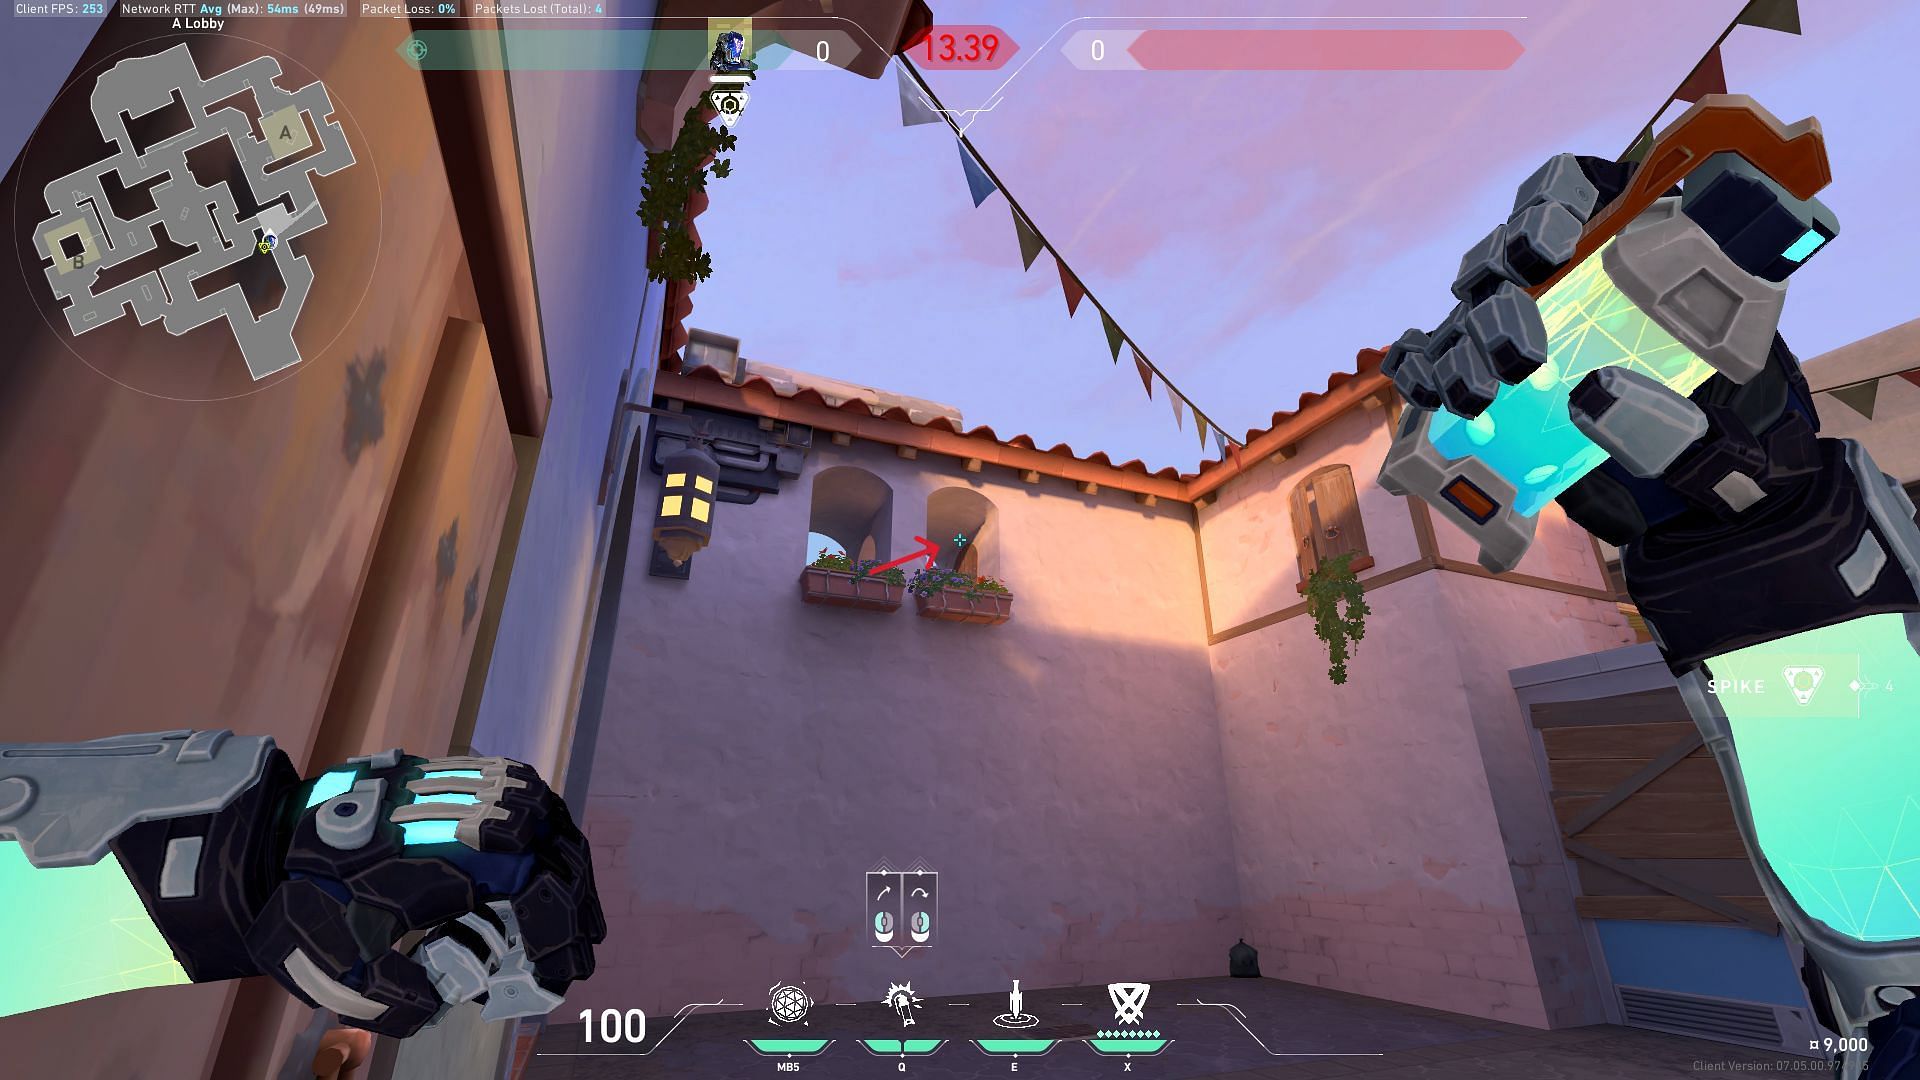
This is an easy lineup to flash enemies holding A-main as well as A-elbow to help your teammates get some kills. Place yourself on the edge of the wooden door on A-lobby. After proper position on the edge of the door, place your crosshair on the open windows in front of you, as marked in the above images. Left-click to fire, and the flash will pop out the window, immediately blinding opponents holding A-main and A-elbow in Valorant's Sunset map.
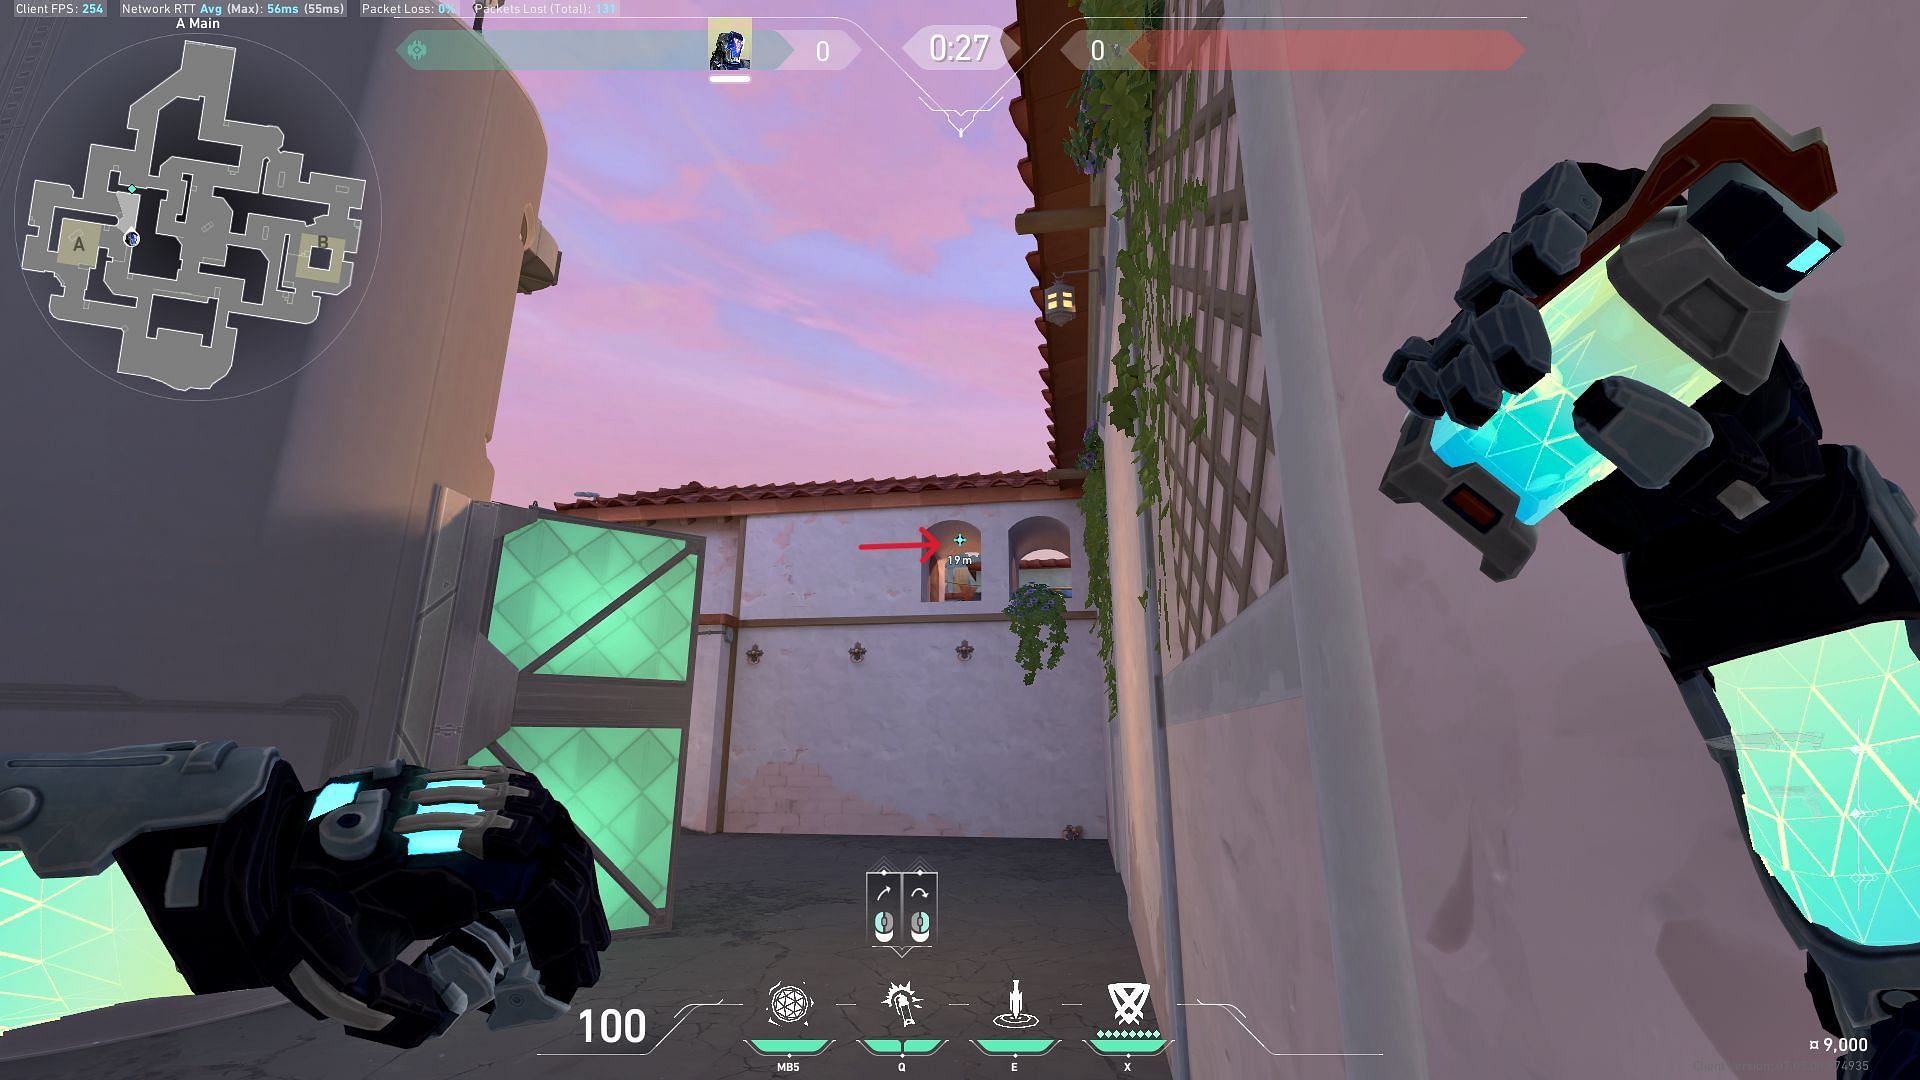
2) A-site FLASH/drive second lineup
This is another extremely easy flash lineup for attacking at A-site. It covers major parts of the A-site and helps your teammates eliminate targets easily. Place yourself outside the A-elbow, as shown in the image. Place the crosshair upward, match the ZERO/point icon with the elements on the steel wall in front of you, and match the other HUD element on the roof rail, as shown in the image.
Left-click so that the flash pops exactly on top of the entire A-site, blinding enemies holding A-site in the Sunset map in Valorant.
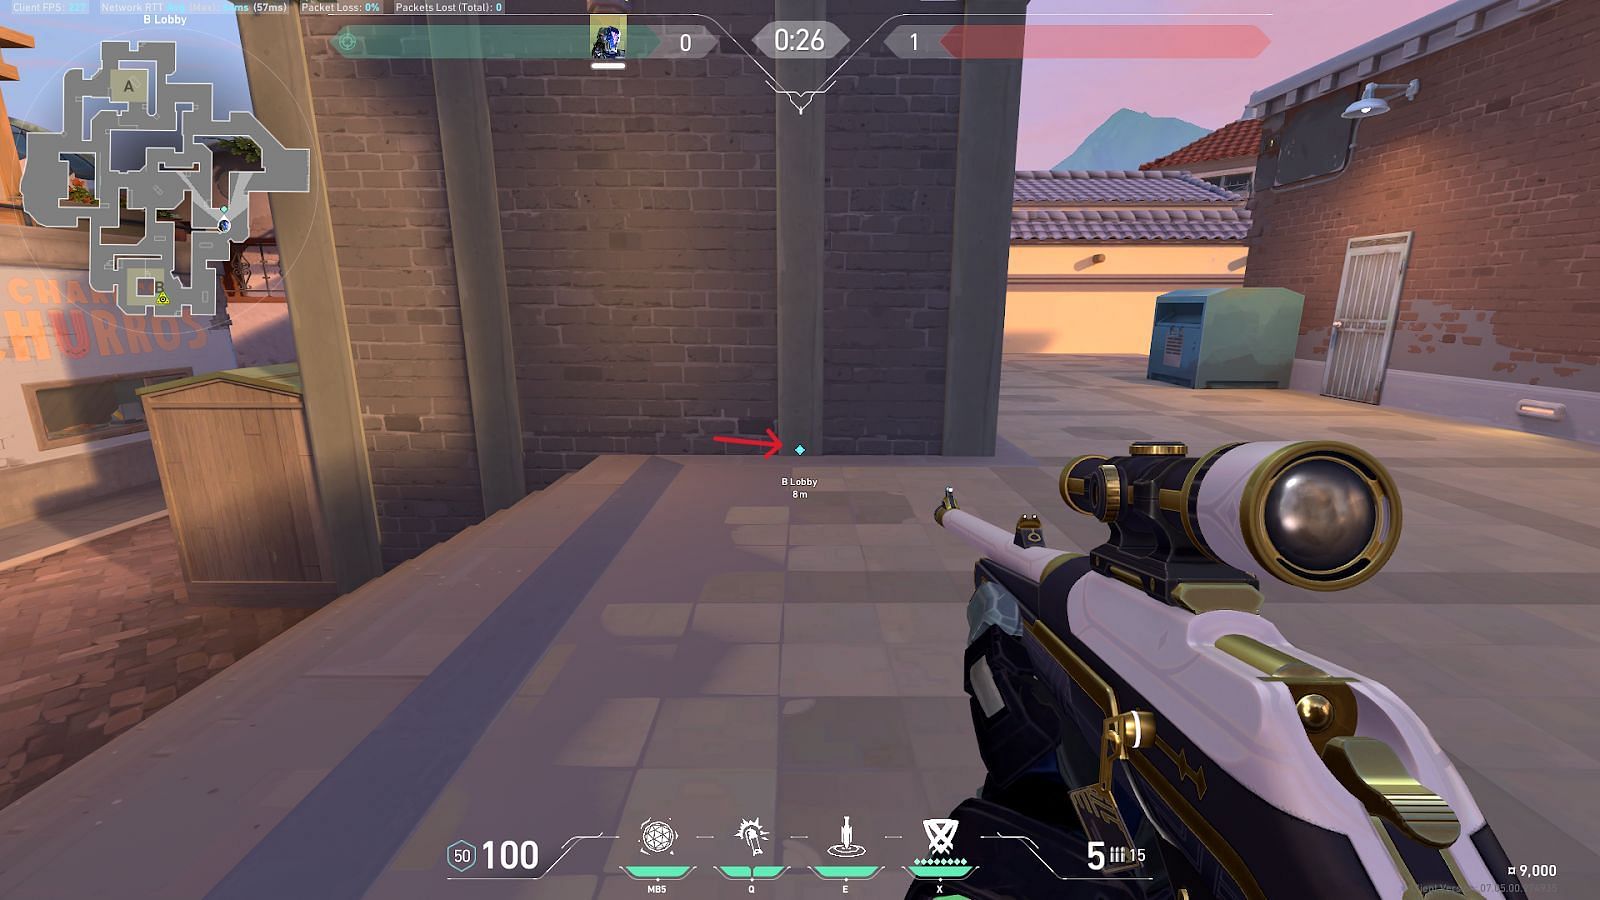
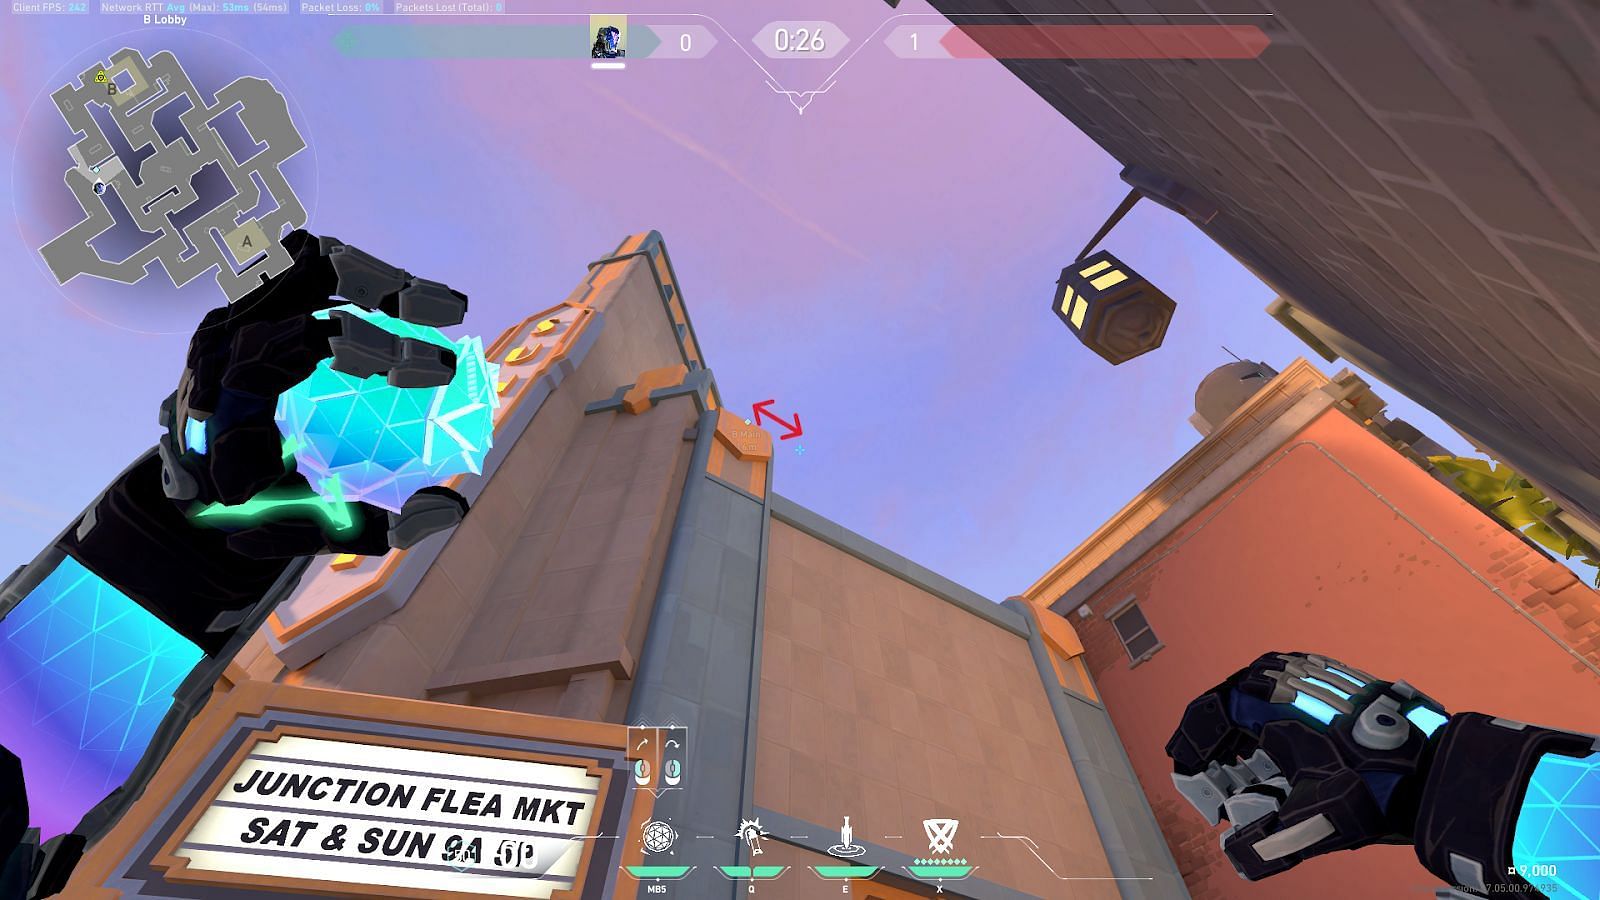
3) B-site FLASH/drive lineup
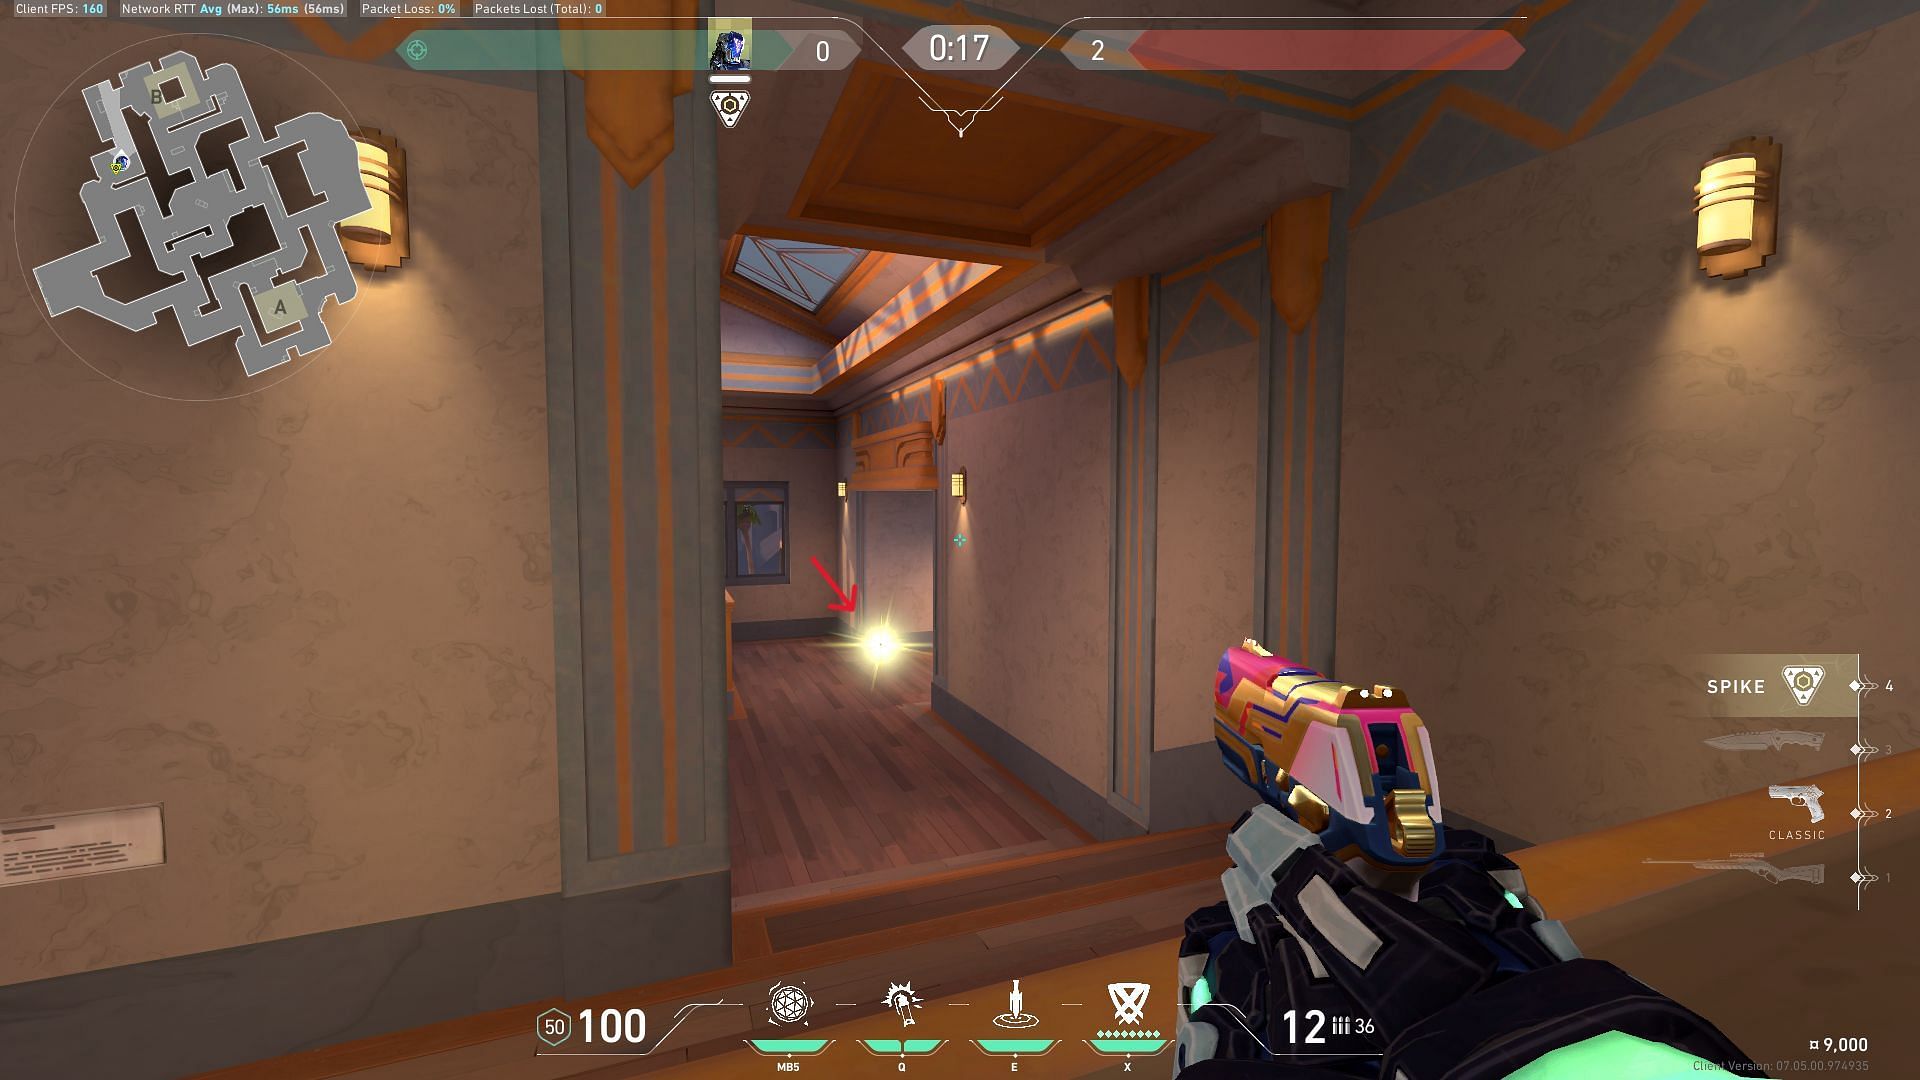
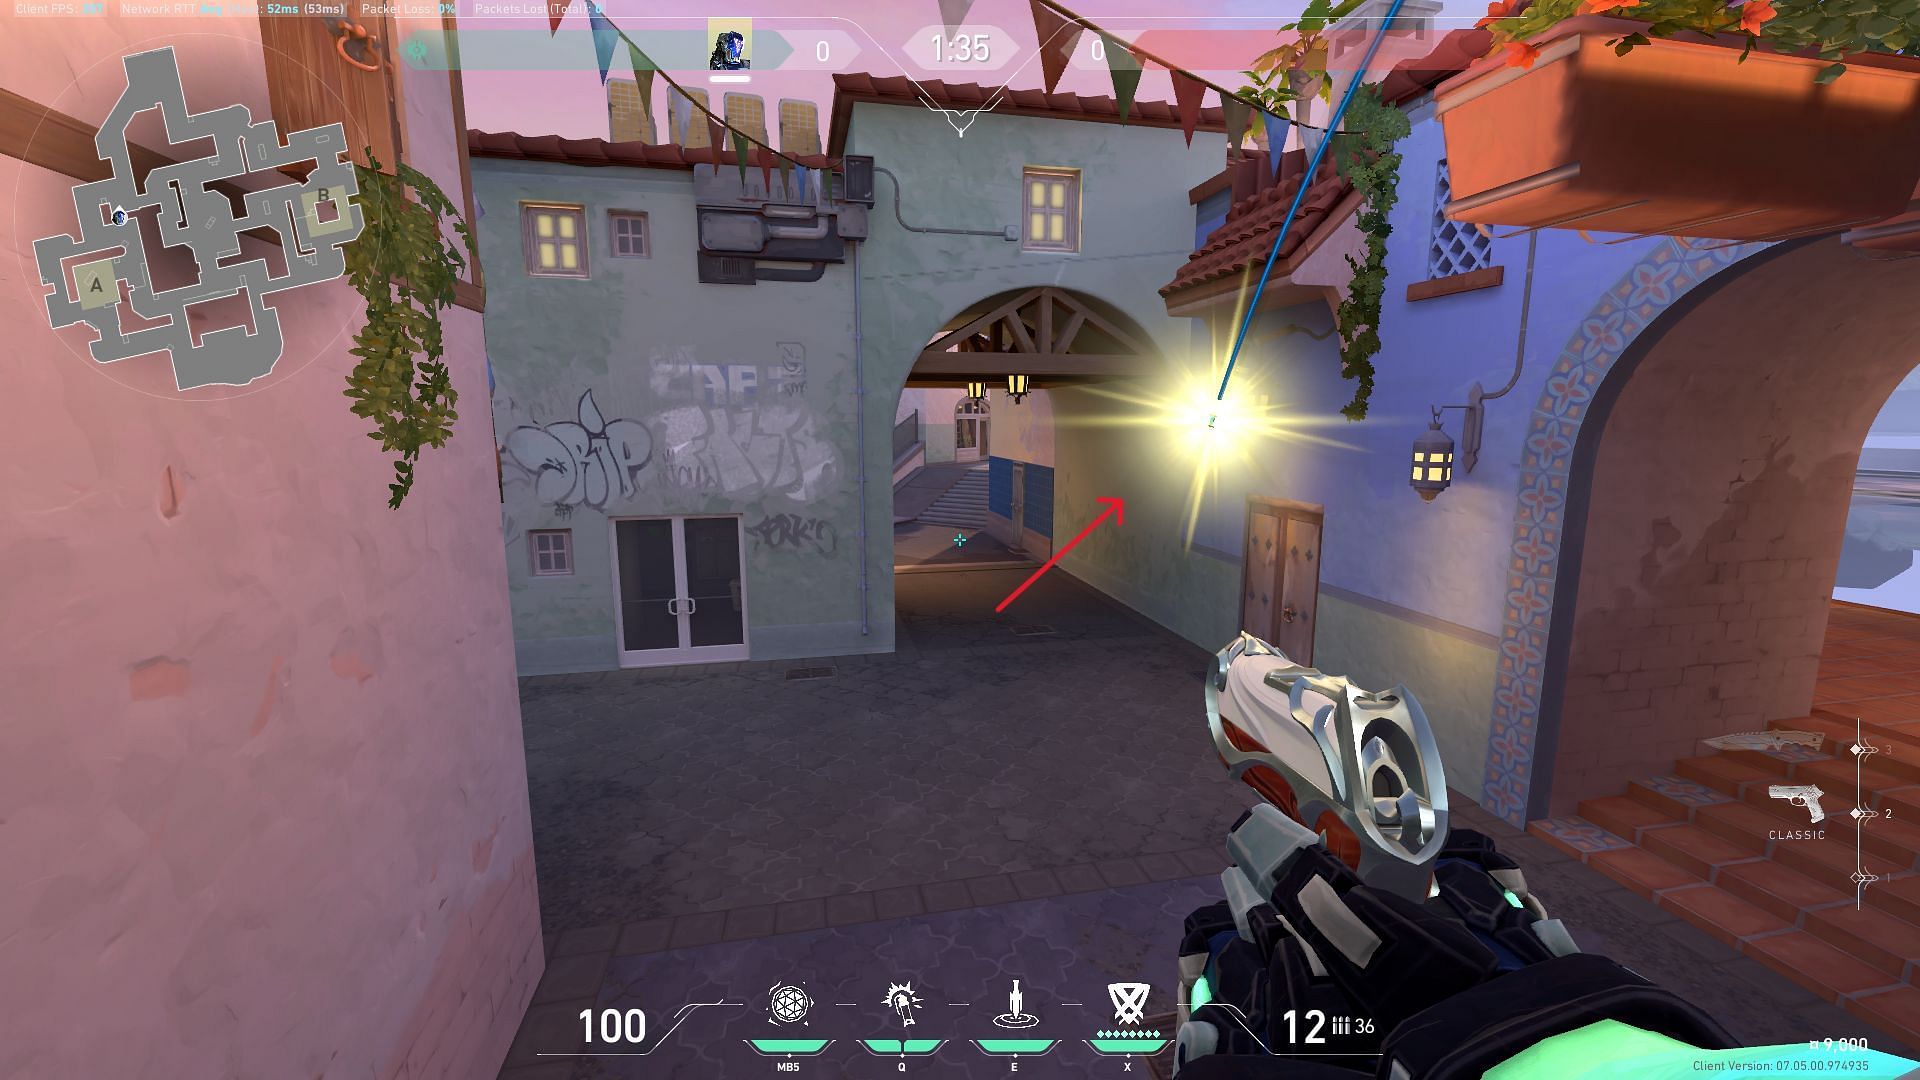
This is an easy flash lineup for attacking B-site in Valorant's Sunset map. Position yourself on the edge of the barrier pre-round at B-lobby. Place your crosshair on the wall as highlighted in the image above, then left-click to throw. The flash will instantly pop at B-main of the Sunset map.
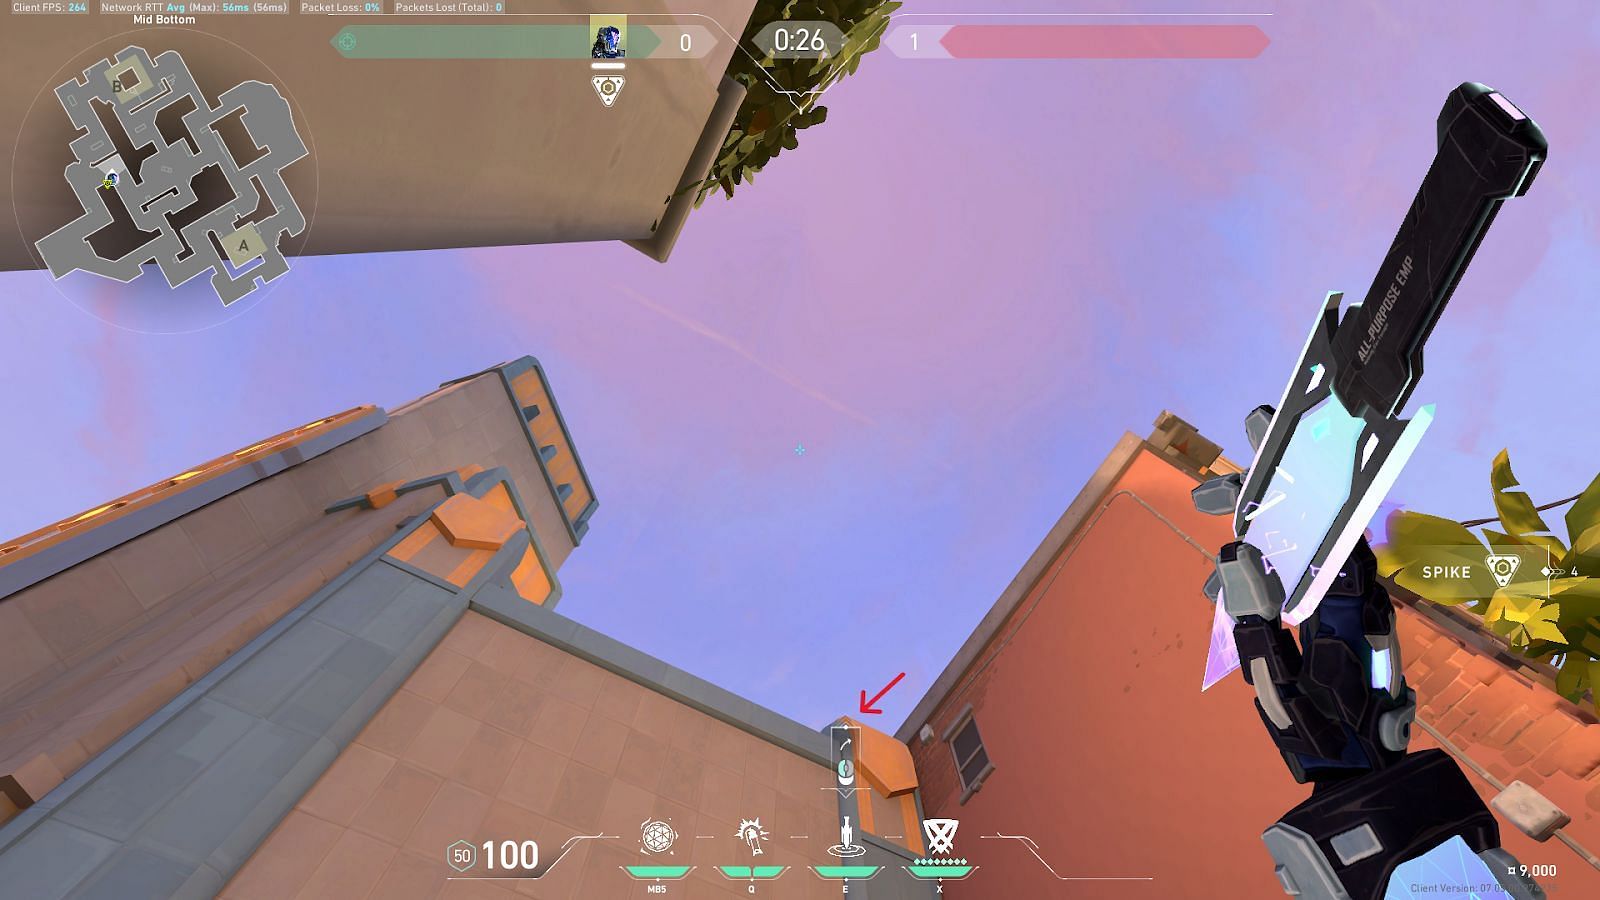
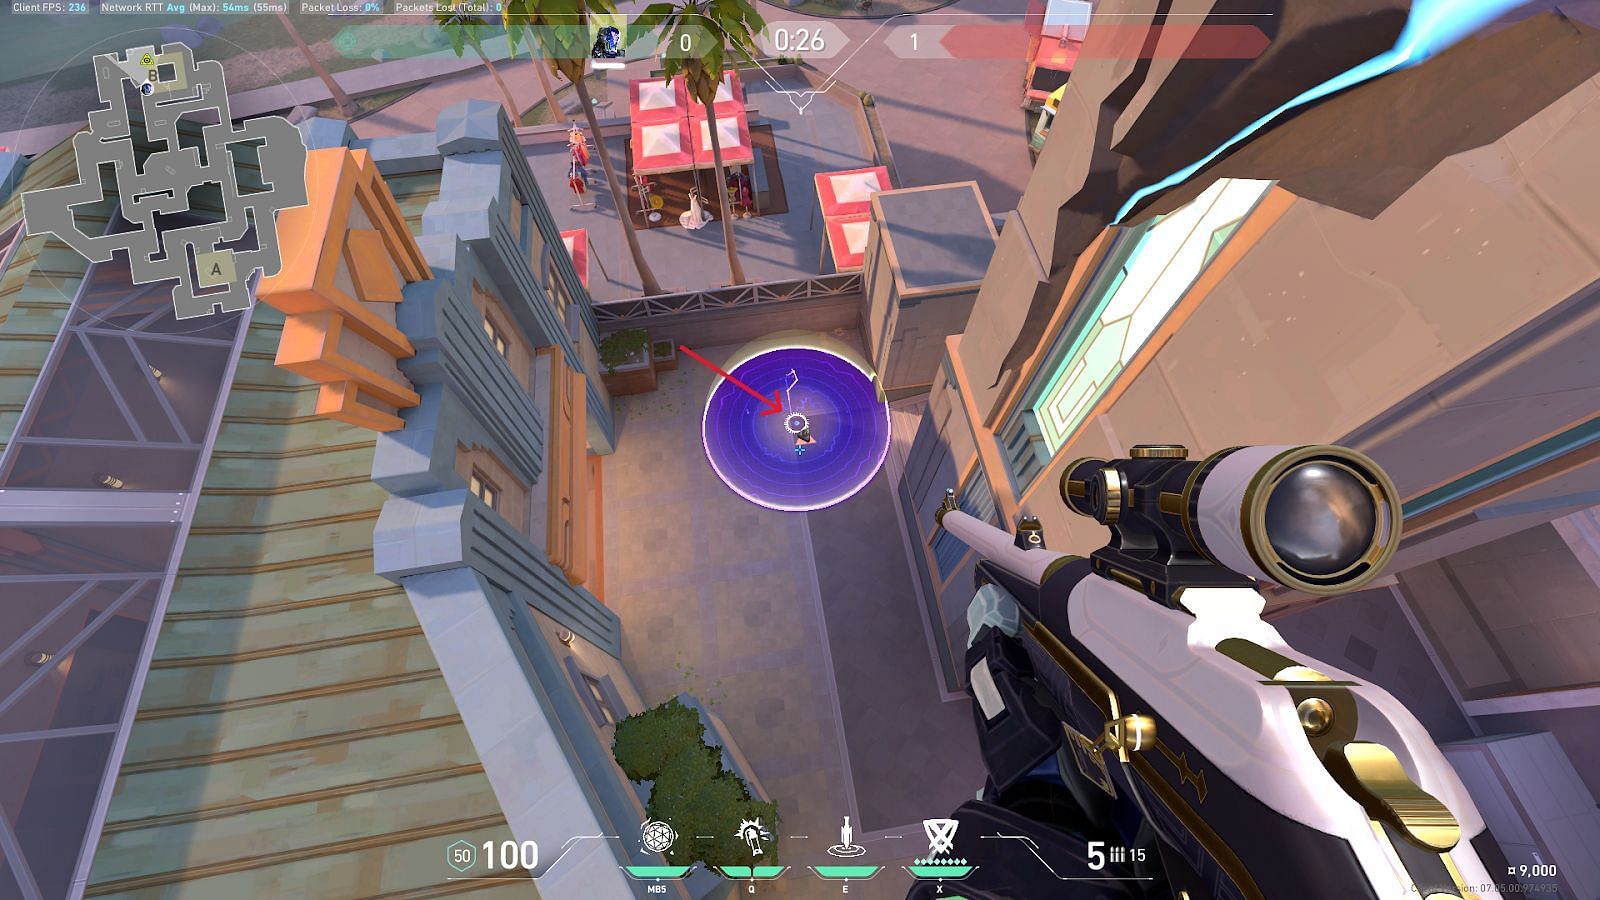
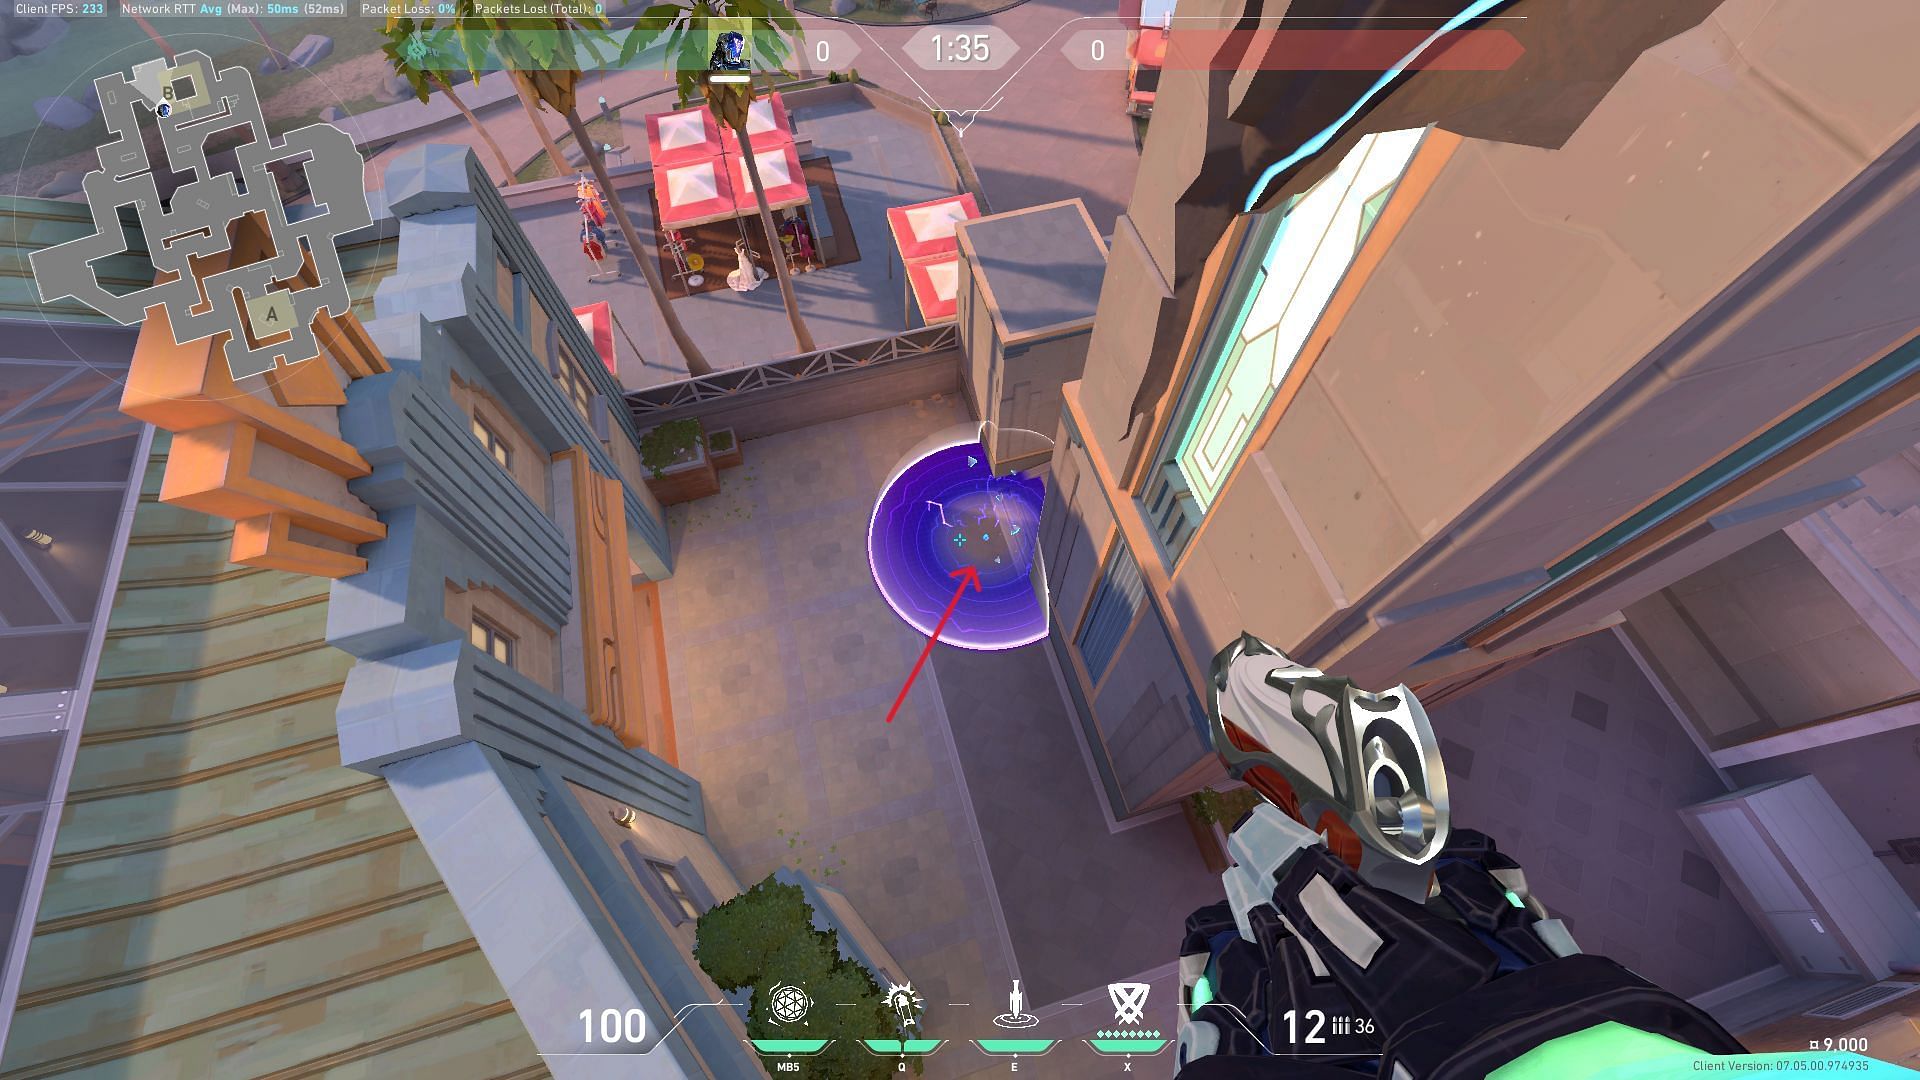
4) B-site FLASH/drive second lineup
This is another easy flash for attacking B-site in Valorant's Sunset map. You need to get on top of the green box at Mid-bottom. Place yourself on the edge of the box and equip KAY/O's FLASH/drive ability. Place your crosshair in the middle of the vent and left-click to throw. The flash will pop at B-main, blinding the opponents taking cover and enabling your team to score some early frags.
Defending
B) ZERO/point blade lineups for Defending in the Sunset map
1) A-main ZERO/point lineup
This is an easy ZERO/point lineup to reveal enemies pushing on A-main while defending in the Sunset map in Valorant. First, place yourself above the small boxes on A-main and equip KAY/O's ZERO/point blade. Place the crosshair in the middle of the left small window as marked in the image. Left-click to throw the blade, which will be on the exact spot, suppressing enemies within the impact area.
2) A- main ZERO/point second lineup
This is another easy blade lineup to catch enemies approaching A-main in Valorant's Sunset map while defending. Stand on the edge of the wall on your left at the A-elbow and equip the ZERO/point blade as shown in the above image. Left-click to throw the blade through the window, and it will land on the garage wall on A-lobby.
3) B-main ZERO/point blade lineup
Position yourself in the middle of the wall at B-main. Equip the ZERO/point blade and place the crosshair at the bottom of the wall, as shown in the images above. Left-click to throw, the blade will land at the bottom of the wall and detect enemies pushing from the B-lobby of the Sunset map in Valorant.
4) B-main def ZERO/point blade second lineup
Position yourself on the edge of the wall at B-main. Equip KAY/O's ZERO/point blade and aim it at the lamp in front of you. Left-click to throw the knife as it will land exactly on the marked spot, disabling the flashing abilities of the opponents pushing from the B-lobby at Valorant's new map, Sunset.
B) FRAG/ment lineups for Defence in Sunset map
1) A-site FRAG/ment nade lineup for default spike-plant
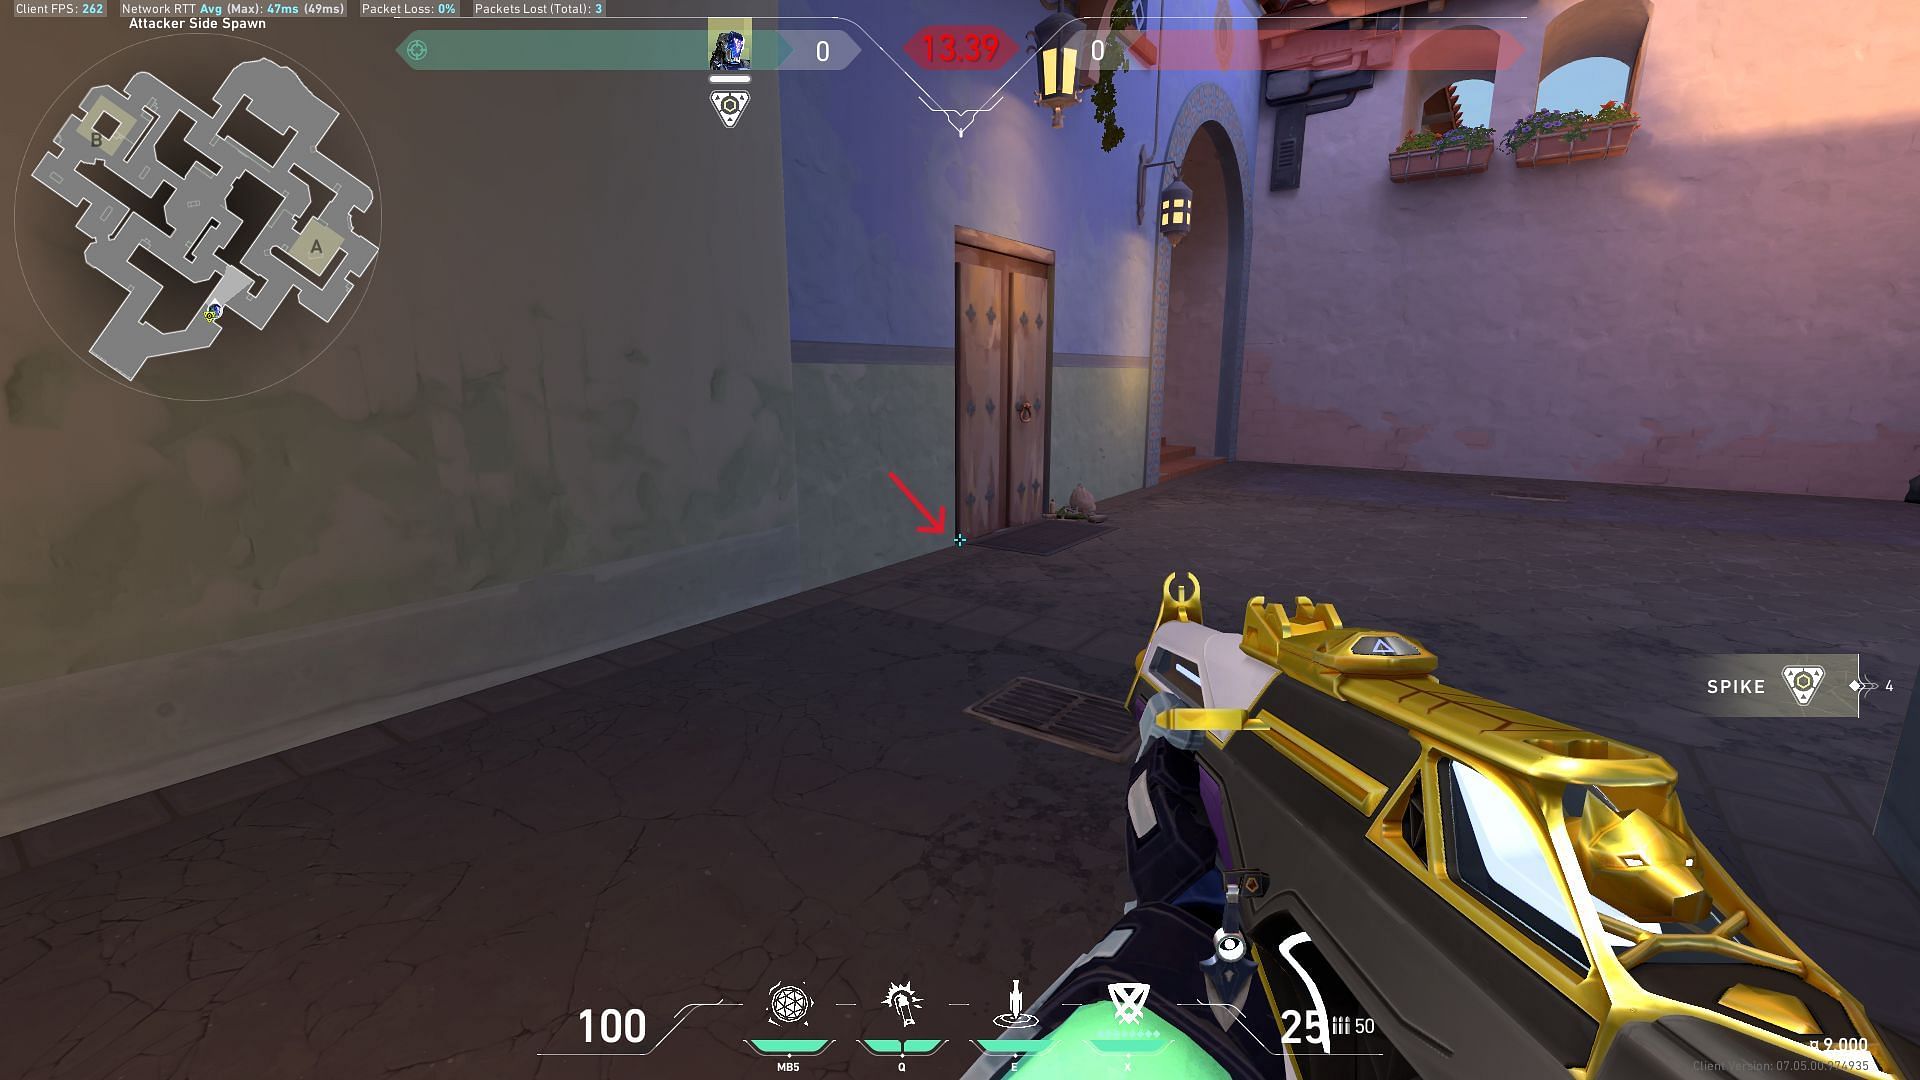
This lineup is important to deny the default spike plant at the A-site of the Sunset map in Valorant. Place yourself on the edge of the wall at Attacker’s Spawn. Equip the FRAG/ment nade and place your crosshair upward to match the HUD icons with the roof rails. Jump and left-click to throw the nade upward, allowing it to land on the default spike plant spot behind the green boxes at A.
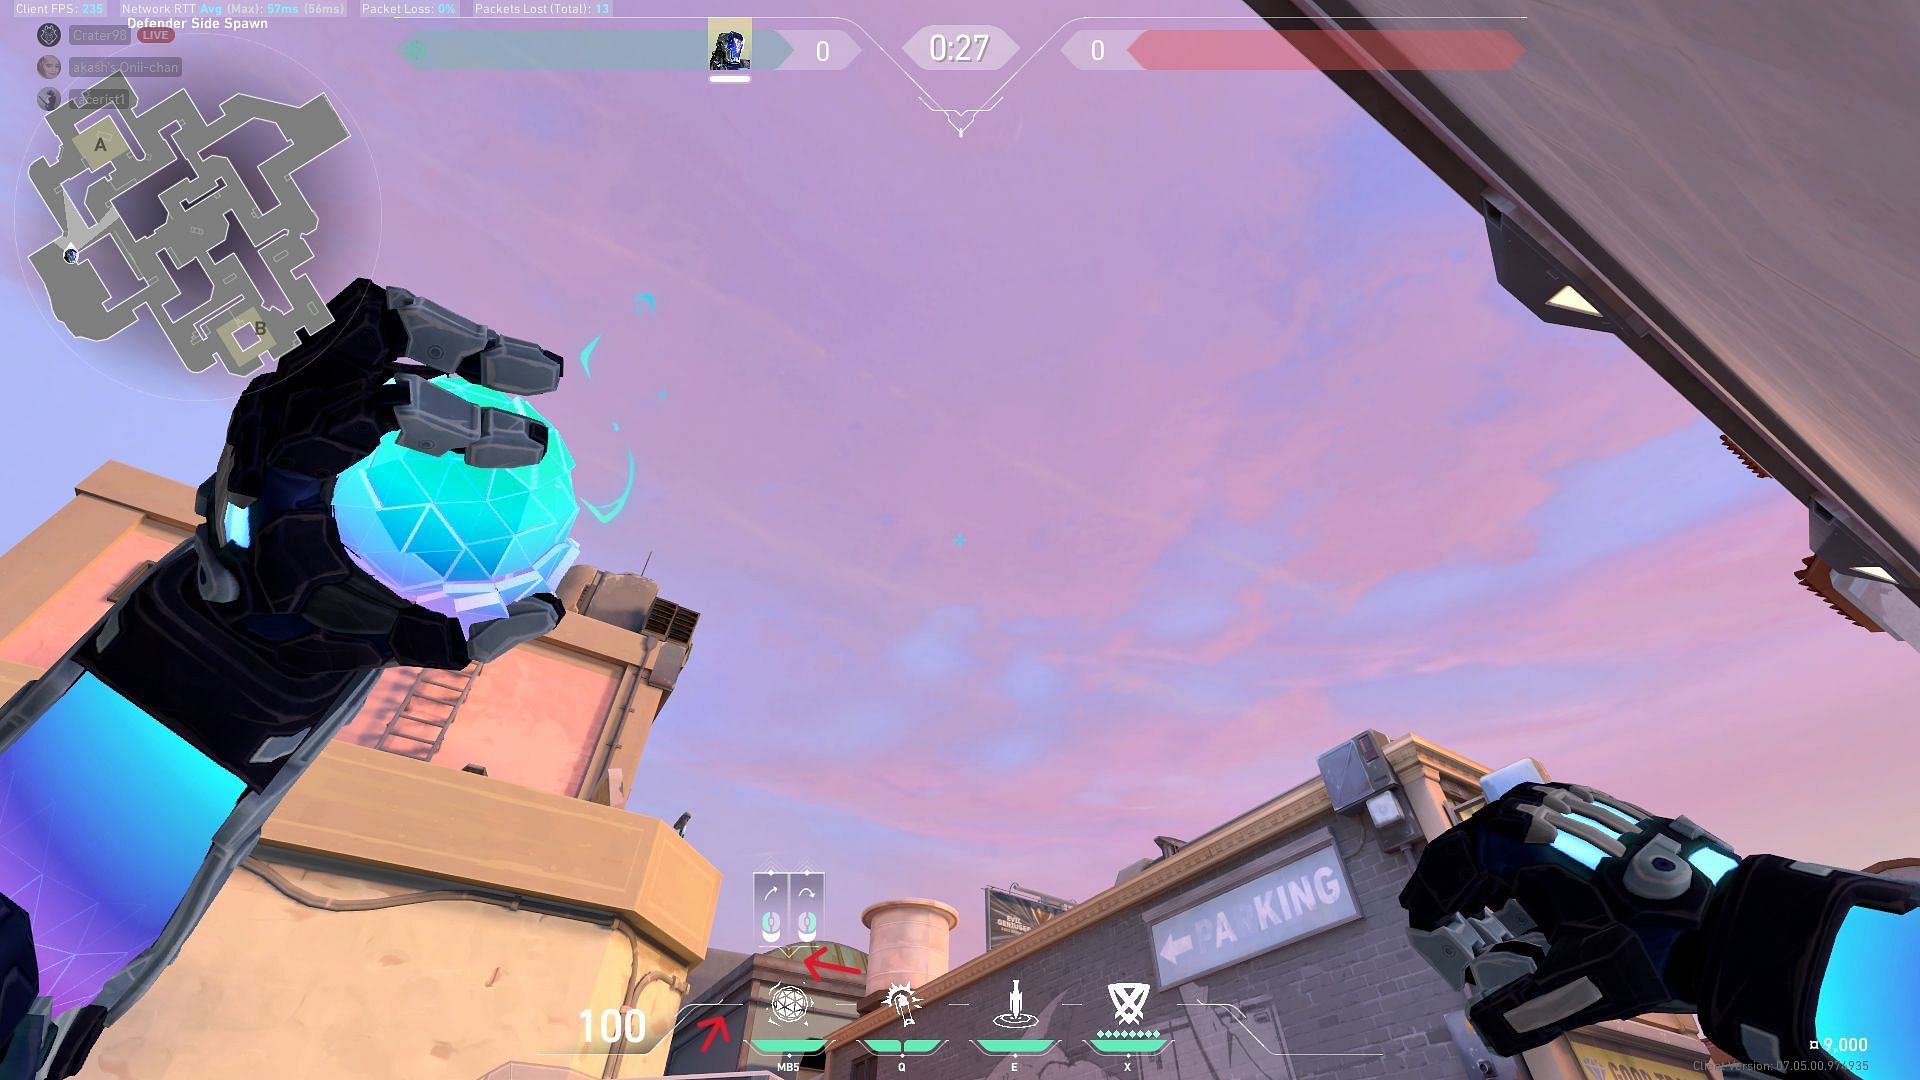
2) A-site FRAG/ment nade lineup for default spike-plant
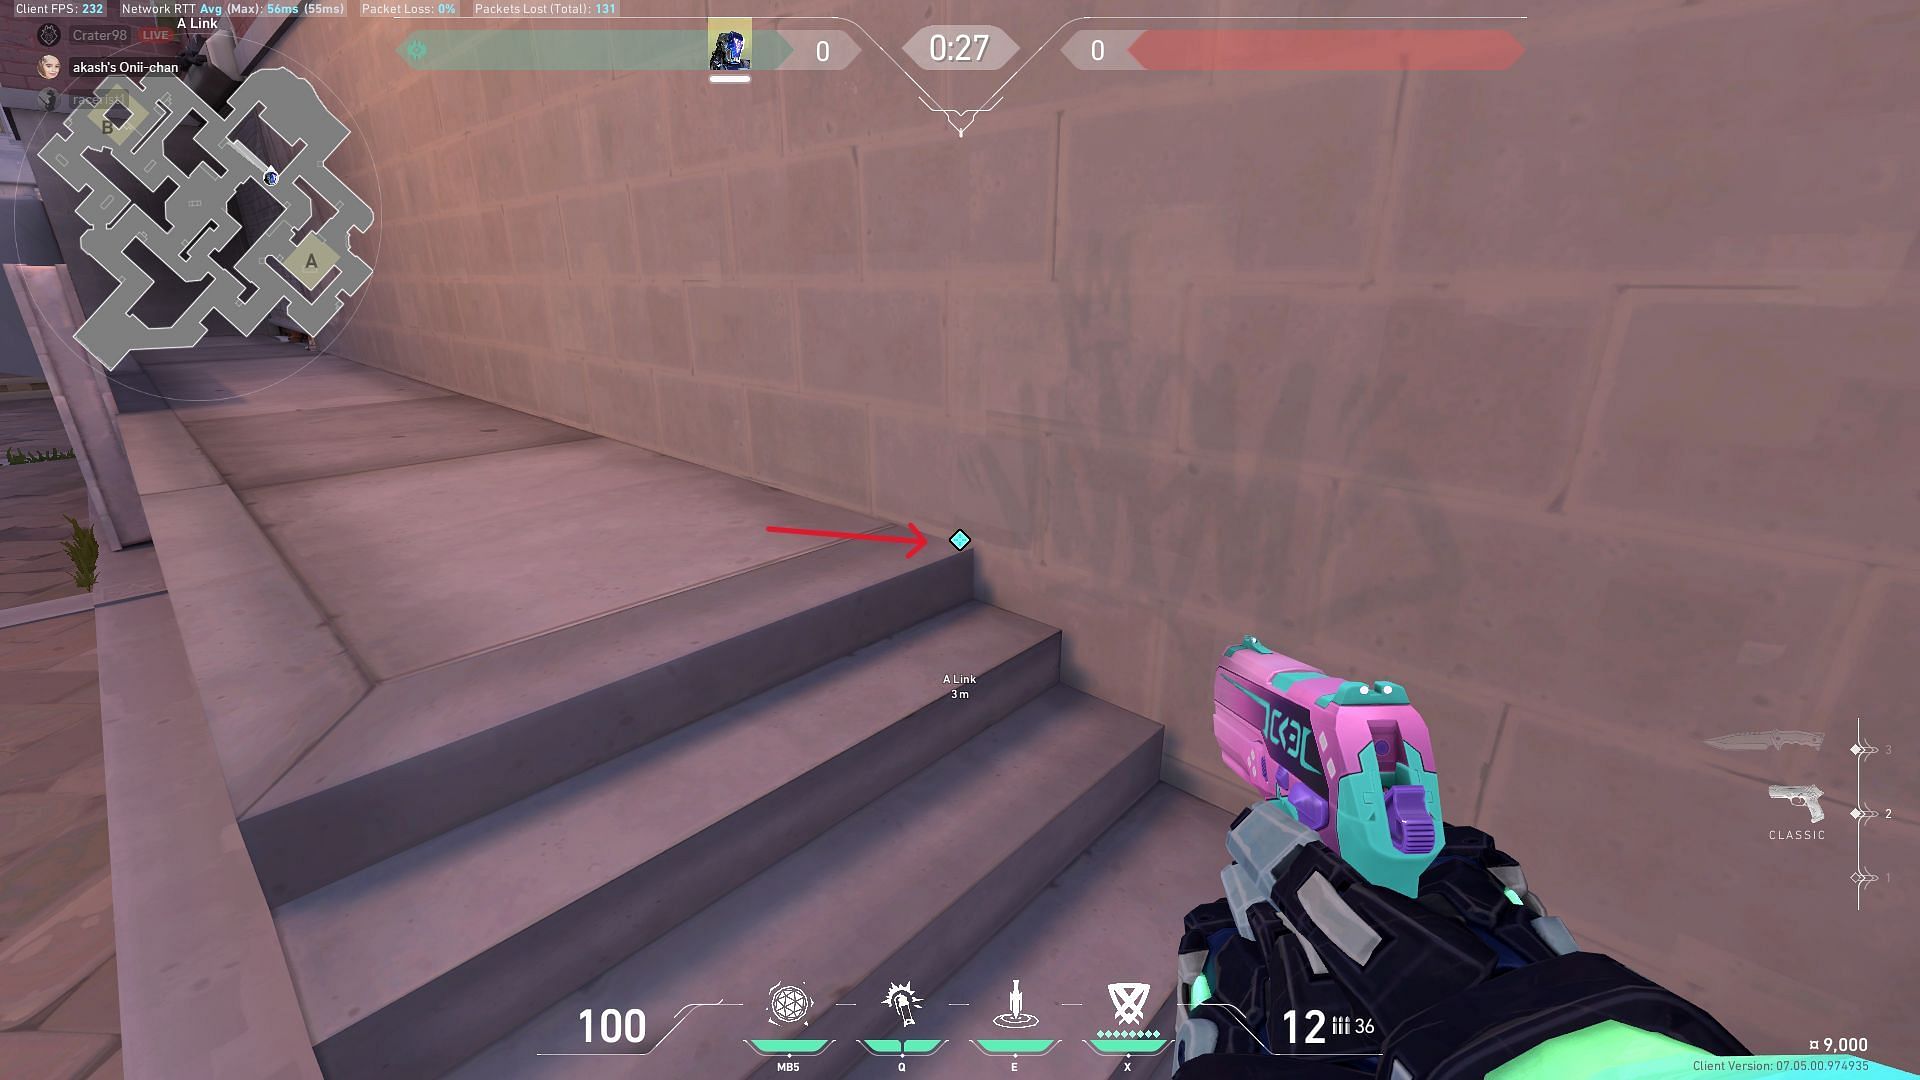
This is another lineup to deny spike plants on default spots of A-site in Valorant's new map, Sunset. Head toward the A-link and position yourself on the stairs as marked in the image. Equip the nade ability, move your crosshair upward, and match the HUD icons with the roof lines. Jump and left-click to throw the nade, which will land behind the solid grey box at A-site.
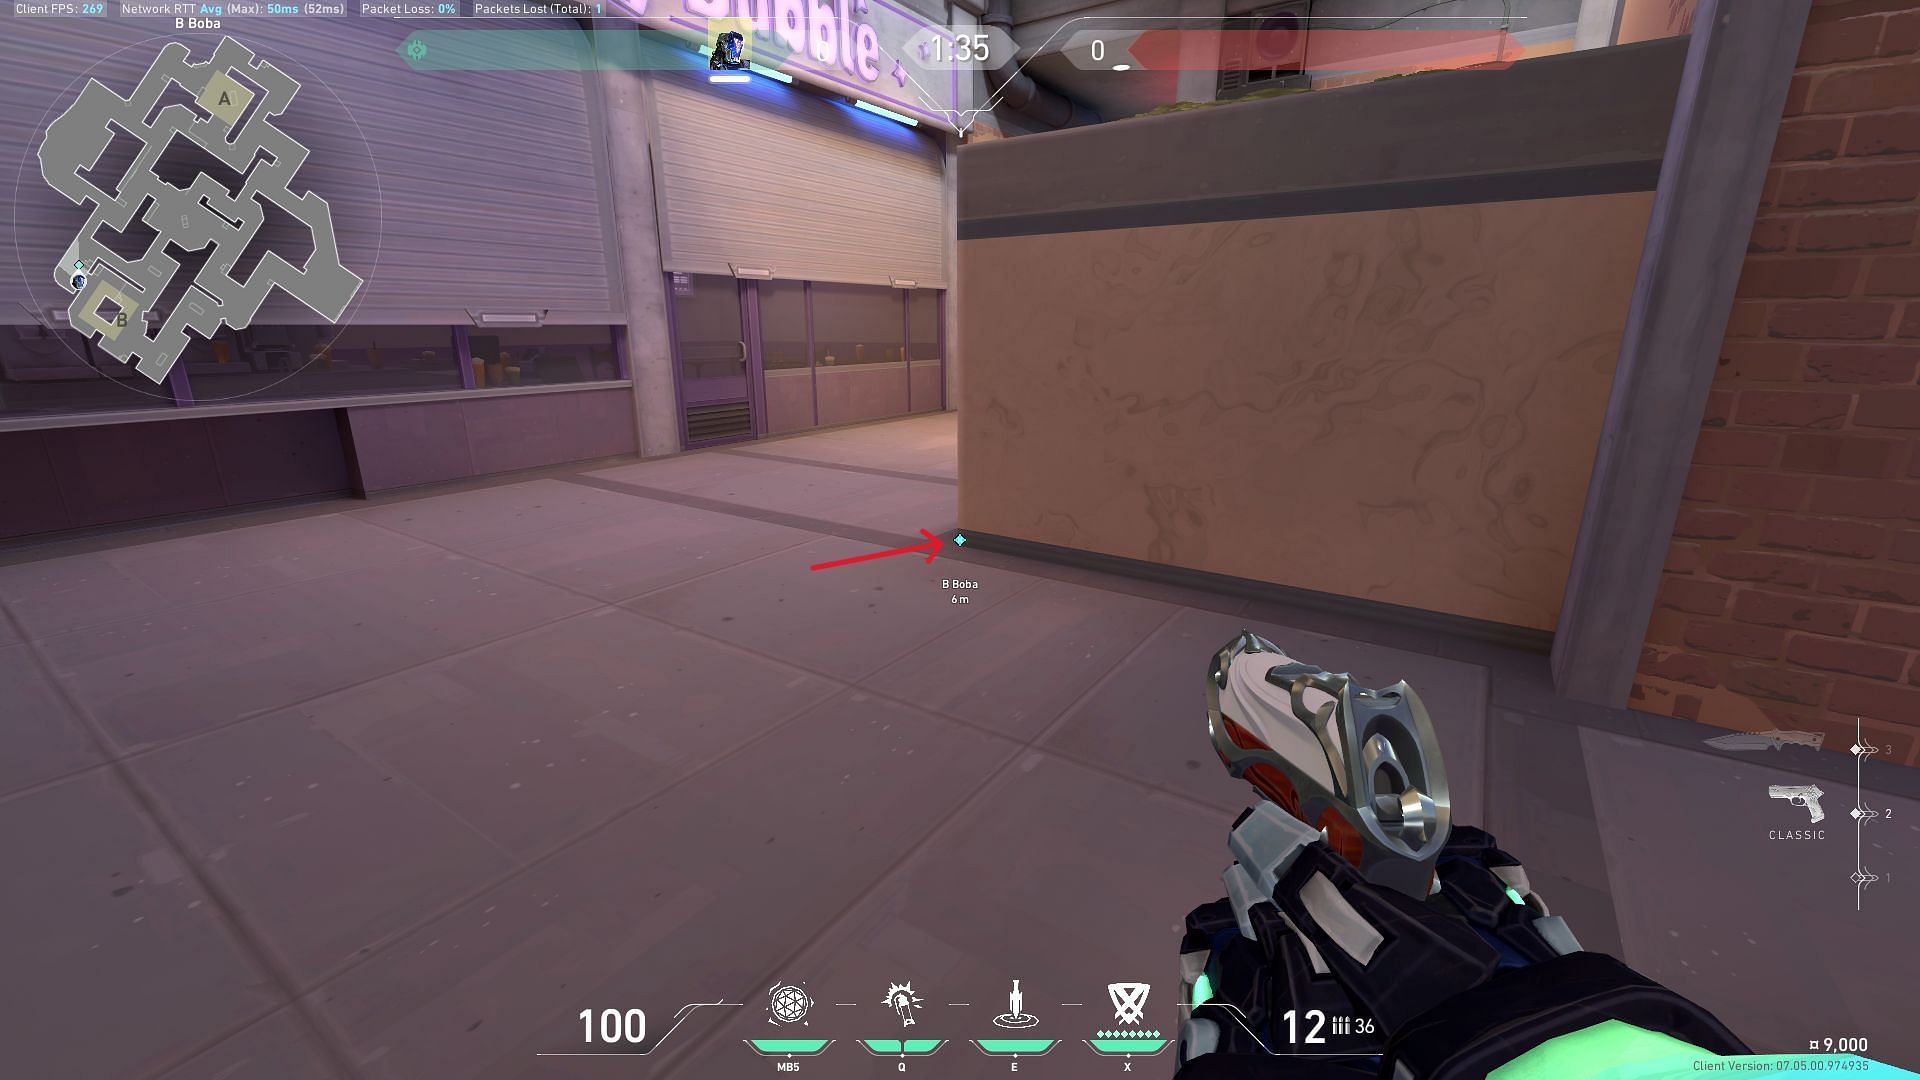
3) B-site def FRAG/ment nade lineups in Sunset

Position yourself on the purple door panel at B-boba, as marked in the image. Equip the nade, move the crosshair upward, and place it at the tip of the floating tower. Jump and left-click to throw the nade in the air, allowing it to land on the default spike plant spot in the Sunset map by Valorant.
4) B-site FRAG/ment def nade second lineup

Place yourself on the edge of the short wall at B-boba. Equip the FRAG/ment ability and place your crosshair at the end of the short wall in front of you, as marked in the images above. Left-click to fire the nade toward the wall so that it bounces off and lands at the default spike plant site covering a portion of the small stairs as shown in the image.
C) FLASH/drive lineups for Defense
1) A-main def Flash lineup
Place yourself on the edge of the black box at A-main. Equip the FLASH/drive ability and place the crosshair at the top of the small window. Left-click to throw the flash, which allow it to pass through the window and blind enemies behind it at the A-lobby of the Sunset map in Valorant.
2) A-site def flash lineup second lineup
This flash lineup from A-elbow is useful to flash enemies aggressively pushing A-main. First, position yourself on the wall at A-elbow, as shown in the image above. Then, equip the FLASH/drive and place the crosshair on the wooden line of the building in front of you. Left-click to throw the flash, which will bounce off the wall and pop on A-lobby after landing. This flash will allow your team to score some early frags in the Sunset map of Valorant.
3) B-site def Flash lineup
Place yourself in the middle of the wall at B-main. Equip KAY/O's FLASH/drive and aim at the edge of the wall in front of you in B-main, as marked in the image above.
Left-click to throw the Flash toward the wall, allowing it to bounce off of it and pop instantly, aggressively blinding the enemies pushing B-main of the Sunset map by Valorant.
4) B-site def Flash second lineup

Place yourself at the edge of the wall at B-main, as marked in the image. Equip FLASH/drive and place the crosshair on the middle of the wall on your right. Left-click to throw the Flash, allowing it to bounce off the wall and land at the start of the B-lobby. Thus, enemies will be aggressively flashed toward B-main in Valorant's Sunset map.
Use of the NULL/cmd Ultimate ability for both Attack/Defense Scenarios
KAY/O's ultimate ability can prohibit enemies from using their special skills and setups or even cancel their ultimates while covering a large amount of area on the Sunset map in Valorant. Use the NULL/cmd effectively in Attack or Defense situations to gain tactical advantage over your enemies.
Keep an eye on the availability of the opponent's ultimate ability, then activate the NULL/cmd to delay their ultimate activation. This way, the enemy Sage may not be able to revive one of her teammates, or the enemy Raze cannot deploy her Showstopper ability on you or your team.
Despite the fact that these lineups in the Sunset map in Valorant have been tried and tested, players are encouraged to create their own innovative lineups that suit their playing style. KAY/O possesses distinct skills since his utilities can deprive opponents of their abilities and help his team score a few effortless eliminations in Valorant.