
'%20x='0'%20y='0'%20height='100%25'%20width='100%25'%20%0A%20%20%20%20%20%20%20%20%20%20xlink%3Ahref='data:image/jpg;base64,/9j/4AAQSkZJRgABAQAAAQABAAD/2wCEAAMDAwMDAwQEBAQFBQUFBQcHBgYHBwsICQgJCAsRCwwLCwwLEQ8SDw4PEg8bFRMTFRsfGhkaHyYiIiYwLTA+PlQBAwMDAwMDBAQEBAUFBQUFBwcGBgcHCwgJCAkICxELDAsLDAsRDxIPDg8SDxsVExMVGx8aGRofJiIiJjAtMD4+VP/AABEIAAUACgMBIgACEQEDEQH/xABZAAEBAQAAAAAAAAAAAAAAAAAABQgQAAICAwEBAQAAAAAAAAAAAAECAwQAERIxIUEBAQAAAAAAAAAAAAAAAAAAAAIRAQEBAQEAAAAAAAAAAAAAAAERAAIi/9oADAMBAAIRAxEAPwDDlWWCpDUhajUm7khEzOJdydyc/QHC/u9Aaye9iaN2RCoVSQo5B0B57jGEVW5d+ZKb/9k='%3E%3C/image%3E%3C/svg%3E)
Roblox is an online gaming platform and a tool for game development created by the Roblox Corporation. It enables users to create games and play those that are made by others. This article is a guide on how you can develop your own game and other related topics on the platform.
The platform allows users to develop their own games that can be played by other users by using its own engine, Roblox Studio. A Lua-derived language called Luau is used to create games (more often referred to by the company as "experiences").
Users can create purchasable content through one-time purchases called "game passes" and microtransactions that can be made repeatedly and are referred to as "developer products" or "products."
Create you own Roblox Games
To create your own game, or rather "experience," follow the steps listed below:
Step 1) Click on Create in the website's top bar.
Step 2) If it isn't already highlighted, select Experiences in My Creations menu.
Step 3) Click on Create New Experience.
Step 4) Select your settings and template options for your creation.
Step 5) Finally, click on Create Experience.
You can return to the previous Create page by doing this. If you'd like, you may share your experience right away, or you can wait until you've finished working on it.
Click the Edit button on the right of the entry of your new experience in your Experiences list to begin building.
You can build a new experience at any moment, but it won't be available to other players until it's made public by using the "Make Experience Public" process.
You can choose to make your experience public or private. Refer to the methods mentioned further in this article to do so.
Make your experience public or private
There are two methods that users can follow to make their Roblox experience public or private.
Method One:
Step 1) Click on Create in the top bar of the website.
Step 2) If it isn't already highlighted, click on Experiences in the My Creations tab.
Step 3) To switch between the two statuses, find the place you want to make public or private and click on the gray or green symbol underneath the place's title.
Method Two:
Step 1) Go to your experience's page.
Step 2) To access the settings menu for the experience, click the three dots icon.
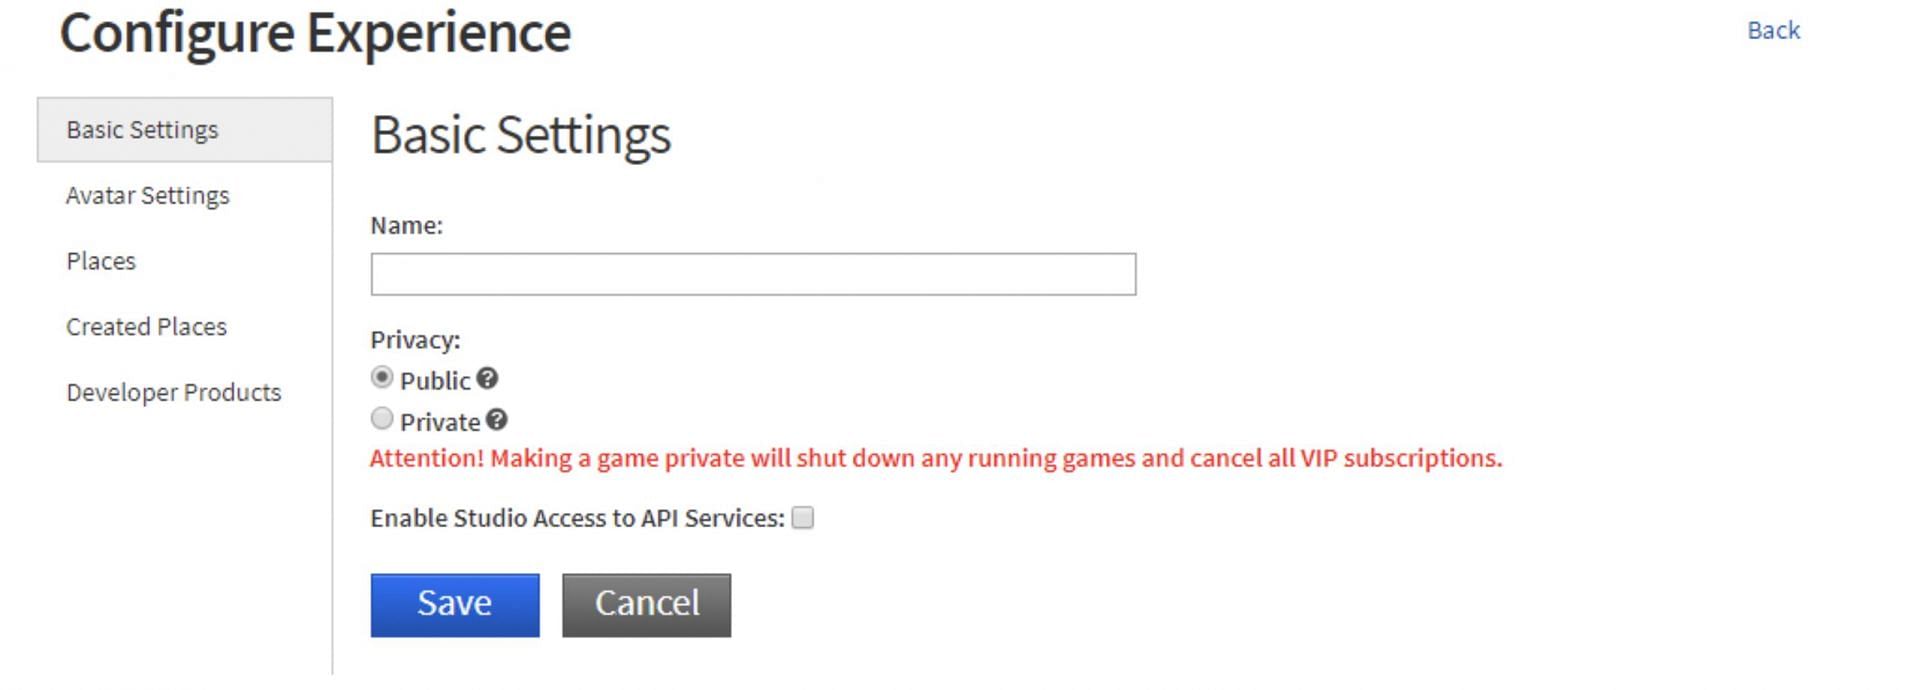
Step 3) Select whether you want to customize this place or this experience.
Step 4) Irrespective of what you choose in the preceding step, click on the Basic Settings tab on the resulting screen. If it isn't already highlighted.
Step 5) Select between Public and Private under Privacy.
Any user will be able to observe and participate in the experience if it is public (green icon).
Unless it's a group experience, in which case only you and the appointed developers (with the required rank and experience edit permissions) will be able to play the experience.
Private (green symbol) will prevent anybody other than you from viewing or playing the experience. Please refer to the help article on Roblox for the group experience's additional details.
According to Roblox Studio, all users are free to create as many experiences as they wish, but each account is only allowed to have 200 publicly playable experiences available at any given moment.
A total of 20 million games are created each year using Roblox Studio, the bulk of which are created by children.

Check out this A-Z list of all of our Roblox Codes 2025