
'%20x='0'%20y='0'%20height='100%25'%20width='100%25'%20%0A%20%20%20%20%20%20%20%20%20%20xlink%3Ahref='data:image/jpg;base64,/9j/2wBDAAYEBQYFBAYGBQYHBwYIChAKCgkJChQODwwQFxQYGBcUFhYaHSUfGhsjHBYWICwgIyYnKSopGR8tMC0oMCUoKSj/2wBDAQcHBwoIChMKChMoGhYaKCgoKCgoKCgoKCgoKCgoKCgoKCgoKCgoKCgoKCgoKCgoKCgoKCgoKCgoKCgoKCgoKCj/wgARCAAGAAoDASIAAhEBAxEB/8QAFgABAQEAAAAAAAAAAAAAAAAAAAUG/8QAFQEBAQAAAAAAAAAAAAAAAAAAAQP/2gAMAwEAAhADEAAAAKefCP8A/8QAIhAAAgEDAgcAAAAAAAAAAAAAAQIFAAMEEiEHERQWMZTS/9oACAEBAAE/AIaZmJWIyJMRMMmNasHIW31V/XoAJO/LztScWMFkVu2294/Nf//EABgRAQEAAwAAAAAAAAAAAAAAAAECAAQF/9oACAECAQE/ADpbRSF5/8QAGREAAQUAAAAAAAAAAAAAAAAAAAIDBBEx/9oACAEDAQE/AFR26w//2Q=='%3E%3C/image%3E%3C/svg%3E)
Minecraft's witches are inhabitants of swamp biomes, where they reside in ramshackle huts with their pet cats. Killing them doesn't yield much in the way of experience points, but these mobs do drop helpful brewing ingredients, including glass bottles, glowstone and redstone dust, spider eyes, gunpowder, as well as sugar. They also drop sticks upon death.
It should be noted that Minecraft witches won't drop all of these resources at once. However, killing a large number of witches can result in plenty of brewing ingredients for the foreseeable future. This can be difficult since witches don't exactly spawn in groups. To solve this issue, you can create a witch farm to spawn and harvest their drops.
Creating a witch farm can be a tough job in Minecraft, but it's still possible with plenty of blocks, redstone, water buckets, and scaffolding.

Chart New Territories with the ultimate Minecraft Seed Generator!
Breaking down how to build a witch farm in Minecraft 1.20
The foundation
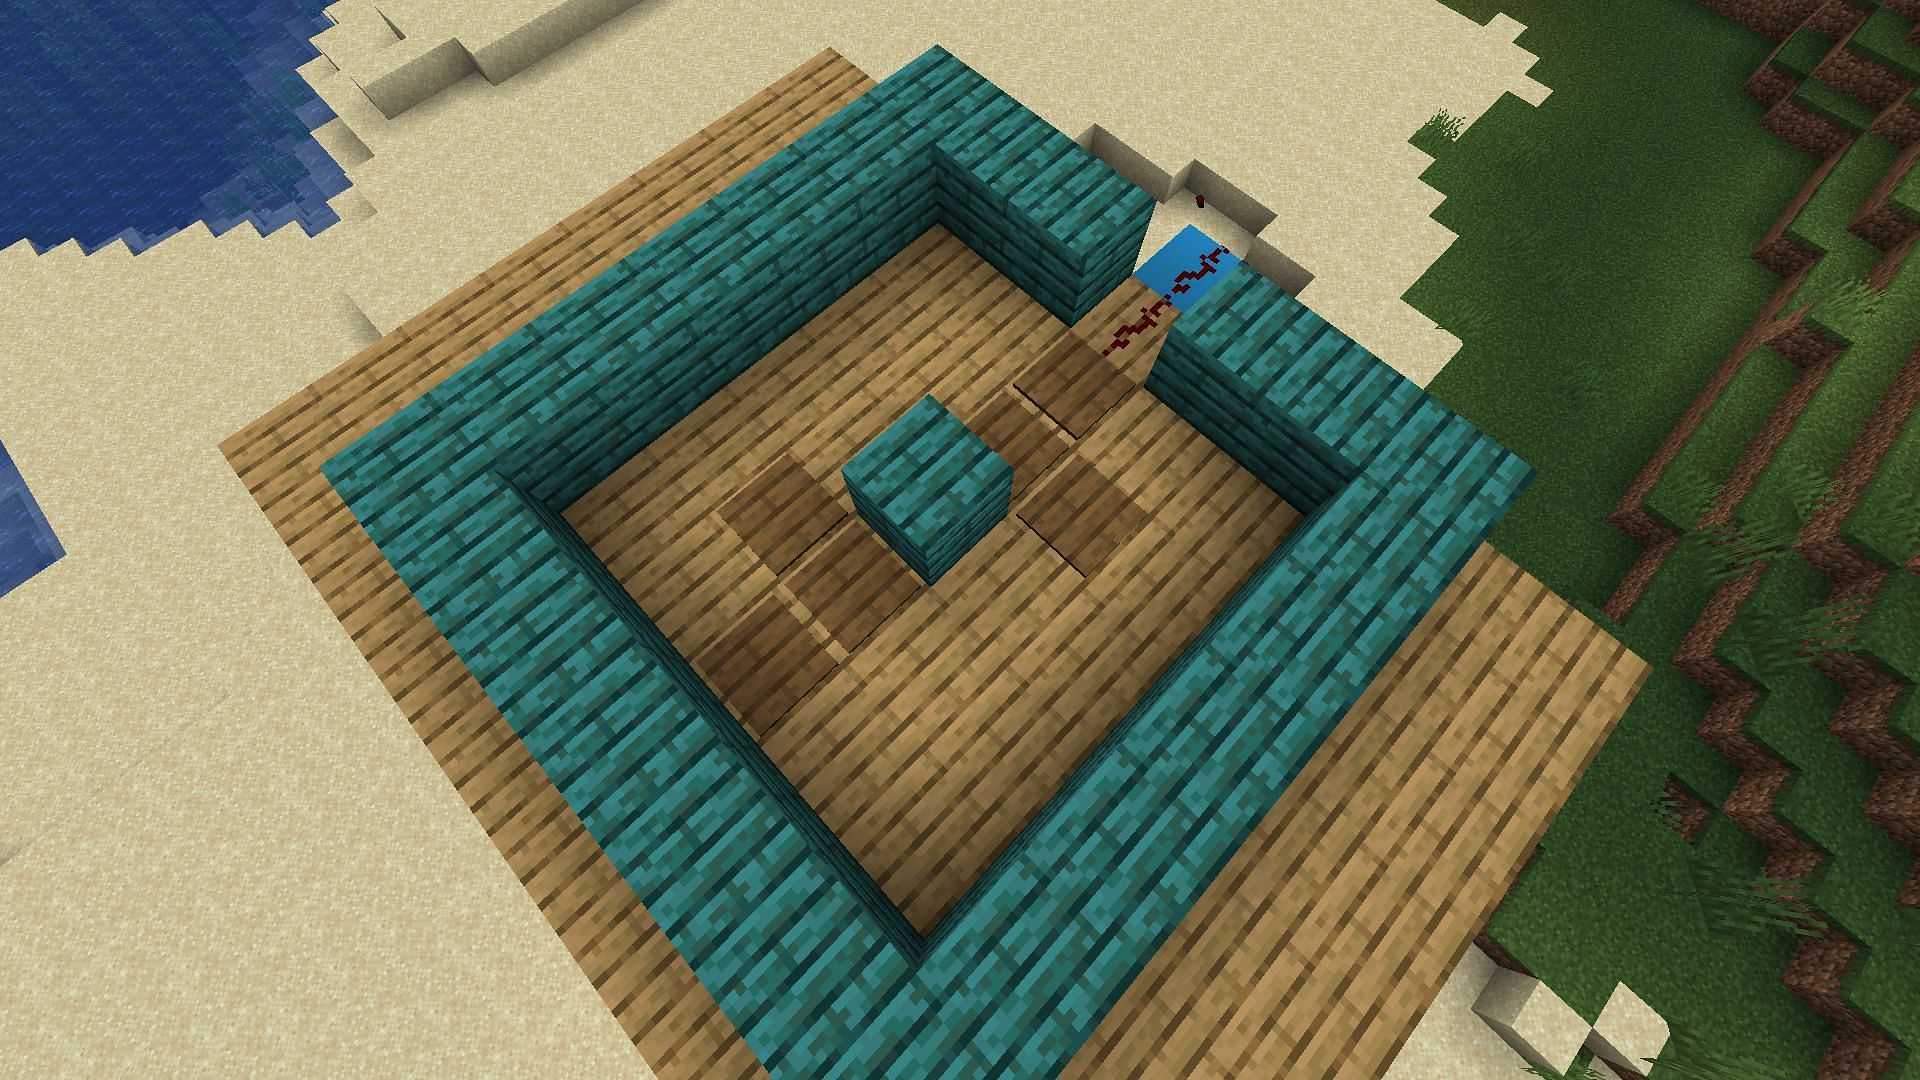
To start, you will want to place three rings of blocks around a witch hut in Minecraft and destroy the structure itself. The rings can then be converted into platforms complete with water trenches, which will become important later.
The steps below will ensure that you create the base foundation of your farm and the necessary water mechanic to move spawned witches later on.
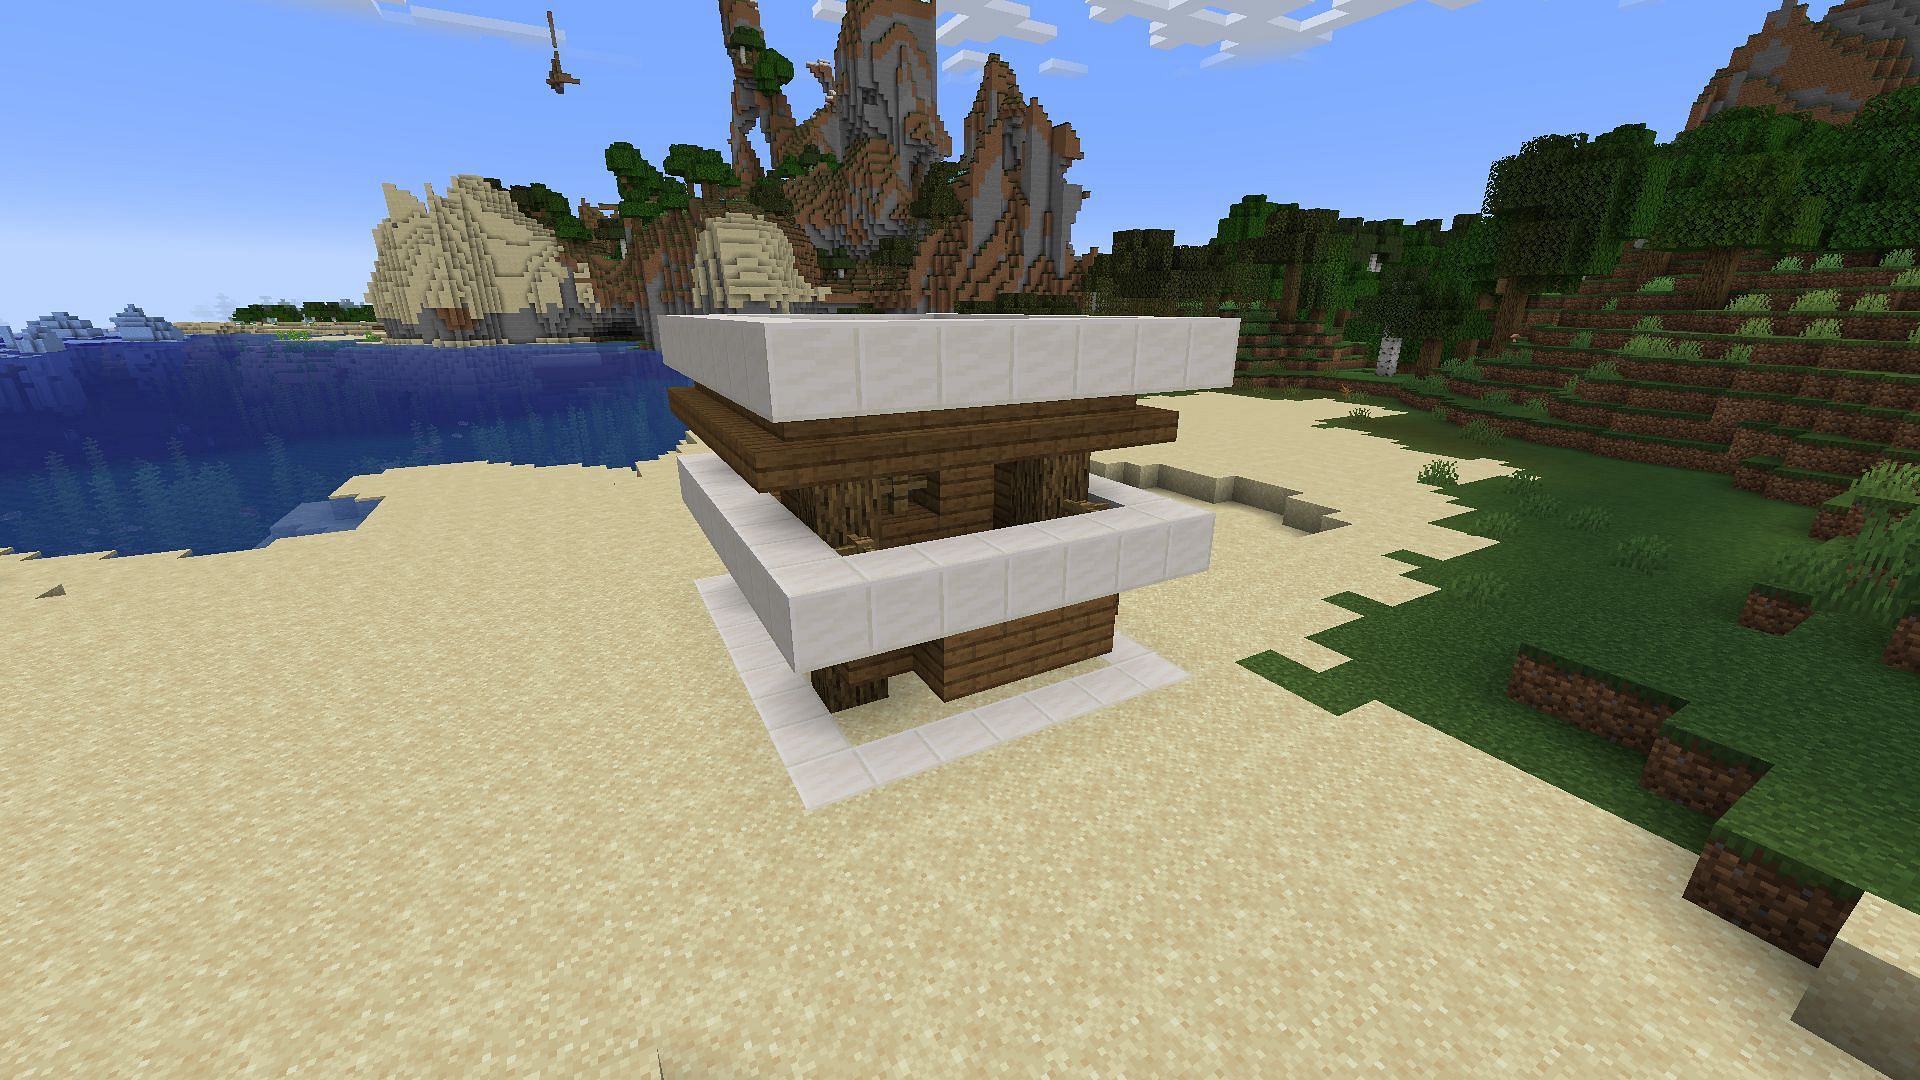
- Begin by creating three rings around the witch hut. The rings should be placed in the middle, top, and bottom of the witch hut. They should be two blocks apart vertically.
- Completely destroy the witch hut after the rings are in place. Kill the witch inside if you haven't already, and move the cat out of the way if it is present.
- Fill in the three rings with blocks of your choosing to create three floating horizontal platforms.
- Place blocks along the short sides of the floating platforms. Doing so should result in three 8x9 block platforms floating in the air.
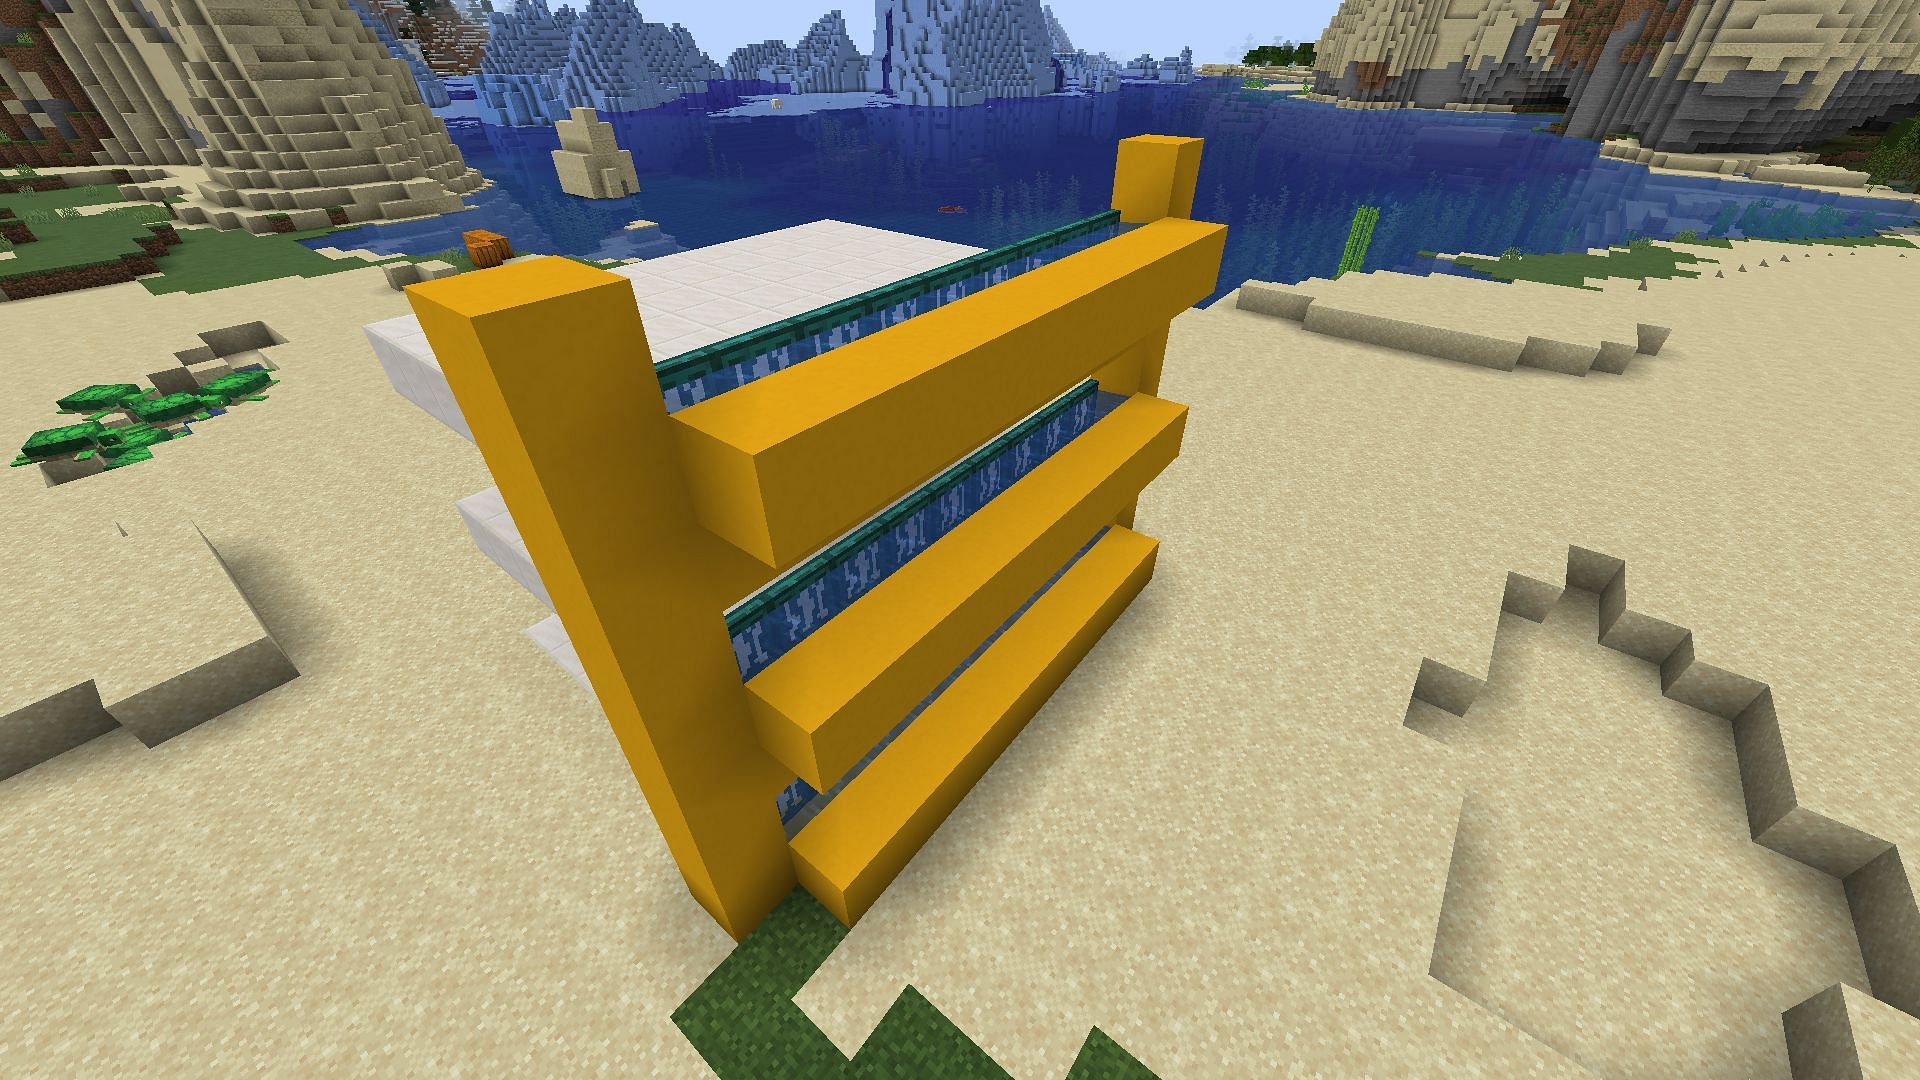
- On the blocks you placed in step 4, place trapdoors and activate them so they point upright.
- Build up the sides of the platform so that the blocks you placed in step 4 meet two pillars on opposite sides.
- Place a row of blocks behind the blocks you placed in step 4. This should create trenches between the blocks and the trapdoors. Fill these with water buckets evenly so there is no flow.

Adding the redstone
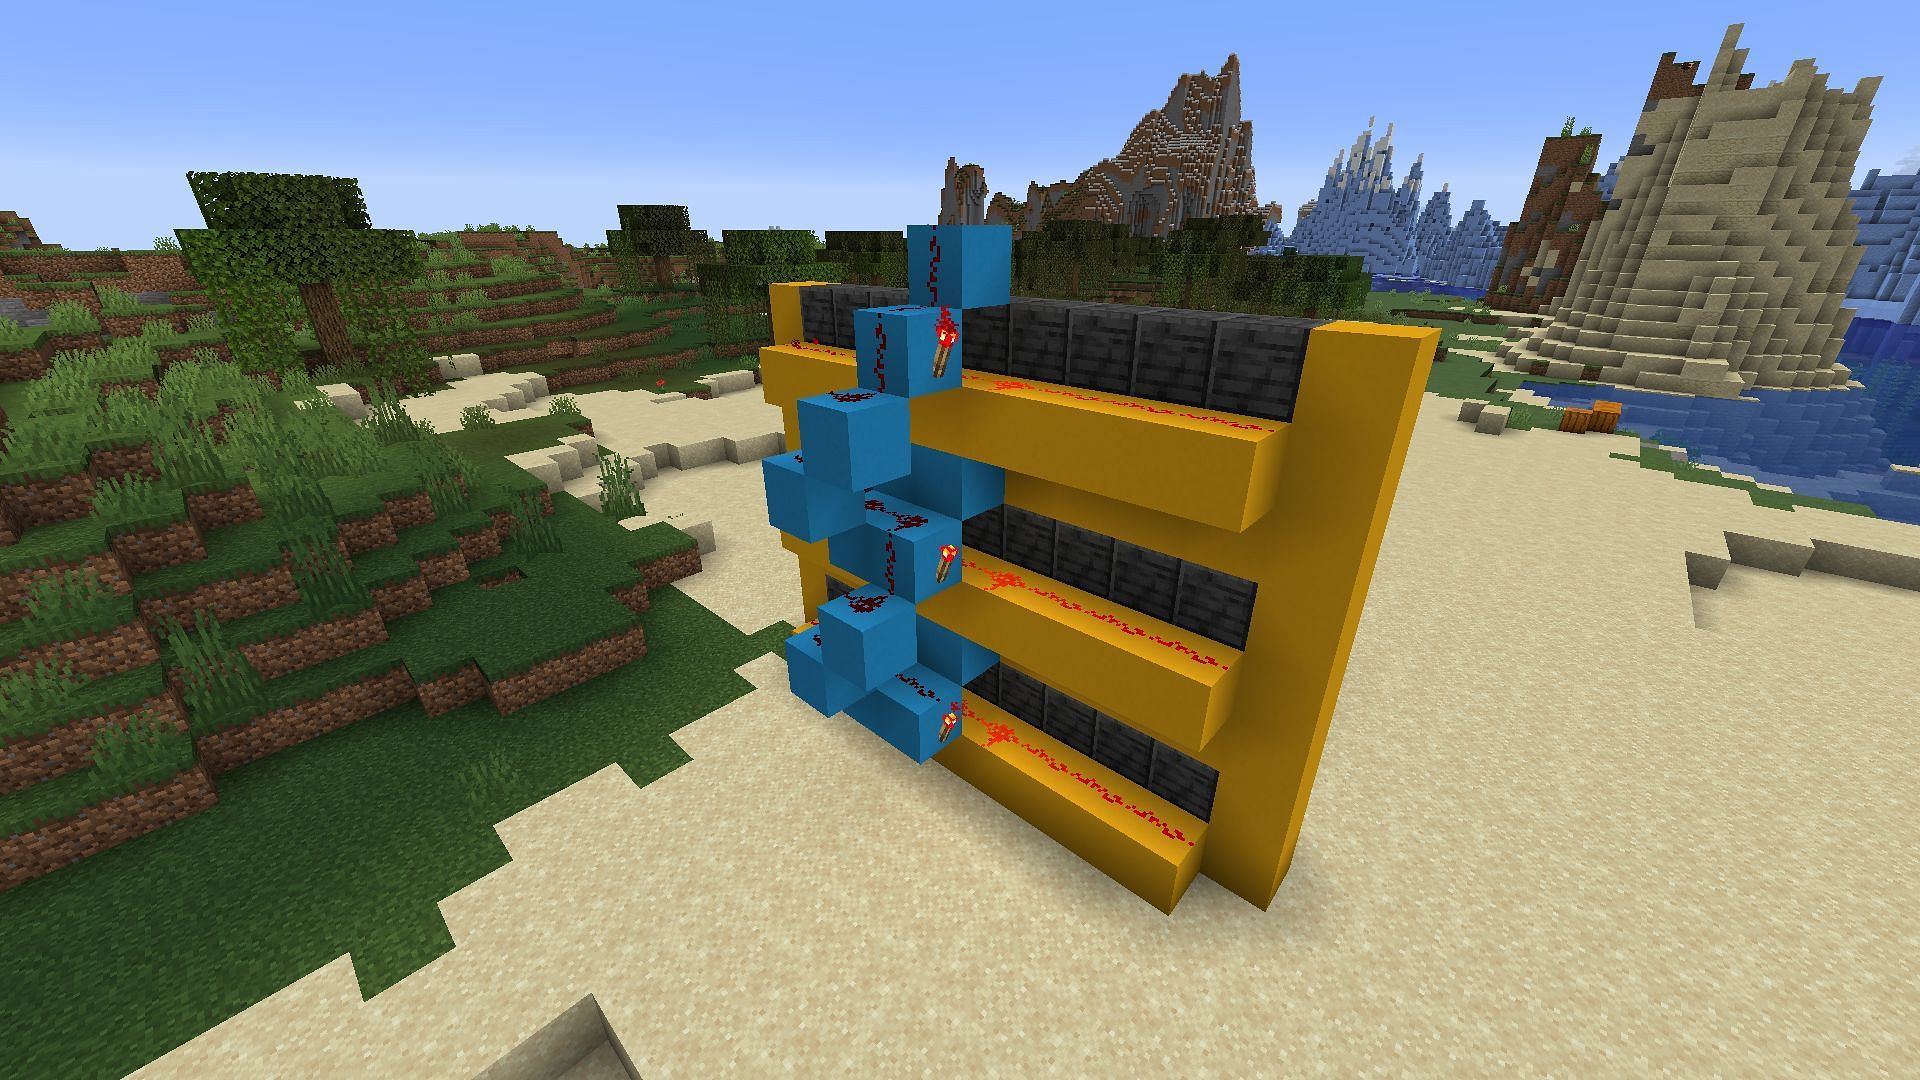
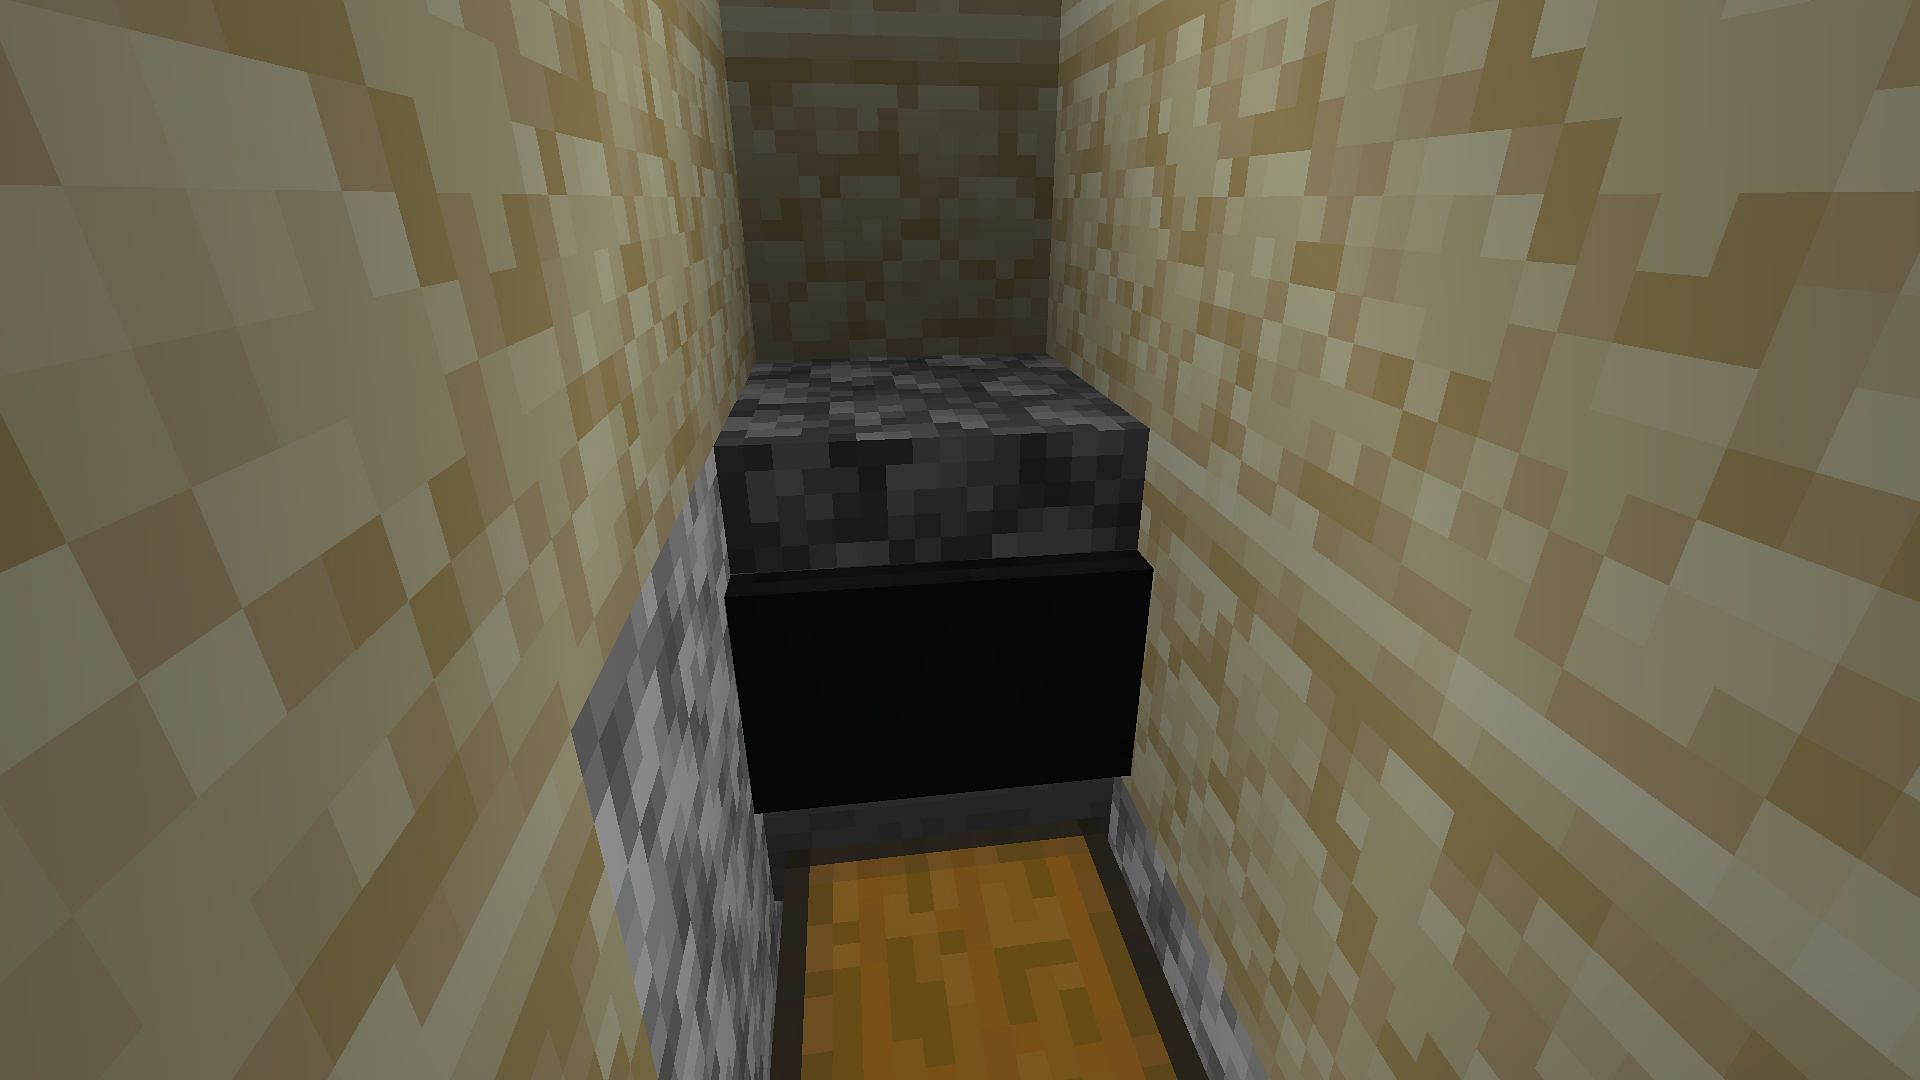
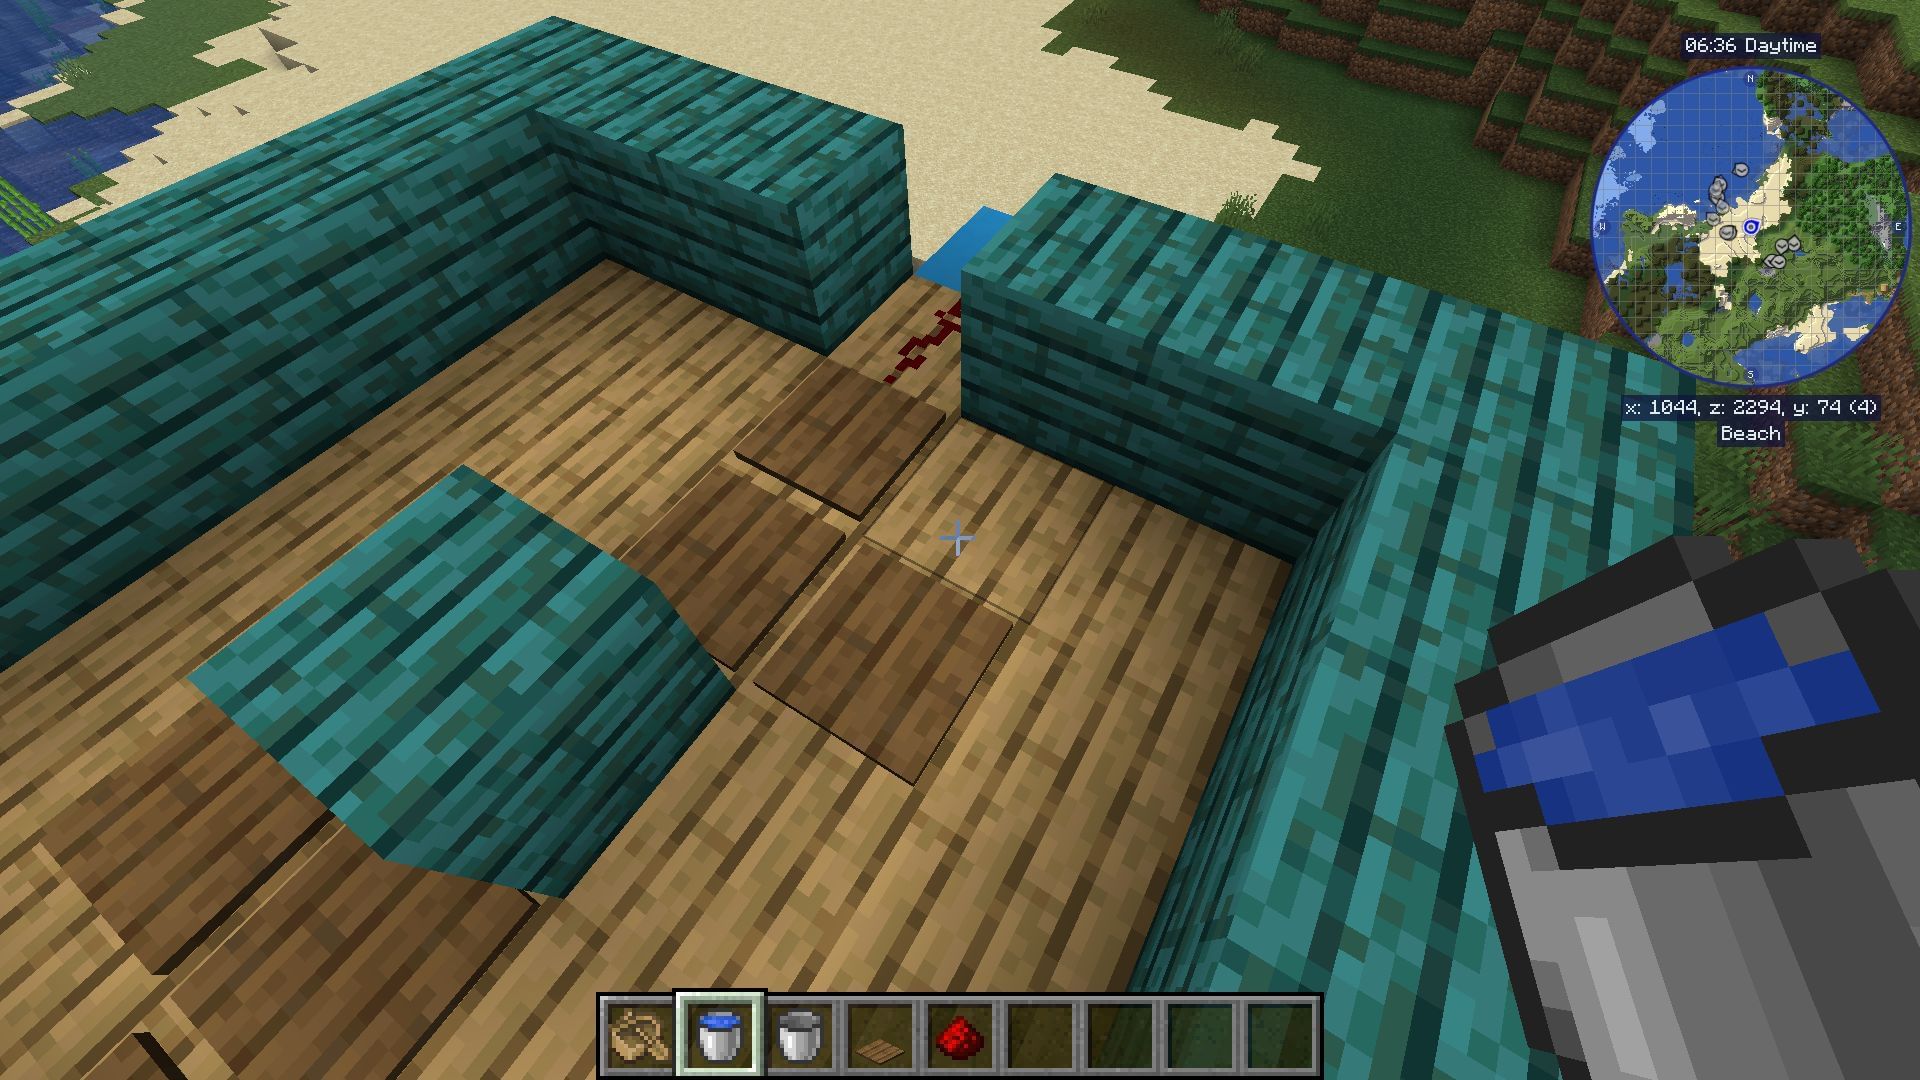
Next, you will need to add some redstone to the build. This will help activate the trapdoors and allow the water flows to push any spawned witches into an eventual kill put using entity cramming. This can be tricky, and you will want to make absolutely sure that your placement of redstone torches and dust is precise to get the desired effect.
Here's how to add redstone to the Minecraft witch farm:
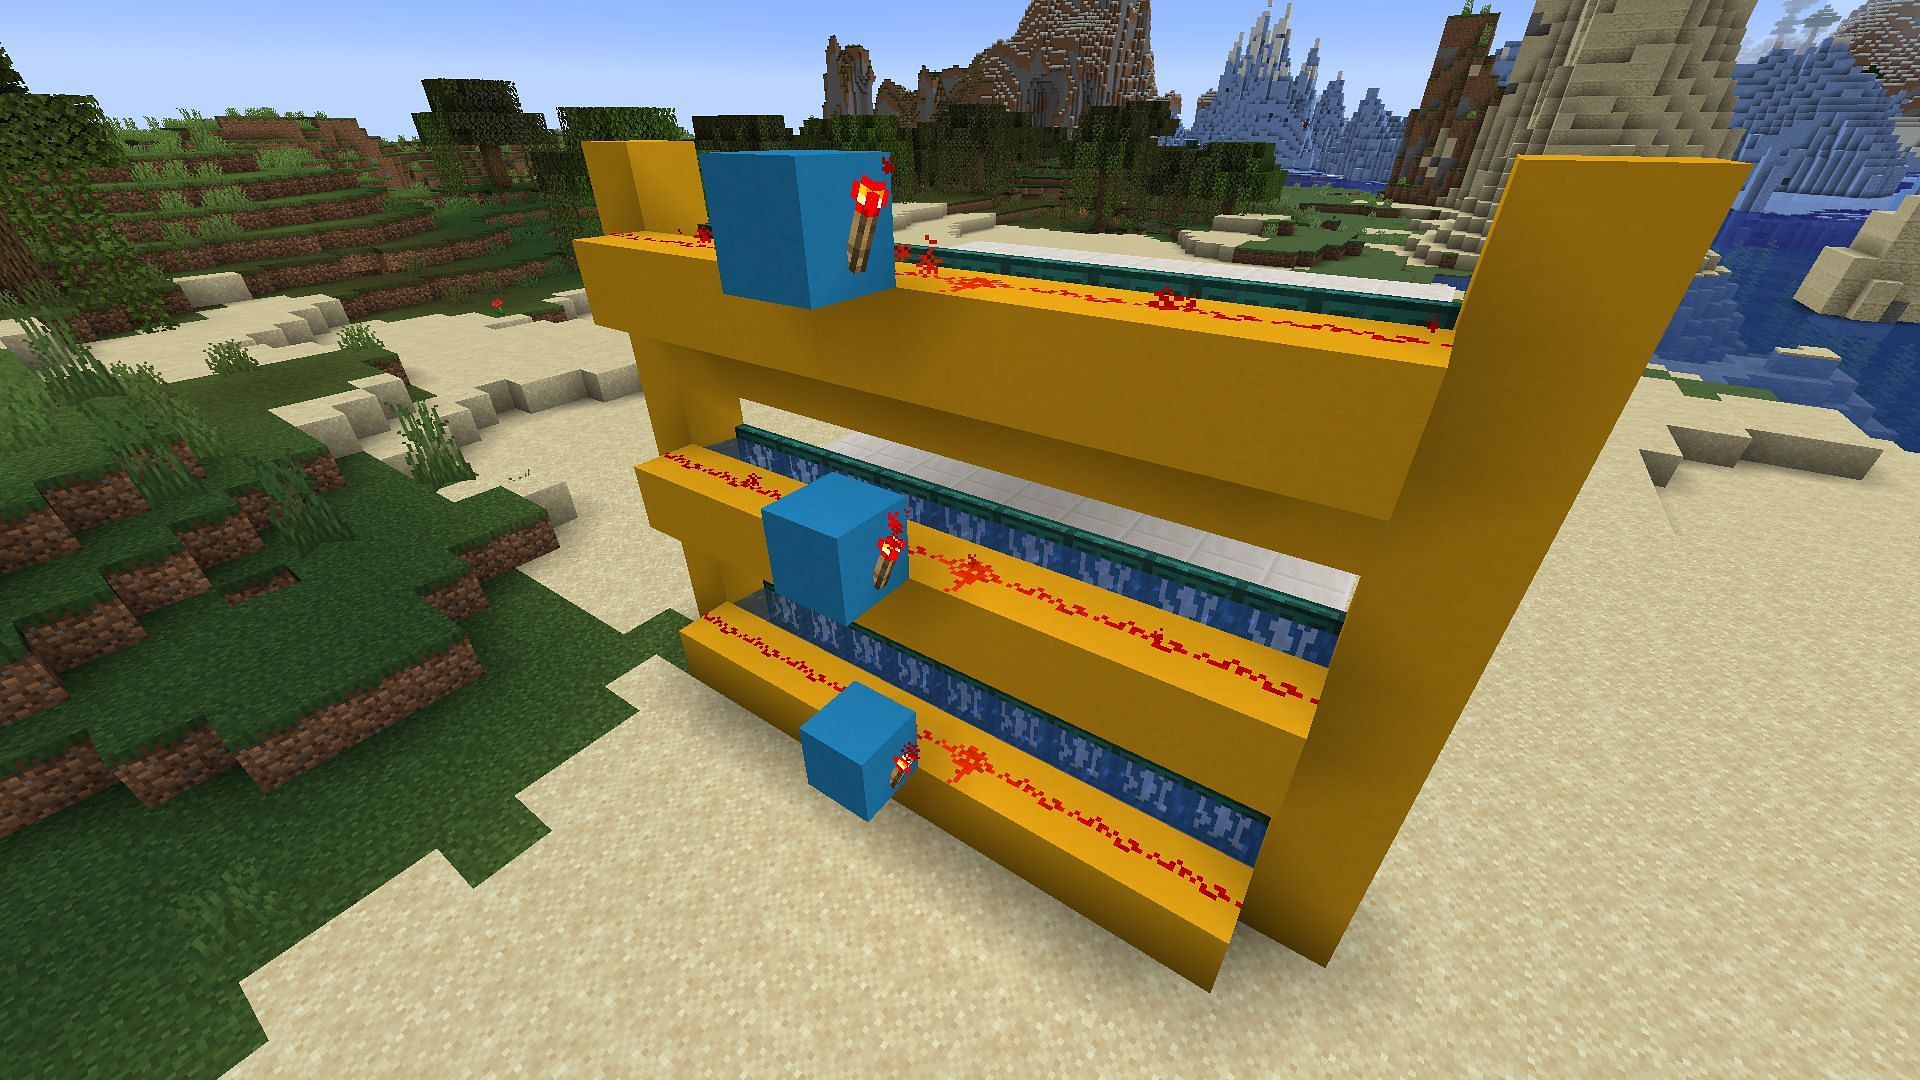
- Place a straight row of redstone dust on the blocks across from the activated trapdoors.
- Place a block to the side and above each row of redstone dust with a redstone torch placed on its side. An example can be seen in the image above.
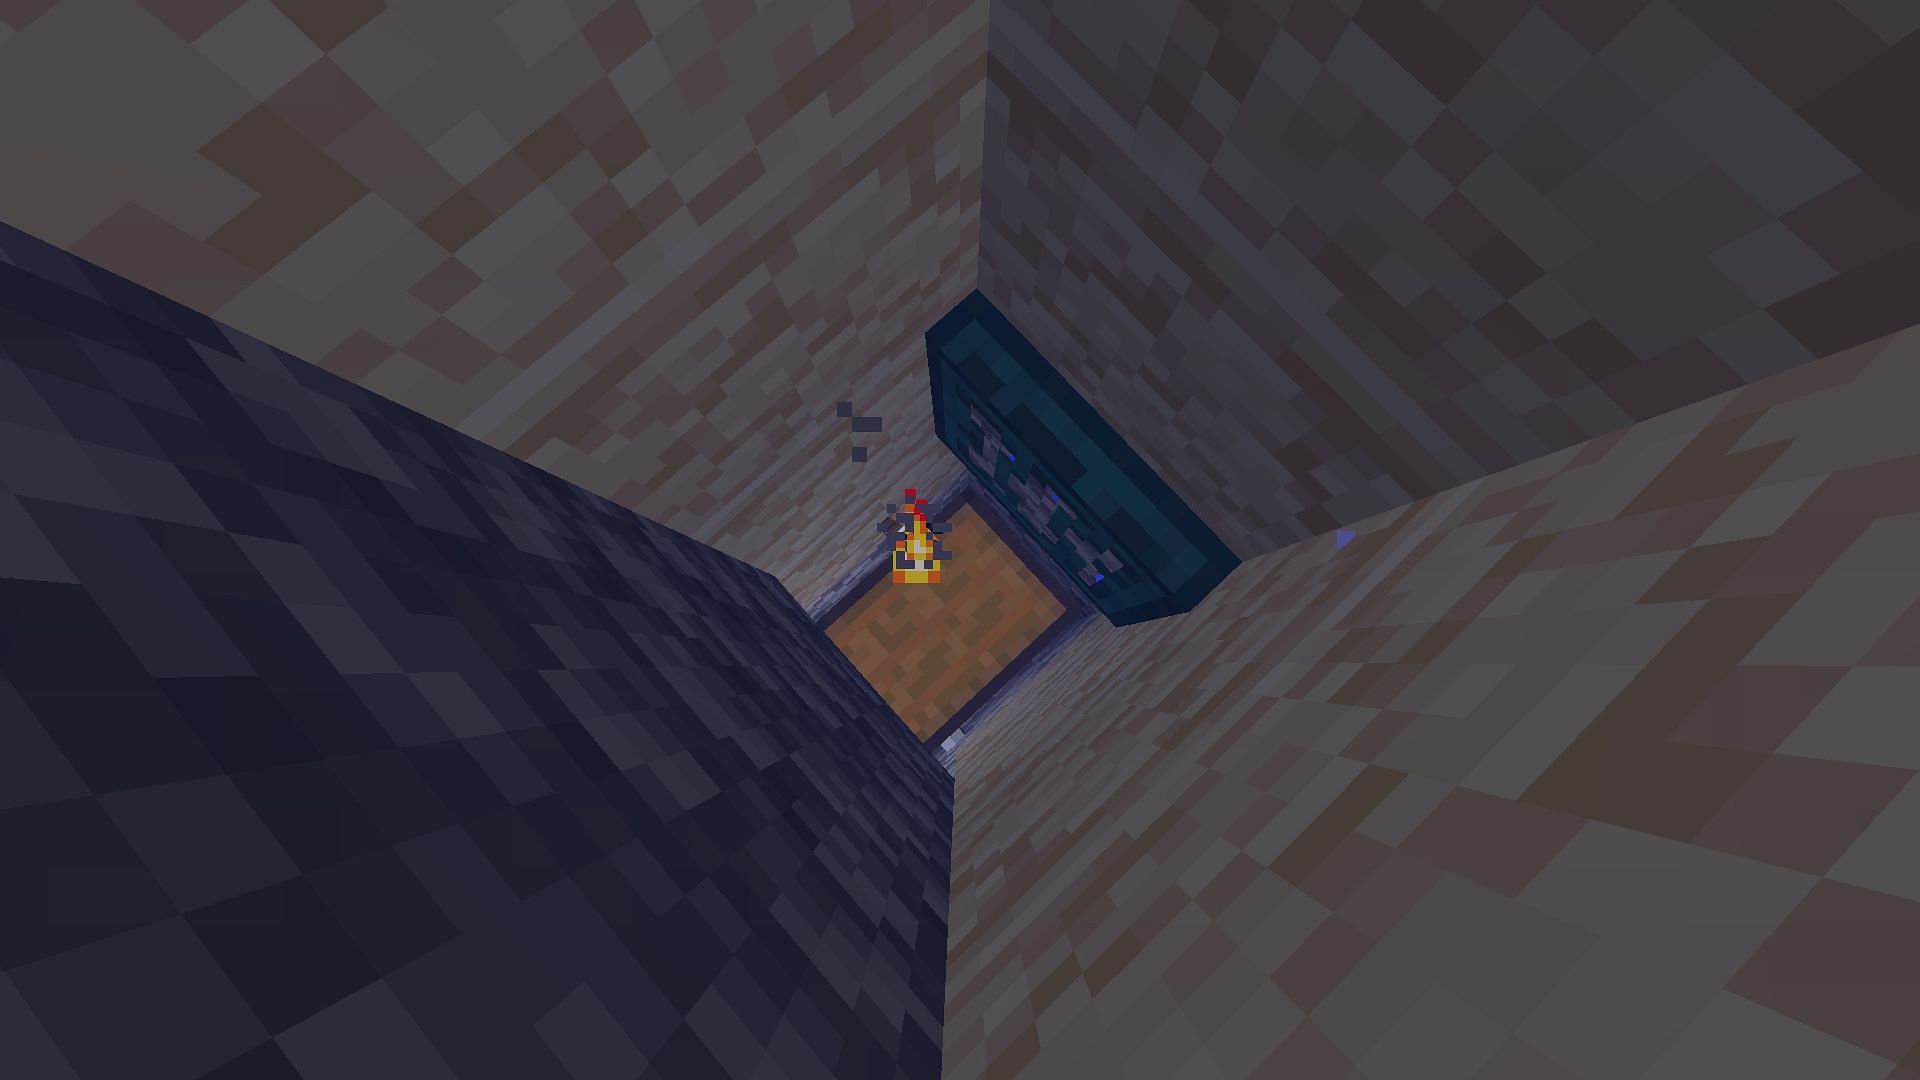
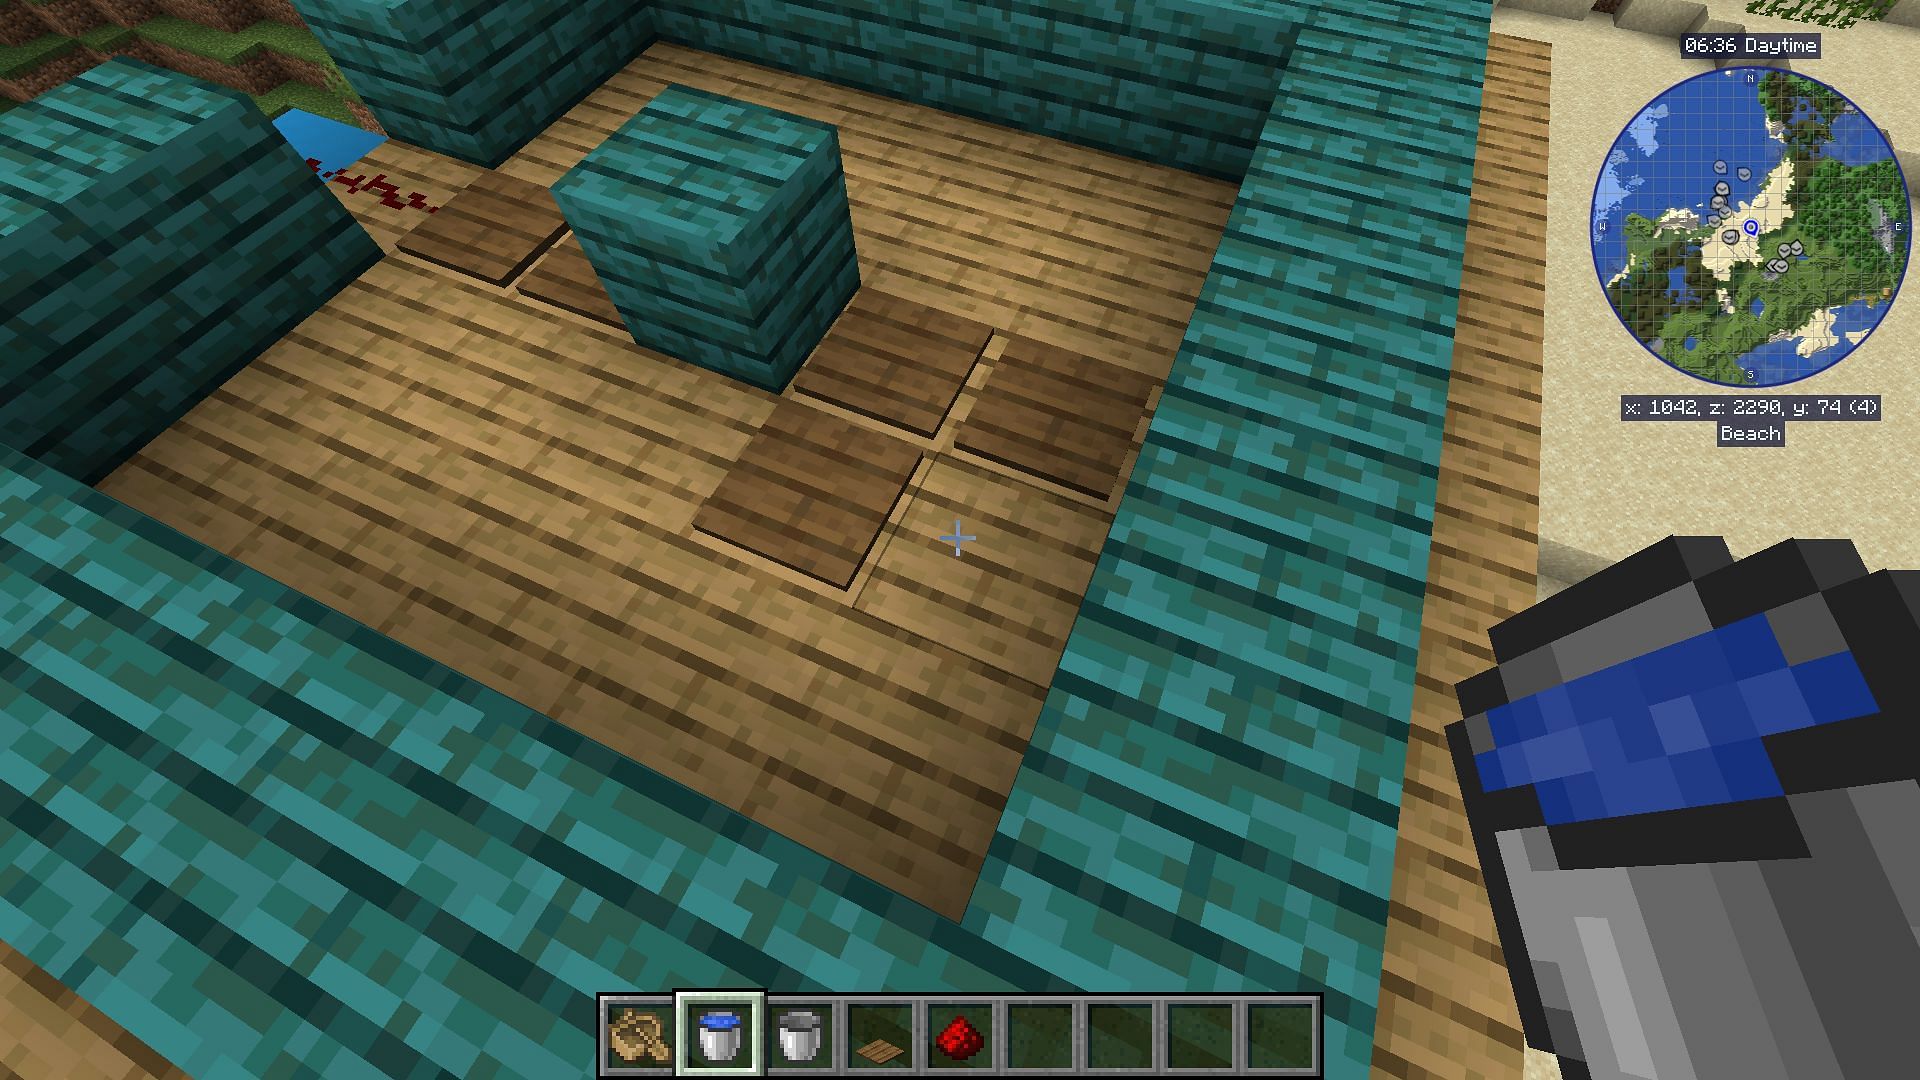
- The next part is tough but necessary. Create a spiraling staircase connecting all of the redstone torches. An example image will be shown below.
- Place a final block above the middle of the redstone row at the top of the farm. You can then place redstone dust all the way down the spiral staircase until it connects to the bottom-most redstone torch.
- Build rows of blocks above the water trenches.
- Add side walls and a roof to the rest of the build. One side of the farm should still be open.
Building the kill trench
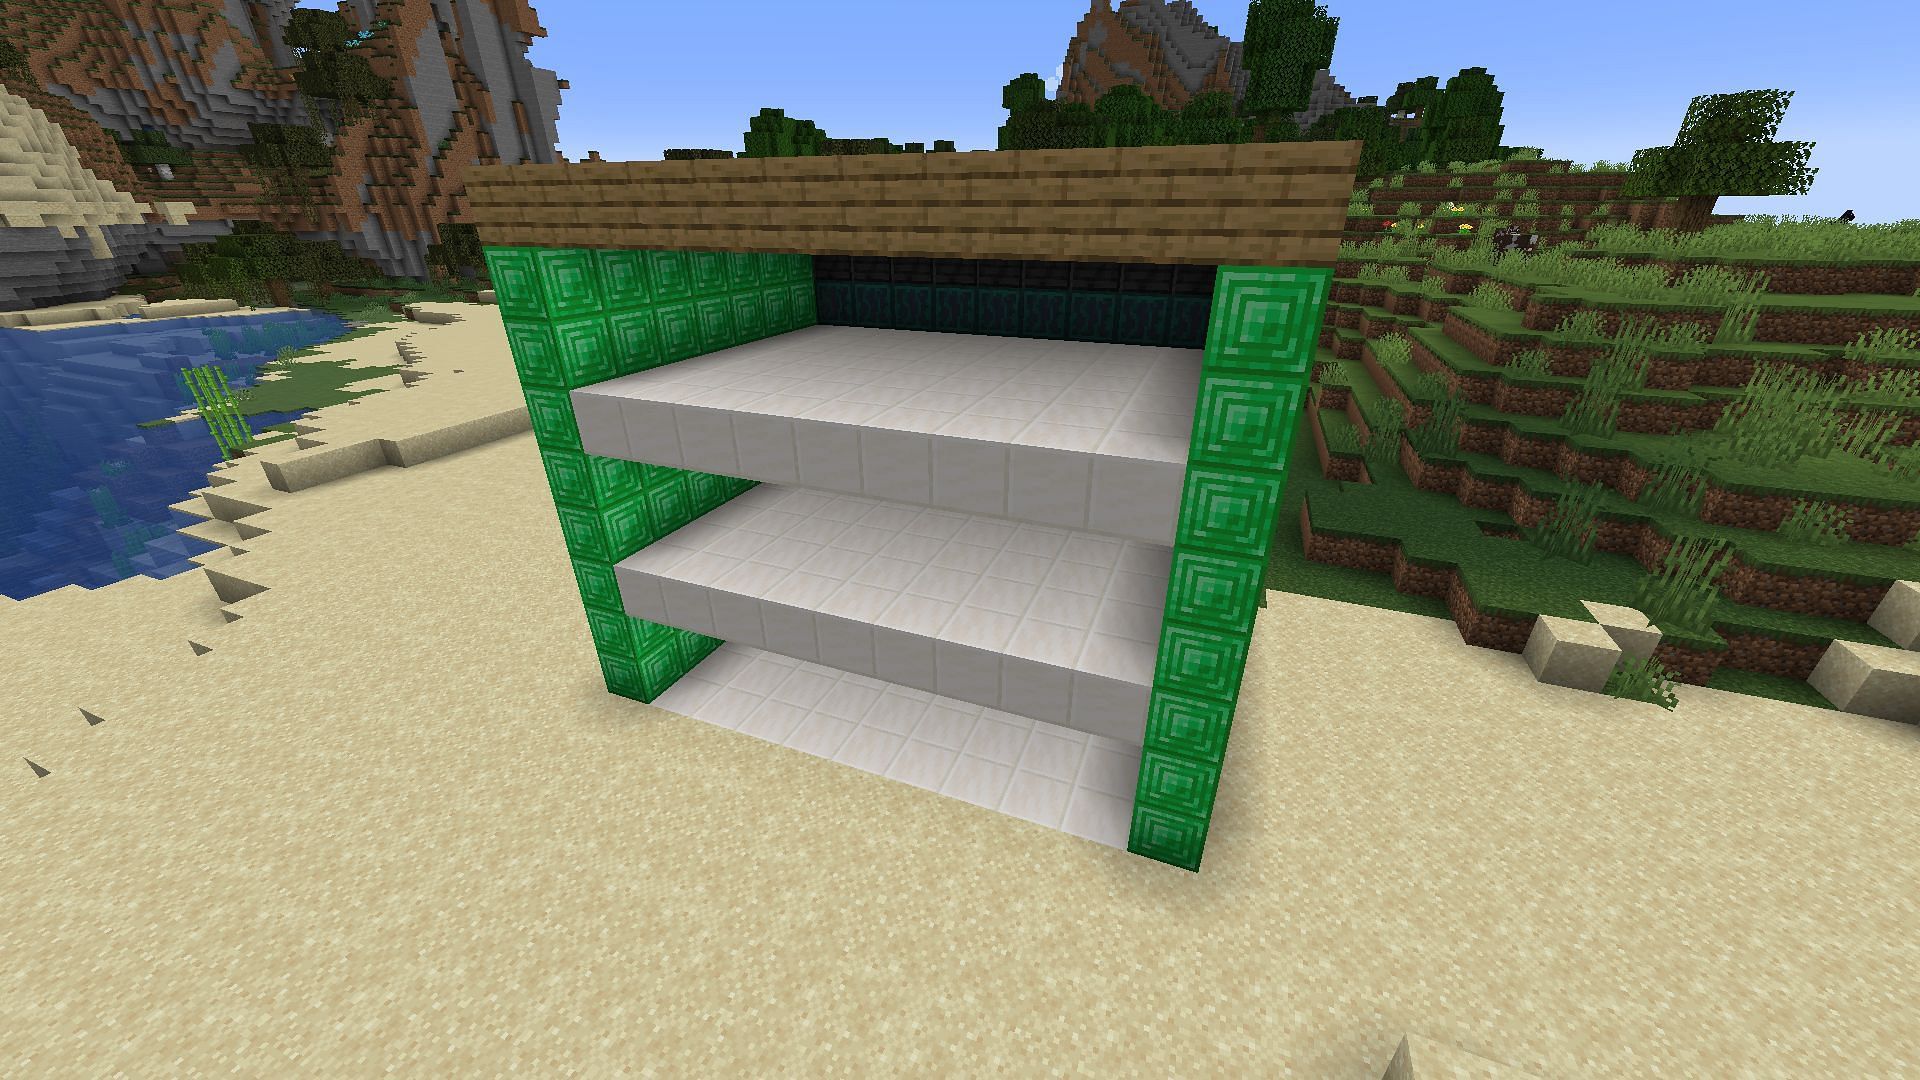
Next up, you will need to create a trench in front of the "mouth" of the Minecraft farm. The witches will be pushed by the water into this trench and be funneled into a space where the entity cramming mechanic will kill them directly and deposit their drops into a chest for collection.
Here's how to build the kill trench for the Minecraft witch farm:
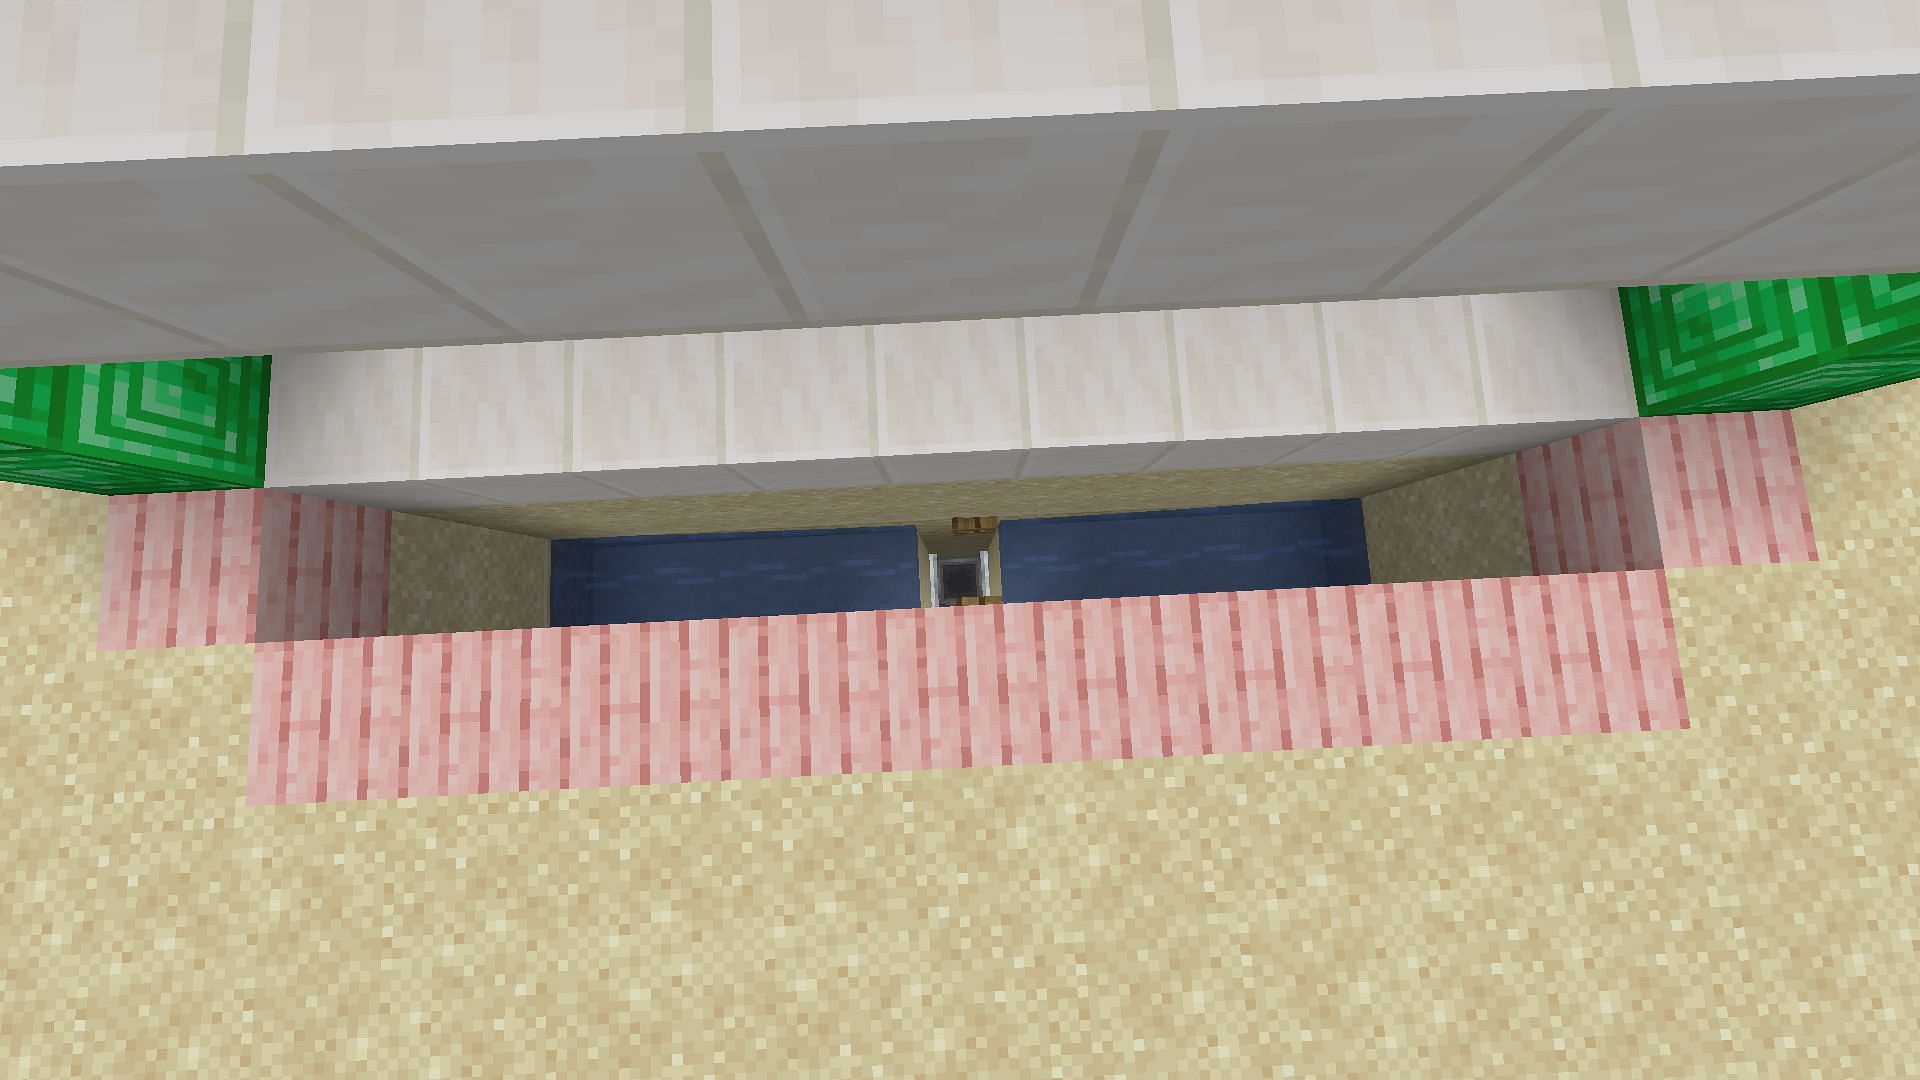
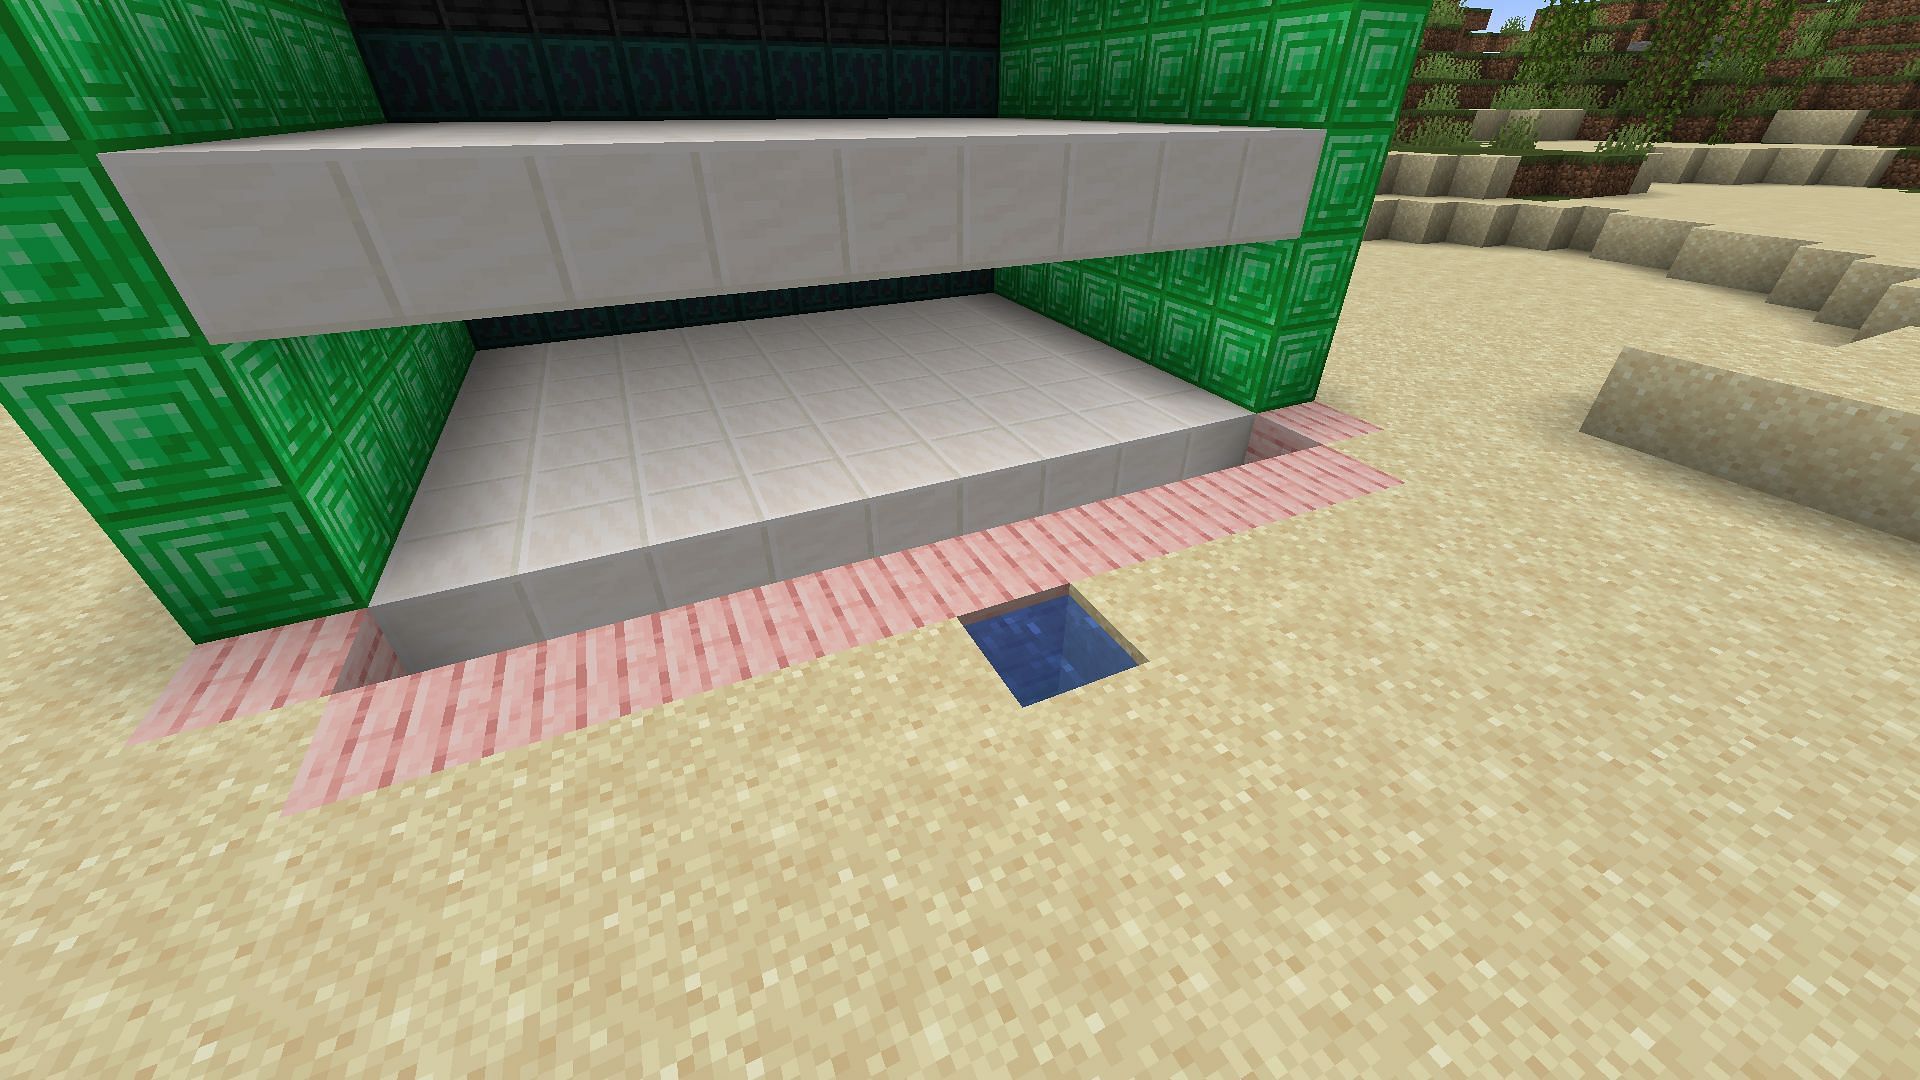
- Create a barrier around the front of the farm at ground level (this is marked in the image above by the cherry wood planks).
- Between the farm and the barrier, dig a trench that is four blocks deep and nine blocks wide.
- Use a water bucket to create water flows on opposite sides of the trench. These water flows should meet in the center.
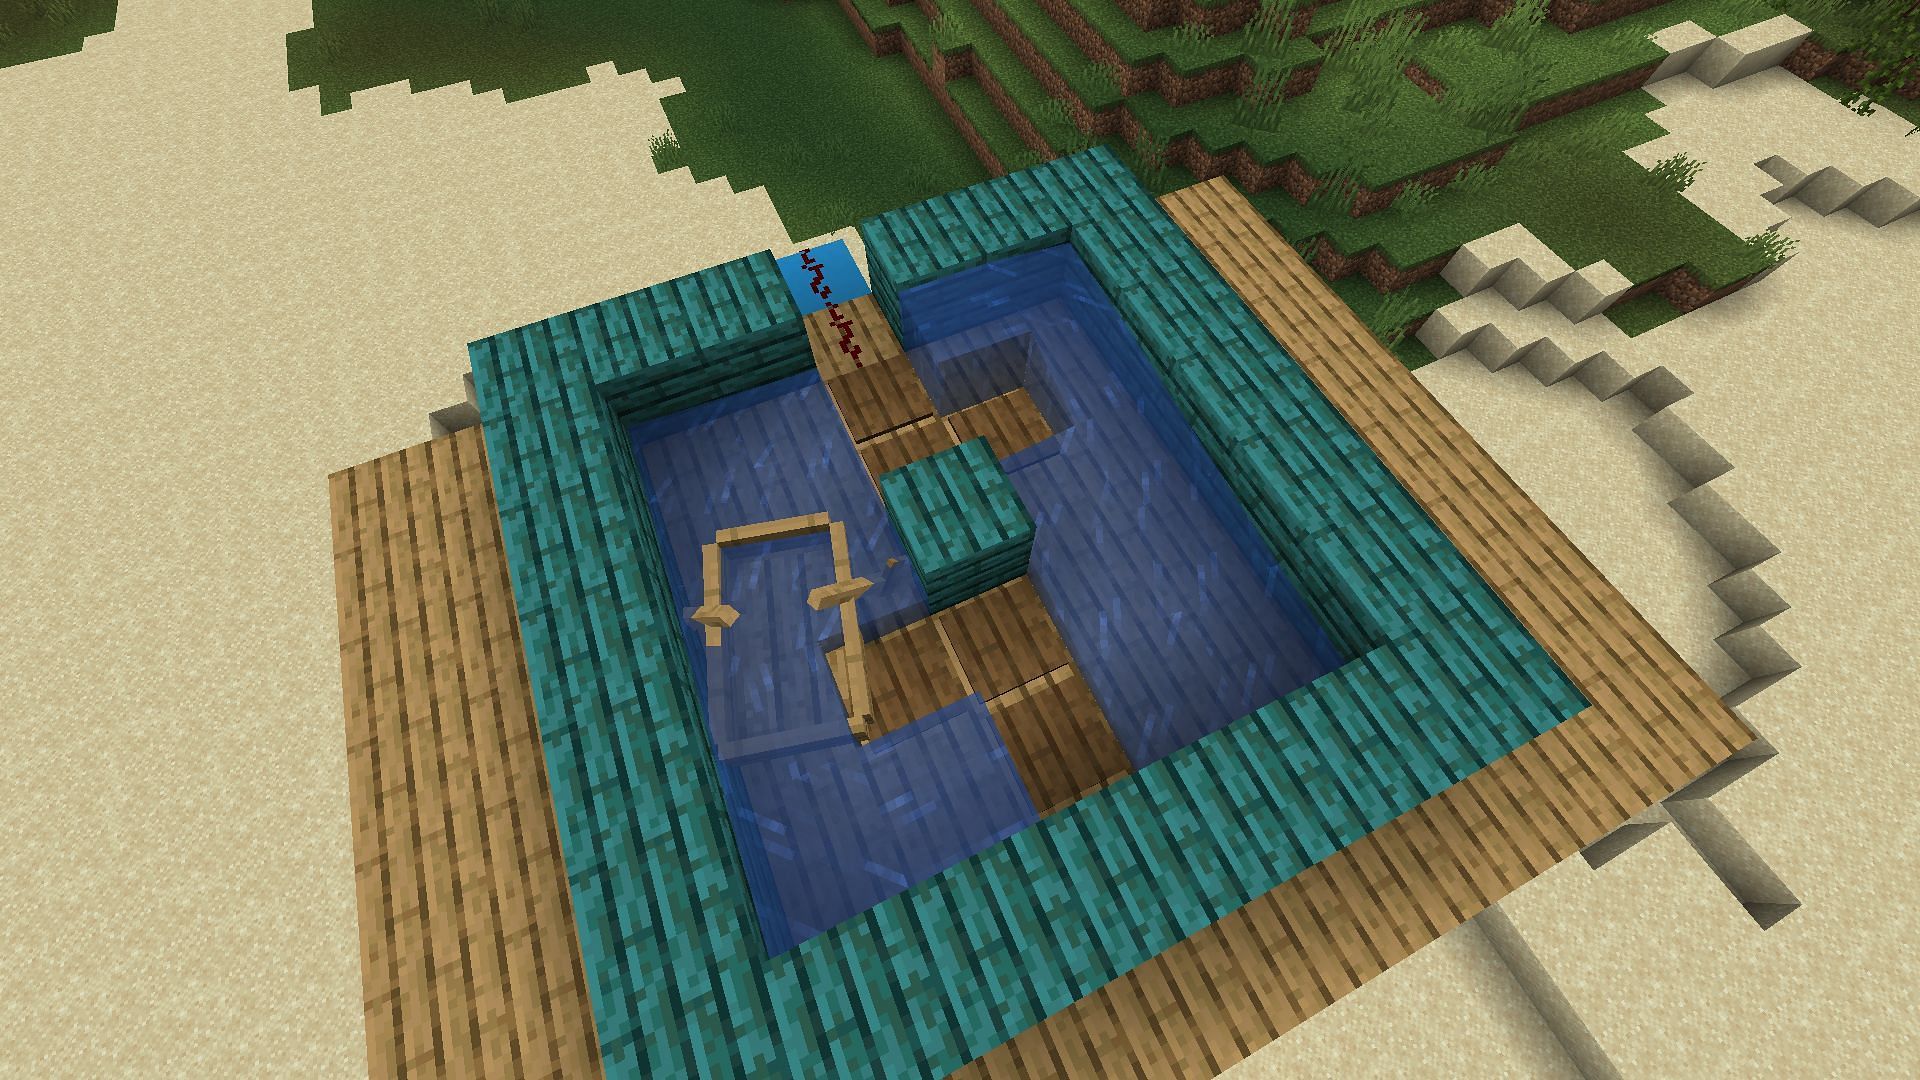
- In the middle of the trench, place a fence gate and activate it.
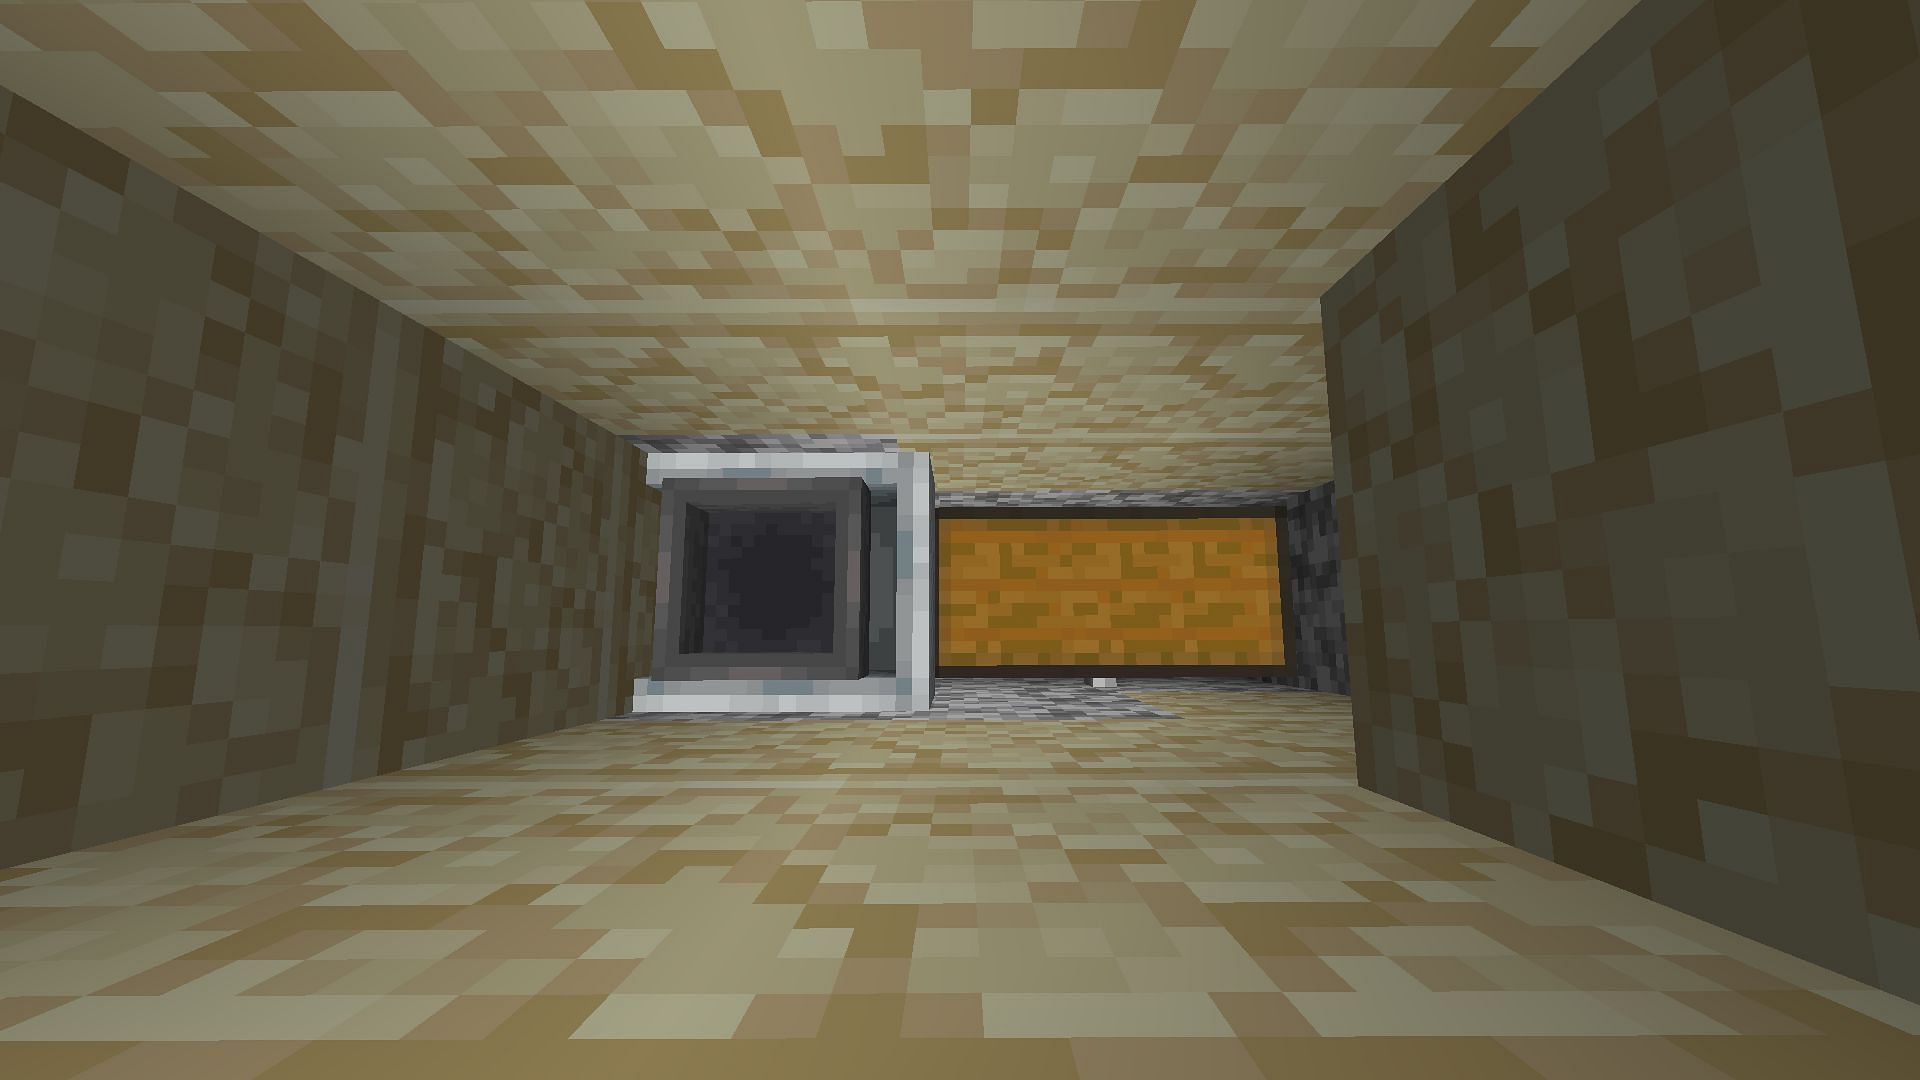
- Dig downward four blocks and clear out the next six blocks in front of you vertically.
- Within this area, place a double chest on the far side and connect a hopper to it. The hopper should line up underneath the fence post you placed in step 4.
- Place a rail on top of the hopper, then top the rail with a hopper minecart. Break the rail afterward.
- Above the minecart, place a solid block. Place a piston (facing downward) on top of this block. Attach a lever to the piston and activate it to push the solid block into the hopper minecart. Break the piston afterward.
- This next part is vital for this Minecraft build. Place a rail on top of the block inside the minecart. Then, place 24 ordinary minecarts on top of the rail. Be sure to be in sneak mode so you don't accidentally enter the carts. Lastly, cover up the blocks in front of the minecart, but make sure not to put any blocks in the drop hole underneath the fence gate.
- Stand on the far side of the double chest, place another trapdoor over your head, and activate it.
- Dig upward to get out of the kill pit, then fill the hole with water so you can swim down and access the chest later.
Building the redstone clock
The next portion of this Minecraft farm is tricky but isn't too difficult when broken down step by step. You will need to create a redstone clock using a boat and the movement of water flows. This will allow the boat to trigger the pressure plates of the clock, sending a redstone pulse that will release the water inside the farm and send the witches to their doom.
Here's how to build the redstone clock in Minecraft:
- Place a piece of redstone dust that connects the roof to the spiral staircase. Place two wooden pressure plates beneath this dust. You can then place one pressure plate to the right to create an L shape.
- Put down a standard building block under the second pressure plate you placed vertically. Create a reversed L shape on the other side of this block. You can see the pressure plate placement above and below by checking for the spruce pressure places.
- Build a frame of standard solid blocks around the pressure plates, as seen above and below.
- Take two water buckets and place them in the corners of the clock. The flow should effectively go entirely clockwise, with the exception of the pressure plates creating gaps.
- Lastly, place your boat in the water. Make sure it's moving correctly and touching the top pressure plate to activate the redstone on the spiral staircase.
Creating the AFK room and sealing the front of the witch farm
To add the finishing touches, you will need to create an AFK room high above the Minecraft farm. Before doing so, you will want to seal the front of the build with a final wall of blocks and place slabs across the entire roof to prevent witches from spawning on top of the farm.
Here's how to add the AFK room and sealing the Minecraft farm:
- Use a final wall of blocks to completely cover up the front of the build that was left open in previous segments.
- Take slabs and completely cover every solid block on the roof of the farm. This includes the frame and center of the water clock.
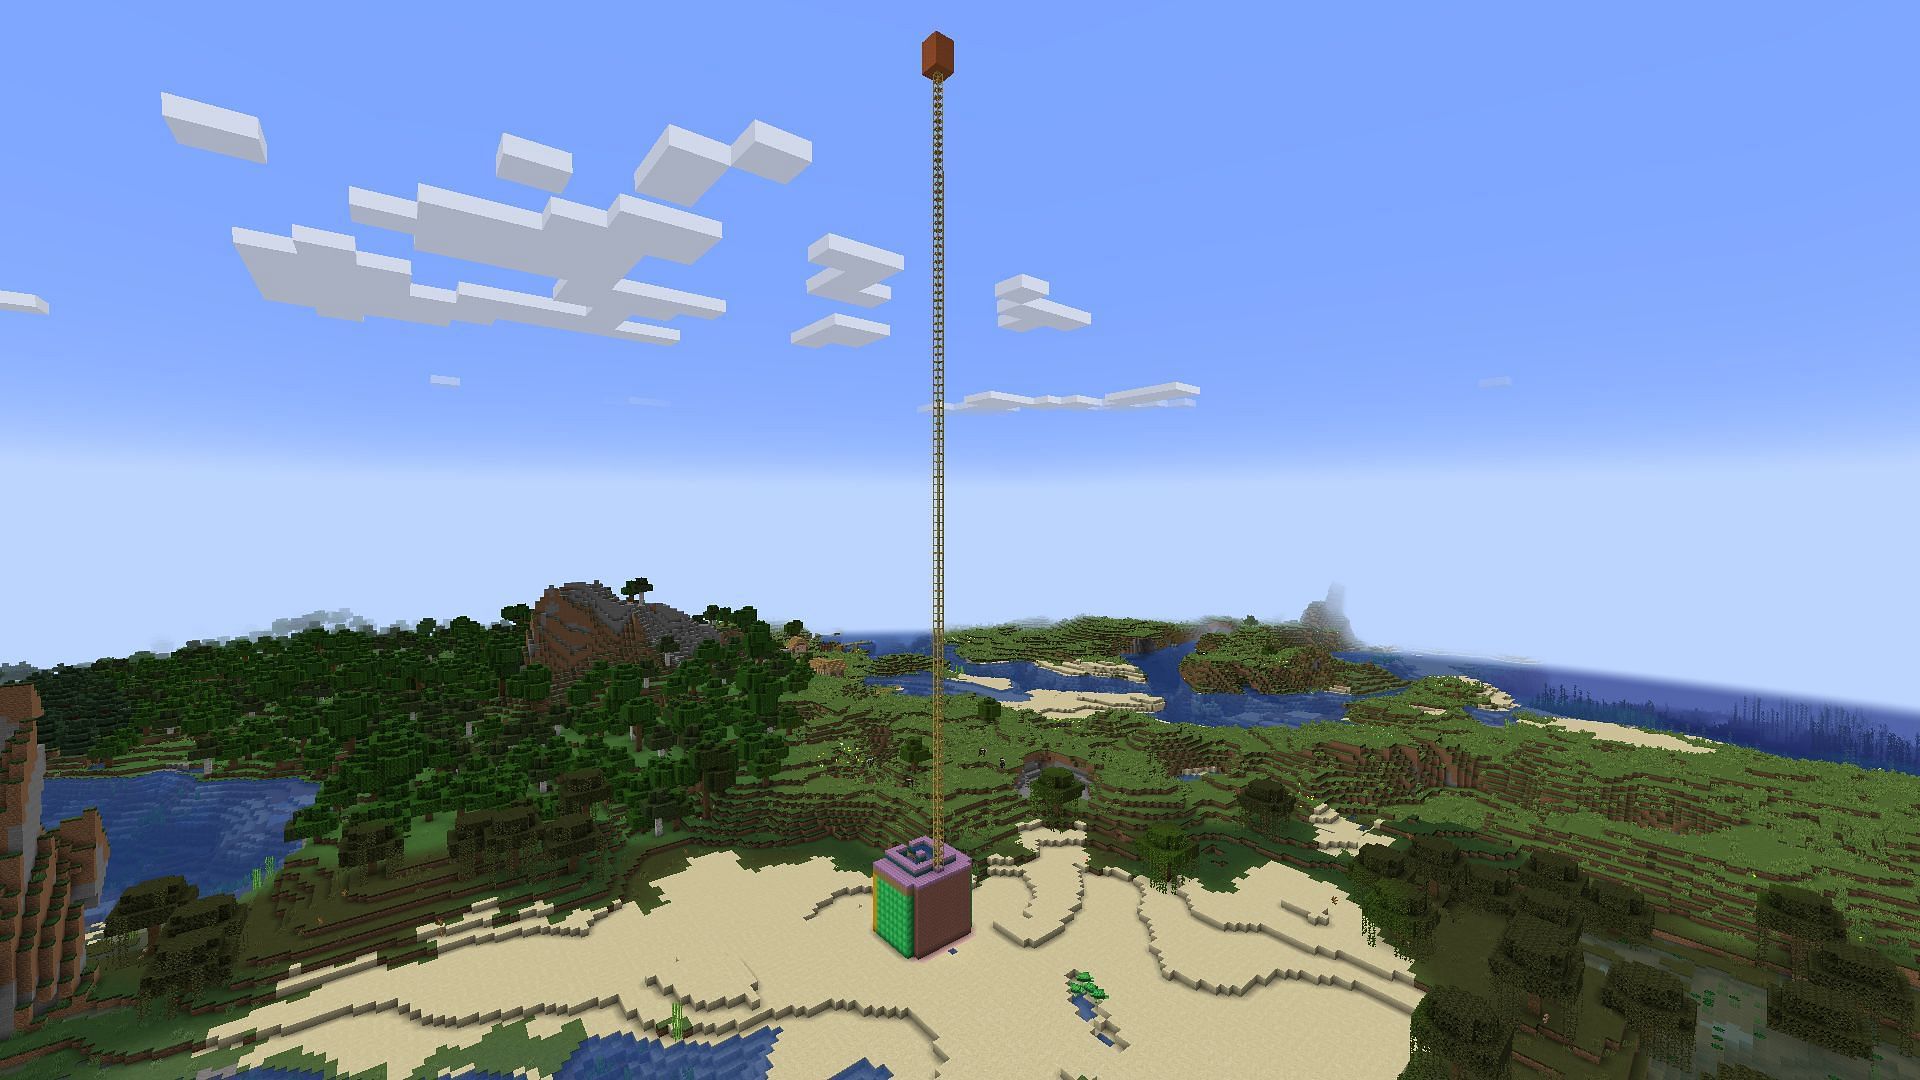
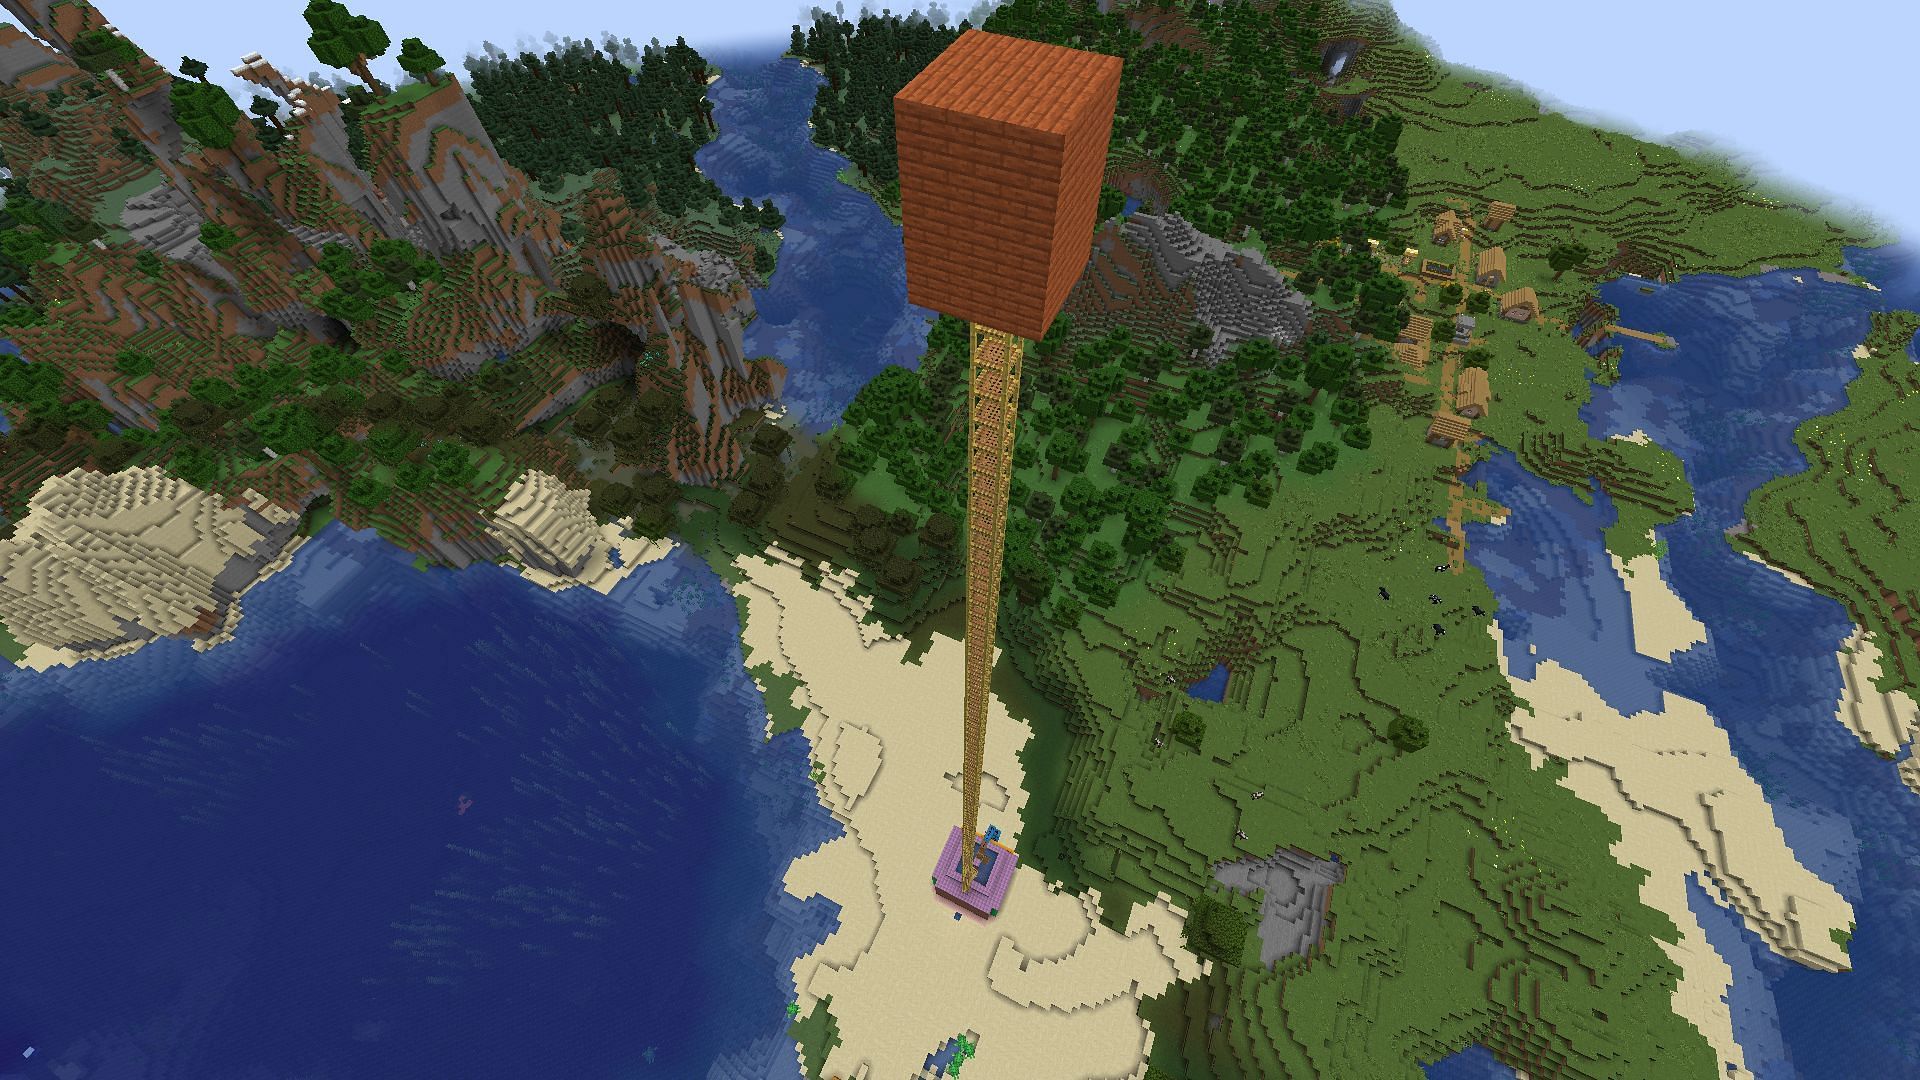
- Place a final slab in a part of the roof of your choosing to create a solid block. Then, place exactly 105 scaffolding blocks atop this block. They should stack on top of each other vertically up into the sky.
- Climb the scaffolding and create a small AFK room for yourself. It should be lit with a light source block to avoid any hostile mob spawns.
With the AFK room in place, you are finished with your Minecraft farm. To use it, you should climb up the scaffolding and spend time in the AFK room. After some time has passed, you can descend the scaffolding and hop into the water hatch outside of the farm to collect any resources dropped by the witches upon death.

Uncover new worlds with our Minecraft Seed Generator!