
'%20x='0'%20y='0'%20height='100%25'%20width='100%25'%20%0A%20%20%20%20%20%20%20%20%20%20xlink%3Ahref='data:image/jpg;base64,/9j/2wBDAAYEBQYFBAYGBQYHBwYIChAKCgkJChQODwwQFxQYGBcUFhYaHSUfGhsjHBYWICwgIyYnKSopGR8tMC0oMCUoKSj/2wBDAQcHBwoIChMKChMoGhYaKCgoKCgoKCgoKCgoKCgoKCgoKCgoKCgoKCgoKCgoKCgoKCgoKCgoKCgoKCgoKCgoKCj/wgARCAAGAAoDASIAAhEBAxEB/8QAFgABAQEAAAAAAAAAAAAAAAAAAAYH/8QAFQEBAQAAAAAAAAAAAAAAAAAAAQL/2gAMAwEAAhADEAAAAMelBr//xAAfEAADAAEDBQAAAAAAAAAAAAABAgMEAAUGERITIjH/2gAIAQEAAT8AwOeZuJtdkn6eJFEQqKezV9zXIvS1IqXoxdj0H06//8QAFhEBAQEAAAAAAAAAAAAAAAAAAgEA/9oACAECAQE/ACSVUZv/xAAVEQEBAAAAAAAAAAAAAAAAAAAAAf/aAAgBAwEBPwCv/9k='%3E%3C/image%3E%3C/svg%3E)
Borderlands 4 is packed with treachery, chaos, and hidden agendas. During the mission 'A Council Divide,' you learn that supplies are being sabotaged from within the Electi council. Once the quest is done, you will unlock the next quest in the Electi faction storyline, 'A Traitor Within.' The quest begins as a straightforward supply run but soon spirals into a chaotic confrontation with the Order.
In this guide, we will break down how to unlock the A Traitor Within quest in Borderlands 4 and give you a step-by-step walkthrough, including how you can solve Willem’s Node puzzle.
Borderlands 4: How to unlock A Traitor Within
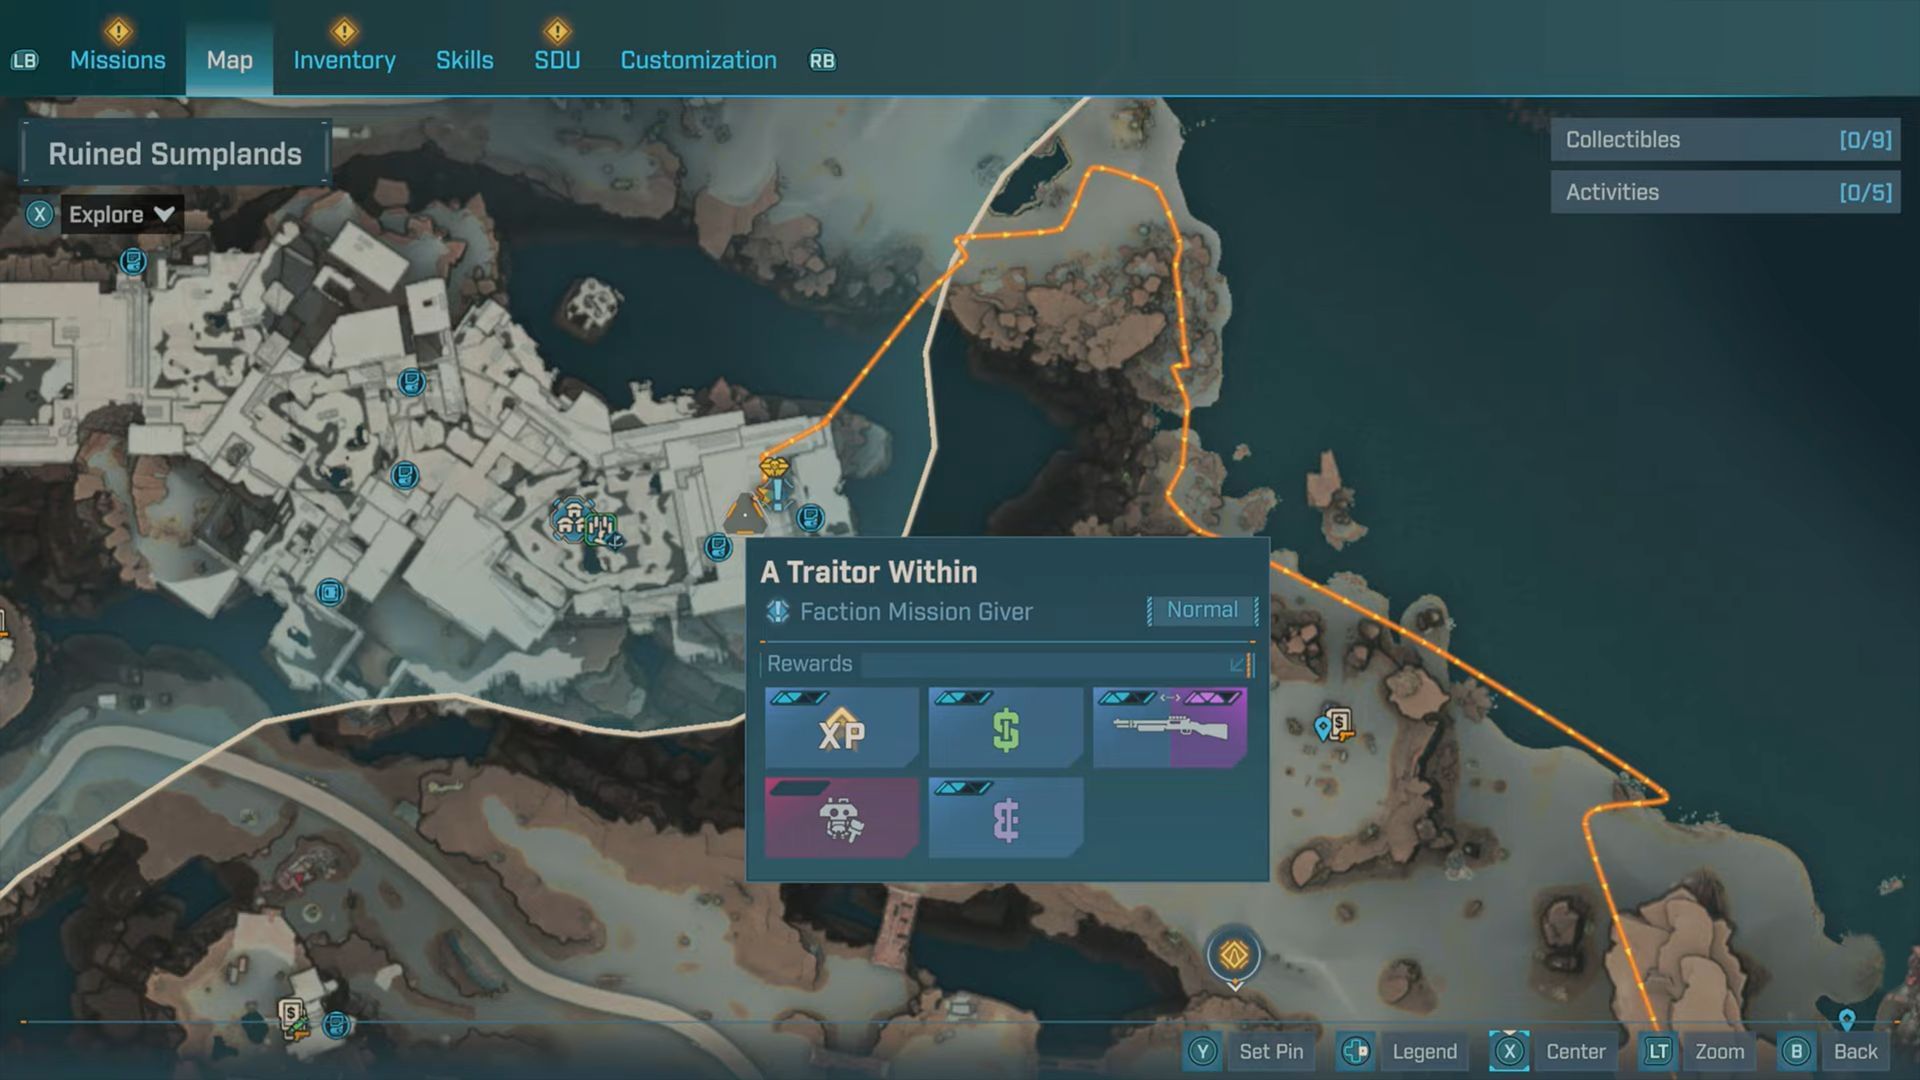
A Traitor Within is part of a series of quests for the Electi faction in Borderlands 4. To unlock this quest, you will need to complete three other quests for the faction.
- Faction: Electi
- Quest giver: Levaine
- Prerequisite: Enter the Electi Part 1 > Enter the Electi Part 2 > The Council Divided
Levaine will assign this quest once you speak to her after completing The Council Divided.
A Traitor Within walkthrough
Step 1: Collect 4x Thresher Eggs
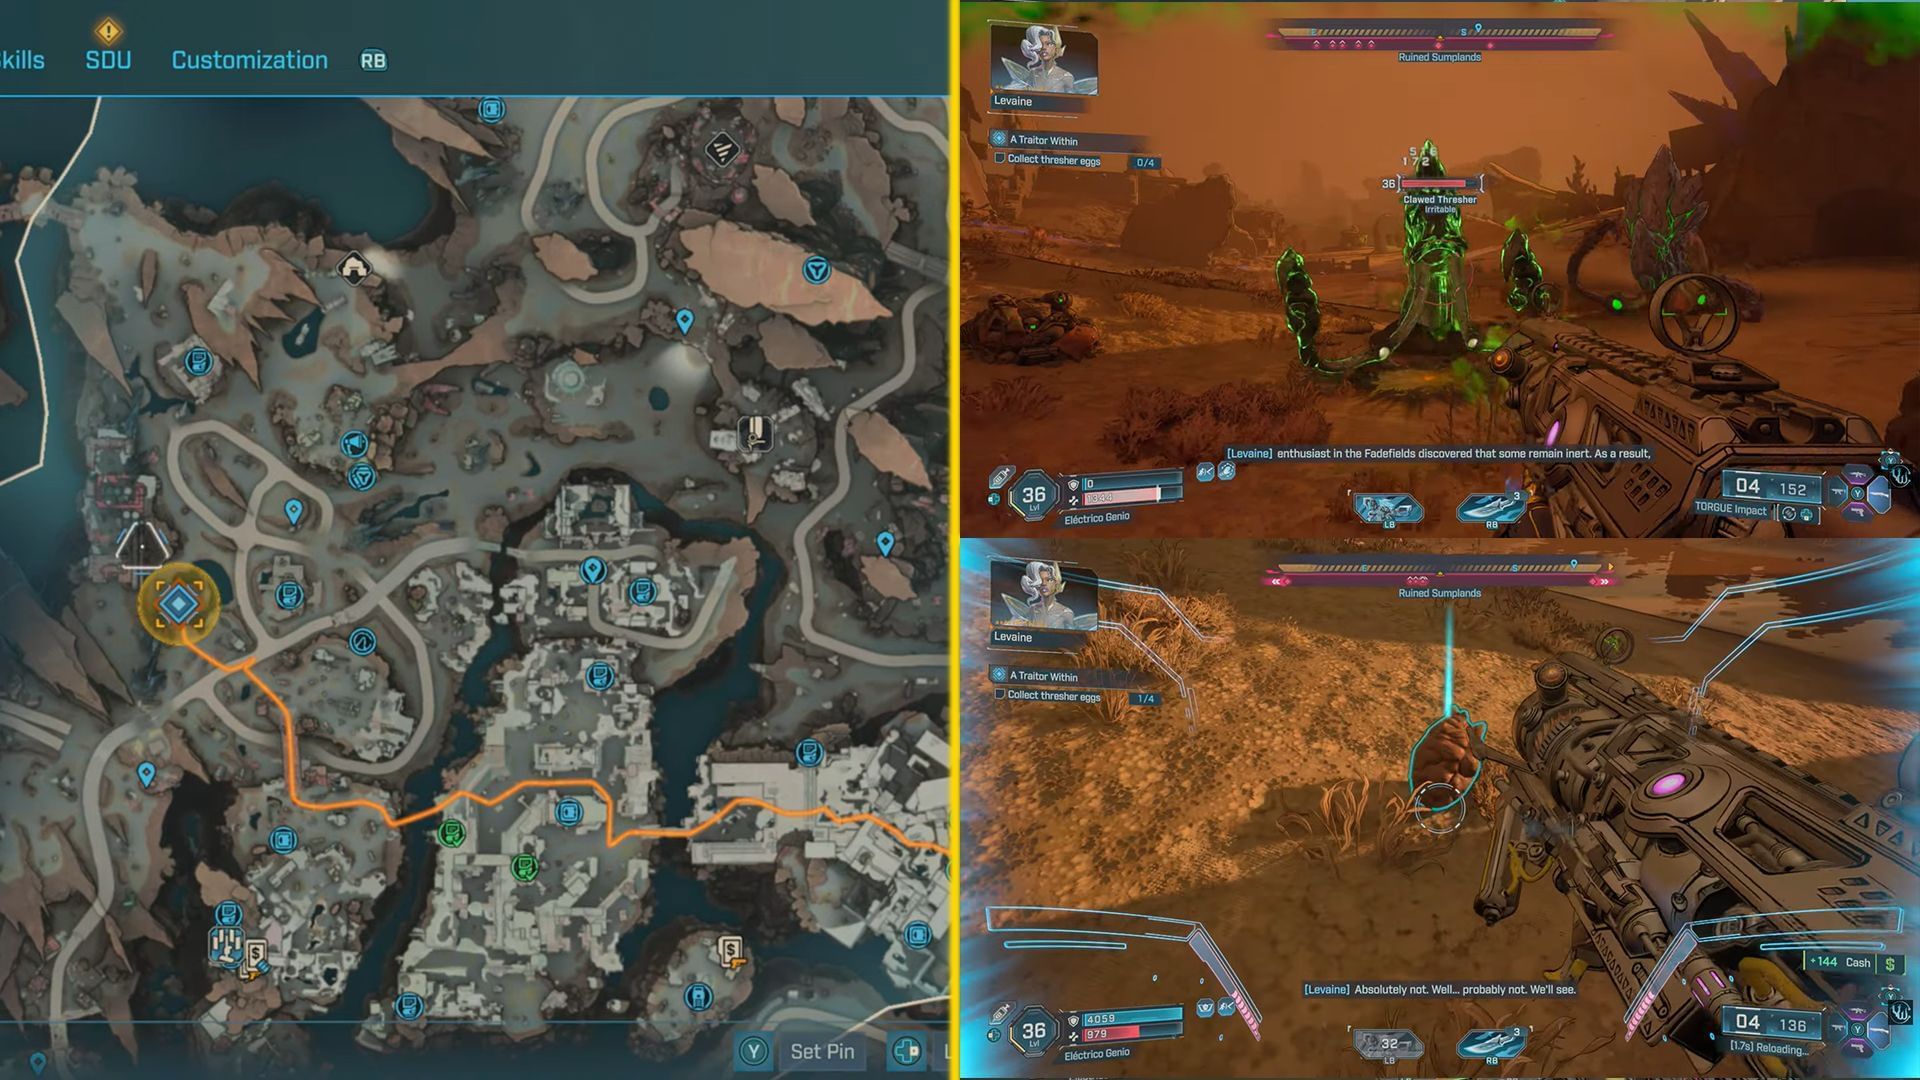
- Head to the western side of the Ruined Sumplands to the designated marker.
- Eliminate the Threshers in the area.
- Pick up their eggs (4x).
Tip: Don’t get swarmed by the Threshers; it is recommended to use AoE damage weapons against them.
Step 2: Acquire 3x Pangolin Spit
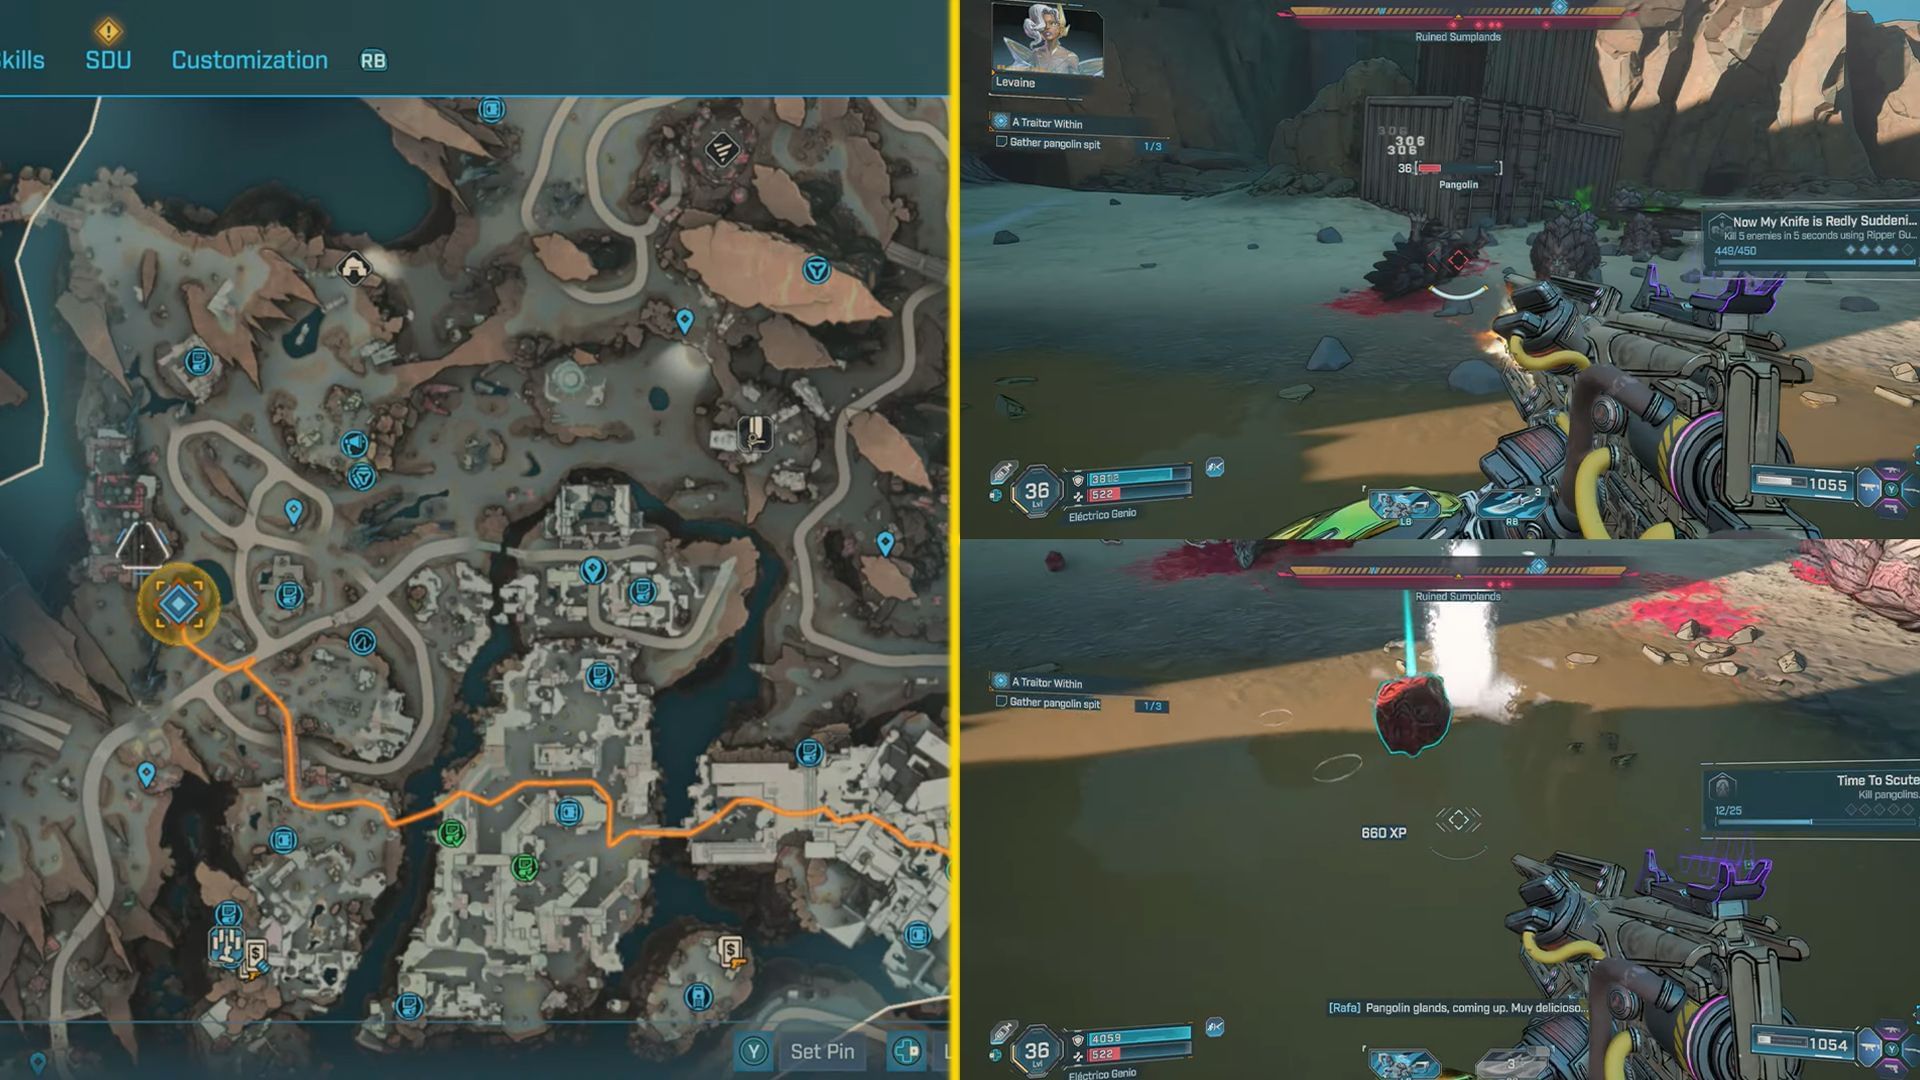
- Pangolins will spawn in the same location once you have collected the eggs.
- Eliminate the Pangolins.
- Collect the Pangolin Spits.
Gathering the last ingredient triggers an ambush by Order troops.
Also read - Borderlands 4: How to get Darkbeast legendary SMG
Step 3: Eliminate Order troops
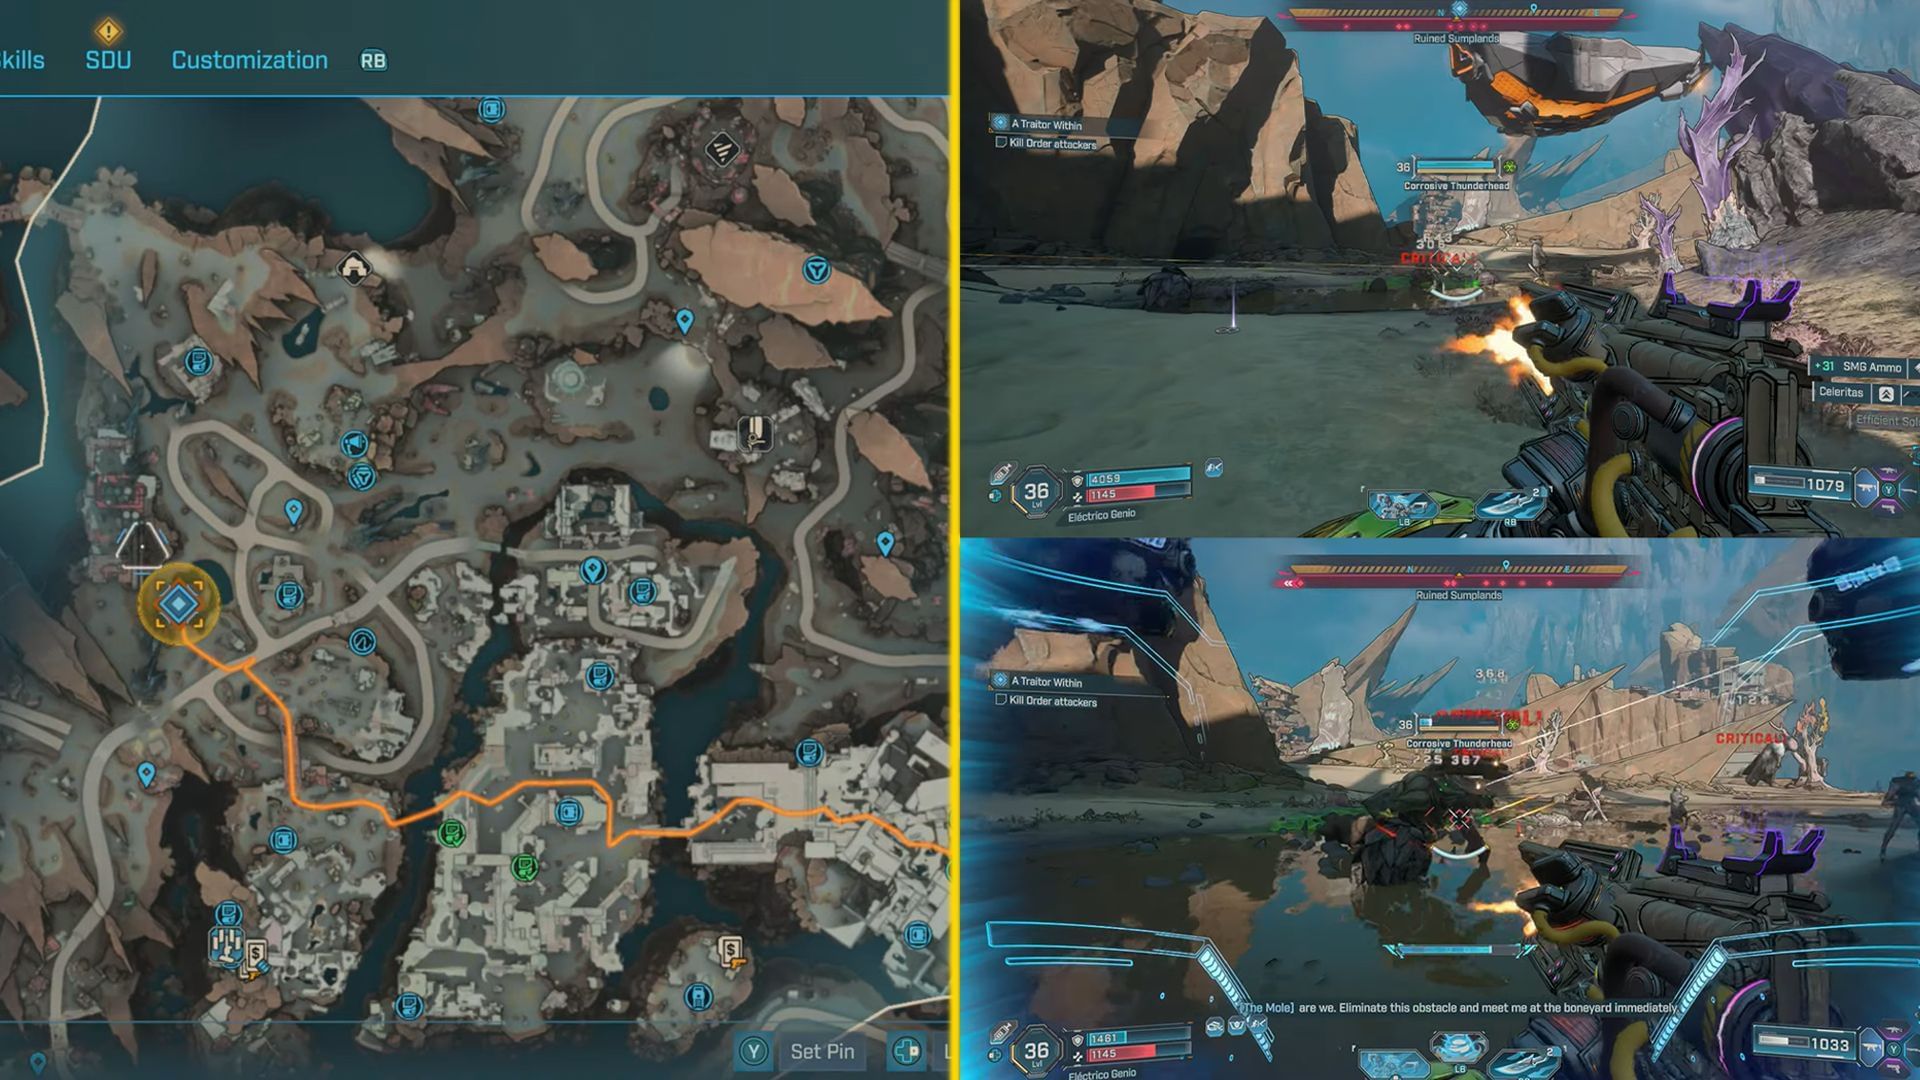
As soon as you are done gathering the ingredients, an Order dropship will show up, revealing that you have been betrayed by one of the Electi leaders.
- Defeat the Order troops to proceed.
- Agility and AoE damage are recommended for the fight.
Step 4: Deliver the supplies
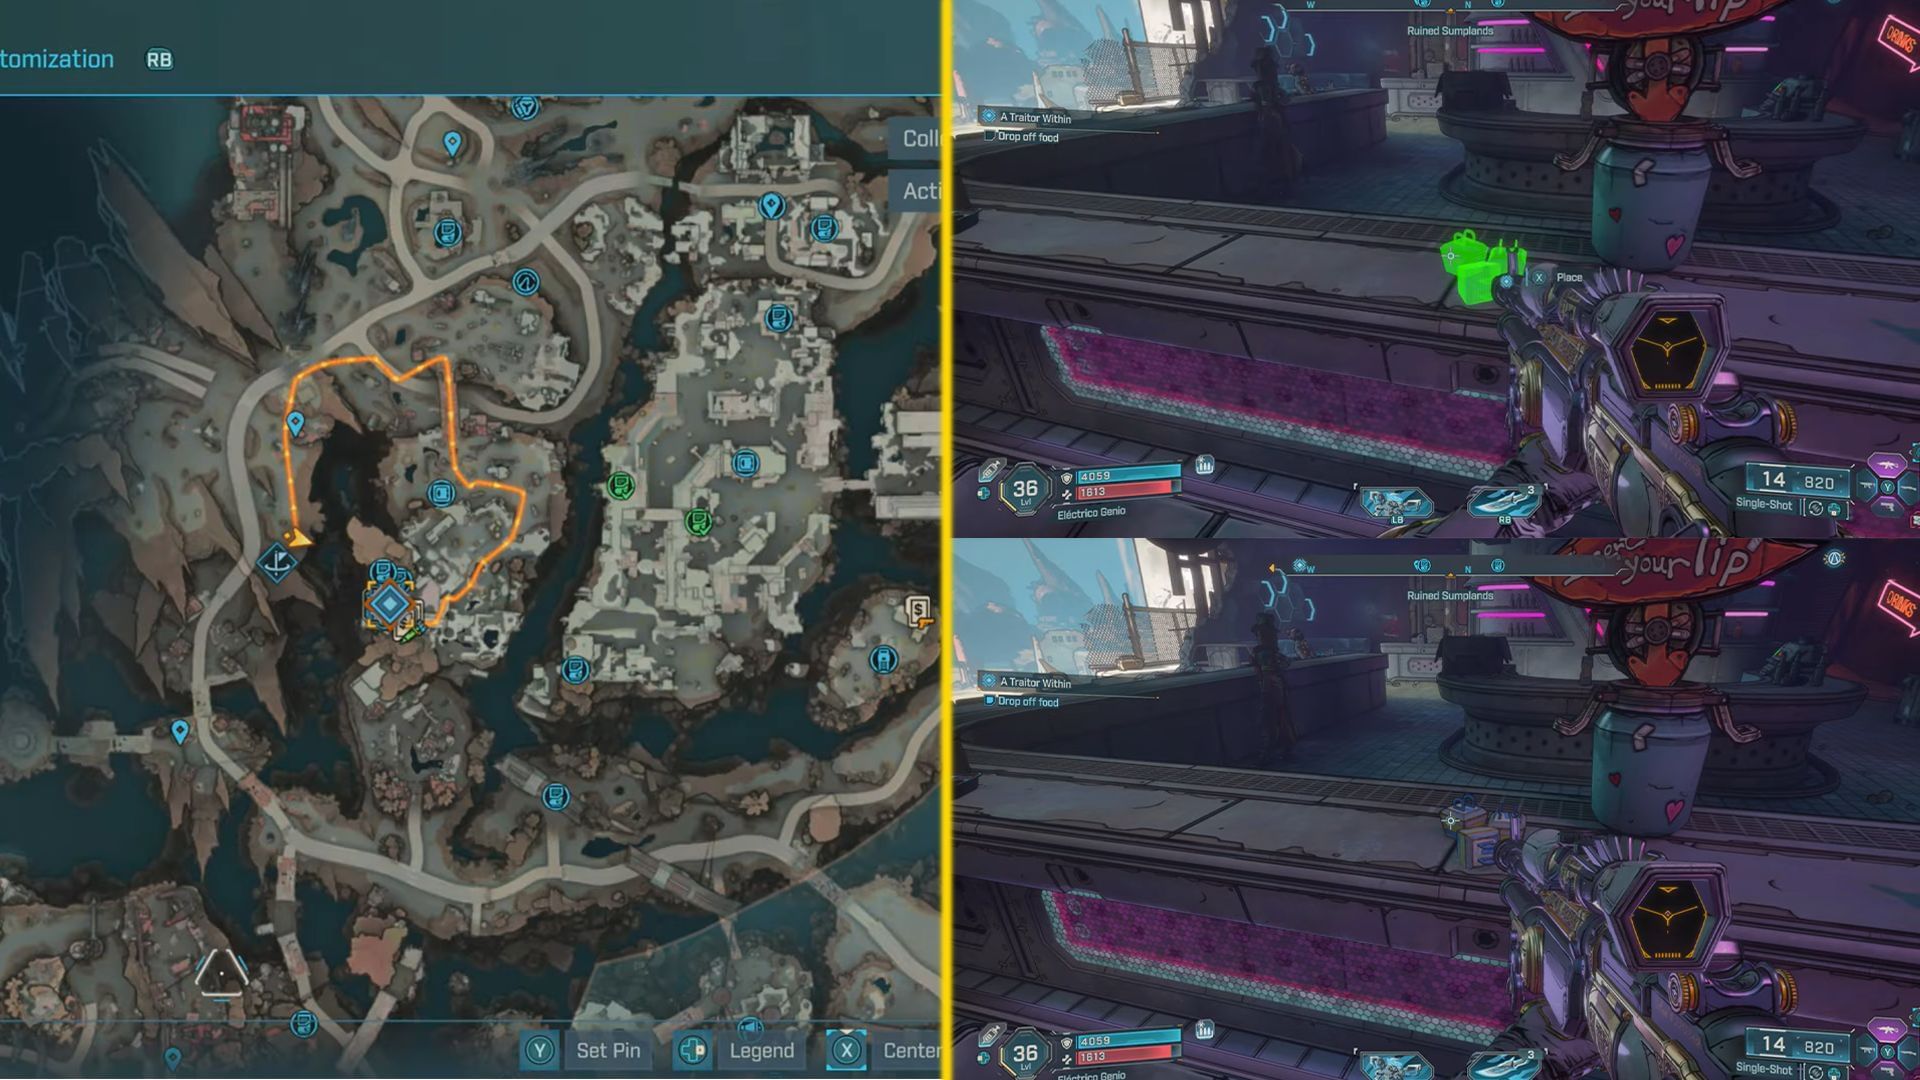
- Once you have eliminated the Order troops, go to Moxxi’s Bar in the Ruined Sumplands.
- Complete the delivery by leaving the ingredients on the counter near the vending machines.
Also read - Borderlands 4 Timid Kyle's Neglected Opening (Augur Mine): Location, how to unlock, and boss drops
Step 5: Go to the Boneyard, slay the Rippers, and collect the ECHO log

- Go to the southwest region of the Tonnage Peel region, towards Quisling’s Cave.
Prepare for a fight; a large group of Rippers is present in this area.
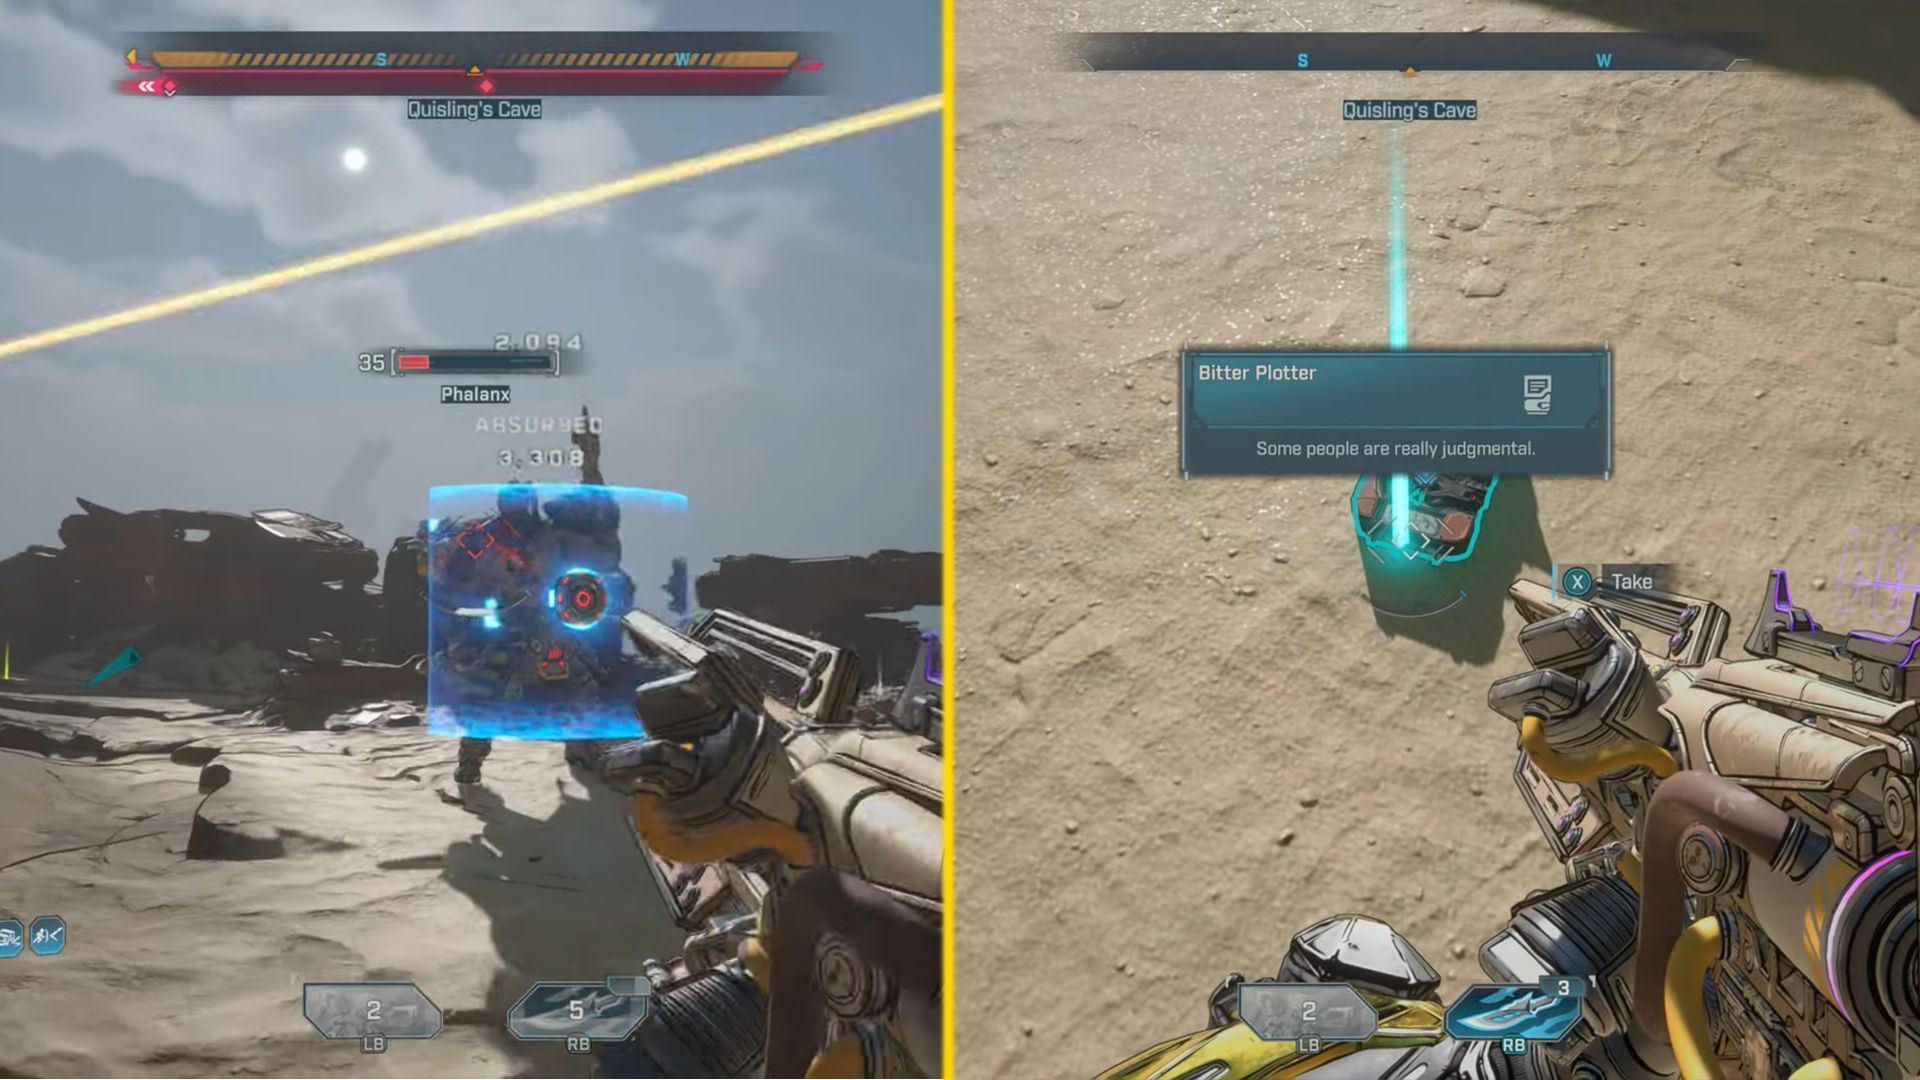
- Eliminate all the Rippers present in the Boneyard.
- Pick up the ECHO log (Bitter Plotter) from the enemy drops.
The ECHO log reveals more information about the traitor’s plot.
Step 6: Enter Quisling’s cave

- Travel deeper inside Quisling’s Cave.
- Eliminate the hostile Kratch near the entrance.
- Keep following the blue drone markers through the cavern.
You will need to use grapple points to reach higher spots and cross gaps. Wait for the drone to move into the right position before jumping.
Also read - Borderlands 4: How to get Ohm I Got Legendary SMG
Step 7: Confront the Order ambush
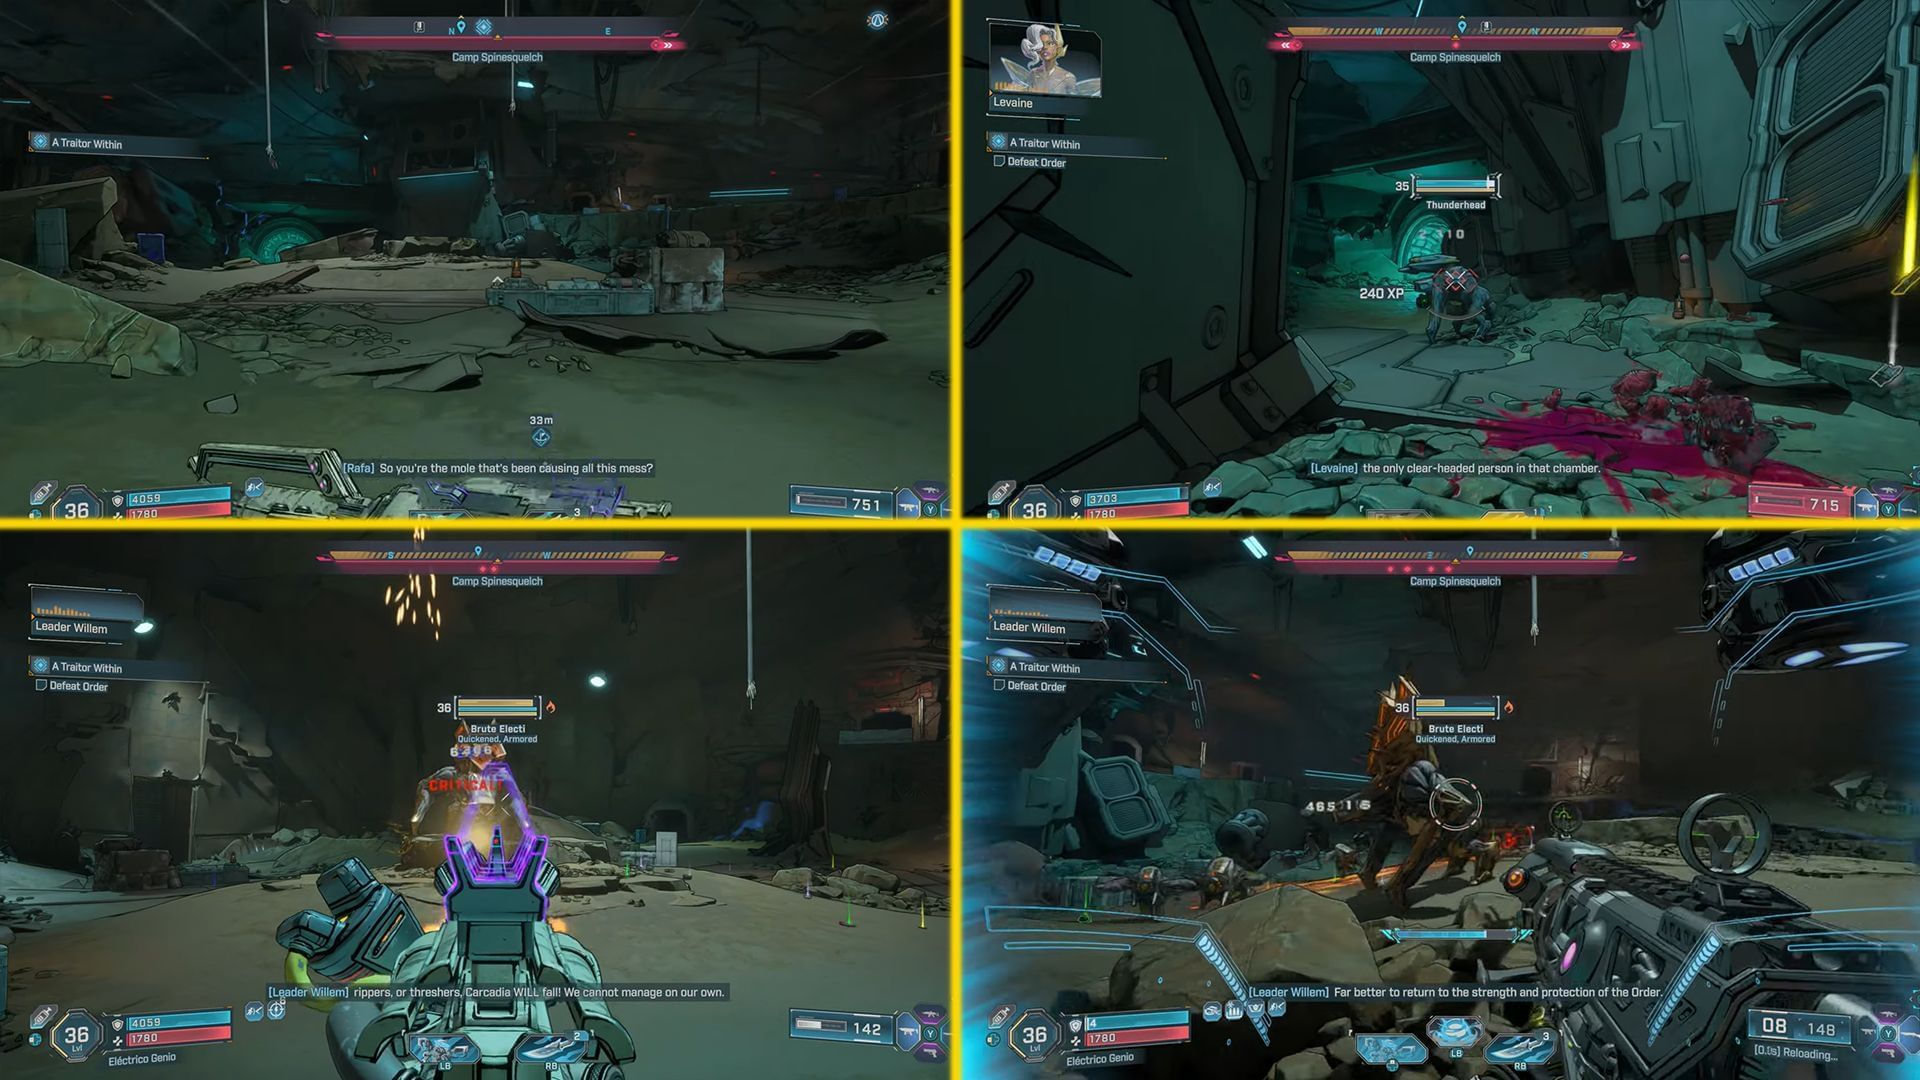
- Follow the linear path until you locate the chamber with the black/yellow caution stripes; drop down.
Here, the traitor will reveal himself, and you will be ambushed by mobs of Order troops, starting one of the toughest mob encounters in Borderlands 4. Enemies will include Order troops and a Brute Electi (has heavy armor and high damage output).
Tip: If you are underleveled, there will be a red skull icon beside the enemies; lower the difficulty or level up and return later.
Step 8: Search the cockpit
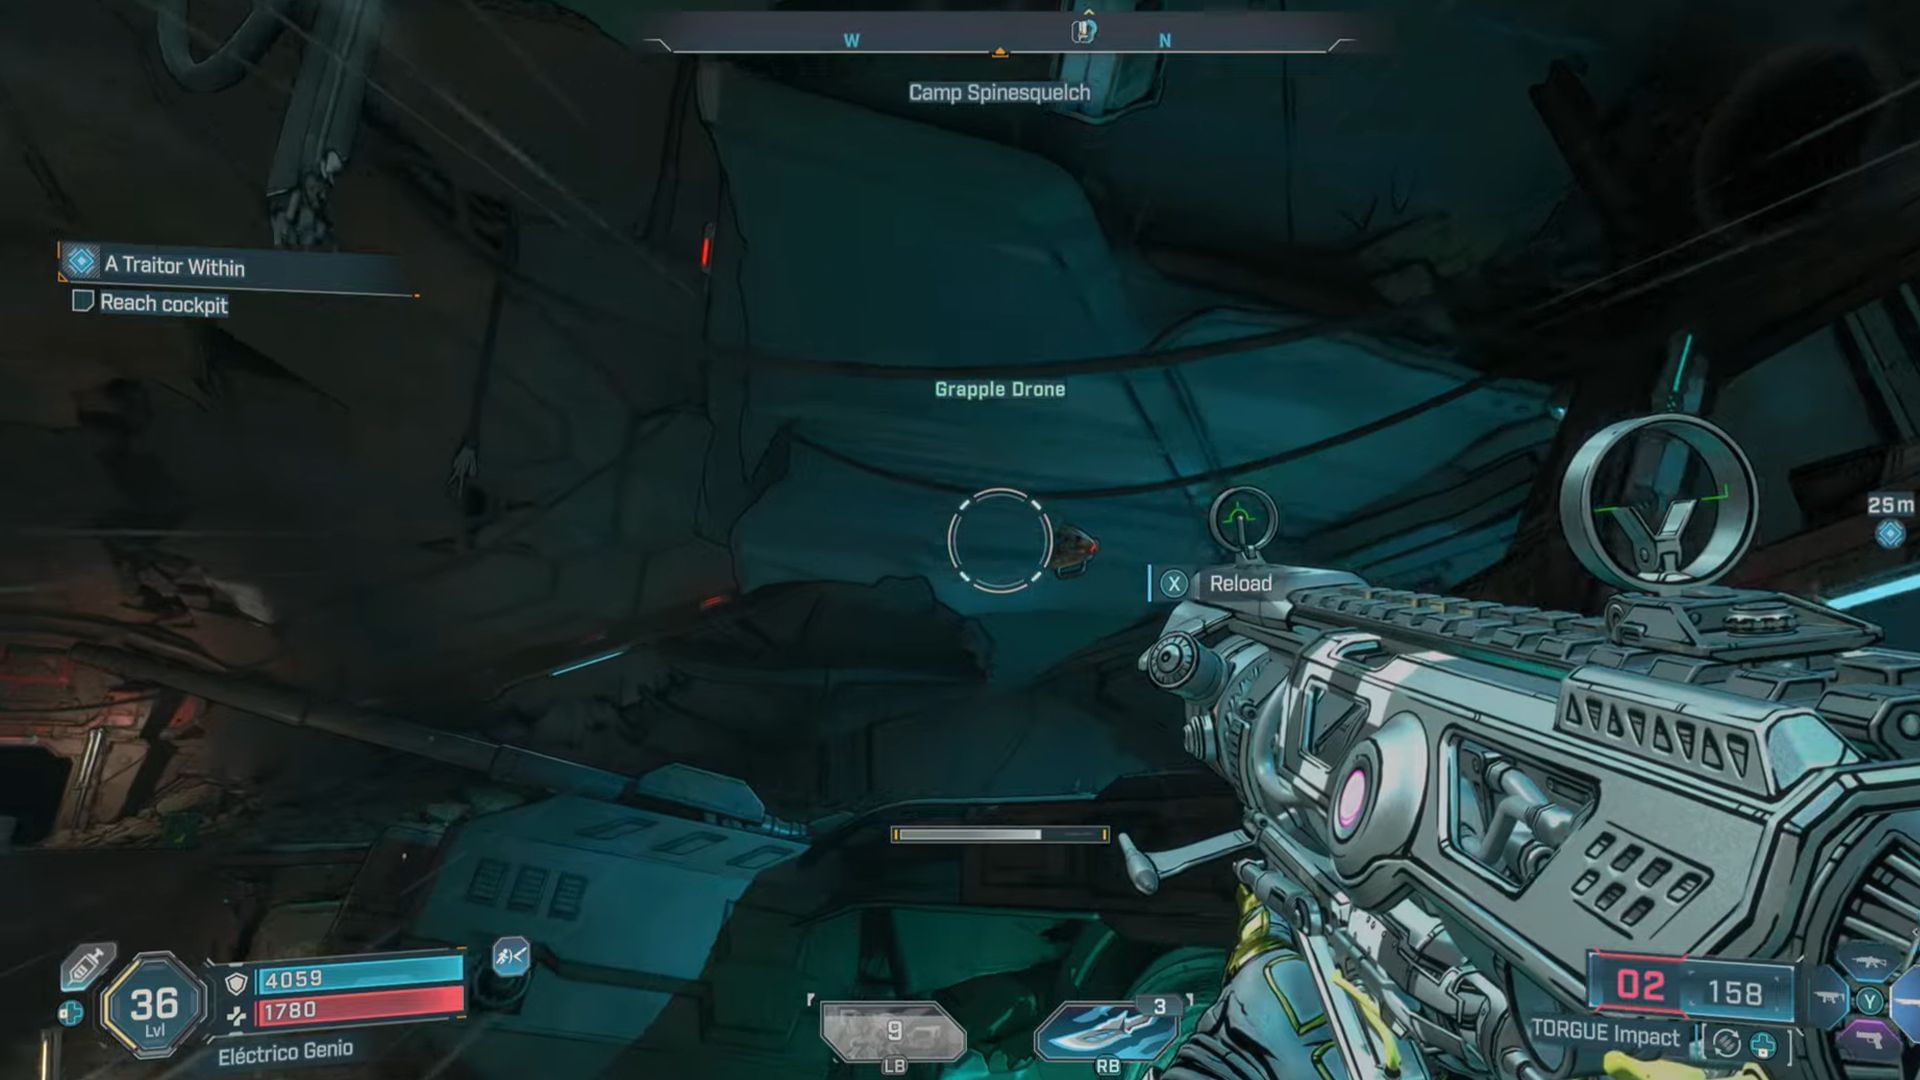
Once you have defeated every hostile in the area, use the grapple drone located at the far north side of the room to reach the cockpit area. Levaine will be waiting for you there.
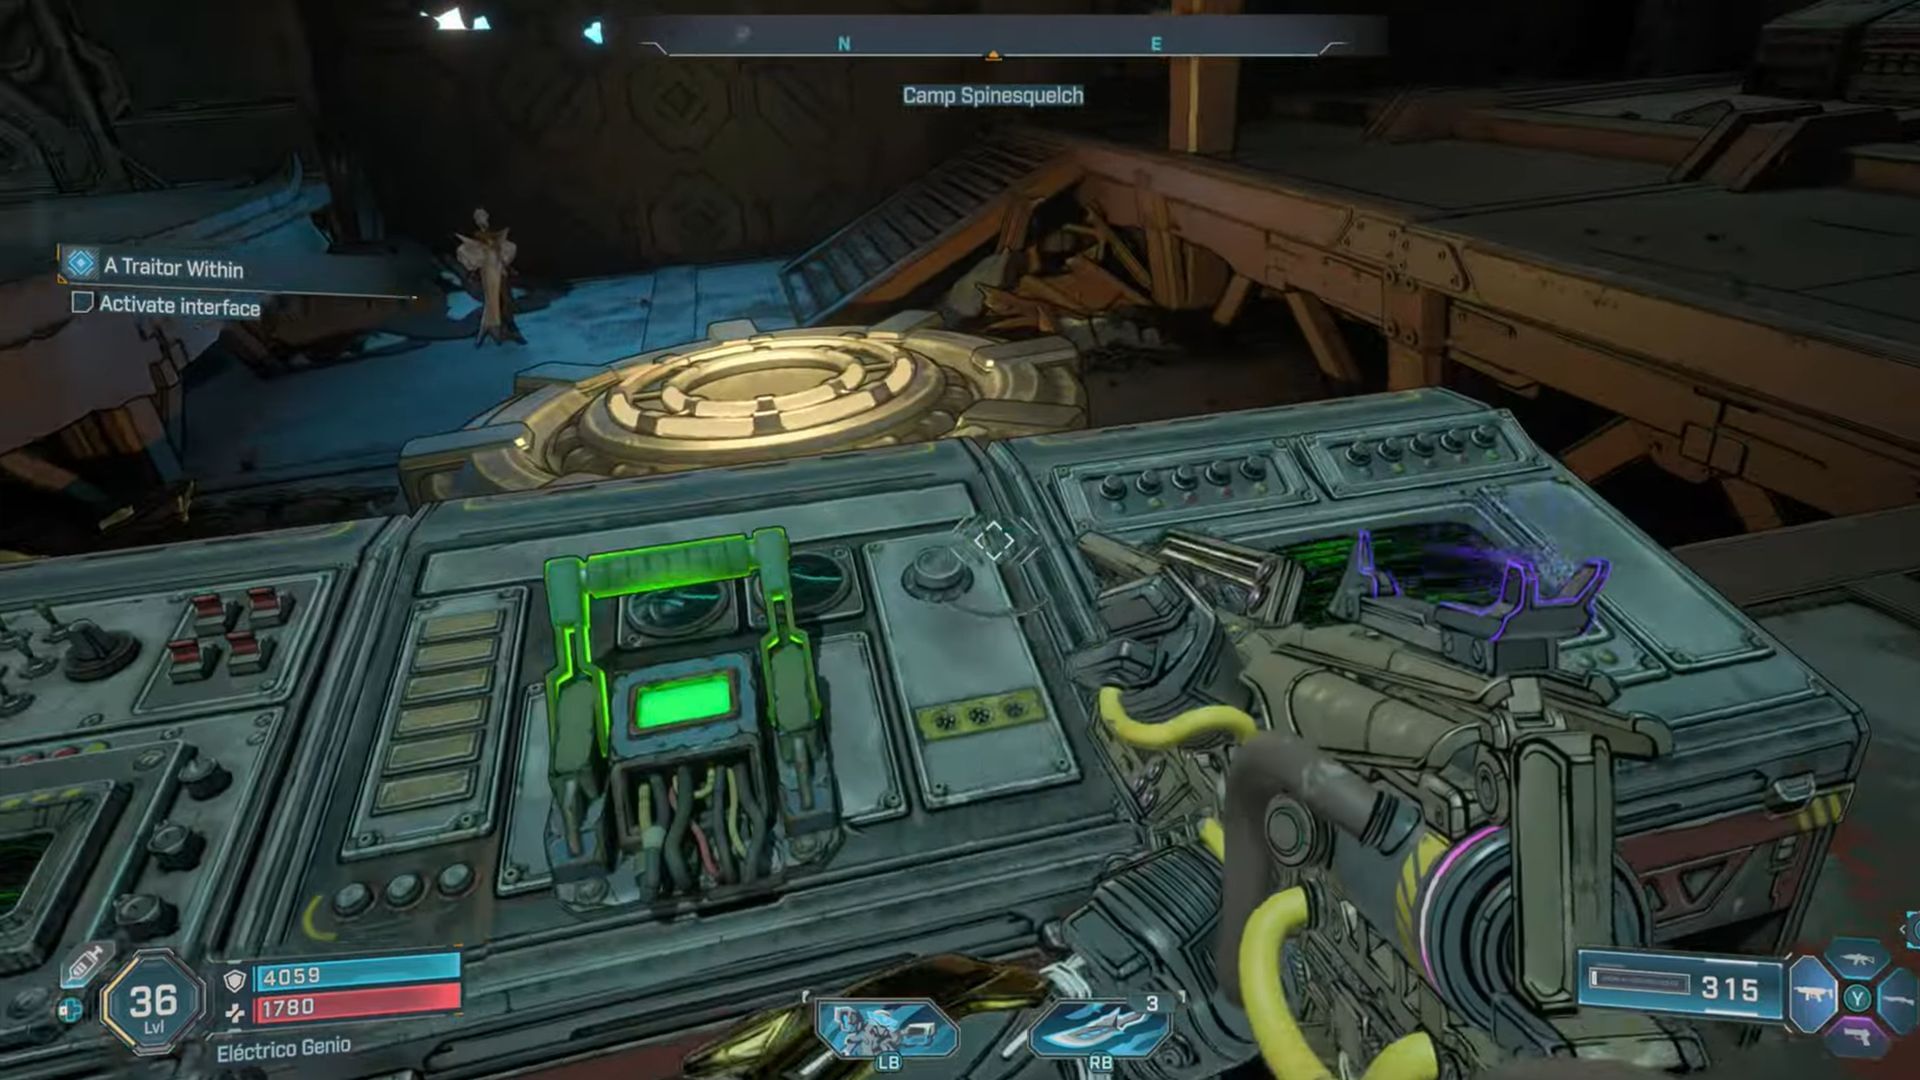
- Find and interact with the green-lit console at the right side of the room.
- Pull the central console lever to activate Willem’s holographic interface.
Also read - Borderlands 4: How to get Wombo Combo legendary AR
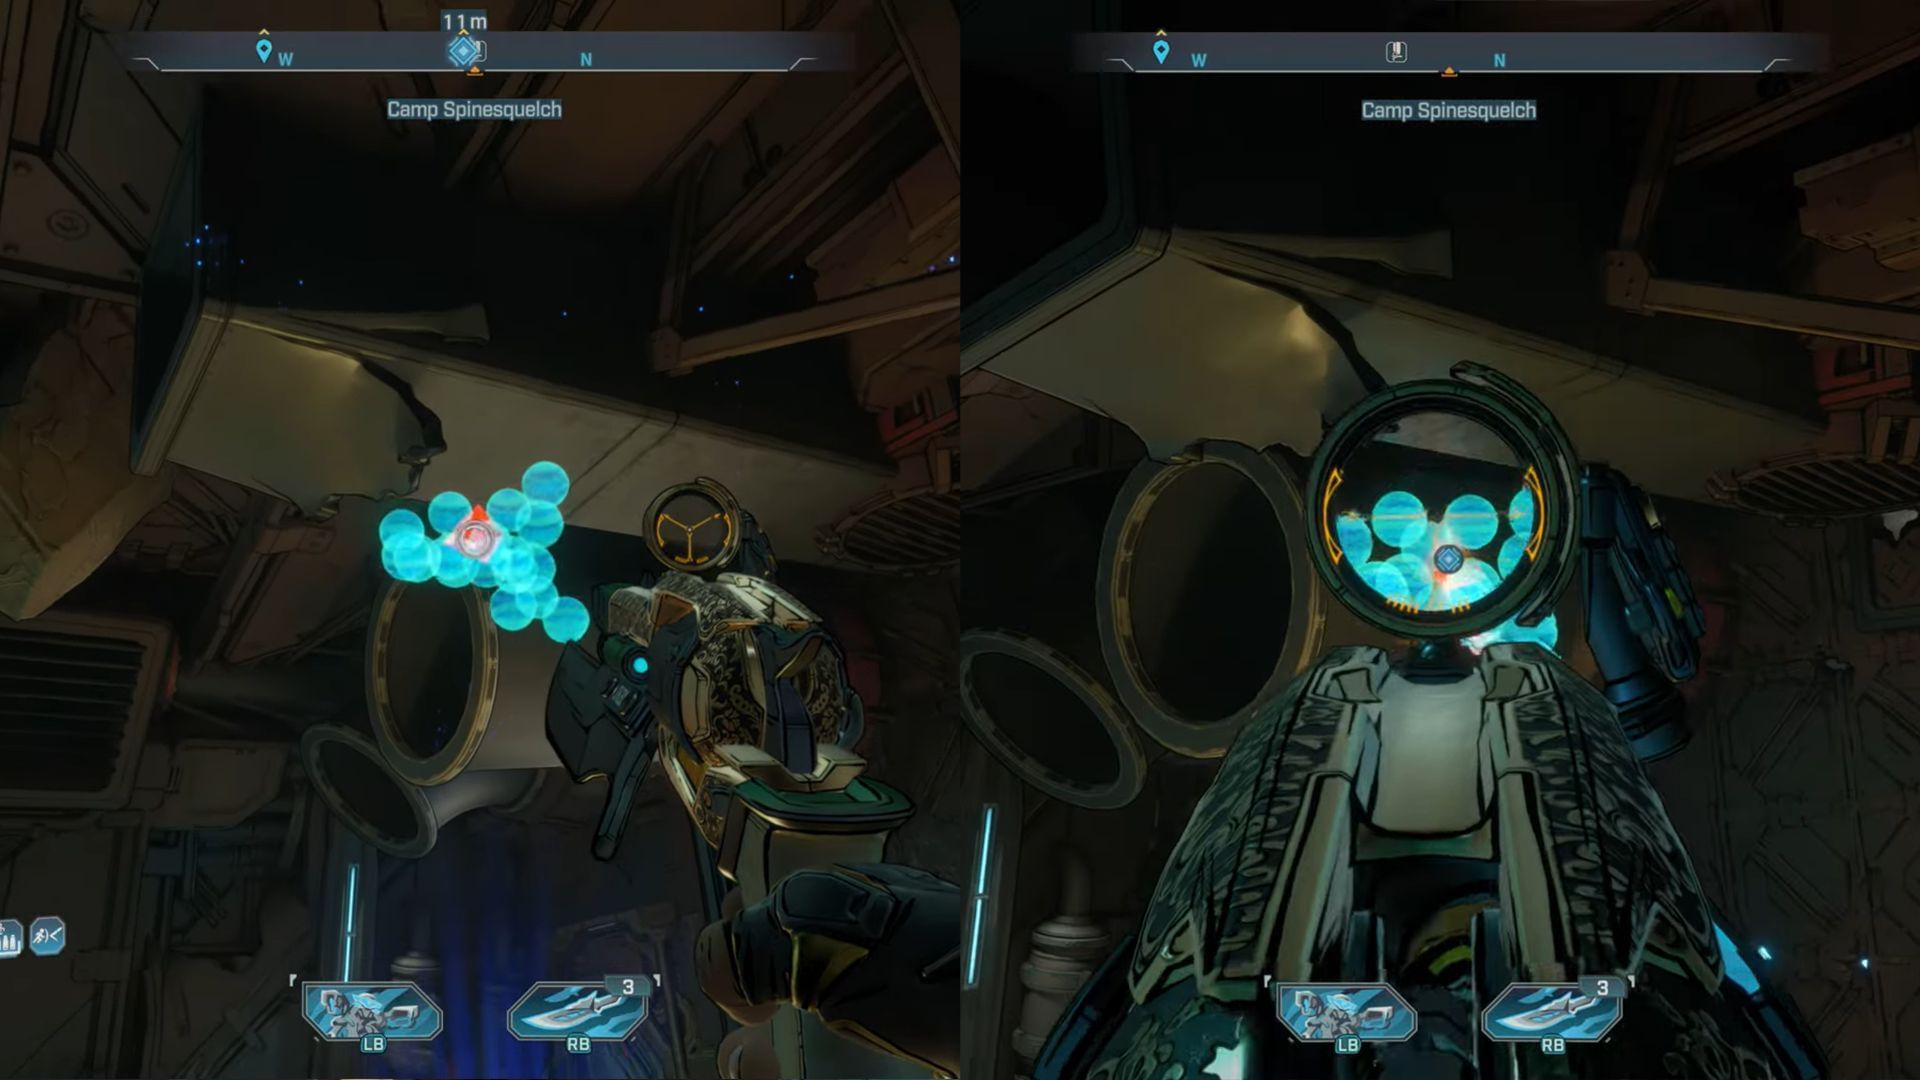
Step 9: Solve Willem’s node puzzle
To solve this unique puzzle, you will need to do some precision shooting and positioning:
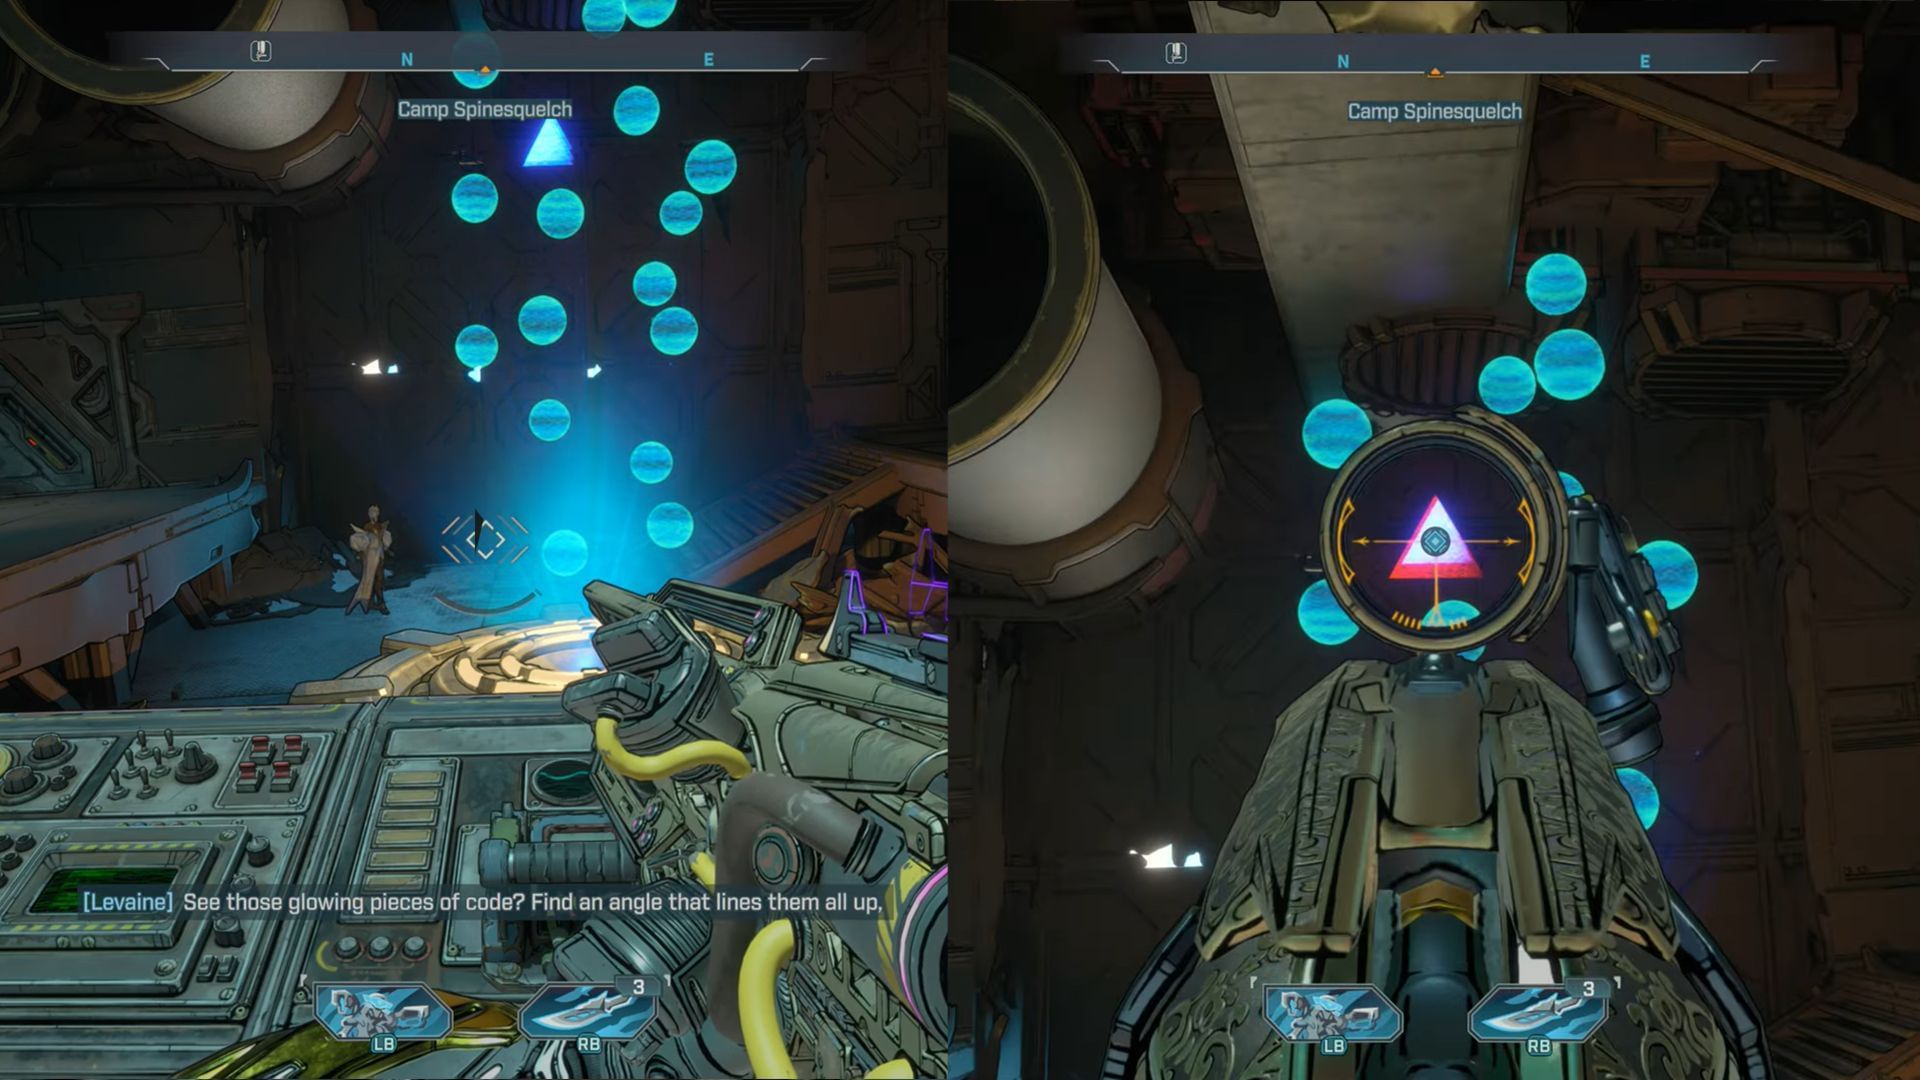
- Node 1: Aim your weapon at the single red prism when it overlaps with the blue prisms right behind it. Fire immediately when the crosshair turns red.
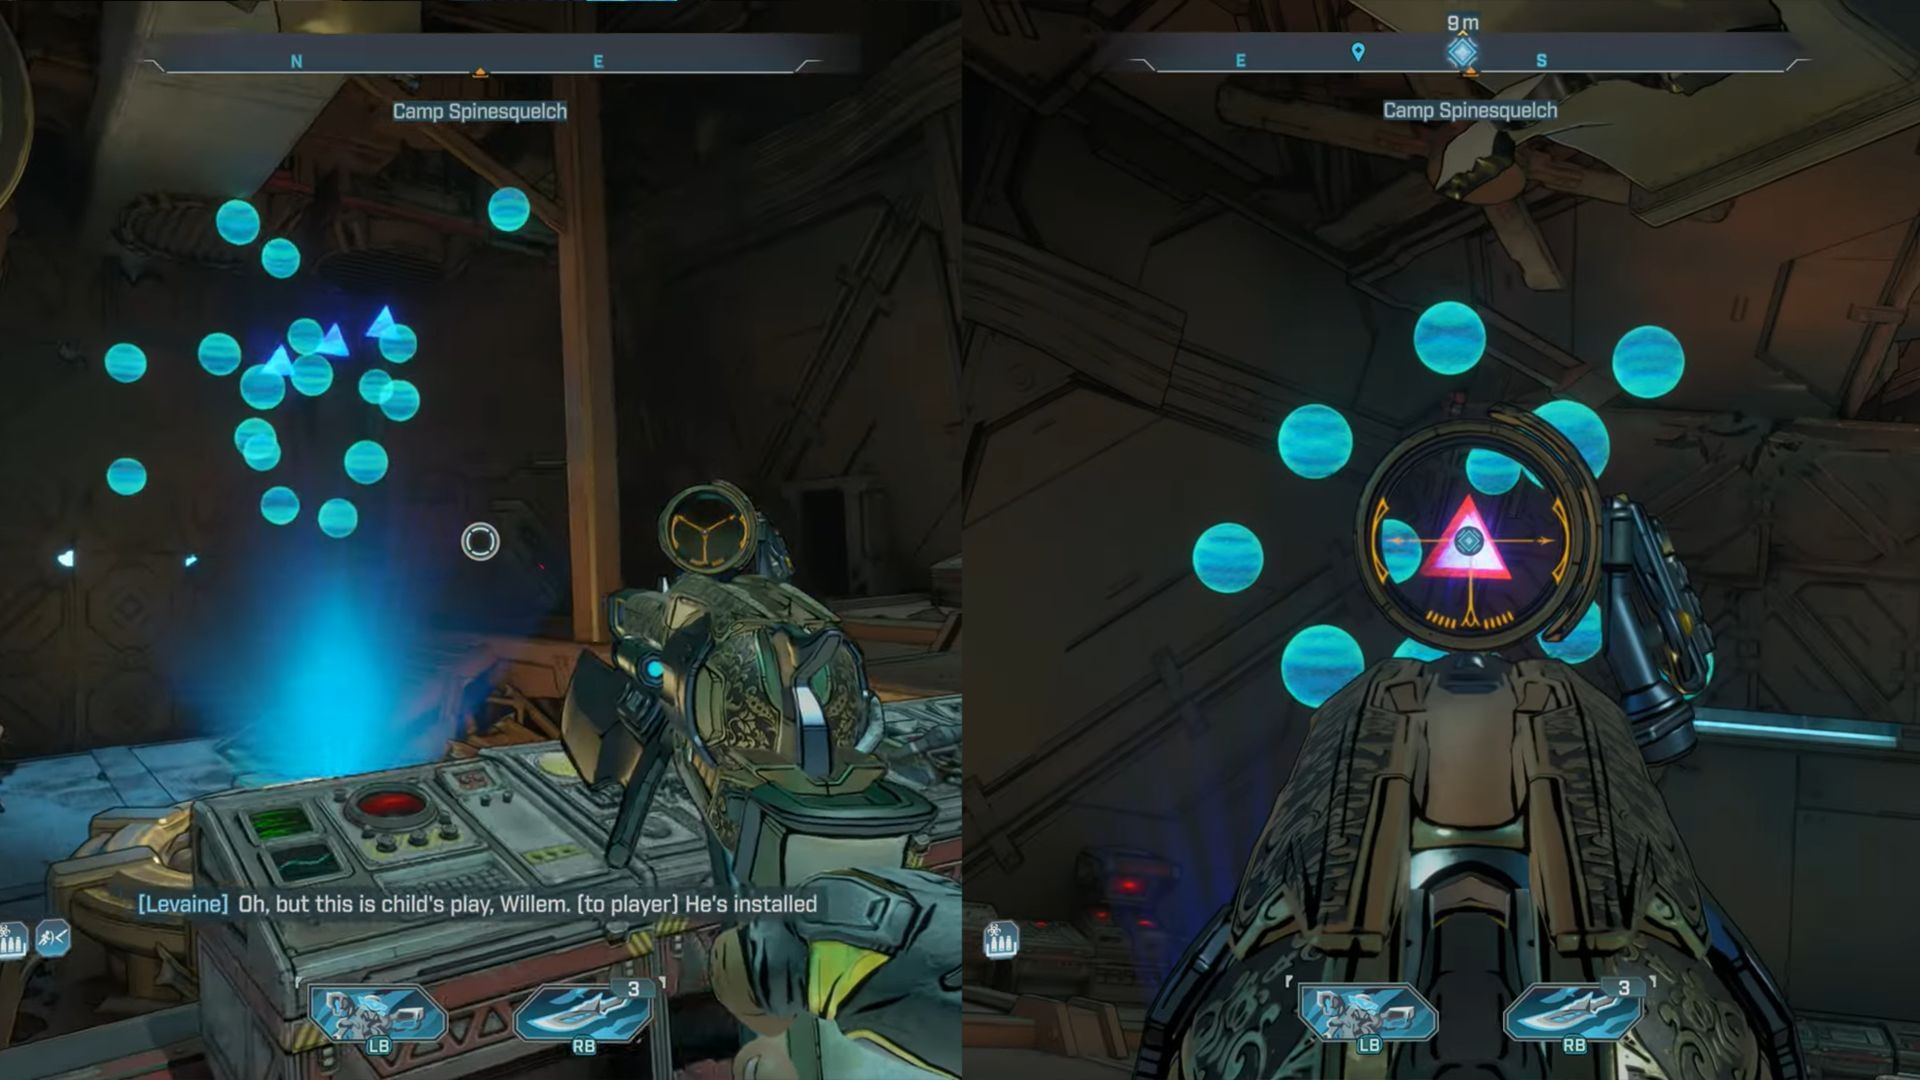
- Node 2: Go where Levaine is standing (northwest corner). Align the triangles and shoot once they are overlapped.
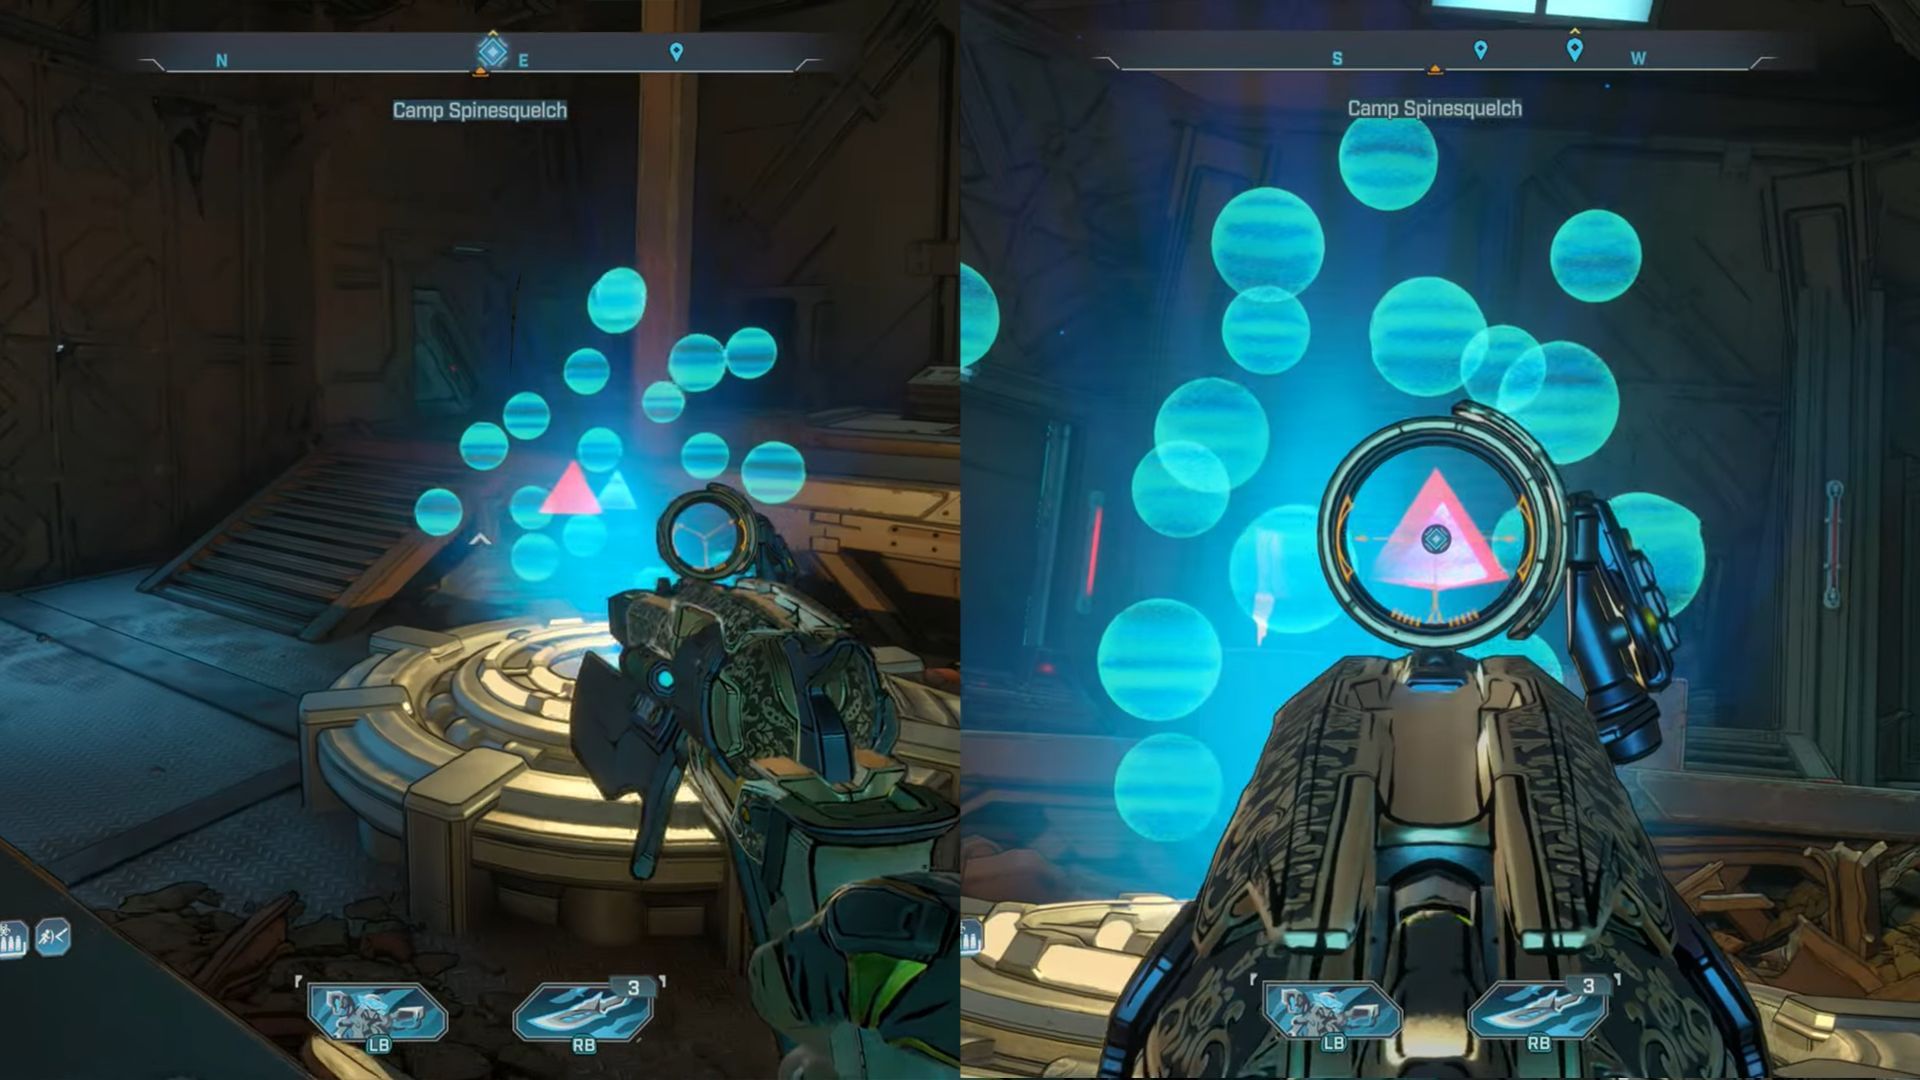
- Node 3: You will need to repeat the alignment shot from a different angle in the same area.
- Node 4: You will find some crates in the southern corner of the room. Climb on them to get a higher position; line up the shot and shoot the prism.
Tips and tricks:
- Use precision weapons like assault rifles and pistols.
- Avoid using SMGs, shotguns, or explosive weapons.
Step 10: Hand the drive over to Levaine
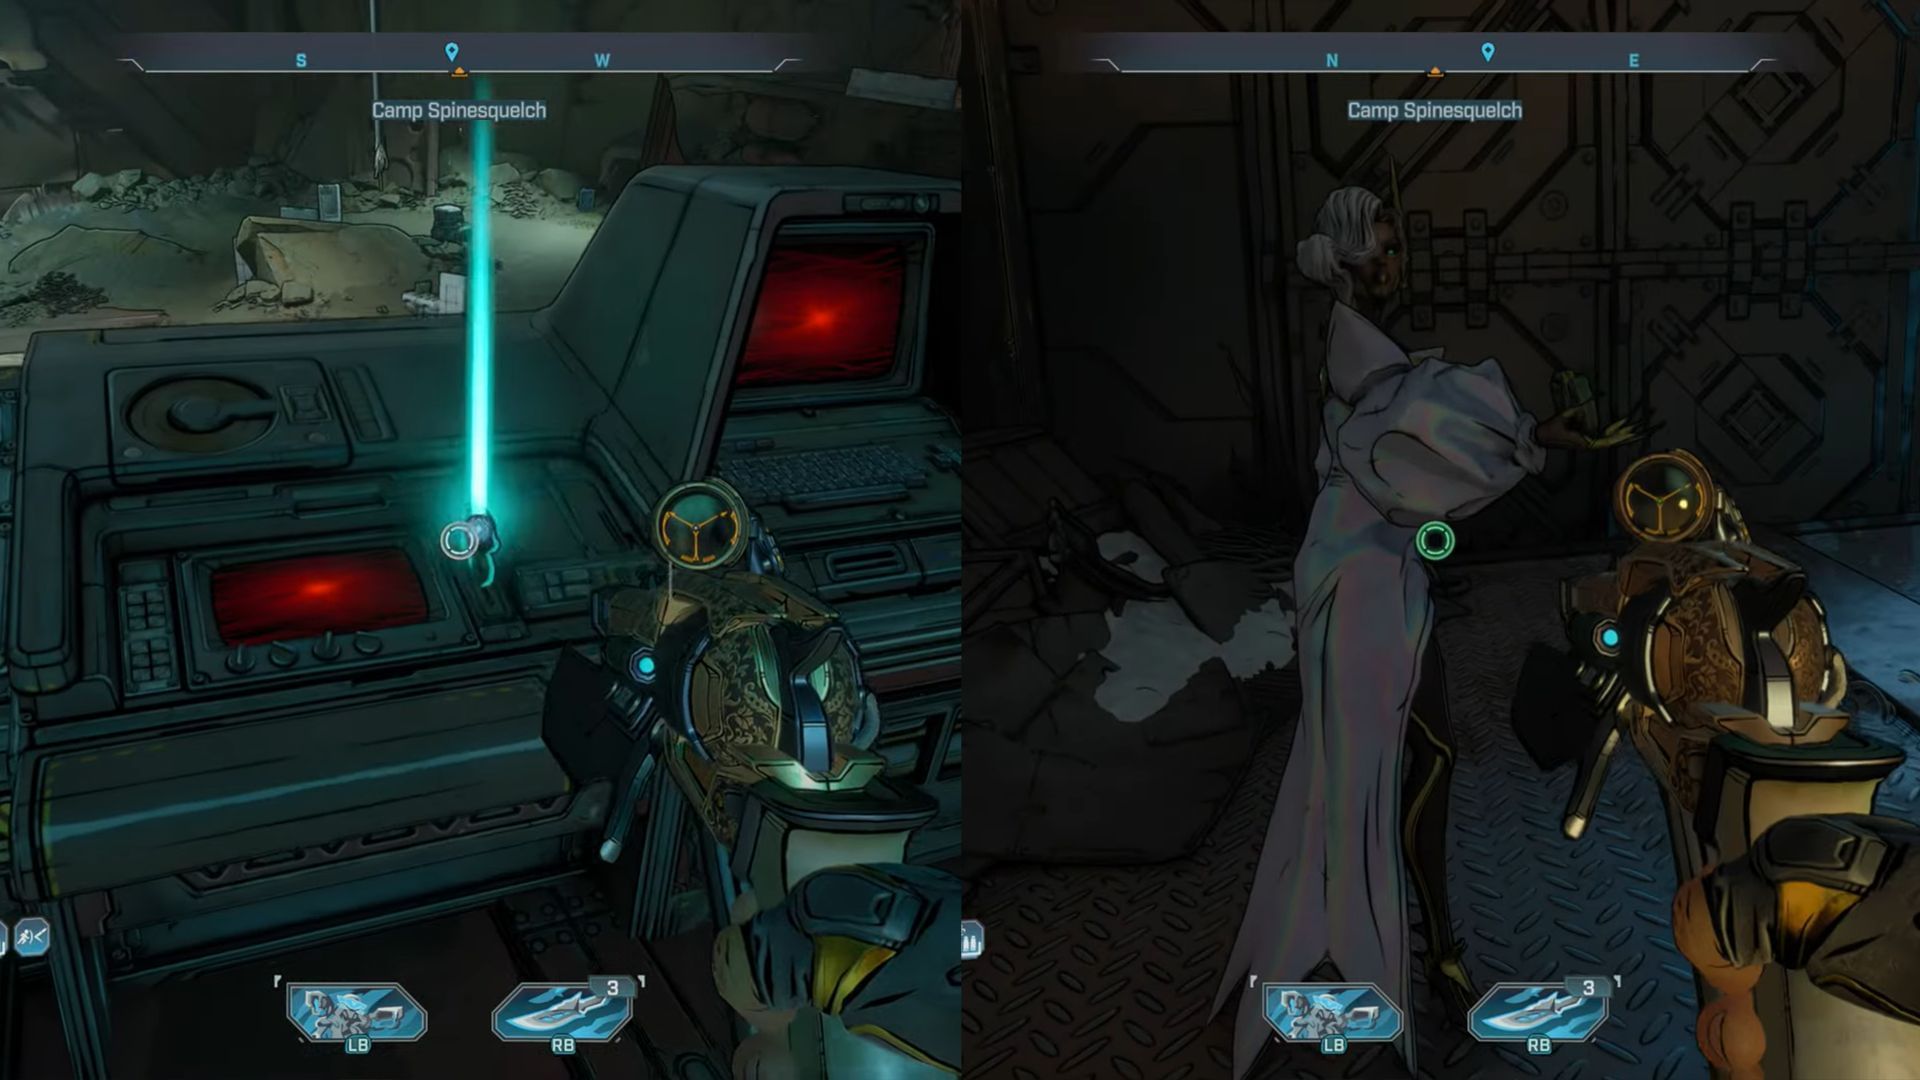
Once you have dealt with the puzzle:
- Get the micro-drive from the console.
- Give it to Levaine, and the mission will end.
Also read - Borderlands 4: Her Own Funeral walkthrough
Borderlands 4: A Traitor Within rewards
Finishing this faction story mission will give you the following rewards:
- Experience / XP (scales with your level)
- Cash
- Eridium
- Weapon: Shotgun (varies between blue and purple rarity)
- Cosmetic: ECHO 4 paintjob - Middle name ‘Danger’
Once the quest is done, you will unlock ‘The Mole’s Gambit,’ which is the next quest of the Electi faction storyline in Borderlands 4.
Read more articles on Borderlands 4 here:
- Borderlands 4: How to farm bosses for Legendary gear (Moxxi's Encore)
- How to get your first vehicle in Borderlands 4
- Finway's Cup walkthrough
- No Place Like Home walkthrough
- PowerDrop walkthrough
- How to get Teen Witch legendary class mod
- The Council Divided walkthrough